Share:
Paul is an iOS Developer Advocate at Nexmo. A seasoned software engineer, trainer and speaker, he specialised in data-driven solutions on Apple platforms with an emphasis on prototyping, best practices and balance with agility.
Receive a Phone Call with Voice API and Swift
Time to read: 11 minutes
In this tutorial you will create a Swift application that can receive phone calls using the Vapor web framework and the Nexmo Voice API. You can follow this tutorial on both MacOS or Ubuntu.
For the complete solution, please check out this Github repo.
The Nexmo CLI - you'll use this to create an application, purchase a number and link the two together
Swift 4.1 or greater - on MacOS, Xcode 9.3 or greater will do the trick
This tutorial will walk you through the following steps:
Learn about Nexmo concepts
Create a new Vapor project
Add a route for the voice answer
Expose the application using ngrok
Purchase a Nexmo number
Create a Nexmo application to use with the number
Test your application
Before delving into the build, here are couple of concepts that you'll need to understand.
A Nexmo application allows you to easily use Nexmo products, in this case the Voice API to build voice applications in the Cloud.
A Nexmo application requires two URLs as parameters:
answer_url- Nexmo will make a request to this URL as soon as the call is answeredevent_url- Nexmo sends event information asynchronously to this URL when the call status changes; this ultimately defines the flow of the call
Both URLs need to return JSON and follow the Nexmo Call Control Object (NCCO) reference. In the example below, you will define an NCCO that reads a predefined text for an incoming call, using the Text to Speech engine.
A Nexmo virtual number will be associated with the app and serve as the "entry point" to it—this is the number you'll call to test the application.
For more information on Nexmo application please visit the Nexmo API Reference.
You will use Vapor to create a simple Swift web app—if you don't already have Vapor installed, do so by running this command:
Extensive installation instructions are available for MacOS and Ubuntu.
From the command line, navigate to an appropriate location where you want your project to reside (e.g. your Documents directory) and create a new Vapor app:
If you are using MacOS you can have vapor automatically create an XCode project for you (the -y option will automatically open the Xcode project):
Build & Run to test your app ensuring that the Run scheme is selected. Once everything is compiled, the server is started and you will see a notice in the console:
Server starting on http://localhost:8080Point your browser to that URL and an It works! message should appear.
You'll now add a route that will serve as the answer_url for the Nexmo application. http://localhost:8080/webhooks/answer will respond with the following JSON object:
[
    {
        "action":"talk",
        "text":"<speak>To be <break strength='weak' \/> or not to be <break strength='weak' \/> that is the question.<\/speak>"
    }
]A Vapor project stores its routes in the routes.swift file inside the Sources/App group. Open this file, clear all the existing routes and define the new route:
import Vapor

public func routes(_ router: Router) throws {
    router.get("/webhooks/answer") { request -> String in
        let talk = Action(
            action: "talk",
            text: "<speak>To be <break strength='weak' /> or not to be <break strength='weak' /> that is the question.</speak>")
        let encoder = JSONEncoder()
        guard let data = try? encoder.encode([talk]) else { return "error encoding" }
        return String(data: data, encoding: .utf8) ?? "error"
    }
}
Action is a simple Swift Structure to hold the NCCO action details - define it after the router closure:
struct Action: Encodable {
    var action: String
    var text: String
}By coding Action to conform to Encodable, you ensure that the JSONEncoder can use it.
Build & Run the app and test the new route output at: http://localhost:8080/webhooks/answer.
You now have a URL that will be used as the answer_url.
For Nexmo to reach your Vapor application, it needs to access a publicly available URL-your application runs on your machine and is only accessible inside your local network.
ngrok is a simple utility that exposes your local web server through public URLs.
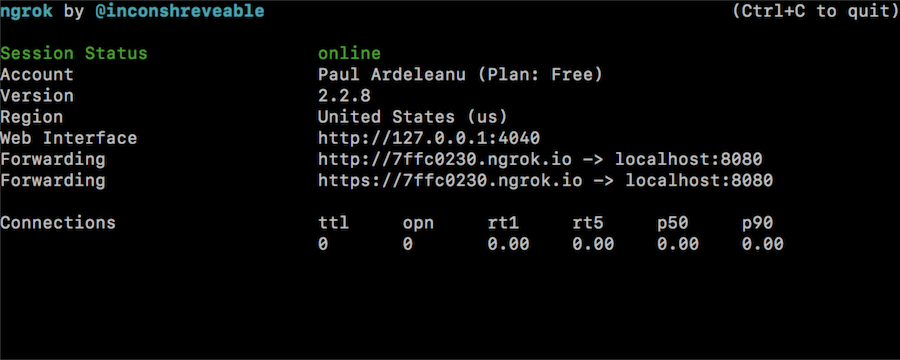
With ngrok installed, run the following command:
Take note of the forwarding address as you will need it when you configure your account — an example output is shown below—the forwarding address is https://7ffc0230.ngrok.io.
This will be the number you're going to call to connect to your Nexmo application. The example below uses an US number but numbers for other countries are available.
Note: When signing up for a Nexmo account, €2.00 is added to your balance and this will be more than enough to get a number.
To purchase a new number, use the Nexmo CLI:
Take note of the new number assigned to you on purchase; you will need this next.
You'll now tie everything together by creating a new Nexmo application using the ngrok forwarding address:
Note: The second URL parameter, http://your-ngrok-forwarding-address/webhooks/events, doesn't exist and you'll never actually use it, but an event URL needs to be specified when creating a Nexmo application.
The output given by the above command will include the id of the new application (eg: Application created: 39083ced-5275-423d-8a1f-9db528c106b1). You will need this application id to link your phone number to the application—you can use the Nexmo CLI to do this:
The application will now send a request to your http://your-ngrok-forwarding-address/webhooks/answer URL when it receives a phone call.
From your phone, make a call to your Nexmo number to hear the most important question of them all.
In a few lines of code you have created an application that can receive a phone call and speak a message to the caller. There are other ways to interact with the caller and other Speech Synthesis Markup Language(SSML) tags you can use.
Want to learn more? Check out our documentation on Nexmo Developer where you can learn about the call flow, Voice API and Nexmo Call Control Objects.