Share:
Misha is a Customer Solutions Engineer at Vonage, where he focuses on developing the Video API. After trading the buzz of San Francisco for the charm of Milwaukee, Wisconsin, he now spends his free time uncovering the hidden gems of the Midwest.
Real-Time Human Detection with OpenCV
This blog post will show how to build your own “smart” video camera. It will show how to take an image from the frame of a web camera, detect if there is a human in the frame, and send out an SMS via Vonage Communication APIs to notify you about potential threats.
This idea came to me after my parents' house was burglarized. They live in a remote location with no security cameras, and the police were never able to find who committed the crime. After this, my parents decided to equip the house with some security equipment. I was a college student at the time, so I decided to take it upon myself to use my skills to build a security system for them.
Feel free to reach out to me as I have fully developed this into a working prototype that has been utilized by my family!
You will need to use a Raspberry Pi (I used a Raspberry Pi 2), a Raspberry Pi camera, and a “dummy” security camera.
To build this project, you’re going to need the following things in addition to the hardware:
Vonage SMS documentation
In this tutorial, we will use the Haar classifier. It is an effective object detection method developed by Paul Viola and Michael Jones in their 2001 paper, “Rapid Object Detection using a Boosted Cascade of Simple Features.”
Initially, the algorithm needs a lot of positive images (in our case, images of various people) and negative images (images that do not contain a human on the frame) to train the classifier.
From there, we have to grab certain features from the classifier. Each feature is a single value obtained by subtracting the sum of pixels under the white rectangle from the sum of pixels under the black triangle.
Read more about the Cascade Classifier, and the algorithm behind it, in this OpenCV: Cascade Classifier article.
On your Raspberry Pi, create a new Python file and import all the needed libraries using the following import statements:
import cv2
import nexmo
import timeThese libraries are used to detect people, to communicate to the users about the people detected, and to calculate the time difference between sent texts.
After that, we will need to start capturing the video footage from your available camera:
video_captured = cv2.VideoCapture(0)Specifying 0 in the parameter above means that we will be using the first available video camera—usually, there is only one available, but if you have an external camera plugged in, you can specify which stream to use by passing the appropriate parameter to VideoCapture.
Now, let’s initialize the Vonage API SMS client. For this, you’ll need your API key and secret that can be found in the dashboard of the Vonage API account you created:
client_nexmo = nexmo.Client(key=’your_project_key’, secret=’your_secret_key’)After this, we will load the already pre-trained classifier. The classifier used in this tutorial can be accessed by following the link and grabbing the classifier you would like to use in your project.
We will be using the haarcascade_fullbody.xml classifier.
For testing purposes, and to make it easier to include proper screenshots, I used the haarcascade_frontalface_default.xml classifier in my example repo, but the haarcascade_fullbody.xml classifier is the most appropriate for the security camera use case.
classifier = cv2.CascadeClassifier('haarcascade/haarcascade_fullbody.xml')Most of the detection happens in the following piece of code:
while (True):
    # read frame-by-frame
    ret, frame = video_captured.read()

    # set the frame to gray as we do not need color, save up the resources
    gray_frame = cv2.cvtColor(frame, cv2.COLOR_BGR2GRAY)

    # pass the frame to the classifier
    persons_detected = classifier.detectMultiScale(gray_frame, 1.3, 5)

    # check if people were detected on the frame
try:
        human_count = persons_detected.shape[0]
else:
        human_count = 0

    # extract boxes so we can visualize things better
    # for actual deployment with hardware, not needed
    for (x, y, w, h) in persons_detected:
        cv2.rectangle(frame, (x,y), (x+w, y+h), (255, 0, 0), 2)
    cv2.imshow('Video footage', frame)

    if (cv2.waitKey(1) & 0xFF == ord('q')):
        break
We read each frame from our captured video stream. It is also a good idea to convert it to gray to conserve resources. Once that is done, we pass the frame to the classifier to see if there is a person detected. If that is the case, a rectangle is drawn on the frame around the detected person.
Please see an example below of my face being detected:
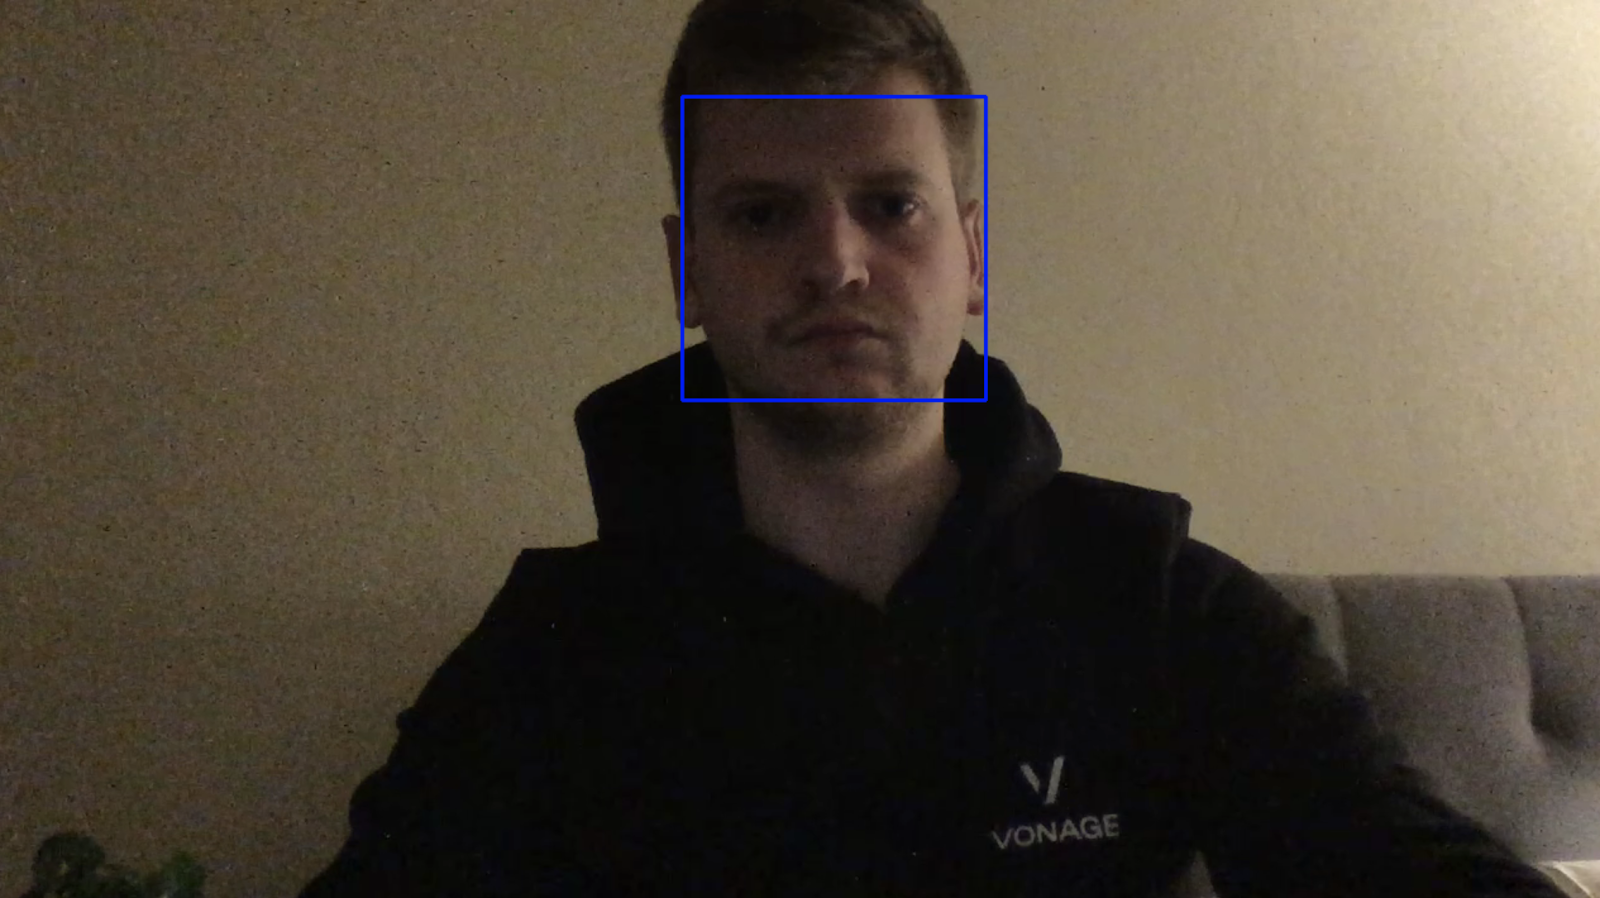 Example below of my face being detected
If you load a different classifier, such as upperbody.xml or fullbody.xml, you’ll be able to use the same code for the detection.
Please note that the full-body classifier only recognizes the person on the frame if all of the body is in the frame. Just the face and/or upper body would not work. The same goes for the upper body classifier—just having the face in the frame would not result in a successful detection.
This comes from a limitation in the classifiers provided by OpenCV. You can always attempt to train your own classifiers; that can take extra time and resources, but it is a good way to build on this project if you’re interested in learning more about that side of things.
Now, let’s add Vonage SMS API capabilities into our application so that the user can be notified if there is a stranger detected on their video frame.
Note: It is important to add delay to this (especially while testing) so that the user does not get a lot of SMS messages for one detection event.
In our example, we will be using a time.sleep(number of seconds) method to do so; however, feel free to develop your own more sophisticated method if you have one.
Add the following code after the try/else block in the code:
if (human_count > 0):
        client_nexmo.send_message({
            'from': ‘your_outbound_phone_number’,
                'to': ‘your_inbound_phone_number’,
                'text': 'There has been ' + str(human_count) + ' human(s) detected!',
        })
The SMS will only be sent out if there is at least one human detected on the frame. To make sure that we don’t send out too many messages, we will put the thread to sleep for about five seconds and look for the person in the frame afterward.
That's it! In just 50 lines of code, you are ready to detect people snooping on your property and be conveniently notified when that happens, using the Vonage SMS API.
The source code to this post can be found at the following GitHub link. I have also included the Haar Cascade classifiers used in this project so you can get up and running quickly.
Of course, there is more that can be done to make this project more sophisticated and efficient.
Firstly, the time.sleep() method means that there is at least a five-second gap between the frame analysis which is not an ideal situation and could be improved. It would also be a good idea to crop the video frame image that you receive from the camera down to just a specific detection area in order to improve the efficiency of the detection—less pixels to check means faster detections.
https://docs.opencv.org/master/db/d28/tutorial_cascade_classifier.html https://opencv-python-tutroals.readthedocs.io/en/latest/py_tutorials/py_gui/py_video_display/py_video_display.html https://github.com/opencv/opencv/tree/master/data/haarcascades