
Share:
Customer Solutions Engineer at Vonage. With a background in product management, network and systems operations, customer support, quality assurance, software development team manager, Tony is working in the Telecommunications industry formerly in France and now in the US. He helps global large and smaller companies develop solutions using programmable voice, messaging, video, and multi-factor authentication services.
Processing Voice Calls With Amazon Transcribe & Comprehend
Time to read: 2 minutes
In this tutorial, we will guide you through setting up an Amazon Transcribe & Comprehend reference connection. We will also guide you by setting up a sample application using Vonage Voice API that will allow a caller to connect with another party through the Vonage platform. The call will then get separate real-time transcription with sentiment analysis for each party’s speech by connecting WebSockets to the reference connection.
AWS AI platforms offer advanced capabilities that include the transcription engine Amazon Transcribe and the sentiment analysis engine Amazon Comprehend.
This tutorial will guide you on setting up an Amazon Transcribe & Comprehend reference connection and a sample application using Vonage Voice API.
This sample application will allow a party to call a phone number on the Vonage platform, which calls another party. Both parties will be talking to each other where each party’s audio stream gets sent via a WebSocket to the reference connection for real-time transcription. Then transcripts are sent to the reference connection for real-time sentiment analysis.
Each party has a separate real-time transcription and sentiment analysis. In this sample application, there are two parties in the voice conference call. The separate transcription and sentiment analysis would work the same for even more participants in a conference call.
In the first section, we will set up the Amazon Transcribe & Comprehend reference connection, allowing real-time audio streaming of each party’s voice via a WebSocket from the Vonage platform. Audio chunk submissions, transcripts, sentiment analysis results to/from Amazon Transcribe & Amazon Comprehend is carried out via (secure) HTTP requests. It also relays the transcripts and sentiment scores back to the Voice API application using webhooks.
In the following section, we will set up a sample application that uses the Vonage Voice API to do the following:
Handle an incoming call
Call the second party
Establish a WebSocket for each party
Receive separate transcripts for each party
Submit transcripts for sentiment analysis
Receive separate sentiment scores of each party’s speech sentences
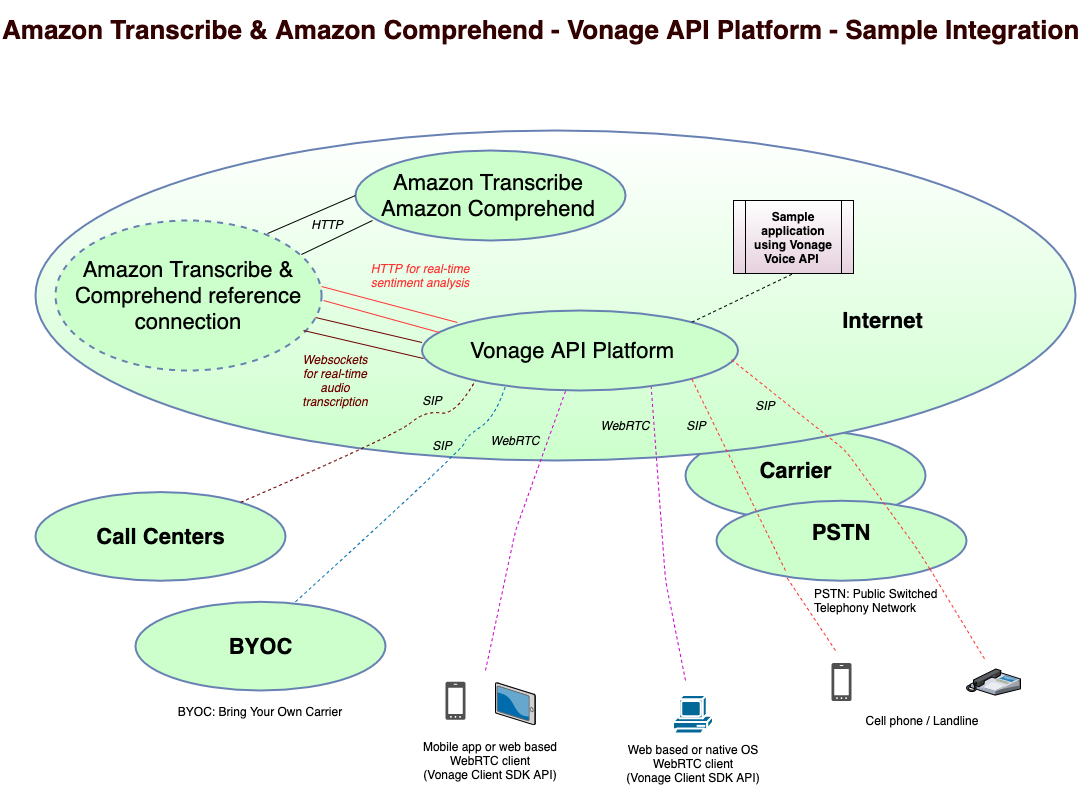
The diagram below shows an overview of a sample integration architecture.
The sample application in this article handles a conference call with two parties connecting via PSTN (e.g. cell phone, landline phone, VoIP phone, PBX extension).
Go to https://github.com/nexmo-community/transcribe-comprehend-multi-sub,
Follow instructions as described in this repository,
Select one of the deployment types as explained in the Running Transcribe and Comprehend reference connection section,
Make note of the server public hostname and port (e.g. xxxx.ngrok.io, myserver.mycompany.com:40000, or
<docker_host_name>:<proxy_port>), as it will be needed for the next section "Set up the sample Vonage Voice API application" (as argument of the parameter TRANSCRIBE_COMPREHEND_REFERENCE_CONNECTION).
Go to https://github.com/nexmo-community/transcribe-comprehend-client,
Follow instructions as described in this repository,
Select one of the deployment types as explained in the Running Transcribe & Comprehend client application section,
Make note of the phone number linked to your Voice API application and the CALLEE_NUMBER as explained in the Set up your Vonage Voice API application credentials and phone number section as they will be referred to for the next section "Test drive the sample application".
Call the phone number linked to your Voice API application, you will hear “Please wait, we are connecting your call”,
Party with phone number CALLEE_NUMBER will get called, answer that call, you will hear “We are connecting you to the caller”,
Both caller and callee can now talk to each other,
You will see on the Transcribe and Comprehend reference connection application console as well as on the sample Vonage Voice API application console, the transcripts and sentiment scores of each party’s sentences.
Share:
Customer Solutions Engineer at Vonage. With a background in product management, network and systems operations, customer support, quality assurance, software development team manager, Tony is working in the Telecommunications industry formerly in France and now in the US. He helps global large and smaller companies develop solutions using programmable voice, messaging, video, and multi-factor authentication services.