Share:
Former technical writer at Vonage. Loves playing with and documenting APIs.
Play an Audio File Into a Voice Call with Java and Spark
Time to read: 16 minutes
This tutorial shows you how to stream audio into a call using the Nexmo Voice API.
The most obvious use case for this is to play holding music or messages. No one is especially fond of being put on hold. But you can make it as pleasant an experience as possible by giving your callers something to listen to rather than silence. Studies have shown that time seems to pass more quickly when callers have something to listen to and it can also reduce their anxiety levels significantly - great when they're calling your customer service department to complain.
However, the same studies have also reported that callers can react negatively if they don't like what they are forced to listen to. So choose your music or message carefully and, whatever you do, don't Rick Roll them!
To answer an incoming call, you must create a publicly-accessible webhook and configure your Nexmo account to use it. We will be using Java and the Spark web framework to create the webhook. Once the call is underway, we'll use the Nexmo REST API Client Library for Java to stream audio into it. You can find a version of the code for this tutorial on GitHub.
The JDK or its open source equivalent OpenJDK. This tutorial was written using OpenJDK 11, but version 8 or above of either should be fine.
Gradle (version 3.4 or later) to build your project and manage its dependencies.
ngrok to make your webhook available over the public Internet.
You need a Nexmo virtual number you can use to receive incoming calls. You can purchase one directly in the developer dashboard, but in this tutorial, you will use the Nexmo CLI tool instead.
Install the Nexmo CLI:
Then, configure it with your NEXMO_API_KEY and NEXMO_API_SECRET from the developer dashboard:
Use the Nexmo CLI to display the numbers with voice capability that are available for purchase in your country, by replacing GB in the following command with your own two-character country code:
Select a number and buy it:
You must make your webhook accessible to Nexmo's APIs. A great way to do this during development is to use ngrok. To learn more, read our blog post on ngrok.
Download and install ngrok, then execute the following command to expose your application on port 3000 to the public Internet:
Make a note of the public URLs that ngrok provides and leave it running for the duration of this tutorial (because you need to configure your application with these URLs and ngrok gives you new, random ones every time you run it unless you sign up for a paid plan):
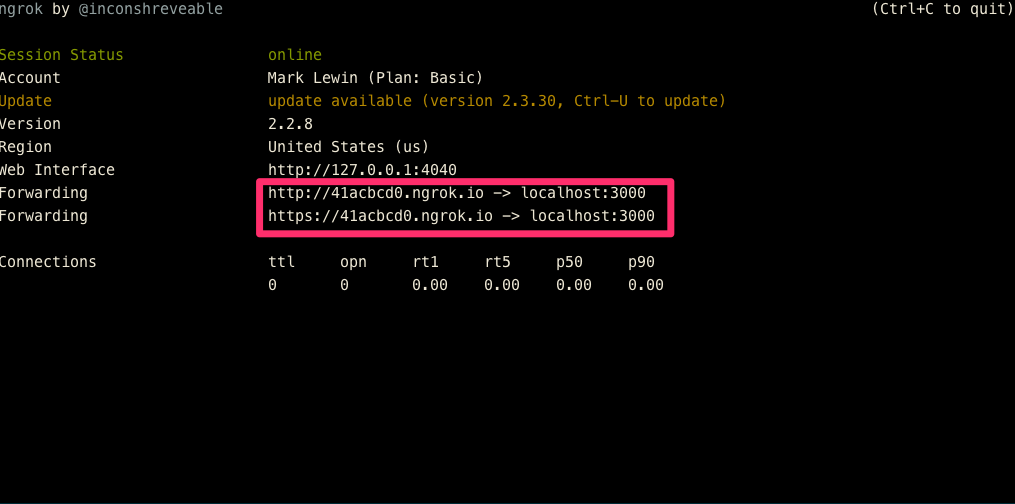 Terminal showing the ngrok URLs
Create a directory for your project called play-audio-into-call, change into that directory and then use gradle to initialize the project:
Accept all the defaults, then open the generated project in your IDE.
Locate the build.gradle file and change the dependency repository from jcenter() to mavenCentral():
repositories {
    mavenCentral()
}Replace the dependencies section with the following:
dependencies {
    // Spark framework
    implementation 'com.sparkjava:spark-core:2.8.0'

    // Nexmo client library
    implementation 'com.nexmo:client:4.4.0'

    // Use JUnit test framework
    testImplementation 'junit:junit:4.12'
}We won't be using JUnit in this example, but you can safely leave it in there for now.
Gradle created the App class in the src/main/java/play/audio/into/call directory.
Open App.java in your IDE. Remove the getGreeting() method that gradle created for you and add the necessary import statement for the spark package.
Then, call Spark's port method to indicate that your application is listening for requests on port 3000.
Your App.java should look like this:
package play.audio.into.call;

import static spark.Spark.*;

public class App {
    public static void main(String[] args) throws Exception {
        port(3000);
        System.out.println("I'm listening!");
    }
}Run your application by executing gradle run in the play-audio-into-call directory. Check that it's working by visiting http://localhost:3000 in your browser and seeing the "I'm listening" message displayed on the page.
A Voice API Application is a Nexmo construct and shouldn't be confused with the application you are going to write. Instead, it's a "container" for the authentication and configuration settings you need to work with the API.
You can create a Voice API Application with the Nexmo CLI. You must provide a name for the application and the URLs of two webhook endpoints: the first is the one that Nexmo's APIs will make a request to when you receive an inbound call on your virtual number and the second is where the API can post event data.
In this tutorial we're only interested in the "answer" webhook, so you can provide any URL for the "event" webhook. Replace the domain name in the following Nexmo CLI command with your ngrok domain name and run it in your project's root directory:
This command downloads a file called private.key that contains authentication information and returns a unique application ID. Make a note of this ID because you'll need it in subsequent steps.
You now need to link your Nexmo virtual number to your Voice API Application. Run the following Nexmo CLI command, replacing NEXMO_NUMBER with your Nexmo virtual number (including the international dialing code, but omitting any leading zeroes) and APPLICATION_ID with the application ID you generated in the preceding step:
That's all the configuration done. Let's get back to coding your application.
When Nexmo receives an inbound call on your virtual number, it will submit a GET request to your /webhooks/answer endpoint. That endpoint doesn't exist yet, but you will create it shortly.
Nexmo expects your webhook to provide a response that contains a Nexmo Call Control Object (NCCO). This is an array of objects in JSON format, each of which describes an action that tells Nexmo how to handle the call.
In this example, you will read a welcome message to the caller using text-to-speech and then place them into a conference. The two NCCO actions that achieve this are talk and conversation, respectively. So the NCCO you need to include in your response will look like this:
[
  {
    "action": "talk",
    "voiceName": "Russell",
    "text": "Please wait while we connect you to the conference"
  },
  {
    "action": "conversation",
    "name": "Test Conference"
  }
]The talk action should be fairly self-explanatory. All you're doing is reading the text string back to the user in the Russell voice. (You can find a full list of available voices here).
The conversation action requires you to provide a name for the conference so that you can join multiple callers to the same conference. In this tutorial you will likely be the only caller, but you are still required to name it. We are using the conversation action just to keep the call open so that we can stream audio into it later on.
The Nexmo REST API Client Library for Java provides some helper classes to create this NCCO, so let's configure that first.
Include the following import in your App.java file:
import com.nexmo.client.NexmoClient;Then, in your main method, just under the call to port(3000), instantiate the client library, replacing /path/to/your/private.key with the path to your private.key file and APPLICATION_ID with your Voice API Application ID:
public class App {
    public static void main(String[] args) throws Exception {
        port(3000);
        NexmoClient client = NexmoClient.builder()
            .applicationId("APPLICATION_ID")
            .privateKeyPath("/path/to/your/private.key")
            .build();
    }
}
So first you need to create that endpoint. The route you'll use for this is /webhooks/answer.
Include the following import statements:
import com.nexmo.client.voice.VoiceName;
import com.nexmo.client.voice.ncco.Ncco;
import com.nexmo.client.voice.ncco.TalkAction;
import com.nexmo.client.voice.ncco.ConversationAction;And add this code to your main method:
get("/webhooks/answer", (req, res) -> {
    String callId = req.queryParams("uuid");
    System.out.println("Call answered. The UUID for this call is: " + callId);
    TalkAction intro = TalkAction.builder("Please wait while we connect you to the conference.")
        .voiceName(VoiceName.RUSSELL)
        .build();
    ConversationAction conversation = ConversationAction.builder("Test conference")
        .build();
    res.type("application/json");
    return new Ncco(intro, conversation).toJson();
});
This code uses the TalkAction and ConversationAction Nexmo client library helper classes to build the NCCO which it then returns in the response to Nexmo.
Test it by first ensuring that ngrok is running and then executing gradle run. Then, call your Nexmo virtual number. Your application displays the call UUID and you should hear the welcome message. The line remains open until you disconnect.
You now need a way to play audio into the conference call. To do that, you will create a route called /play/:id, where the :id is the UUID of the call you want to stream audio into. You will call this route manually once the conference call is underway.
Add the following import statement:
import com.nexmo.client.voice.StreamResponse;The create the /play/:id route in your main method:
get("/play/:id", (req, res) -> {
    String id = req.params(":id");
    final String URL = "http://example.com/your/audio/file.mp3";
    System.out.println("Playing audio into " + id.toString());
    StreamResponse startStreamResponse = client.getVoiceClient().startStream(id, URL, 0);
    System.out.println(startStreamResponse.getMessage());
    Thread.sleep(5000);
    client.getVoiceClient().stopStream(id);
    return "";
});
Replace URL with the URL to an audio file of your choice. You can use https://nexmo-community.github.io/ncco-examples/assets/voice_api_audio_streaming.mp3 for testing.
This route strips the call UUID from the GET request URL and uses it in the startStream method to identify the correct call to stream the audio to. It plays the audio for five seconds and then stops playing it by calling stopStream. If you didn't stop it like this, it would continue playing indefinitely as specified by the third parameter to startStream which tells Nexmo how many times to play the audio, with zero meaning infinite.
You're all set! Now you can test it.
Run your Java application from within your application directory:
Call your virtual number, listen to the welcome message and make a note of the call UUID displayed in the console.
In a browser, or by using Postman or a similar tool, create a GET request to the /play endpoint, passing in the call UUID, for example:
http://localhost:3000/play/d2af966a2fa415b7080b2762940a828c
You should hear some audio which terminates after five seconds.
In this tutorial, you learned how to create a Java application with the Spark framework to answer a call on your Nexmo virtual number using the Voice API, create a conference and then stream audio into it. Invite a friend to call the number at the same time as you so that you can both be placed into the conference. Consider experimenting with different audio files and creating a separate /stop/:id endpoint so that you can control the duration of the audio manually.