
Share:
Benjamin Aronov is a developer advocate at Vonage. He is a proven community builder with a background in Ruby on Rails. Benjamin enjoys the beaches of Tel Aviv which he calls home. His Tel Aviv base allows him to meet and learn from some of the world's best startup founders. Outside of tech, Benjamin loves traveling the world in search of the perfect pain au chocolat.
Integrate Slack and WhatsApp with Low-Code (Part 2)
Time to read: 5 minutes
Startups and small businesses often lack resources for full-fledged (and expensive) customer support solutions. However, with Vonage's AI Studio low-code platform, you can build a custom, cost-effective customer experience solution tailored to your needs. One option is to build a WhatsApp integration with Slack.
This two-part tutorial will show you how to integrate WhatsApp and Slack to create a powerful customer support system. In Integrate Slack and WhatsApp with Low-Code (Part 1), you saw how to get the project setup and make your first connection to send WhatsApp messages to Slack. In this second part, you will handle the more advanced logic so that your team can respond to customer inquiries directly from Slack.
TL;DR: Find the refactored server code on Github to follow along with the AI Studio and Slack setup without worrying about JavaScript programming.
 Preview of Slack-WhatsApp Integration
In part one, we got our project setup and initiated the conversation in Slack. Now you might think the next step would be to let our Slack teammates respond right? Well, we need to solve the problem first of somehow linking our Slack thread to our AI Studio conversation so we know how to organize our messages back and forth! We’ll do this by creating a Slack Message Shortcut. This message shortcut will require our agent to “open a ticket” by just clicking a button on the new conversation. This will send a request to our application where we’ll store the conversation thread information in a new object in relation to the conversation_id.
In order to create shortcuts, you’ll need to enable interactivity on your Slack app. You can see how to do so below. For the Request URL you’ll add your TUNNEL_URL followed by /slack/start. This will be the endpoint in our application where Slack will send a request whenever the shortcut is triggered.
 Enable Slack InteractivityNext click on “Create New Shortcut” and fill it in:
Where should this shortcut appear: On messages.
Name: Start a ticket
Short Description: Creates a conversation for a customer inquiry
Callback ID: begin_response
Now we’ll update our application to use the information we receive back from Slack and link it to our AI Studio sessions. First, we’ll create a global object called SESSIONS. You can add this just above our endpoints:
const SESSIONS = {};
Inside of our endpoints we’re going to do 4 things:
Handle the response we receive from Slack and extract thread_ts (timestamp) and session_id
Create a new entry in SESSIONS for the current session/thread
Prepare the data to be sent to Slack, which includes formatting our initialization message for our Slack thread
Sending our request to Slack to post the initialization message in the correct thread
app.post('/slack/start', urlencodedParser, function (req, res){
  const response = JSON.parse(req.body.payload);
  const thread_ts = response.message.ts;
  const session_id = extractSessionId(response.message.text);
  newSession(session_id, thread_ts);
  const data = {
    "thread_ts": thread_ts,
    "text": `Session seen by <@${response.user.id}>`
  }
  axios.post(SLACK_WEBHOOK_URL, data);
  res.send("Begin initiated");
})In our endpoint, we rely on two new functions. You can add these at the bottom of your file with the other functions. The first called extractSessionId searches our payload from Slack for the current sessionId:
const extractSessionId = (input) => {
  const sessionIdPattern = /Session: `([0-9a-f\-]{36})`/i;
  const match = input.match(sessionIdPattern);

  if (match && match[1]) {
    return match[1];
  }

  return null;
};The second function newSession, creates a new entry in our global SESSIONS variable.
const newSession = (session_id, message_ts) => {
  SESSIONS[session_id] = {
    "session_id" : session_id,
    "thread_ts" : message_ts
  }
}
Now that our agent has initialized the conversation in our application, we want to connect Slack to Whatsapp and let them respond to our customers. Let’s do that by creating our first slash command.
In our Slack application dashboard open the Slash Commands tab. Then click “Create New Command”.
Create the following command:
Command: /reply
Request URL: TUNNEL_URL/slack/message
Short Description: Reply to incoming inquiries
Usage Hint: [session_id]
And click “Save”.
 Create a Slack Slash CommandNow we need to update our
 /slack/message endpoint to handle the data being sent from Slack. We need to do two things:
Grab the message and add it as a comment in the correct thread in Slack, along with some formatting
Grab the message and send it to the correct session in AI Studio
We can do that with the following code:
app.post('/slack/message', urlencodedParser, function (req, res) {
  const response = req.body;
  const agentResponse = parseMessage(req.body.text);
  const session_id = agentResponse['sessionId'];
  const message = agentResponse['message'];
  const studio_data = { message_type: 'text', text: message };
  const thread_ts = SESSIONS[session_id].thread_ts;
  const slack_data = {
    "thread_ts": thread_ts,
    "text": `Response sent by <@${response.user_id}> \`\`\`${message}\`\`\``,
  }
  axios.post(`https://studio-api-eu.ai.vonage.com/live-agent/outbound/${session_id}`, studio_data, {
    headers: { 'X-Vgai-Key': AI_STUDIO_KEY }
  })
  axios.post(SLACK_WEBHOOK_URL, slack_data);
  res.send("Response sent to user")
})You’ll notice that we rely on one last function called parseMessage to clean up our data from Slack. You can add it at the end of our file:
const parseMessage = (input) => {
  const [sessionId, ...messageParts] = input.split(' ');
  const message = messageParts.join(' ');

  // Check if the first part is a valid session ID format
  const sessionIdPattern = /^[0-9a-f]{8}-[0-9a-f]{4}-[0-9a-f]{4}-[0-9a-f]{4}-[0-9a-f]{12}$/i;
  if (sessionIdPattern.test(sessionId)) {
    return { sessionId, message };
  }

  // If the first part is not a valid session ID, treat the entire input as a message
  return { message: input };
};You can now test sending message replies from Slack! How cool is it to receive it on the WhatsApp side?!
So we now almost have our full scenario working. But we’re missing one thing! We need to allow our user to send continuous messages into Slack to reply to our human agent. We can do this by updating our /inbound endpoint.
Here, we handle the data from AI Studio and pull out the message and session_id. Using the session_id we can lookup our thread_ts. Once we have the thread_ts, we can send off our message to the correct thread with a POST request to Slack.
You can update your code to the following:
app.post('/inbound', (req, res) => {
  const message = req.body.text
  const session_id = req.body.sessionId;
  const thread_ts = SESSIONS[session_id].thread_ts;
  const data = {
    "thread_ts": thread_ts,
    "text": `Customer respsonse: \`\`\`${message}\`\`\``
  }
  axios.post(SLACK_WEBHOOK_URL, data );
  res.send('Inbound endpoint reached');
});
You might think, “That’s it! I’m done!”. Well almost! Our Live Agent Node doesn’t know how long a conversation back and forth between AI Studio and some other interface might last. For that we must let AI Studo know when to end the conversation and exit the Live Agent Routing node. This will end the Slack integration with WhatsApp for the current customer.
We’re going to create another slash command, similar to how we created /reply. This time we will create a command for /close_ticket. Close ticket will again accept the session_id to know which session to end.
Create the following command:
Command: /close_ticket
Request URL: TUNNEL_URL/slack/end
Short Description: Customer issue has been resolved
Usage Hint: [session_id]
And click “Save”.
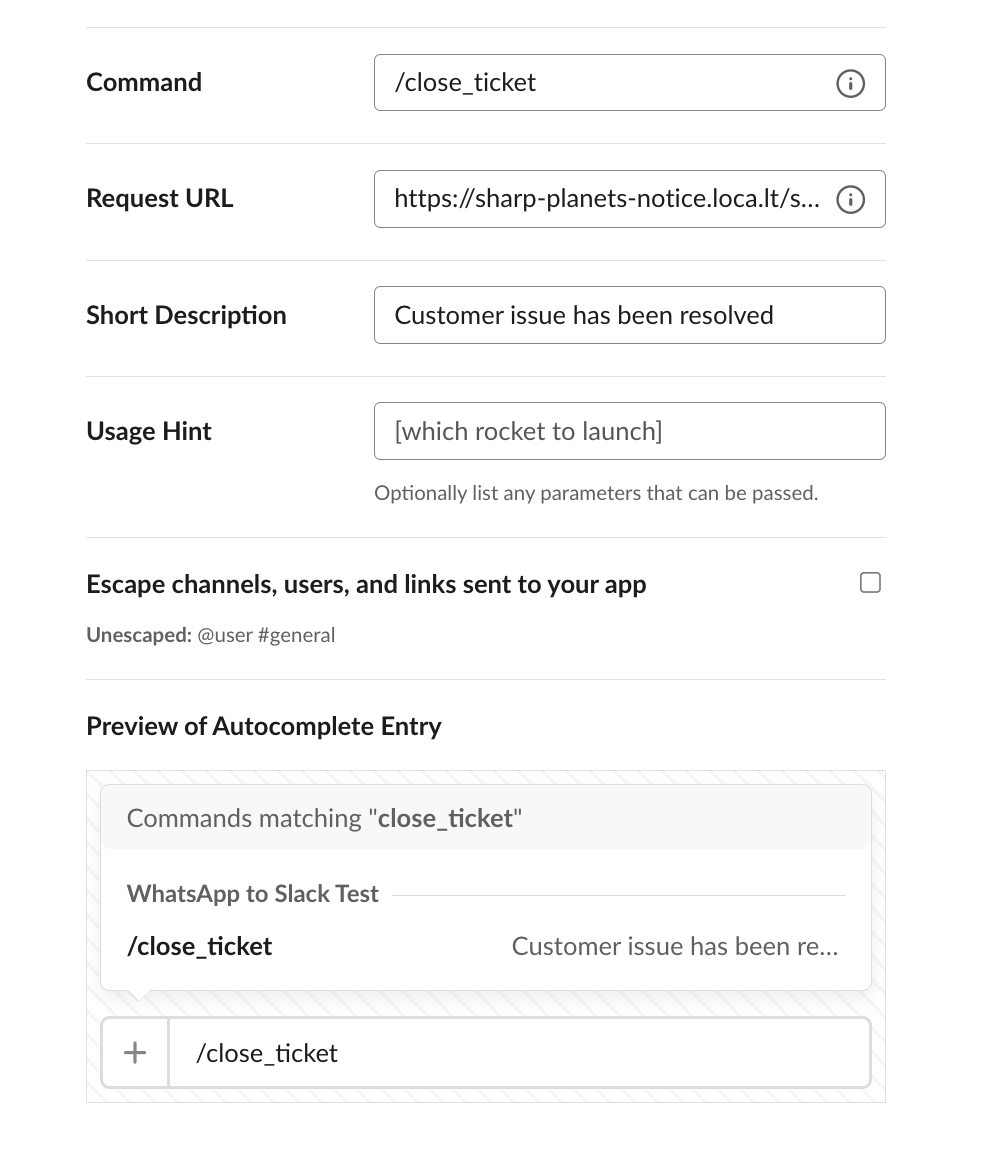 Slack Slash Command Details
Inside of our /slack/end endpoint we need to handle the request from Slack. We really only need to do three things:
Grab the
session_idby using ourparseMessagefunction againSend a request to the Stop Connection endpoint in AI Studio to tell it to stop the conversation for the correct
session_idUpdate the human agent in Slack that the conversation has been ended by posting a message in the correct thread
To do so, update your /slack/end code to look like this:
app.post('/slack/end', urlencodedParser, function (req, res) {
  const agentResponse = parseMessage(req.body.text);
  const session_id = agentResponse['sessionId'];
  const data = {};
  axios.post(`https://studio-api-eu.ai.vonage.com/live-agent/disconnect/${session_id}`, data, {
    headers: { 'X-Vgai-Key': AI_STUDIO_KEY }
  })
  const thread_ts = SESSIONS[session_id].thread_ts;
  const slack_data = {
    "thread_ts": thread_ts,
    "text": `This conversation has been marked as resolved.`,
  }
  axios.post(SLACK_WEBHOOK_URL, slack_data);
  res.send("Conversation ended")
})
And that’s a wrap! You've successfully implemented a seamless WhatApp to Slack and Slack to WhatsApp integration for customer support using Vonage's AI Studio low-code platform. Restart your Node.js server by running node server.js in your terminal, and test the complete flow by sending messages back and forth between your phone's WhatsApp and Slack. Isn't it amazing?
Alternatively you can find the refactored server code on Github with setup instructions
To further enhance this application, consider leveraging Slack's robust Web API, which enables interactivity based on emoji reactions. Additionally, you could incorporate AI Studio's SMS or Voice agents, providing customers with an additional communication channel.
Are you using other low-code or no-code solutions for customer engagement? Join the Vonage Developer Community Slack or follow us on X, formerly known as Twitter to share your exciting projects and insights!
Share:
Benjamin Aronov is a developer advocate at Vonage. He is a proven community builder with a background in Ruby on Rails. Benjamin enjoys the beaches of Tel Aviv which he calls home. His Tel Aviv base allows him to meet and learn from some of the world's best startup founders. Outside of tech, Benjamin loves traveling the world in search of the perfect pain au chocolat.