Share:
Software Developer who loves building awesome tools and products. I currently work with Laravel, PHP and Vue.
Incident Reporting with PagerDuty and Vonage
Time to read: 8 minutes
Product deprecation notice From August 31st 2025, the Vonage Dispatch API will be closed to new users, though the product will continue to be supported for existing users. If you are looking to build a messaging application with failover functionality, failover is now supported directly in the Messages API.
For general information about the Messages Failover feature please refer to this guide. For guidance on migrating from Dispatch API to Messages API Failover, please refer to this guide.
If you have any further questions regarding this product deprecation, please contact us on the Vonage Community Slack.
PagerDuty is an incident reporting management system that provides notifications and automatic escalations to help engineering teams detect and fix issues as they arise with their infrastructure. In this post, we’ll be looking at how we can use Vonage to alert members of an engineering team whenever an incident occurs on any of their infrastructure.
Using the Vonage Dispatch API, which provides an automatic failover option, we’ll first send out notifications via Facebook Messenger as the primary medium and then SMS as a fallback option.
To follow along, you’ll need the following:
PHP version 7.1 or Higher
Laravel 5.8
Ngrok which allows you to expose your local web server to the internet. To learn more about how to set up your local environment with Ngrok, you can check out the docs here.
A Facebook Account
A PagerDuty Account
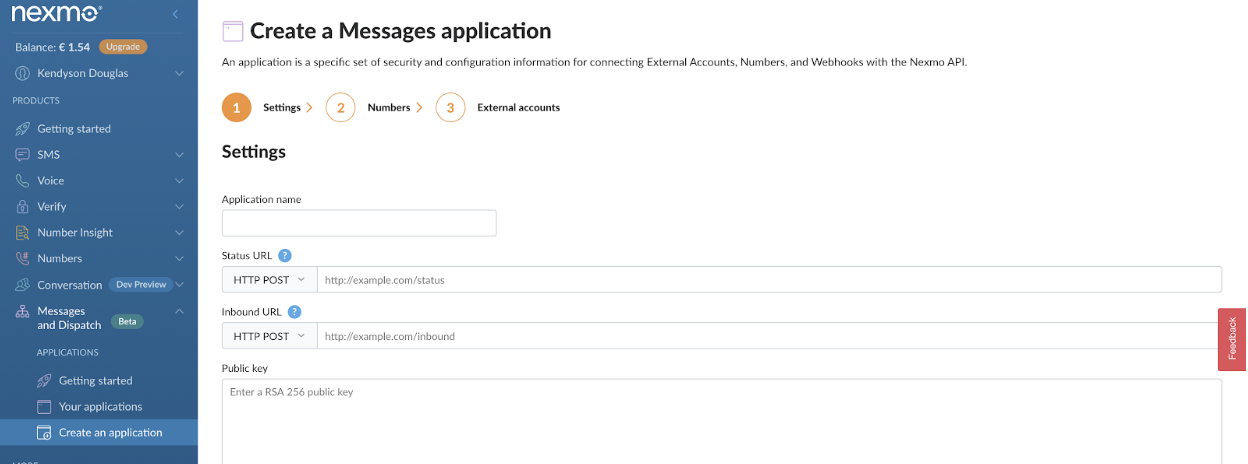
To be able to use the Dispatch API, there are a few things we need to do with our Vonage account. Head over to your Vonage dashboard and under the Messages and Dispatch section, create a new messages application.
 new message app in dashboard
\
The Status URL is the webhook endpoint Vonage will make a POST request to whenever we send out SMS notifications. This will allow us to determine the status update of the SMS that has been sent out i.e delivered, rejected, or submitted. Since we’ll be using Ngrok, the status URL should be something like this
qc43v7.ngrok.io/webhooks/status.The Inbound URL is the endpoint Vonage will make a request to whenever inbound messages are received and should look similar to this
qc43v7.ngrok.io/webhooks/inbound-messageNext, generate a public/private key pair. This will automatically download the private key file for you as well. Take note of this file as we’ll be needing it shortly.
Create the application and then take note of the application id. Next, you’ll be prompted to associate numbers and external accounts to this application. This is totally optional, so you can go just go with the default and then create the application.
Head over to PagerDuty and create an account if you don’t already have one. We’ll also need to create a Service. A Service in PagerDuty represents anything we would like to open incidents against. It could be an application, a component, or even a team. So whenever a new incident occurs on that Service, we want to send out webhook notifications to a particular endpoint in our application.
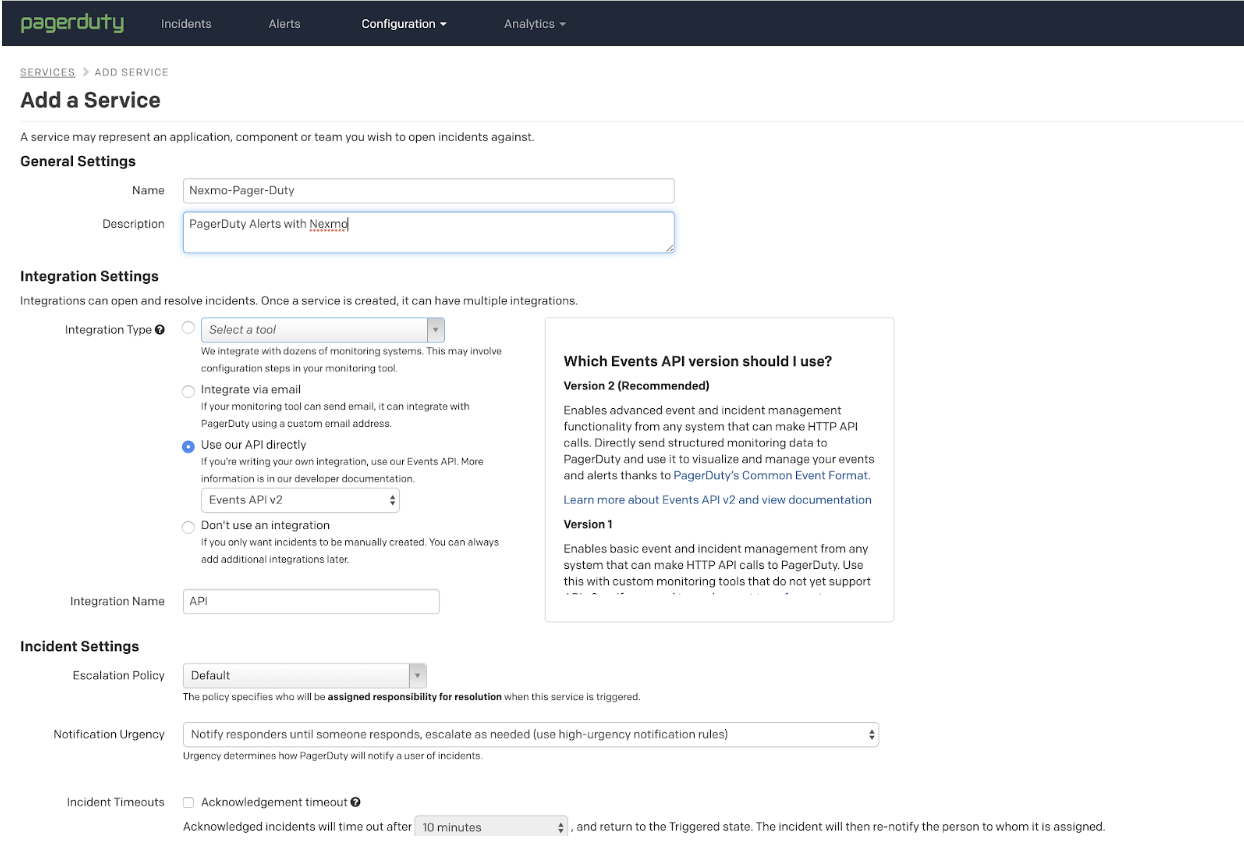
In your PagerDuty dashboard, head over to Configuration -> Services and create a new Service.
 pager duty dashboard
Since we’ll be making use of our own custom integration, select use our API directly for the integration type, and then select Events API V2 and fill out all the other necessary details. You can read more about creating a service on PagerDuty here.
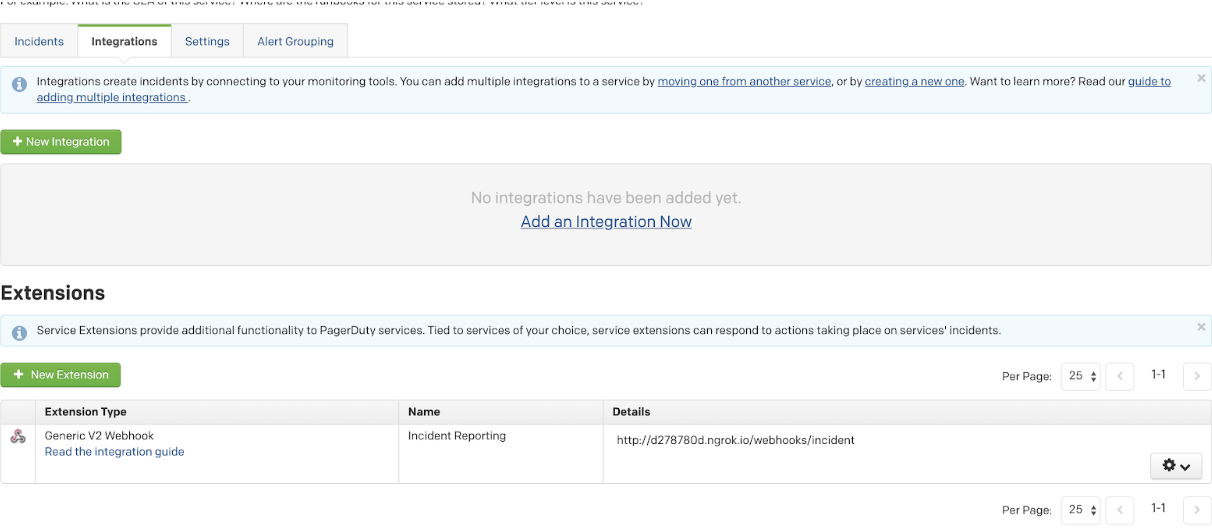
Next, after you’ve successfully created the service, under the Integrations tab, select New Extension and then give it a type of Generic V2 webhook. The details section will consist of the endpoint in our application where we want to receive notifications from PagerDuty and should be something like qc43v7.ngrok.io/webhooks/incident
 pager duty
We’ll be using composer to install a new Laravel project. From the command line, create a new Laravel project using the following command:
Edit the routes/web.php with the following code:
<?php

Route::post('/webhooks/inbound-message', 'WebhookController@inboundMessage');
Route::post('/webhooks/status', 'WebhookController@status');
Route::post('/webhooks/incident', 'WebhookController@report');Cross-site request forgery attack is a type of malicious attack whereby unauthorized commands are carried out on behalf of an authenticated user. To prevent such attacks, Laravel automatically generates a Csrf token for every authenticated user which helps to validate that the authenticated user is the one actually making a request to the application. However, since these requests will be coming from outside the application and we trust the source, we need to disable Csrf validation for these routes. The VerifyCsrfToken middleware is used for validating all tokens. Luckily, the middleware accepts an except array which contains a list of all routes to disable CSRF verification for.
Edit the app\Http\Middleware\VerifyCsrfToken.php file with the following code:
protected $except = [
        '/webhooks/*'
];Next, run the following command to create a controller:
php artisan make:controller WebhookController This will generate a WebhookController.php file for us in the app\Http\Controllers directory. Edit the file with the following code:
<?php

namespace App\Http\Controllers;

use Illuminate\Http\Request;
use Illuminate\Support\Facades\Log;
use App\Jobs\ReportIncident;

class WebhookController extends Controller
{
    public function inboundMessage(Request $request)
    {
        return Log::debug('Inbound Message', $request->all());
    }

    public function status(Request $request)
    {
        return Log::debug('Status', $request->all());
    }

    public function report(Request $request)
    {
        Log::debug('Incident', $request->all());

        dispatch(new ReportIncident());

        return response('Webhook received');
    }
}For the inboundMessage() and status() methods, we simply log the request data from Vonage to the log file Laravel provides. The report() method dispatches a ReportIncident job which we shall be creating shortly. This job is responsible for triggering SMS notifications using a custom Wrapper around the Vonage API.
To be able to successfully send messages from Vonage to Facebook, you’ll first need to link a Facebook page associated with your Facebook account to your Vonage account. You can learn how to do that here.
When you’re done with the linking, send a message from your Facebook account to the Facebook page. Since it’s an inbound message, Vonage will send a request containing details of the message to the /webhooks/inbound-message endpoint we created earlier. Check your logs file and you should see an entry similar to the following:
Inbound Message{
   "message_uuid":"0a2088d2-e028-4aa0-aa4a-ae11a6f82fb0",
   "to":{
      "id":"1923256201474167",
      "type":"messenger"
   },
   "from":{
      "id":"23037543461244470",
      "type":"messenger"
   },
   "timestamp":"2019-08-06T21:56:16.887Z",
   "direction":"inbound",
   "message":{
      "content":{
         "type":"text",
         "text":"Hello"
      }
   }
}The Facebook sender id is the to.id, while the recipient id is the from.id. Take note of these details as we’ll be needing them shortly.
Since the Dispatch API is still in beta as at the time of writing this tutorial, the Vonage PHP library doesn’t yet provide support for it. As a result, we’ll be using a custom wrapper to interact with Nexmo’s API. To get started, we first need to generate a Json Web Token (JWT) which we’ll use for authenticating with the API.
Using the Vonage CLI, run the following command:
vonage jwt --key_file=./private.key --app_id=VONAGE_APPLICATION_ID./private.key is the path to the private key file that was generated for you when you created the Messages and Dispatch application, while the app_id is the application id we took note of earlier. Next, copy the output of this command.
Add the JWT you just generated to your .env, the messenger details we noted earlier and the phone numbers that will handle sending and receiving SMS notifications.
VONAGE_JWT = xxxx
FB_SENDER_ID = xxxx
FB_RECIPIENT_ID = xxxx
SMS_FROM = xxxx
SMS_TO = xxxxNext, we will reference the environment variables we just defined through our config file. Head over to the config directory and under the services.php file, add a new Vonage array.
'vonage' => [
        'jwt' => env('VONAGE_JWT'),
        'fb_sender_id' => env('FB_SENDER_ID'),
        'fb_recipient_id' => env('FB_RECIPIENT_ID'),
        'sms_from' => env('SMS_FROM'),
        'sms_to' => env('SMS_TO')
    ]
The only dependency our project will have is the GuzzleHTTP library which we’ll use for making API calls. Run the following command to install the library:
composer require guzzlehttp/guzzle
In the app directory, create a Vonage.php file and add the following code to the file:
<?php

namespace App;

use GuzzleHttp\Client;

class Vonage
{
    protected $client;

    public function __construct()
    {
        $this->client = $this->setUpClient();
    }

    protected function setUpClient()
    {
        $authBearer = 'Bearer ' . config('services.vonage.jwt');

        return new Client([
            'base_uri' => 'https://api.nexmo.com',
            'headers' => [
                'Authorization' => $authBearer,
                'Content-Type' => 'application/json',
                'Accept' => 'application/json'
            ]
        ]);
    }


    public function dispatch()
    {
        $response  = $this->client->request('POST', '/v0.1/dispatch', [
            'json' => [
                'template' => 'failover',
                'workflow' => [
                 [
                    'from' => [ 'type' => 'messenger','id' => config('services.vonage.fb_recipient_id')],
                    'to' => ['type' => 'messenger', 'id' => config('services.vonage.fb_sender_id')],
                    'message' => [
                      'content' => [
                        'type' => 'text',
                        'text' => 'An incident just occurred',
                      ]
                     ],
                    'failover' =>[
                      'expiry_time' => 15,
                      'condition_status' => 'read',
                    ]
                   ],
                  [
                    'from' => ['type' => 'sms','number' => config('services.vonage.sms_from')],
                    'to' => ['type' => 'sms','number' => config('services.vonage.sms_to')],
                    'message' => [
                      'content' => [
                        'type' => 'text',
                        'text' => 'An incident just occurred',
                      ]
                    ]
                  ]
                ]
            ]
        ]);

        return json_decode($response->getBody());
    }
}In the dispatch() method, we’ve defined a failover template and a workflow. Whenever an incident occurs via PagerDuty, we’ll get a notification about the incident on Facebook Messenger. If the notification isn’t read within 15 seconds, the failover condition is triggered and an SMS notification is sent as a fallback.
Run the following command on the terminal to create a new job class:
php artisan make:job ReportIncidentEdit the app\Http\Jobs\ReportIncident file with the following code:
<?php

namespace App\Jobs;

use Illuminate\Bus\Queueable;
use Illuminate\Queue\SerializesModels;
use Illuminate\Queue\InteractsWithQueue;
use Illuminate\Contracts\Queue\ShouldQueue;
use Illuminate\Foundation\Bus\Dispatchable;
use App\Vonage;

class ReportIncident implements ShouldQueue
{
    use Dispatchable, InteractsWithQueue, Queueable, SerializesModels;

    /**
     * Create a new job instance.
     *
     * @return void
     */
    public function __construct()
    {
    }

    /**
     * Execute the job.
     *
     * @return void
     */
    public function handle(Voange $vonage)
    {
        $vonage->dispatch();
    }
}The handle() method receives the custom Vonage wrapper we created earlier on as a dependency and then we call the dispatch method on the class.
It’s time to finally test what we’ve been building so far. Head over to your PagerDuty dashboard and create a new incident.
 incidents screenshot
This will trigger a webhook notification to be sent out to the endpoint we added earlier to our PagerDuty account which will, in turn, send out a message to the Facebook page we linked earlier to our Vonage account. Assuming everything went fine, you should inspect your log file as Vonage would have sent an update as regards the status of the message we just submitted.
{
   "message_uuid":"c1bcf89b-c16e-427f-a4b7-15816327832f",
   "to":{
      "id":"1923256201474167",
      "type":"messenger"
   },
   "from":{
      "id":"23037543461244470",
      "type":"messenger"
   },
   "timestamp":"2019-08-08T01:53:07.922Z",
   "status":"read",
   "_links":{
      "dispatch":{
         "href":"v0.1/dispatch/15756412-30d6-4664-8a1e-abcd029ea7a4",
         "dispatch_uuid":"15756412-30d6-4664-8a1e-abcd029ea7a4"
      }
   }
},
{
   "template":"failover",
   "status":"completed",
   "timestamp":"2019-08-08T01:53:07.959Z",
   "usage":{
      "price":"0.003",
      "currency":"EUR"
   },
   "dispatch_uuid":"15756412-30d6-4664-8a1e-abcd029ea7a4",
   "_links":{
      "messages":[
         {
            "message_uuid":"c1bcf89b-c16e-427f-a4b7-15816327832f",
            "href":"v0.1/messages/c1bcf89b-c16e-427f-a4b7-15816327832f",
            "channel":"messenger",
            "usage":{
               "price":"0.001",
               "currency":"EUR"
            },
            "status":"read"
         }
      ]
   }
}From the above logs, we first get a status update informing us that the message has been read and then subsequently another status update informing us that the dispatch workflow has been completed. Since the message was read within 15 seconds, the failover condition was satisfied; as a result, the SMS notification was never triggered.
To test that the SMS notification will be sent out if the failover condition isn’t met, You can repeat the same process but this time do not read the Facebook messenger notification. You’ll discover that this time the SMS notification will be triggered.
In this tutorial, we’ve seen how we can build a custom integration with PagerDuty and Vonage to ensure a resilient fall back alert system in the case of an emergency. You can find a link to the Github repo here.