
Share:
Oluwatobi is a software developer and writer. He loves to simplify complex topics, making them easy for anyone to understand
Implement Multi-factor Authentication In Go with Verify
Time to read: 11 minutes
Whether you are working on a project with millions of users or just a small side project, ensuring that the applications you build are secure and safe is of the utmost importance. Applications that aren't secure could expose user data to hackers, resulting in a loss of money and trust. It is the job of a software developer to ensure that the code being written takes a security-first approach, with all loose ends accounted for. One way to ensure the security of your applications is by integrating a multi-factor authentication system, commonly referred to as MFA.
Multi-factor authentication is used for adding extra security to applications as well as verifying a user's identity. In this article, we'll learn how to implement an MFA system using the Go programming language and the Vonage Verify API.
To follow along with this article, you'll need:
Go (version 1.14 or higher)
Go modules enabled
A text editor of your choice
A basic knowledge of Go
To complete this tutorial, you will need a Vonage API account. If you don’t have one already, you can sign up today and start building with free credit. Once you have an account, you can find your API Key and API Secret at the top of the Vonage API Dashboard.
We'll be creating a simple application that generates a verification code and sends it to a user-provide phone number. The user inputs the code on a confirmation page and the application will confirm if it is valid.
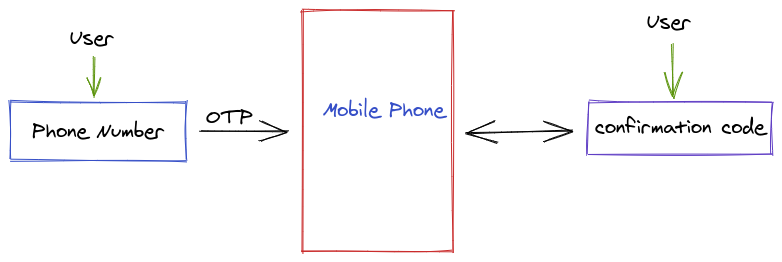 App workflow
The image above is a rough sketch of the workflow for the application we'll be building in this article.
To get started, create the files and folders to match the tree structure below:
├── static/ │ ├── index.html │ ├── form.html ├── .env ├── utils/ │ ├── verify.go └── server.go
The static folder contains two HTML pages (forms) that will be used to collect the user's phone number and confirmation code, respectively.
Env files are used to store environment variables and values that are to be kept private. The .env file will contain the Vonage API Key and Secret which you can get from the dashboard.
The utils directory contains a verify.go file which will house all the code directly related to the Vonage Verify API. The server.go file at the root of our project will contain the logic related to the server that serves up the HTML files.
The first step in creating our web application is to create a simple web server that will serve up the HTML forms. In the server.go file, include the following:
func main() {
//Create the fileServer Handler
   fileServer := http.FileServer(http.Dir("./static"))
//Create a New Serve Mux to register handler
   mux := http.NewServeMux()
   mux.Handle("/", fileServer)
//Create the server on Port 8080 and print start message!
   fmt.Printf("Starting server at port 8080\n")
   log.Fatal(http.ListenAndServe(":8080", mux))
}We import the net/http package and invoke its FileServer function, passing in the route to the static directory as its first argument. The http.FileServer function returns a handler which we register to a URL pattern. To register a handler, we have to create a new serve mux using the http.NewServeMux function and invoke its Handle method passing in / as our pattern along with the file server handler we generated above. Next, we create the server using the http.ListenAndServe method. We pass in the port and the serve mux we created above, then print a message to the terminal to notify us that the server is up and running.
When you execute the server.go file, you will get a start message indicating that the server has started. However, if you visit localhost:8080/ on the browser you'll only see a blank page. This is because our index.html file is empty.
In the index.html file, create a form titled Register with an input field for the user’s phone number and a submit button:
<form method="POST" action="/form">
   <h2>Register</h2>
   <label>Please Input your phone number:</label><br/>
   <input name="phone" type="tel" required value="" >
   <input type="submit" value="Submit">
</form>
The method of the form is POST since the server will be receiving data which the user provides. We set the action of the form to a route, /form, which we will provision to process the data returned from the registration form.
Now that the first registration page is ready, we can create a second page for the confirmation of the code that is sent to the user. The confirmation page is similar to the registration page, with only a few changes in the labels of fields and inputs:
<form method="POST" action="/confirm">
   <h2>Confirm Phone Number</h2>
   <label for="phonenum">Please Input the confirmation code sent to your phone:</label><br/>
   <input id="phonenum" name="confirmation" type="tel" required value="" >
   <input name="phone" type="hidden" value="{{ .Phone }}">
   <input name="requestId" type="hidden" value="{{ .Id }}">
   <input type="submit" value="Submit">
</form>
The full text for both HTML files can be seen in the sample repo. After setting up both HTML files, restart the server. If everything went well, the index.html file should appear when you visit localhost:8080 in the browser.
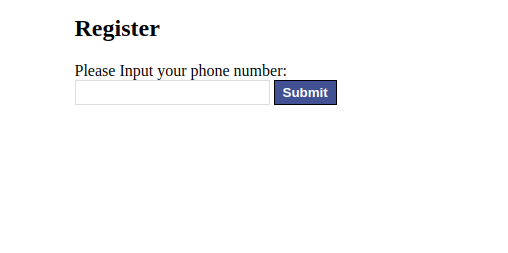 Registration form
If you input a phone number and click the submit button, you will notice it redirects to localhost:8080/form as specified using the HTML action attribute earlier. The /form route is not currently configured to serve up the form.html file. In the next section, we will create a handler for the /form route that will accept the phone number as an argument and render the confirm.html file.
In this section, we will discuss the core of our application—multi-factor authentication—and code it up. We will be using the Vonage Verify API to implement multi-factor authentication.
The process of implementing MFA with the Verify API is a two-way process:
The first step is to start a verify request. At this stage a code is sent to the user’s phone.
The second step is to check if the verification code provided by the user is correct.
When a Verify request is started, a Request_id will be automatically generated from the user's phone number. This ID will be used in the verification in step two.
The developers at Vonage have created a Go package for interacting with a host of Vonage APIs, including Verify. To get started, install the package into your project by running go get github.com/vonage/vonage-go-sdk in the terminal.
Now that we are all set up, let's dive right in!
In the verify.go file, create four functions:
1. createClient
This function contains the logic for creating a client. A client is necessary for us to interact with the Verify API. To create a client, we invoke the NewVerifyClient function provided the vonage-go package we imported earlier. The NewVerifyClient function requires an authentication set, which we create by invoking the CreateAuthFromKeySecret function, passing in the API key and secret
It is a good practice to store sensitive information as environment variables to prevent it from getting into the wrong hands. In the .env file created above, add your API key and secret in the format API_KEY=0000000.
At this point, the createClient function looks like this:
func createClient() *vonage.VerifyClient{
   Key, _ := os.LookupEnv("API_KEY")
   Secret, _ := os.LookupEnv("API_SECRET")
   auth := vonage.CreateAuthFromKeySecret(Key, Secret)
   client := vonage.NewVerifyClient(auth)
   return client
}2. init function
The init function is predefined by Go, and it is used to initialize our application. We'll use it to load in our environment variables from the .env file before the rest of our code is executed, but first we need to install a package that is commonly used to load environment variables. In the terminal, run go get github.com/joho/godotenv' to install the package. Next, add the corresponding import. Theinitfunction will contain just a few lines of code which invokes thegodotenv` Load function.
func init() {
   // loads values from .env into the system
   if err := godotenv.Load(); err != nil {
      log.Print("No .env file found")
   }
}3. VerStart Function
This function is where we start the verification request. The function is going to be exported to the main package, so we capitalize the first letter of the function as is standard in Go. In the VerStart function, we start the request by invoking the Vonage SDK’s Request method on a client. We invoke the createClient function we created above to get a client on which we can call the Request method:
func VerStart(phoneNumber string) string{
   client := createClient()
verification, _, err := client.Request(phoneNumber, "Go-Tut MFA", vonage.VerifyOpts{
		CodeLength: 6,
	})

   if err != nil {
      log.Fatal(err)
   }
   return verification.RequestId
}The Request method takes in three parameters:
The phone number to be verified
The brand name
An options struct that is used to customize the OTP that will be sent to the user.
In our app, we want the phone number to be dynamic, so we specify it as a parameter for the Request function which will be passed in when the function is invoked. The brand name is a short string to mark which brand is sending the SMS—for this example, I used “Go-tut MFA”. When the required parameters are passed into the Request method, we can deal with its return values. The Request method returns a verification response containing a status field, an http response which we will ignore, and an error type. We can return the verification response status and handle the error.
4. verCheck function
This function houses the logic related to confirming the verification code the user submits. This function is similar to the verStart function seen above:
func VerCheck(reqId, code string) string{
   client := createClient()
   response, _, err := client.Check(reqId, code)
   if err != nil {
            log.Fatal(err)
   }
   if err != nil {
      log.Fatal(err)
   }

   return response.Status
}The verCheck function takes in a request ID, which is a required argument for the Check function, and a code parameter, which should be the confirmation code sent to the user. This function will return a status, which is of type string. The status returned will indicate if the user inputted the correct confirmation code. The response status will be 0 if and only if the confirmation code the user inputs is correct.
In the next section, we would see where the four functions created above should be invoked to make our application work.
Now that all the utility functions our application needs are ready, we can put it all together into a working application. We've already rendered our index page, but we also have to render the confirmation page that will display once the submit button is clicked. To do this in Go is pretty different from other languages. We'll have to create a handler function and attach it to the /form route which receives the registration form data. Next, we'll create a function called formHandler to implement Go’s handler interface. We then parse the request body so we can access the form data from the index.html. We use the http request’s ParseForm method for this.
The form data can be extracted from the parsed form by using the formValue method. This method takes in the name specified on the HTML input attribute of our index.html file. We can then import and invoke the verRequest function with the phone number.
To render the confirmation page when a user inputs their phone number, we will have to create a separate function. Though we can simply use the http.Servefile function to serve up our form.html file, it is not the ideal solution in our case. As well as rendering the confirmation file, we also need to pass the user's phone number and the request ID so it can be used to invoke the verCheck utility function up above.
The render function is pretty basic—it receives an http request, response writer, and an interface. The render function uses Go’s http/template package to parse the files and execute with the provided data (the user’s phone number and request ID).
func render(w http.ResponseWriter, filename string, data interface{}) {
//parse the provided file
   tmpl, err := template.ParseFiles(filename)
   if err != nil {
      log.Println(err)
   }
//execute the file
   if err := tmpl.Execute(w, data); err != nil {
      log.Println(err)
   }
}With the render function ready, we can invoke it in the formHandler function by passing in the route to the form file and our message. To pass in a message, we simply create a struct that defines the fields we would like to pass to the form.html file:
type Message struct {
   Phone  string
   Id     string
}We have to create hidden fields in the form.html file to receive the variables in the message struct by adding the following to the form:
<input name="phone" type="hidden" value="{{ .Phone }}">
<input name="requestId" type="hidden" value="{{ .Id }}">At this point, the entire formHandler function looks like this
func formHandler (w http.ResponseWriter, r *http.Request){
//Parse the form
      if err := r.ParseForm(); err != nil {
         fmt.Fprintf(w, "ParseForm() err: %v", err)
         return
      }
//Get the value of the Input from the form
      Phone :=  r.FormValue("phone")
      Id := verify.VerStart(Phone)
      msg := &Message{
         Id: Id,
         Phone: Phone,
      }
//Render the form.
      render(w, "./static/form.html", msg)
}
One last thing to do before we test things out is to register the formHandler function to the /form route. We add just one line of code to do this:
mux.HandleFunc("/form", formHandler)And we are all set! You can run the program, input your phone number on the registration page, and click submit. You should see that on clicking the submit button, you are directed to the confirmation page and will receive an SMS on your mobile phone.
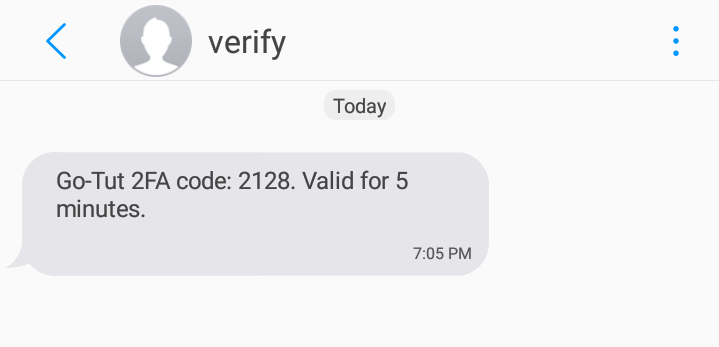 SMS code
Our application is coming together nicely. The next thing to do is to handle the user inputting the confirmation code. In the current state of our application, if a user inputs their confirmation code and clicks submit they are redirected to the confirm route which is not set up yet.
We will set up the confirm handler so that it receives the confirmation code from the client and invokes the verCheck util function. The confirm handler is pretty similar to the form handler with only a few differences.
To get started, we create the confirmHandler function to implements the handler interface and parse the incoming request, just like we did for the formHandler function. Next, we extract the values required to run the verCheck function from the form. There are three value we need to extract:
The phone number
The request ID
The confirmation code
The first two values were passed from the formHandler using the render function and were hidden in the form.html file. To get the values, we simply add the following lines, which we had discussed earlier when creating the formHandler function:
Id := r.FormValue("requestId")
phone := r.FormValue("phone")
confirmation := r.FormValue("confirmation")Now that we have received all the values necessary for the second step in our workflow (verifying the code), we can invoke the verCheck function, passing in the request ID and the confirmation code we just extracted. Remember how we set up the verCheck function earlier to return a success status? We can check that status to see if the confirmation code the user inputted is correct and print out a success message or a failure message to a fresh web page using the fmt.FPrint function. At this point, the confirmHandler should look like this:
func confirmHandler(w http.ResponseWriter, r *http.Request) {
//Parse the form
   if err := r.ParseForm(); err != nil {
      fmt.Fprintf(w, "ParseForm() err: %v", err)
      return
   }
//Extract the Form values
   Id := r.FormValue("requestId")
   phone := r.FormValue("phone")
//Receive the confirmation code
   confirmation := r.FormValue("confirmation")
//Verify the Confirmation code
   response := verify.VerCheck(Id, confirmation)
//Check if the confirmation code is incorrect
   if response != "0" {
     fmt.Fprint(w,"Verification failed! Input the correct code sent to ", phone)
      return
   }

   fmt.Fprint(w,"🎉 Success! 🎉")
}At this point, we are almost done with our application. The last thing we have to do is to register the confirmHandler route by adding the following line of code to the main function:
mux.HandleFunc("/confirm", confirmHandler)And we are good to go! If you start your server and visit the address on the browser, you should see the registration form. If you input your phone number and click submit, you will get the code sent to your mobile phone. Then you will also be automatically redirected to the confirmation page where you can put in the code. When you submit this, you should see success printed out on the page.
So far we have created an application in Go that uses the Vonage Verify API and learned about web development with Go. I hope you enjoyed this. The full code for this application can be found on GitHub.