Share:
Liz Acosta is a Developer Advocate at Vonage. While her career path from film student to marketer to engineer to Developer Advocate might seem unconventional, it’s pretty typical for Developer Relations! Liz loves pizza, plants, pugs, and Python.
How to Send SMS Messages With Python, Flask and Vonage
Time to read: 13 minutes
This step-by-step tutorial shows you how to send SMS with Python and Flask using the Vonage Messages API. You’ll build a working web app, configure webhooks, and handle delivery receipts in real time. Although in-app messaging has risen in popularity, SMS still serves a variety of use cases, ranging from appointment reminders to emergency broadcasts to verifying identity via 2FA. By the end of this tutorial, you will be able to successfully implement the scaffolding necessary to send an SMS using Vonage and a Python Flask app.
Before we jump into the tutorial, we’ll cover some of the terms and technologies used within the sample app. If you’re already familiar with these concepts, you can skip to the tutorial on sending SMS messages with Python.
The Vonage Messages API integrates with SMS, MMS, RCS, WhatsApp, Messenger, and Viber, enabling communication tailored to the channel of your choice. When it comes to SMS in particular, the Messages API lets you programmatically send texts by making an HTTP request to an API endpoint. The API passes the message downstream to the cellular network for delivery to the recipient’s device. Regardless of the type of message you are sending, the API requires the following fields:
Message type: The type of message to send, ie,
textorimage.Message content: The content declared in the
message_typefield, ie, the text message or the publicly accessible URL of the image attachment.To: The recipient of the message.
From: The sender of the message.
Channel: The channel the message is being sent via, ie,
smsormms.
The request body looks like this:
{
   "message_type": "text",
   "text": "Hello from Vonage",
   "to": "14155551234",
   "from": "14155551098",
   "channel": "sms",
}A 202 response contains the following:
{
   "message_uuid": "aaaaaaaa-bbbb-4ccc-8ddd-0123456789ab",
   "workflow_id": "3TcNjguHxr2vcCZ9Ddsnq6tw8yQUpZ9rMHv9QXSxLan5ibMxqSzLdx9"
}Where message_uuid is the unique identifier for the message and workflow_id refers to the ID of the failover workflow – which is only present if the request was sent with the failover property. You can learn more about these values in the Messages API documentation.
In the Vonage Python SDK, the API is represented like this:
from vonage_messages import Sms

message = Sms(
	from_='14155551098',
	to='14155551234',
	text='Hello from Vonage!',
)
Vonage has two messaging APIs: a simple and dedicated SMS API and a more capable Messages API. The SMS API lets you send and receive SMS messages programmatically. If that's all you need, this API will get the job done. However, developers will often choose the multi-channel Messages API so they can use it to send and receive messages over different channels,including SMS. In other words, if you start with the Messages API today and you want to add more channels tomorrow, you don't have to rip out your integration and start over.
Moreover, the request structure and the webhook formats are consistent across channels. It supports SMS, MMS, RCS, WhatsApp, Viber, and Facebook Messenger. The Messages API also supports rich content, so your messages can include images, files, templates, and interactive messages on the channels that support them. For this tutorial, we will use the Messages API.
Stands for Short Message Service.
Uses standardized communication protocols to send short text messages to or between devices.
Stands for Multimedia Messaging Service.
Allows you to send multimedia content such as images, videos, audio, as well as longer text content than can be sent in a single SMS message.
Delivers messages via the mobile network without the need for the recipient to have a data or Wi-Fi connection.
Stands for Rich Communication Services.
Is a communication protocol for sending messages to and between devices connected to a cellular telephony network.
Can include text, photos, videos, and files, as well as interactive elements such as suggested reply and suggested action buttons.
It has some similarities to MMS messaging, but also some important differences in the message.
WhatsApp, Messenger, and Viber
Requires an app to send and receive messages, regardless of device.
It has different requirements for who can send messages and how.
For this tutorial, we'll create a web app to send an SMS using Flask, a lightweight yet powerful web framework for Python. As a framework, it enables developers to quickly spin up a software application using web technologies to run in a web browser. We've chosen it for this tutorial because of its ease of use and minimalist approach—unlike other Python web development frameworks, it gives us just the essentials we need to create an example SMS app.
A webhook is how one web-based application pushes data or event notifications to another application, enabling automatic communication rather than having one application constantly poll the other for updates. In general, this means interacting over the web via an API using an HTTP request. In this particular tutorial, we will use a webhook to forward the Messages API delivery receipt to the Flask app.
In this tutorial, we will create a web application and run it locally on your machine. Because it will be running locally, it cannot be accessed by the public internet, and if your web app cannot be accessed, then Vonage cannot make a request to the webhook. That’s where tunneling comes in. Tunneling exposes local servers to the public internet through temporary or static public URLs. ngrok is a software platform that provides this service.
In summary, we will create a Python Flask web app with a webhook and use ngrok to make your local application accessible via tunneling to a public URL so Vonage can actually post to a status webhook.
In this tutorial, we will use Flask to implement an app that sends text messages and also defines a webhook. We will use ngrok to expose the webhook to the public internet so Vonage can make requests to it.
If you prefer, you can pull down the code to send an SMS from the Vonage Community GitHub.
In order to complete this tutorial, you will need the following:
Python 3.8+
An ngrok account and installation
Before we begin building, let’s get everything in order.
The Messages API must be able to access your webhook so that it can make requests to it; therefore, the endpoint URL must be accessible over the public internet.
Once you have ngrok installed, open up a terminal window and run:
ngrok http 5000This command will generate the public URLs your local server will tunnel to on port 5000. Take note of the public URL because we will be using it when we create our Vonage application, it should look something like this:
Forwarding https://4647-135-180-11-118.ngrok-free.app -> http://localhost:5000Please note: Unless you are using one of ngrok’s paid plans, the generated public URLs are not persistent. In other words, every time you run the ngrok command, the resulting URLs will change, and you will have to update your Vonage application configuration. To prevent this, leave ngrok running for the duration of the tutorial.
Since we will be using the Messages API, you will also need to configure your account settings accordingly. From the left-hand navigation in the developer dashboard, select API Settings. In the SMS settings section, select Messages API and complete the accompanying prompts to save your changes.
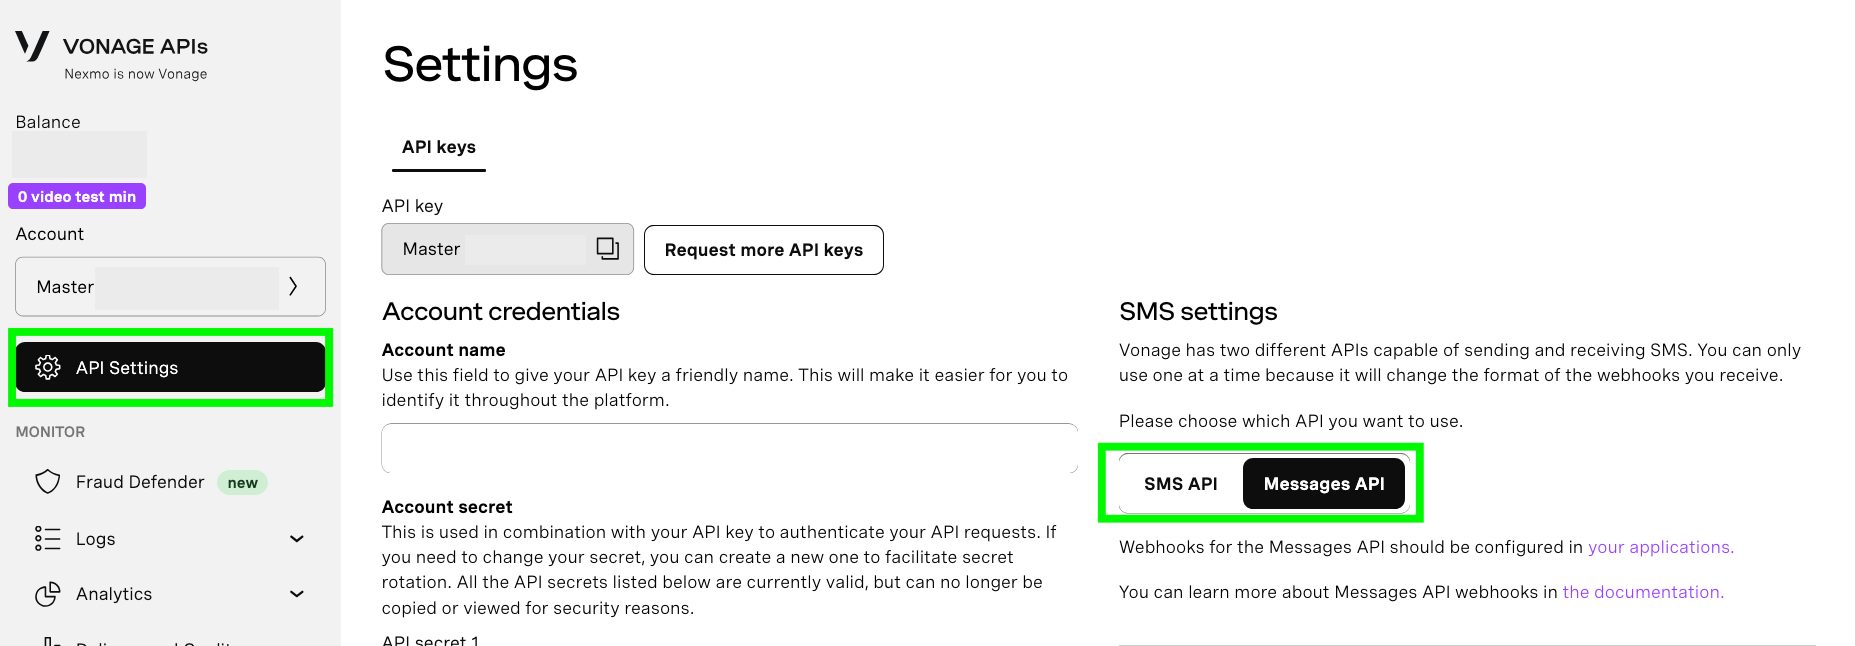 A screenshot of the API Settings menu in the Vonage developer dashboard indicating where to configure the SMS settings to use the Messages API.Create a Messages API application and link your number to it
You first need to create a Messages API application. The “application” we are referring to here is a container for the configuration and security information you need for the Messages API. It is not the same as the Flask web application we will also be creating.
Create your Messages API application in the developer dashboard by navigating to the Applications window from the left-hand menu and clicking the Create new application button. This will open the application creation menu. Give your application the name send-sms.
Under the Capabilities section, toggle the option for Messages, which will reveal a list of text fields. In the text field labeled Status URL, provide the ngrok public URL amended with the webhook we will define in the Flask app. This will look something like https://0a6ec0a950eb.ngrok-free.app/webhooks/message-status.
Since we are not handling inbound messages in this tutorial, the Inbound URL will not be used. However, creating an application requires one, so you can provide http://example.com/webhooks/inbound to satisfy this requirement.
Click the “Generate new application” button.
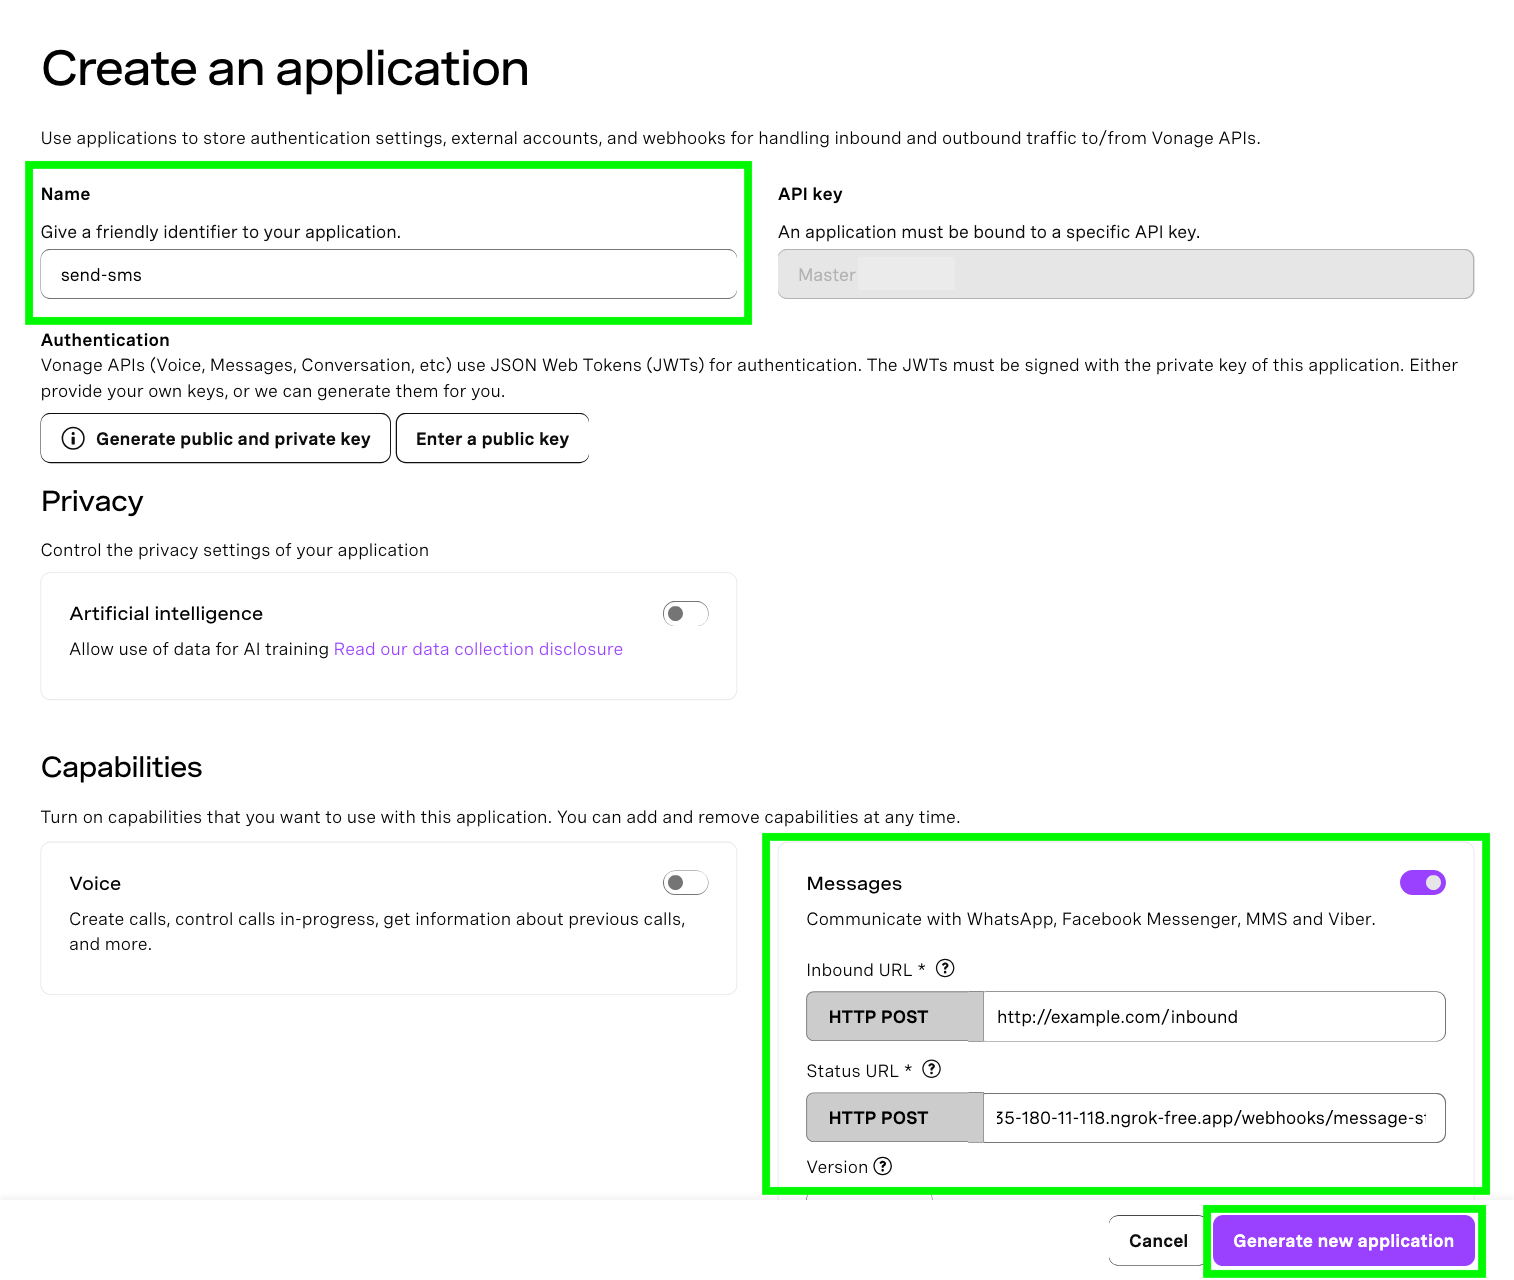 A screenshot of the Create an application menu in the Vonage developer dashboard indicating which options need to be configured in order to create a Messages application.Now that your application has been created, you can link your number to it by clicking the Link button in the available numbers table. Make sure to select a number with SMS and MMS features.
In a new terminal window, run the following to create a new project directory and navigate into it:
mkdir vonage-send-sms && cd vonage-send-sms
Now that you’ve got everything set up, it’s time to start building.
Skip to any section you like by clicking on the steps below:
Python virtual environments allow you to install packages in a location isolated from the rest of your system. This helps prevent system-wide clutter and conflicts with different Python versions and packages. To learn more, check out our blog post about virtual environments.
In your project directory, run the following commands to create a virtual environment and activate a virtual environment:
python3 -m venv venv && source venv/bin/activateYou should now see your terminal prompt prefaced with (venv). To deactivate your virtual environment, run the deactivate command.
In order to install the dependencies we need for this tutorial, run the following:
pip install vonage flask python-dotenv Jinja2 flask-socketio
In the developer dashboard Applications menu, click on the application you created for this tutorial and then click Edit. Once the edit window opens, click on the button that says, “Generate public and private key.” This will trigger the download of your private key as a file with the extension .key. Keep this file private and do not share it anywhere it could be compromised. If you plan on pushing this code somewhere public, make sure to add your private key file to your .gitignore file.
Click on the “Save changes” button, and also note your Application ID.
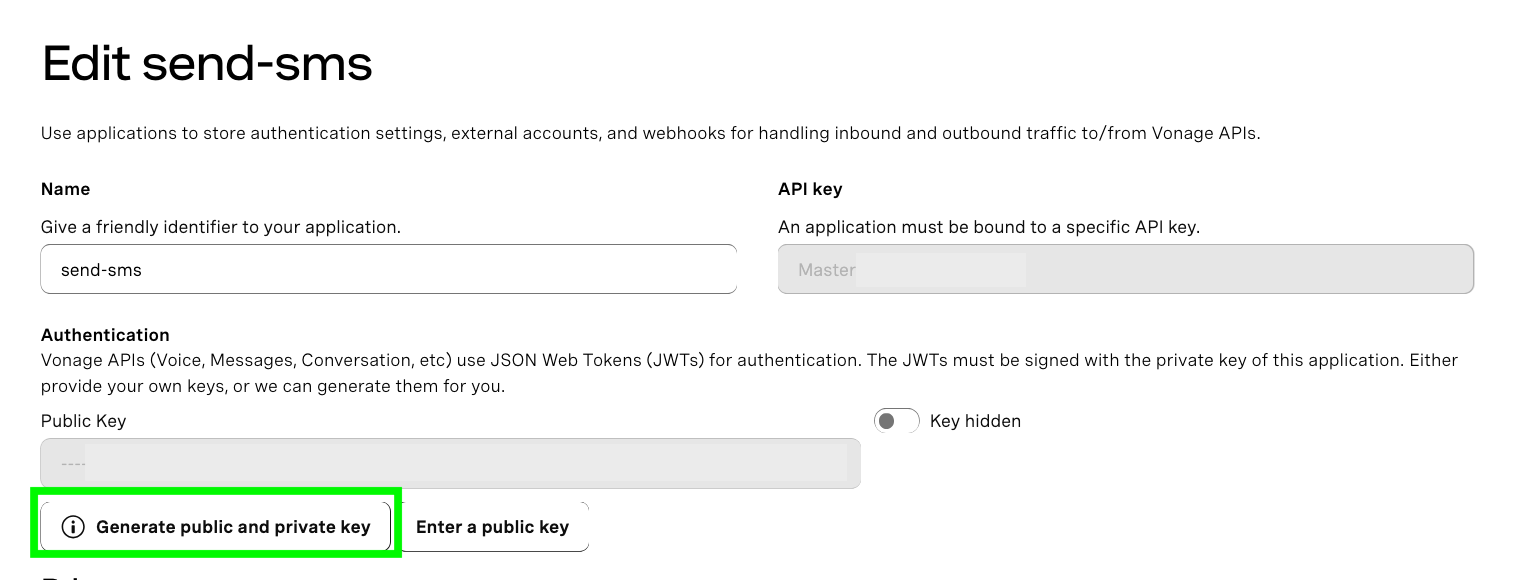 A screenshot of the application Edit menu in the Vonage developer dashboard showing where to generate a public and private key.
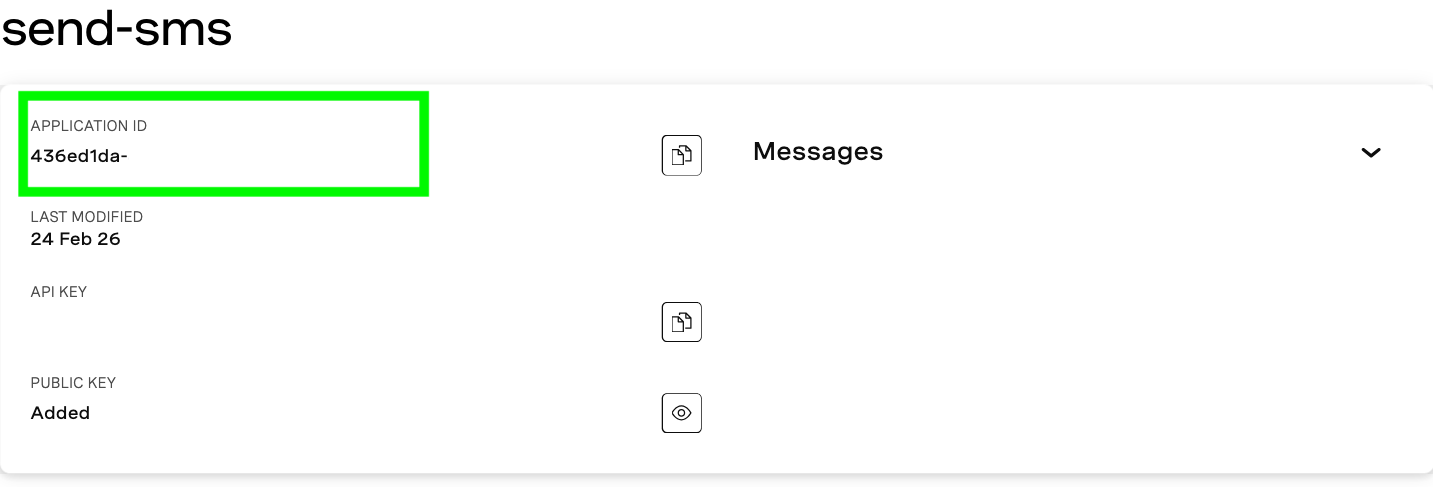 A screenshot of the Messages application in the Vonage developer dashboard indicating where you can find the application ID.Move your private key file to your project directory. In the same directory, create a file called
 .env and add the following variables:
APPLICATION_ID=replace-this-with-your-application-ID
PRIVATE_KEY=replace-this-with-the-name-of-your-private-key-file
VONAGE_VIRTUAL_NUMBER=replace-this-with-your-virtual-numberYou can also find the template on GitHub. To learn more, check out our blog post about environment variables.
For this tutorial, we will create a minimal Flask application that uses the Message API to send an SMS via a web form. In order to create this form, we will need:
The Python application code.
And an HTML template to be rendered in a browser.
In your project directory, create a file called app.py that includes the following code:
import os

from dotenv import load_dotenv
from flask import Flask, redirect, render_template, request, url_for
from flask_socketio import SocketIO
from vonage import Auth, Vonage
from vonage_messages import Sms

load_dotenv()

APPLICATION_ID = os.getenv("APPLICATION_ID")
PRIVATE_KEY = os.getenv("PRIVATE_KEY")
VONAGE_VIRTUAL_NUMBER = os.getenv("VONAGE_VIRTUAL_NUMBER")

if not APPLICATION_ID or not PRIVATE_KEY or not VONAGE_VIRTUAL_NUMBER:
	raise RuntimeError("Missing APPLICATION_ID, PRIVATE_KEY, or VONAGE_VIRTUAL_NUMBER env vars")

client = Vonage(Auth(application_id=APPLICATION_ID, private_key=PRIVATE_KEY))

app = Flask(__name__)
socketio = SocketIO(app)


@app.route('/')
def index():
	return render_template('index.html')


@app.route("/delivery_receipt/<message_uuid>")
def delivery_receipt(message_uuid):
	return render_template("delivery_receipt.html", message_uuid=message_uuid)


@app.route("/webhooks/message-status", methods=["POST"])
def message_status():
	data = request.get_json(silent=True) or {}
	message_uuid = data.get("message_uuid")
	status = data.get("status")

	if not message_uuid or not status:
    	return {"error": "missing message_uuid/status"}, 400

	payload = {"message_uuid": message_uuid, "status": status}

	err = data.get("error")
	if isinstance(err, dict):
    	payload["info"] = f"{err.get('title', 'Error')} : {err.get('detail', '')}"

	print(f"Status update uuid={message_uuid} status={status}")

	socketio.emit("status_update", payload)

	return "200", 200

@app.route("/send_sms", methods=["POST"])
def send_sms():
	to_number = (request.form.get("to_number") or "").strip()
	message = (request.form.get("message") or "").strip()

	print(f"To number is ===> {to_number}")

	if not to_number or not message:
    	return {"error": "to_number and message are required"}, 400

	response = client.messages.send(
    	Sms(
        	from_=VONAGE_VIRTUAL_NUMBER,
        	to=to_number,
        	text=message,
    	)
	)

	message_uuid = response.message_uuid
	print(f"Message UUID is ===> {message_uuid}")

	return redirect(url_for('delivery_receipt', message_uuid=message_uuid))


if __name__ == '__main__':
socketio.run(app)Let’s walk through what is happening here.
The most important part of the code is the send_sms route and function. This is where we use the Messages API to send an SMS. In this particular example, we are using an online form to supply our message details and to trigger a request to the Messages API. Once the form is submitted, the app redirects to a delivery_receipt page.
The next block to pay attention to is the message_status route and function. This is the webhook we configured for the Status URL in our Messages application in the developer dashboard. This is where Vonage will send updates on the status of the message sent by the app.
Typically, updating a message status might use a database or polling, but since this is a minimal demo app, we are going to use WebSocket. WebSocket is a protocol that enables communication between the server and the browser. It has an advantage over RESTful HTTP because communications are both bi-directional and real-time. This allows the server to notify the client at any time instead of the client polling on a regular interval for updates.
This particular example uses the socketio library to establish a communication channel. These status updates will be reflected in the Delivery Receipt page – that way, even if the message fails due to regulations or otherwise, you will be able to see the status and any additional information in real-time.
In your project directory, create a directory called templates. A templates directory is a Flask convention: Flask is configured to search for a templates directory when rendering HTML for a web app’s frontend.
In the templates directory, create two files: index.html and delivery_receipt.html. Copy and paste the respective code from the GitHub repo.
Now you have everything you need to run the code. To deploy your web app locally, run the following command from the project root directory:
flask runThis will spin up a server on http://127.0.0.1:5000. Navigate to that location in a web browser, and you should see something like this:
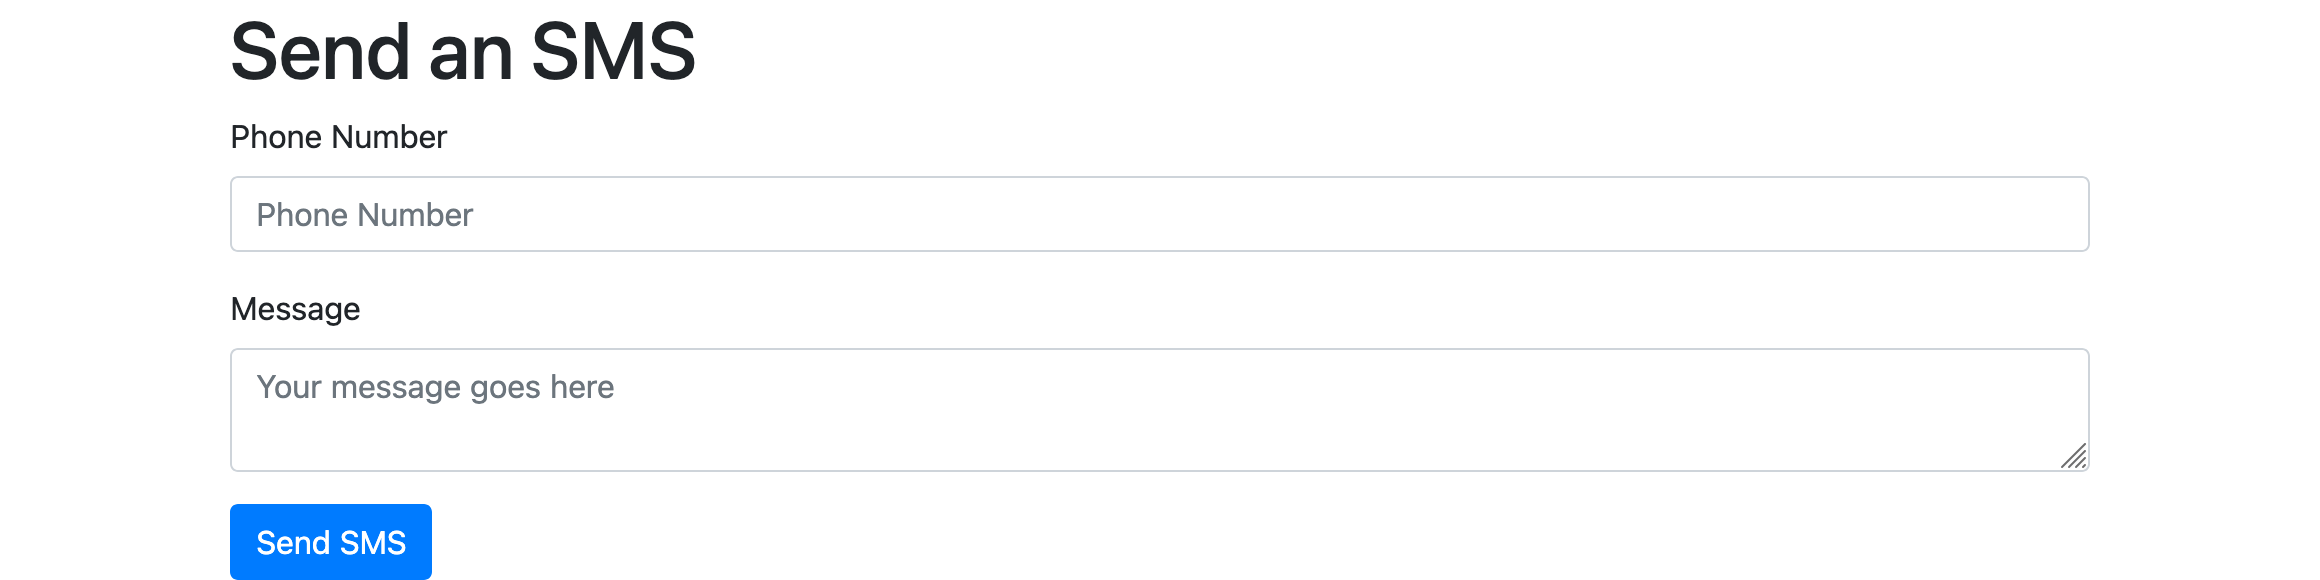 A screenshot of the web app created for the tutorial with a form to send an SMS.5. Try it out!
Fill out the form with the phone number (with country code) that you wish to receive a text to, along with a message to send.
Depending on your region’s SMS regulations, you will receive a text message from your Vonage virtual number using the information you provided in the form. However, because different country regulations may restrict sending an SMS from a Vonage virtual number, regardless of whether or not the message is successful, the Flask app will produce a real-time delivery receipt from Vonage.
 A screenshot of the web app created for the tutorial showing a message delivery receipt.Please note: Because of different SMS regulations around the world, you may receive an error code from Vonage when attempting to send an SMS from a Vonage virtual number. You can view logs in the developer dashboard by selecting Logs from the navigation on the left. To learn more about SMS regulations – especially if you’re using a 10-digit US number – refer to this blog post about what you need to know about 10DLC.
This tutorial guided you through the process of sending SMS messages using Python, Flask, and the Vonage Messages API. SMS continues to play a crucial role in various applications, from alerts to authentication, and this guide provides a practical approach to building an SMS-enabled web app.
You’ve learned how to set up a Flask application, integrate the Vonage API, and utilize ngrok to expose your local server to the internet, enabling real-time messaging capabilities. The tutorial covered essential components such as API configurations, webhook handling for message status updates, and the creation of a user-friendly web form for sending SMS.
Additionally, understanding SMS regulations and their implications was highlighted to ensure compliant messaging practices and to explain why Vonage may not be able to send a message. While this constraint might mean that your app isn’t fully functional, you at least have a foundation to build on as well as a fundamental understanding of the Messages API. From here, you can further explore the API and other messaging channels to leverage text communication for your business needs.
Have a question or want to share what you're building?
Subscribe to the Developer Newsletter
Follow us on X (formerly Twitter) for updates
Watch tutorials on our YouTube channel
Connect with us on the Vonage Developer page on LinkedIn
Stay connected and keep up with the latest developer news, tips, and events.