)
How to Record Audio from Incoming Calls with Node.js
Time to read: 7 minutes
We can record a call in full or in part. In today's blog post, we'll learn more about the record Call Control Object action of the Voice API. We'll also use Node.js.
You can view the source code for recording a call at record-a-call.js on GitHub.
You can get the complete GitHub repo for this tutorial at blog-voice-nodejs-record_audio_incoming_calls.
Node.js installed - Node.js is an open-source, cross-platform JavaScript runtime environment.
ngrok - A free account is required. This tool enables developers to expose a local development server to the Internet.
We will learn how to record audio calls, but it's important to have a Vonage application created with a voice capability, as shown in this tutorial on how to Handle Inbound Phone Calls with Node.js.
Vonage CLI installed — run
npm install -g @vonage/cliCopyand configure it with:
vonage config:set --apiKey=YOUR_KEY --apiSecret=YOUR_SECRETCopy
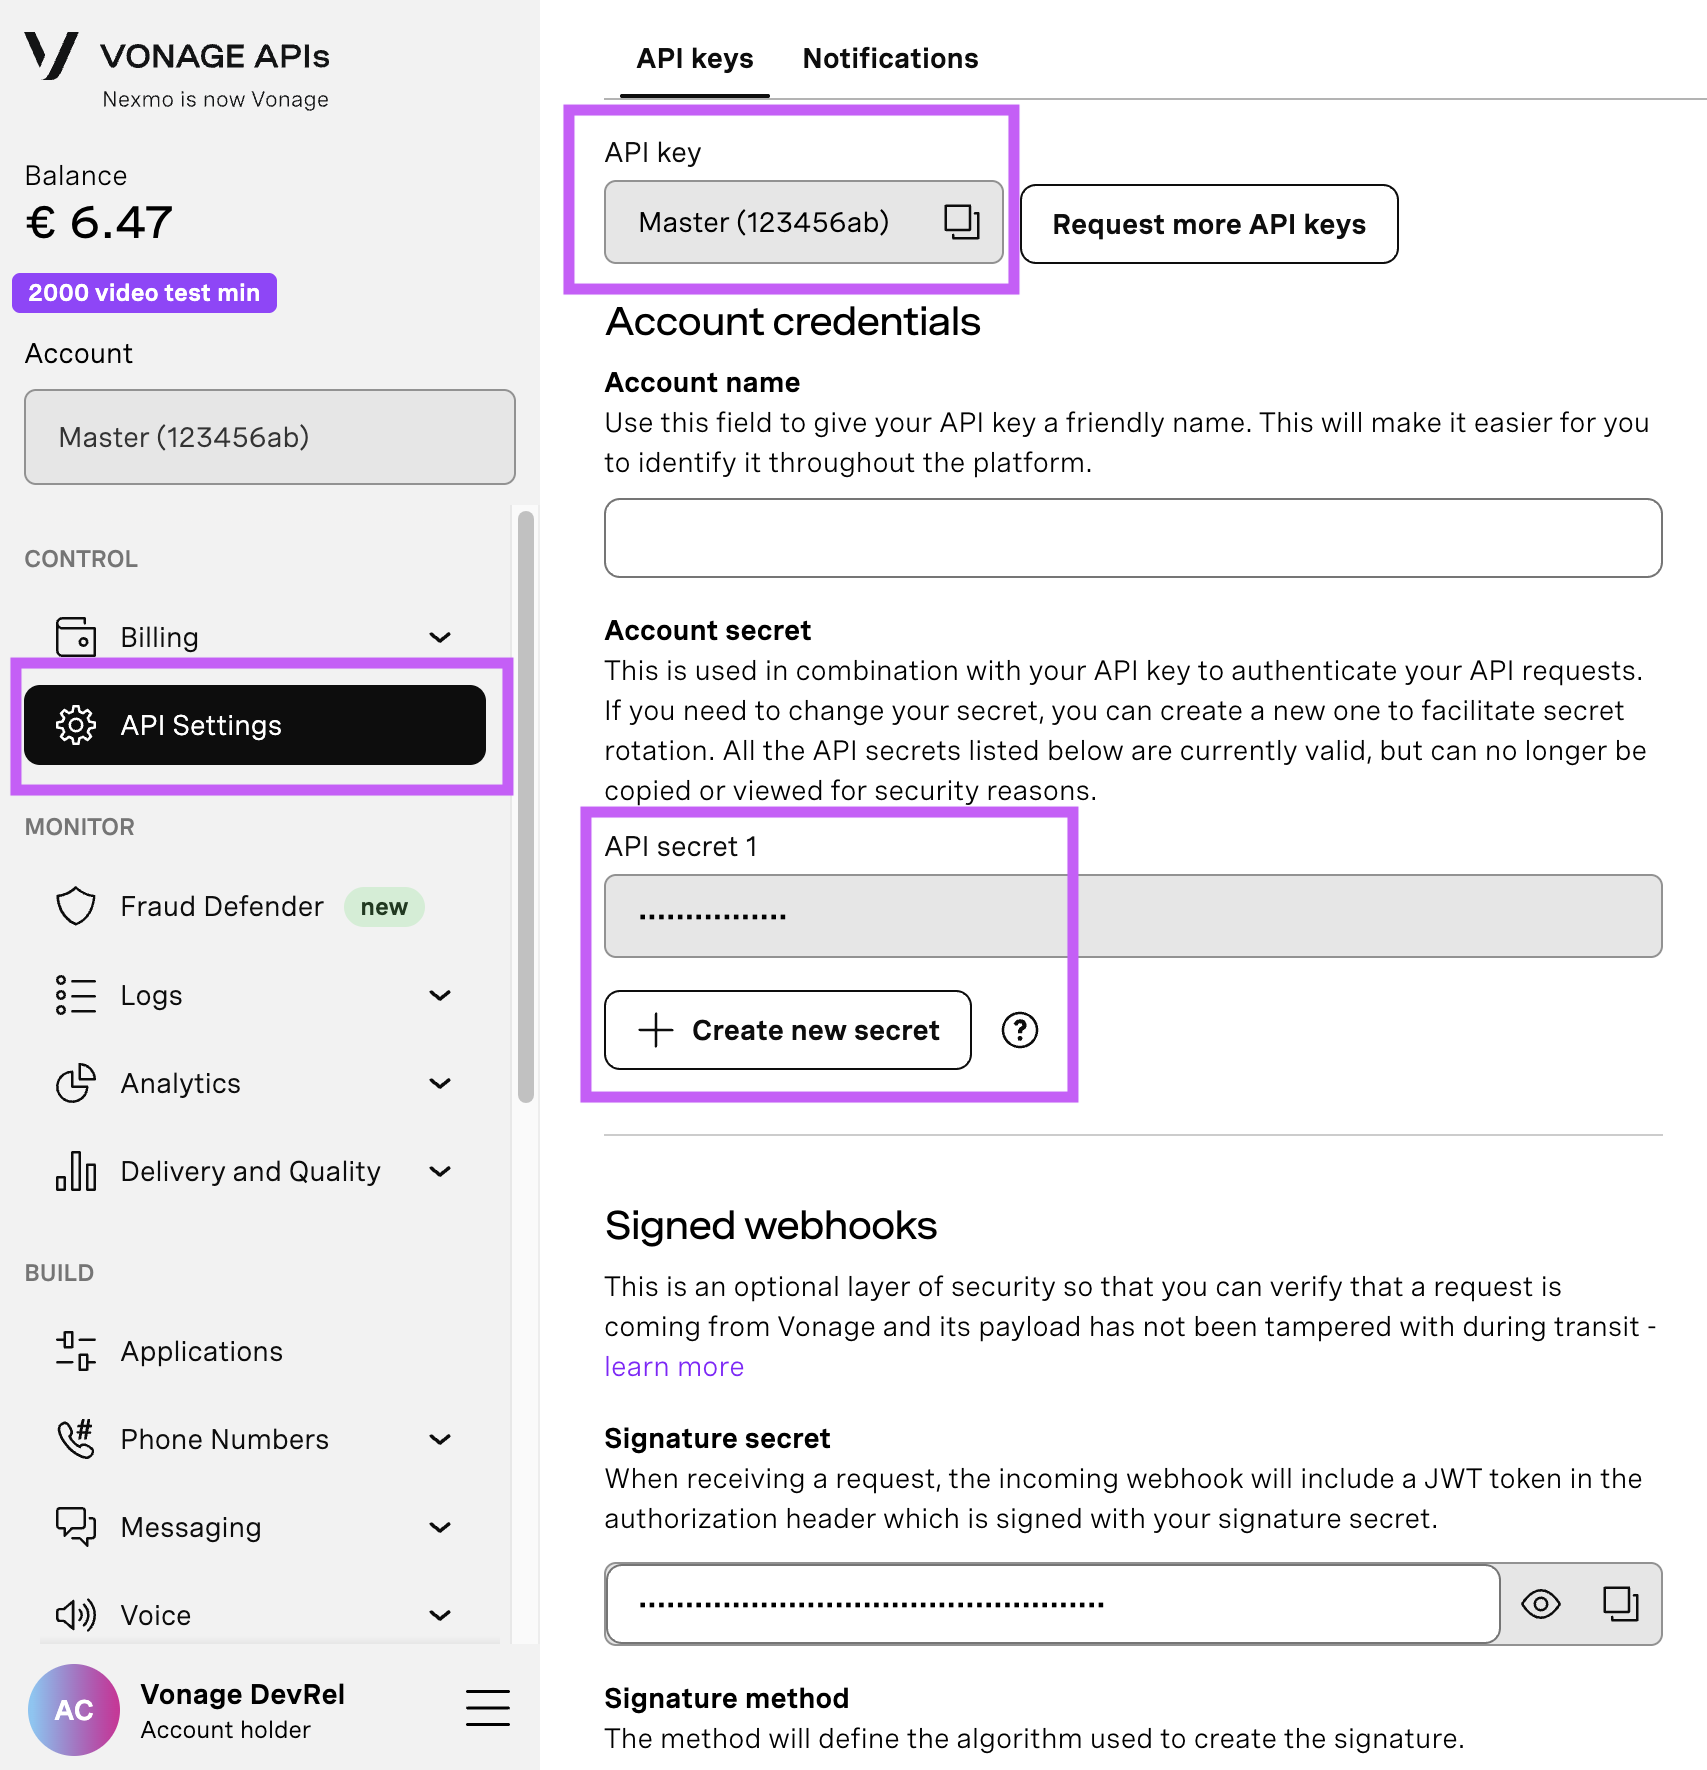
Open your API Settings Page to access your Vonage API Key and Secret, both of which are displayed as shown in the screenshot below. The API Key is located at the top of the page, and to access your API Secret, please refer to the “Account secret” subsection.
Note: In case you cannot remember your previously created API Secret, click on “+ Create new secret” and save it securely.
The previous tutorial walked through creating webhook endpoint URLs and associating them with a voice application to handle incoming calls. In this tutorial, you will modify the Call Control Object (NCCO) to record audio. If you have not completed the previous tutorial yet, follow that one first.
The Call Control Object used in Vonage's Voice API lets you fully customize automated voice calls by:
choosing the language and voice style of the automated caller
triggering webhooks in response to different scenarios (for example, when a user presses a key or doesn't answer)
leaving a custom message on a user's answering machine, and much more!
While developing and testing Call Control Objects, you can use the Voice Playground to try out NCCOs interactively. You can read more in the technical details or visit the Voice Playground directly.
To begin, run ngrok:
vonage tunnel ngrok APPLICATION_ID –port=4002You will use the forwarding URLs, such as https://db95720f.ngrok.app, as your temporary webhook endpoints during development.
Update your Vonage application with the ngrok URLs. You can do this via the Vonage Dashboard or, if you have the Vonage CLI installed, by opening a new terminal tab and running:
vonage apps update YOUR_VONAGE_APPLICATION_ID \

  --voice-answer-url=https://db95720f.ngrok.com/webhooks/answer \

--voice-event-url=https://db95720f.ngrok.com/webhooks/eventNote: The --voice-event-url here is for general call lifecycle events (e.g. call answered, completed). The recording webhook URL is configured separately inside the NCCO's eventUrl parameter, which you'll set up in the next section.
Now that we have created our Vonage Voice Application inside the developer dashboard, let's look at how we should configure our Node.js application.
Begin by going to a command/terminal prompt, creating a working directory, and initializing a Node.js project:
npm init -yWe will handle the requests with Express and use body-parser to parse incoming request bodies. We also need @vonage/jwt to verify the JWT signature on incoming webhook requests. Install all dependencies with:
npm install dotenv express body-parser @vonage/jwt –save @vonage/server-client
Your project should have the following files:
├── server.js         # main Express application
├── recording.js      # helper functions for naming and downloading recordings
├── .env              # environment variables (VONAGE_API_SIGNATURE_SECRET, PORT)
└── recordings/ # auto-created directory where audio files are savedNow that your project is set up, let's define the Call Control Object (NCCO). Edit the onInboundCall handler in server.js to record incoming calls:
// server.js

const onInboundCall = (request, response) => {

  const ncco = [

    {

      action: "talk",

      text: "Please leave your message after the tone, then press hash when finished.",

    },

    {

      action: "record",

      eventUrl: [`${request.protocol}://${request.get("host")}/record`],

      endOnSilence: 3,

      endOnKey: "#",

      beepStart: true,

      timeOut: 60,

    },

    {

      action: "talk",

      text: "Thank you for your message. Goodbye!",

    },

  ];


  response.json(ncco);

};The eventUrl in the NCCO rather than hardcoding a URL is now built dynamically from the incoming request, so your webhook always points to the correct host whether running locally with ngrok or in production. This is where the recording information is sent once the call ends. In this tutorial, the recording webhook is handled at /record. Make sure the eventUrl in your NCCO matches the route registered in your Express app.
Note that in all actions, the
eventUrlparameter MUST be an array, even if it only contains a single value.
Vonage signs the JWT on every webhook request it sends. Your server should verify this signature to ensure the request genuinely comes from Vonage and has not been tampered with.
Add a verifyJWT middleware that reads the Authorization: Bearer <token> header and validates it against your VONAGE_API_SIGNATURE_SECRET (available in the Vonage Dashboard):
// server.js

const { verifySignature } = require("@vonage/jwt");


const verifyJWT = (req, res, next) => {

  try {

    const authHeader = req.headers.authorization;

    if (!authHeader || !authHeader.startsWith("Bearer ")) {

      return res.status(401).send("Unauthorized");

    }

    const jwtToken = authHeader.split(" ")[1];


    if (!verifySignature(jwtToken, process.env.VONAGE_API_SIGNATURE_SECRET)) {

      return res.status(401).send("Unauthorized");

    }

    next();

  } catch (err) {

    return res.status(401).send("Unauthorized");

  }

};
This middleware is then applied to all POST webhook routes (the event and recording endpoints), but not to the GET answer endpoint since that is called by Vonage to fetch the NCCO.
To keep server.js clean, the file-naming and download logic lives in a separate recording.js module. The buildRecordingFileName function derives a unique filename from the recording URL, then downloadRecording fetches the audio file and writes it to disk:
const { buildRecordingFileName, downloadRecording } = require("./recording");When a recording is completed, Vonage triggers the /record (or /webhooks/recordings) webhook with a payload that includes the recording_url :
{

  "start_time": "2026-01-19T00:34:48Z",

  "recording_url": "https://api.nexmo.com/v1/files/486fadc7-2abb-4f56-985e-fb83102acb82",

  "size": 19181,

  "recording_uuid": "33e0c756-5405-44d9-b869-197e55e780f0",

  "end_time": "2026-01-19T00:34:53Z",

  "conversation_uuid": "de783420-379c-409e-8c73-1ea1e6b2a38e"

}
The onRecording handler reads the recording_url from the webhook body, builds the destination filename using buildRecordingFileName, and saves the file inside the /recordings/ directory (which is auto-created on startup):
const recordingsDir = path.join(__dirname, "recordings");

fs.mkdirSync(recordingsDir, { recursive: true });

const onRecording = async (request, response) => {

  const audioURL = request.body.recording_url;


  if (!audioURL) {

    return response.status(204).send();

  }


  const fileName = buildRecordingFileName(audioURL);

  const audioFile = path.join(recordingsDir, fileName);


  try {

    await downloadRecording(audioURL, audioFile);

  } catch (err) {

    console.error("Error downloading recording:", err.message);

  }

  response.status(204).send();

};By default, the recorded audio is saved in MP3 format and stored by Vonage for 30 days.
Finally, register all routes. Note that the event and recording POST endpoints are protected by the verifyJWT middleware, while the answer GET endpoint is left open:
app

  .get("/webhooks/answer", onInboundCall)

  .post("/webhooks/event", verifyJWT, onCallEvent)

.post("/record", verifyJWT, onRecording);The verifyJWT middleware is applied to all POST endpoints, /webhooks/event and /record, but not to the GET /webhooks/answer endpoint, since that is called by Vonage to fetch the NCCO rather than delivering a signed webhook.
Install dependencies and start the server:
npm install

node server.jsThen call your Vonage phone number. If everything is working, you should hear a greeting followed by a beep. Leave a message and press # on your keypad. After the call ends, check the /recordings/ folder. You should find the downloaded audio file there.
You’ve learnt how to record audio files from incoming calls in today’s tutorial. Find further resources to help you learn more about Vonage APIs and Node.js below.
Record a call: Use the Vonage Voice API to record a call.
Record a conversation: Use the Vonage Voice API to record a conversation.
Record a message: Use the Vonage Voice API to record a message.
Record a call with split audio: Use the Vonage Voice API to record a call with split audio.
Download a recording: Use the Vonage Voice API to download a recording.
Getting an SMS Delivery Receipt from a Mobile Carrier with Node.js
How to Make an Outbound Text-to-Speech Phone Call with Node.js
Have a question or want to share what you're building?
Subscribe to the Developer Newsletter
Follow us on X (formerly Twitter) for updates
Prefer video? Watch tutorials on our YouTube channel
Connect with us on the Vonage Developer page on LinkedIn
Help us improve our developer experience by filling out our Voice of the Developer Feedback
Stay connected and keep up with the latest developer news, tips, and events.