Share:
Atique is a computer graduate and proficient Python developer with a passion for exploring new technologies. With a strong background in programming and system engineering, he holds over 10 years of experience in automation, testing, and integration. His interests span single-board computers, software-defined radios, and continuous experimentation with generative AI tools.
Telephony MCP Server for Agentic AI and Language Models
The Model-Context Protocol (MCP) is a specification that allows large language models (LLMS) to discover and use external tools and services. Think of it as a universal language that enables LLMs to communicate with APIs, databases, and other applications in a standardized way.
In this tutorial, you will learn to create MCP tools that can integrate with any Agentic AI application (such as Claude Desktop, Github Copilot or Cursor) and can make calls, send SMS, and collect the responses to be displayed in the application.
>> TL;DR: You can find the complete working code on GitHub.
 Animated view of Claude’s developer-friendly welcome screen asking, 'How was your day, Mr. Developer?' with contextual mode options like Code, Write, and Learn.
Extensibility: MCP allows developers to extend the capabilities of LLMs beyond their built-in knowledge. By creating MCP-compliant tools, you can empower a model to access real-time information (like weather forecasts or stock prices), interact with private knowledge bases, or trigger actions in other systems (like sending an email or booking a meeting).
Standardization: It provides a consistent way for models to interact with tools, regardless of the underlying implementation. This simplifies the development process for both tool creators and model developers.
Security and Control: MCP allows for granular control over which tools a model can access, ensuring that the model only performs actions that it is authorized to.
Python Knowledge: Intermediate knowledge of Python programming language and Python v3.13+.
Docker Desktop: The application will run in a containerized environment and uses Docker Compose.
Claude Desktop Application: This tutorial uses Clause, but any agentic AI application, such as Cursor, Windsurf, or GitHub Copilot that comes with VSCode, can also work.
Vonage API Account: To make calls and communicate with SMS, a Vonage account is required. This includes an API key, API secret, long virtual number and a voice application that can be created from Vonage dashboard.
Ngrok Reverse Proxy: To act as Webhook for collecting events such as call progress and incoming SMS.
To understand how MCP works, let's consider a simple example: a weather server. The interaction is managed by an MCP Client, which runs locally as a plugin to the LLM or Agentic AI application. This client is responsible for communicating with the remote MCP server.
User Prompt: A user asks the LLM, "What's the weather like in London?"
LLM to MCP Client: The LLM understands the user's intent and uses its local MCP Client plugin to find a suitable tool.
Tool Discovery (Client -> Server): The MCP Client sends a request to the MCP Server to discover available tools.
Tool Selection: The MCP Server responds with a list of tools, including get_weather(location: str). The LLM, via the client, selects this tool.
Tool Invocation (Client -> Server): The MCP Client sends a request to the MCP Server to execute the get_weather tool with the parameter location="London".
Execution: The MCP server receives the request, executes the underlying function (which in turn calls a weather API), and gets the current weather in London.
Response (Server -> Client -> LLM): The server sends the result (e.g., "The weather in London is 15°C and cloudy.") back to the MCP Client, which in turn passes it to the LLM.
Final Answer: The LLM formats this information into a user-friendly response and presents it to the user.
This workflow demonstrates how the MCP Client acts as a local bridge, while the MCP Server provides the actual tool functionality, creating a seamless connection between the language model and external capabilities.
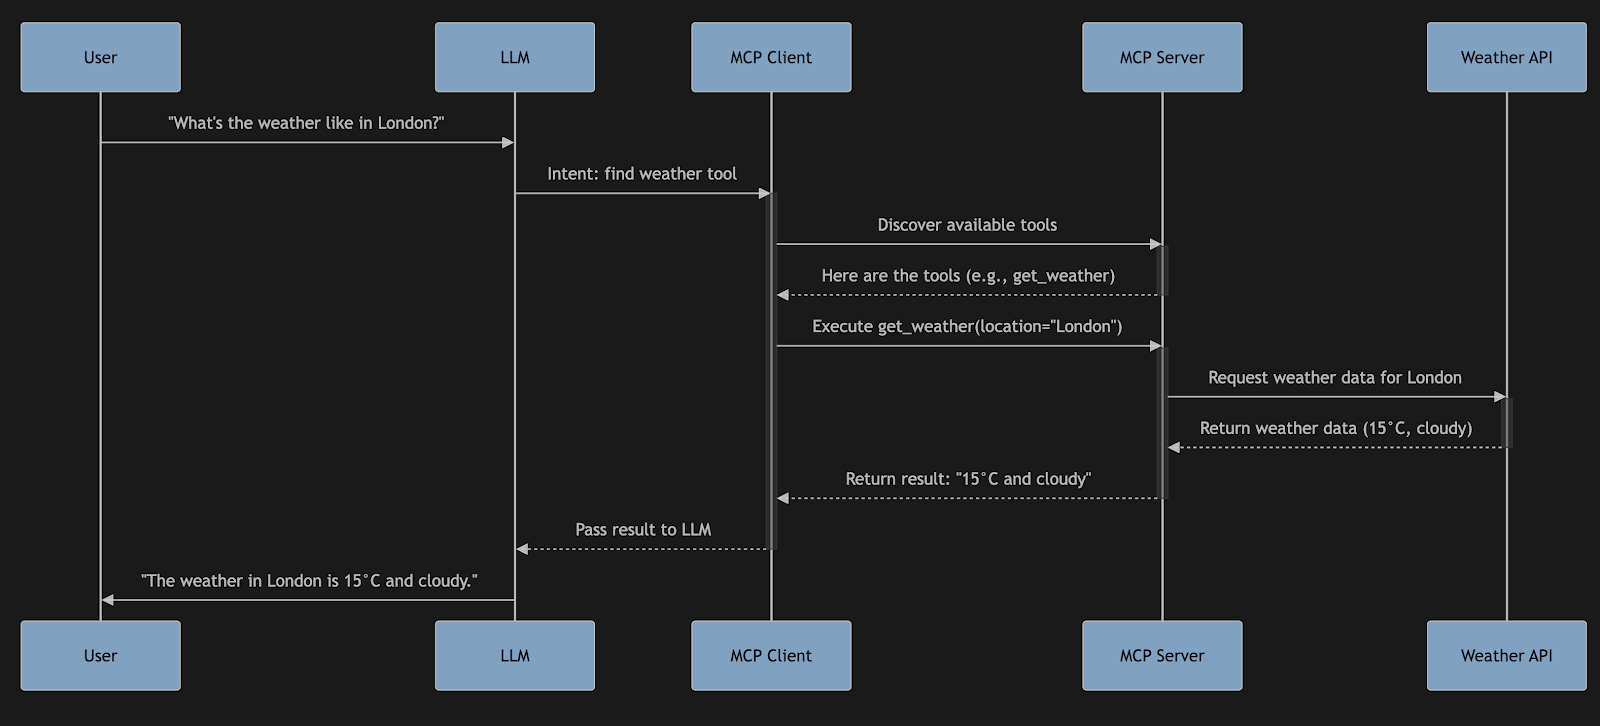 Sequence diagram showing how a user query about London's weather flows through an LLM, MCP Client, MCP Server, and Weather API to return a response.
The Telephony MCP Server is a Python-based server that exposes Vonage's communication functionalities as a set of tools through the Model-Context Protocol. It acts as an intermediary, translating requests from a language model into API calls to the Vonage platform and returning the results.
This MCP server leverages Vonage’s suite of communication APIs. These APIs allow you to programmatically make and receive phone calls, send messages like RCS, SMS, WhatsApp, build WebRTC video applications, and a lot more.
Building on top of these APIs allows a language model, such as Claude, to perform telephony actions like making calls and sending text messages simply by using the tools provided by the server.
The Telephony MCP Server comes with a pre-built set of tools for common telephony tasks:
voice_call(to: str, message: str, from_: str = "VONAGE_LVN"): Initiates a voice call to a specified number and speaks a message.
send_sms(to: str, text: str, from_: str = "VONAGE_LVN"): Sends an SMS message to a specified number.
check_call_status(call_uuid: str = None): Checks the status of a specific call or lists all active calls.
voice_call_with_input(to: str, prompt_message: str, from_: str = "VONAGE_LVN", wait_for_result: bool = True): Makes a voice call, plays a prompt, and uses speech recognition to capture the recipient's response.
sms_with_input(to: str, text: str, from_: str = "VONAGE_LVN", wait_for_result: bool = True): Sends an SMS message and waits for a reply from the recipient.
Let's walk through the process of using the send_sms tool with a language model like Claude, which interacts with the server via a local MCP Client.
User: "Hey Claude, can you send a message to my friend at +1-202-555-0183 and tell them I'm running 10 minutes late for our meeting?"
Claude (LLM): Understands the user's intent to send an SMS. It knows from its MCP integration that a send_sms tool is available.
Claude (Tool Use via MCP Client): Through its local MCP Client, Claude makes a request to the Telephony MCP Server, invoking the send_sms tool with the parameters:
to: "+12025550183"
text: "Hi, I'm running 10 minutes late for our meeting."
Telephony MCP Server: Receives the request from the MCP Client. It then constructs and sends an API request to the Vonage SMS API with the provided details.
Vonage API: Processes the request and sends the SMS message to the recipient's phone. It then returns a success status to the Telephony MCP Server.
Telephony MCP Server to Client: The server formats the success status from Vonage and sends it back to the MCP Client.
Claude (Response): The MCP Client passes the success confirmation to Claude, which then informs the user: "Ok, I've sent the message to your friend."
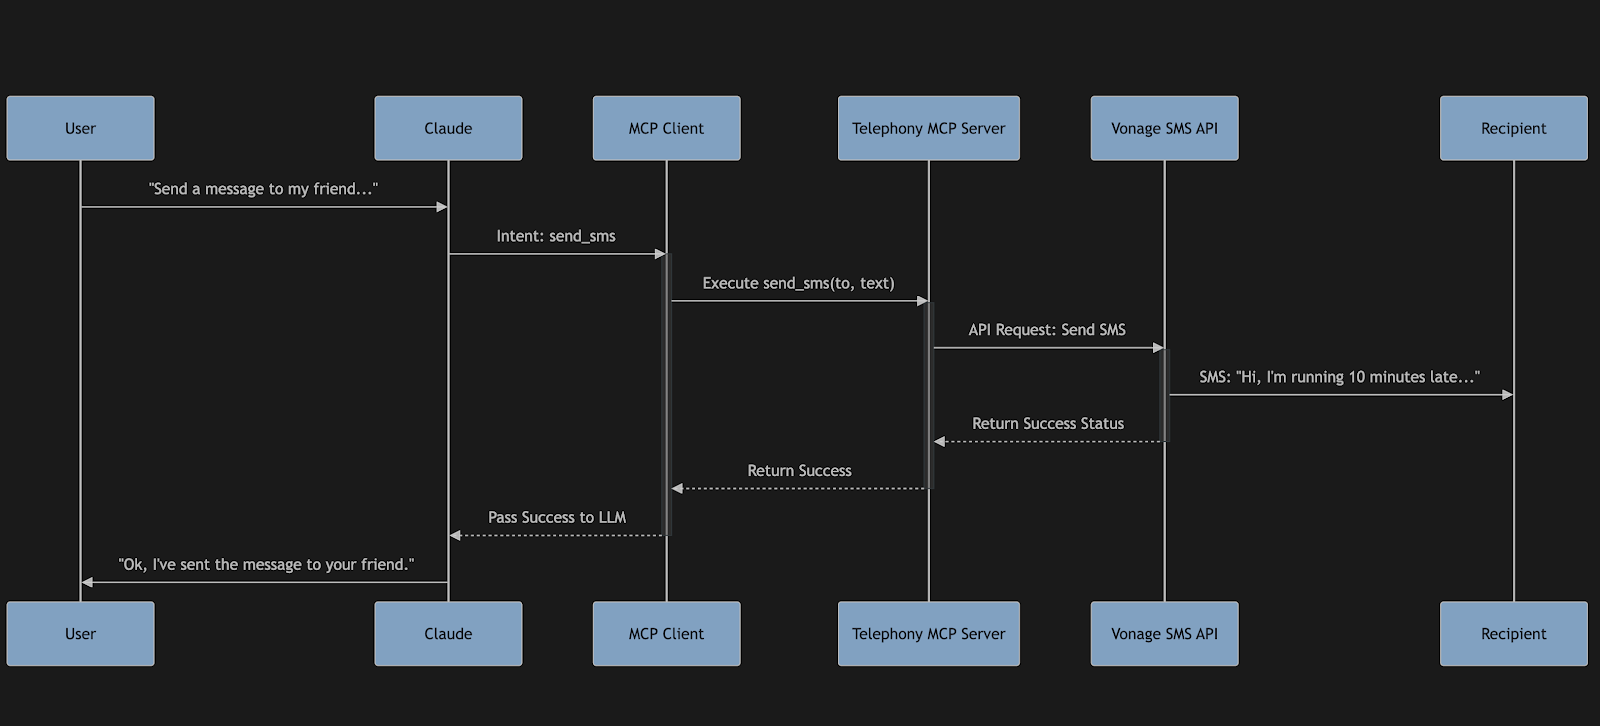 Sequence diagram illustrating how Claude uses MCP and the Vonage SMS API to send a message on behalf of a user.
git clone https://github.com/Vonage-Community/telephony-mcp-server
cd telephony-mcp-server
To receive webhooks from Vonage, your local server must be accessible over the internet. Use ngrok to expose your server, open a new tab in your terminal, and run:
ngrok http 8080The output will be something like this:
Session Status                online
Version                       3.22.1
Forwarding https://4cc705fd88d9.ngrok.app -> http://localhost:8080In the above example, ngrok has created and assigned an Internet-accessible domain name https://4cc705fd88d9.ngrok.app, which can forward the traffic to the locally hosted callback server running on port 8080. We will use it in the .env configuration file as:
CALLBACK_SERVER_URL=https://4cc705fd88d9.ngrok.app
You can read more about testing with ngrok in our developer portal tools.
Sign in to the Vonage Developer Dashboard and create a new application. Generate and download a private.key and place it at the root of the project directory. It will be copied into the Docker container.
Turn on the Voice and Messages capabilities, as shown below. You’ll also need to configure the webhook endpoints for each capability; however, since we won’t actually use these endpoints, you can simply add placeholders.
For Voice:
Answer URL:
https://4cc705fd88d9.ngrok.app/nccoEvent URL:
https://4cc705fd88d9.ngrok.app/event
For Messages:
Inbound URL:
https://4cc705fd88d9.ngrok.app/eventStatus URL:
https://4cc705fd88d9.ngrok.app/event
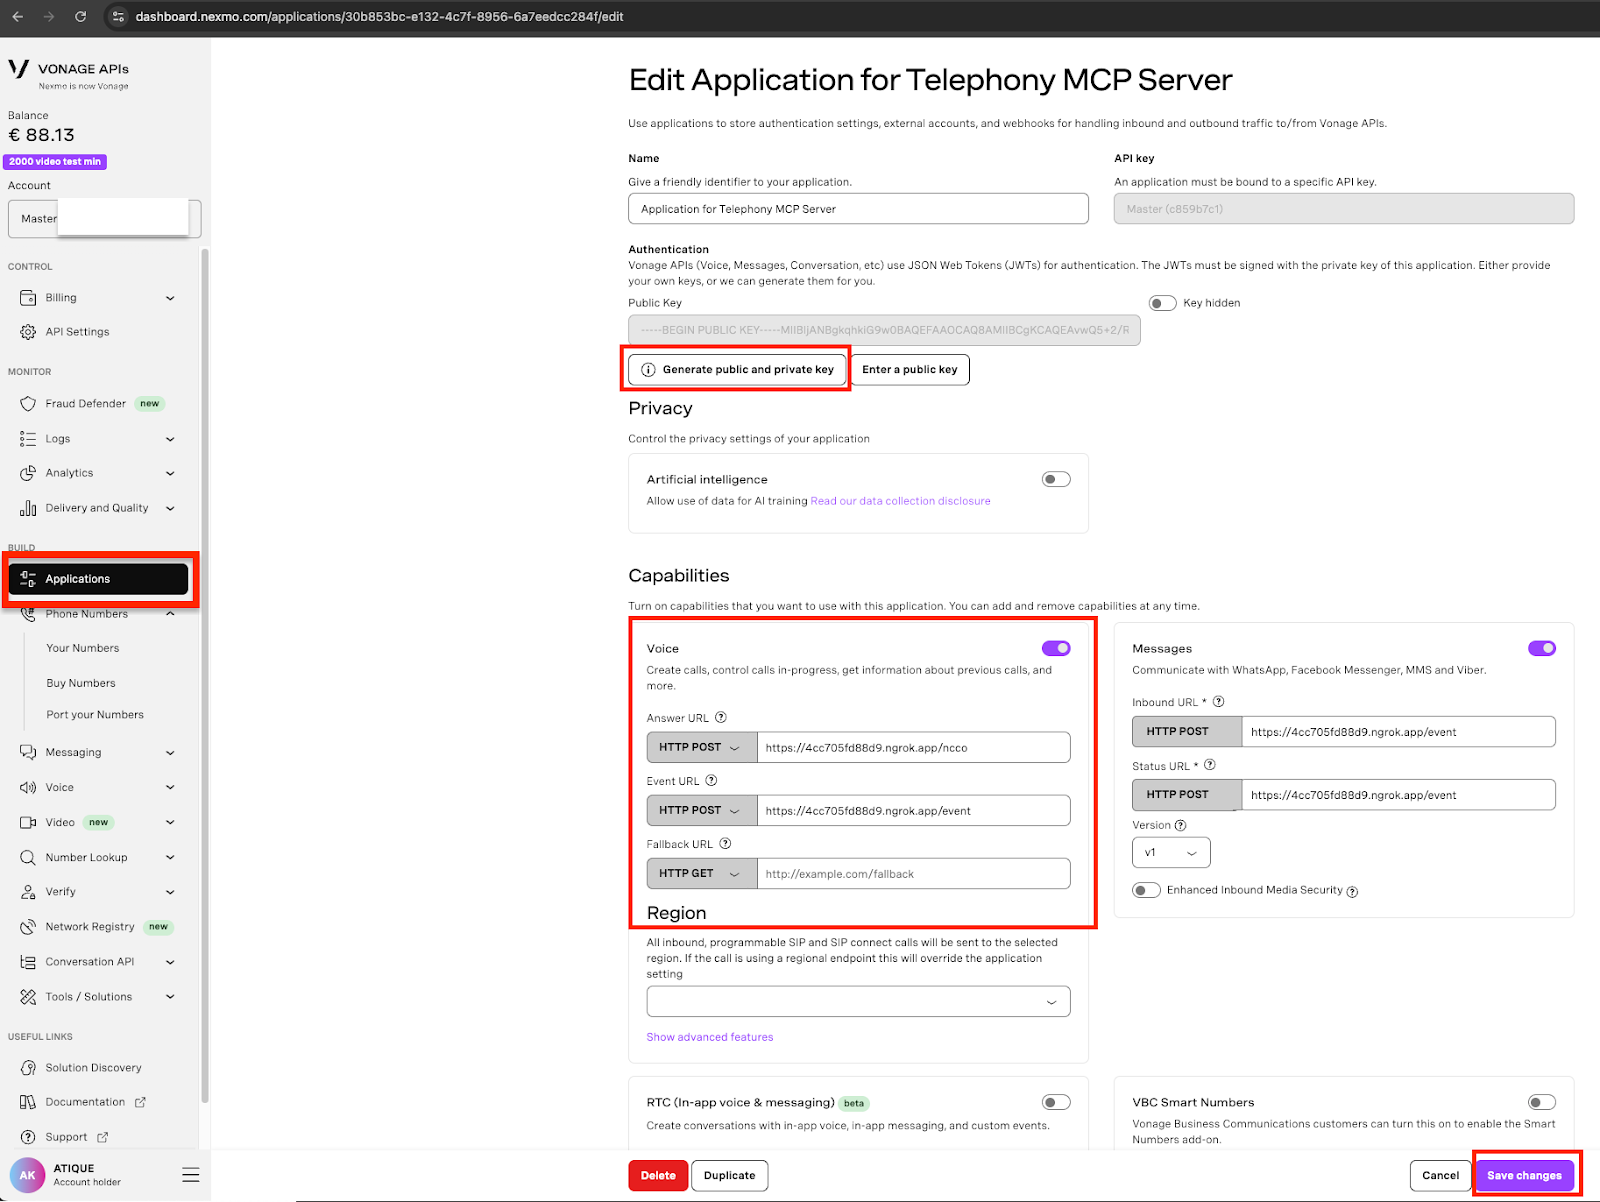 Creating a Vonage application for a Telephony MCP Server in the Vonage API Dashboard, showing the configuration of Voice and Messages capabilities, webhook URLs, and key generation.
From the Vonage Developer Dashboard, go to Your Numbers and edit the number you wish to use by clicking on the pencil icon. Under the section ‘Inbound Webhook URL’ in the Configuration window, add the ngrok url appended with ‘/event’ for e.g. https://4cc705fd88d9.ngrok.app/event.
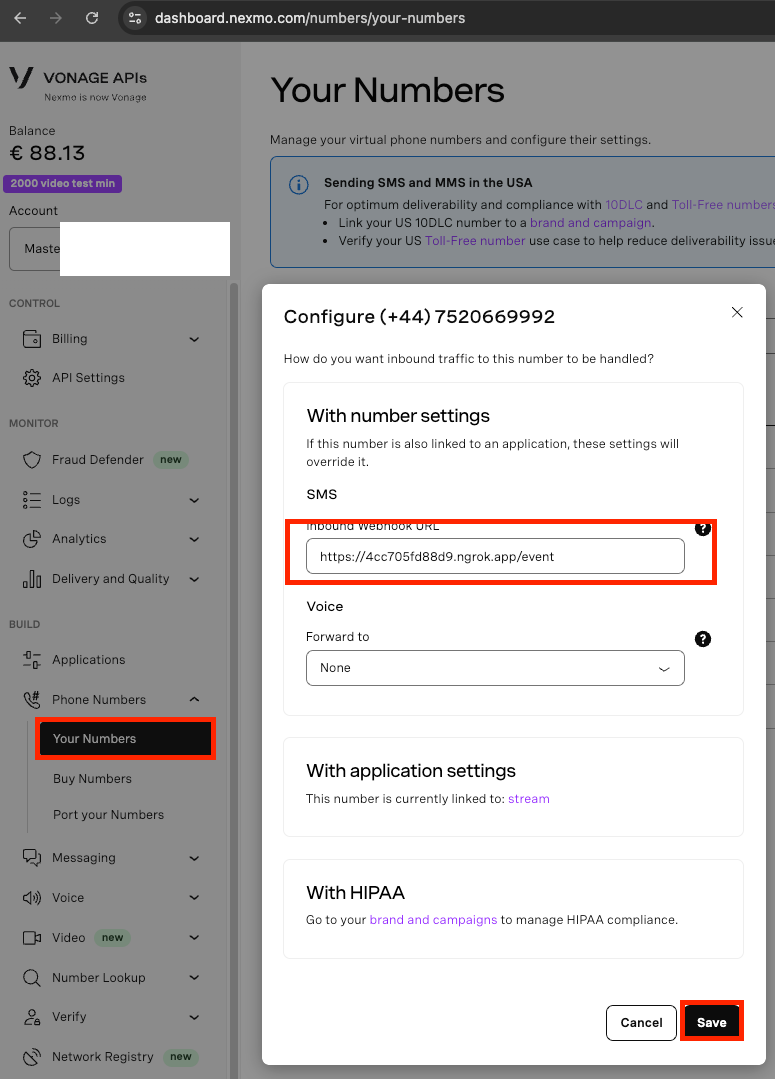 Configuring the inbound SMS webhook URL for a Vonage virtual number in the Dashboard under 'Your Numbers' settings.
Once you save the configuration, any SMS sent to the above virtual number will be forwarded to https://4cc705fd88d9.ngrok.app/event
Create a file named .env in the root of the project.
touch .envPopulate it with your Vonage credentials:
VONAGE_API_KEY=your_api_key
VONAGE_API_SECRET=your_api_secret
VONAGE_APPLICATION_ID=your_application_id
VONAGE_PRIVATE_KEY_PATH=/app/private.key # Path inside the container
VONAGE_LVN=your_vonage_long_virtual_number
CALLBACK_SERVER_URL=https://<ngrok_generated_url>
The project uses Docker Compose to simplify running the necessary services.
Build and Start the Container
From the root of the project directory, run the following command:
docker-compose up --buildThis command will:
Build a single Docker image for the application.
Start one container that runs two services internally: the telephony-mcp-server and the callback-server, each on a different port.
The services will start in the foreground, allowing you to monitor their logs directly in your terminal.
The Telephony MCP Server will be available at http://localhost:8000.
The Callback Server will be running on http://localhost:8080.
You can integrate the Telephony MCP Server with Claude through clients that support MCP, like the Claude Desktop application.
Open Claude Desktop Settings: Navigate to Claude > Settings > Developer > Edit Config to open claude_desktop_config.json file.
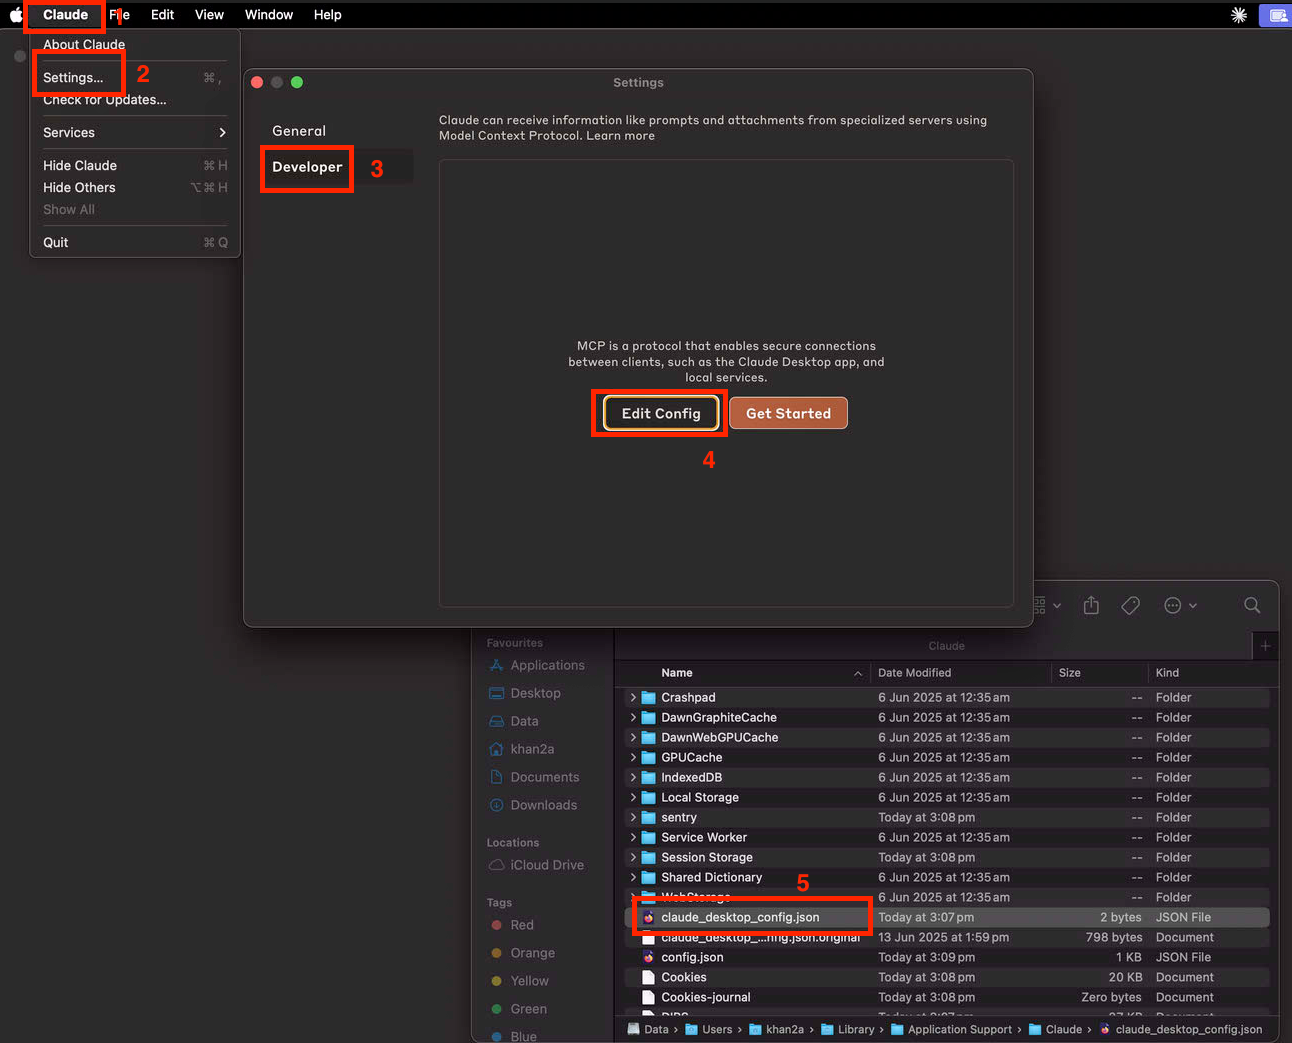 Step-by-step instructions to access and edit the Claude desktop MCP configuration file via Developer Settings.
Add Telephony MCP Server Configuration: Enter the following json into claude_desktop_config.json:
{
  "mcpServers": {
    "telephony": {
      "command": "npx",
      "args": [
        "mcp-remote",
        "http://127.0.0.1:8000/mcp"
      ]
    }
  }
}
Save the json file, quit and restart Claude to take these changes into effect.
Validate Claude is Connected: Go to Claude > Settings > Developer. There should be an entry ‘telephony’ with status ‘running’.
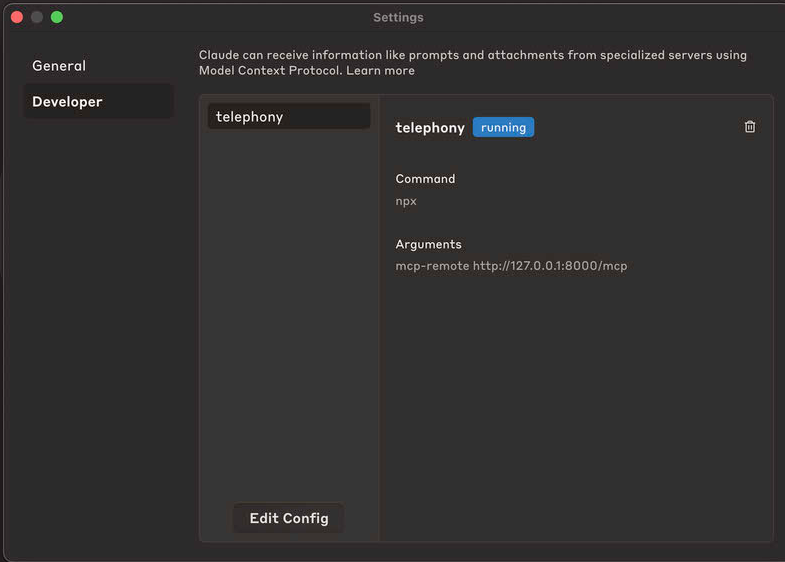 Claude's Developer settings showing the 'telephony' tool actively running with an MCP remote endpoint configured via NPX.
Once integrated, you can start giving Claude commands that use the telephony tools. You can check the availability of Tools from ‘Search and Tools’ menu:
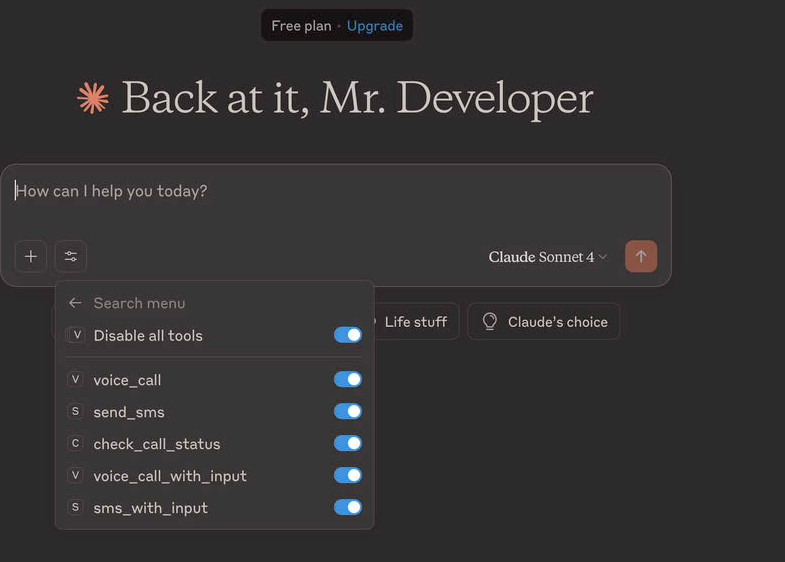 Screenshot showing Claude’s prompt interface with MCP tools like send_sms and voice_call enabled via the tools menu.
Let’s imagine that you want to ask a friend if they are free for dinner. Try sending Claude the following prompt: "Send a message to Jane at +1-202-555-0125 and ask her if she's free for dinner tonight."
Claude will recognize the intent and the required tool. It might show you a confirmation before executing:
Tool: send_sms
to: "+12025550125"
text: "Hi Jane, are you free for dinner tonight?"

[Execute] [Cancel]After you approve, Claude will use the tool and give you a final confirmation:
"I've sent the message to Jane."
Later, you could use another tool:
"Call Jane to see if she got my message."
And Claude would use the voice_call tool to connect you.
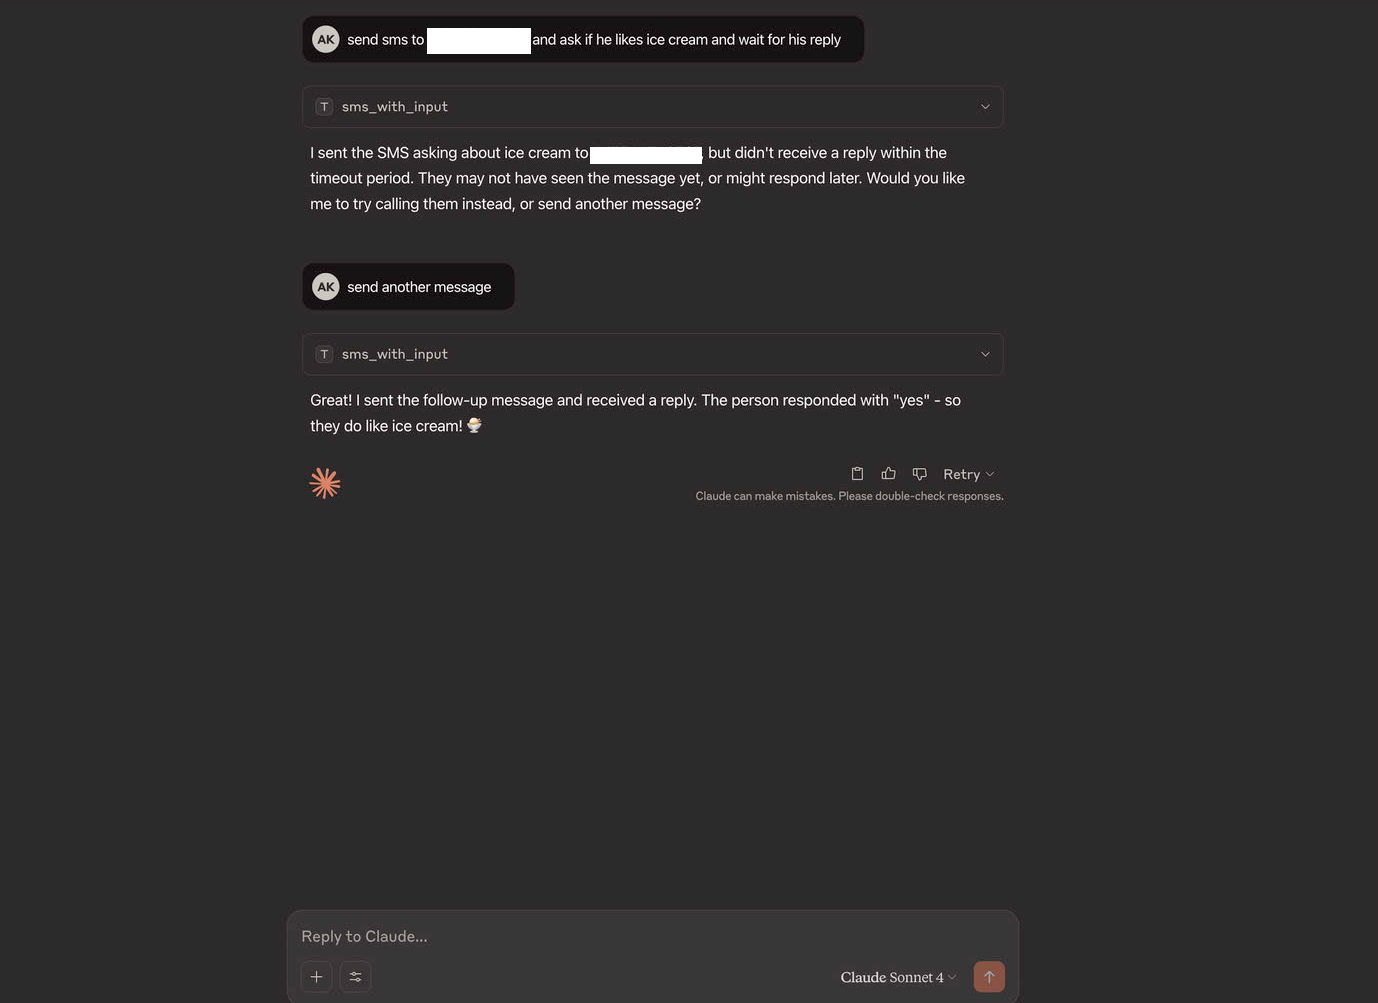 Conversation with Claude using the sms_with_input MCP tool to send and follow up on a message asking if someone likes ice cream.
The Telephony MCP Server is a powerful example of how the Model-Context Protocol can bridge the gap between advanced language models and real-world actions. By providing a standardized way for LLMs to access communication APIs, we unlock a new class of applications where AI assistants can interact with the world on our behalf in a meaningful and tangible way.
This project not only serves as a practical tool but also as a blueprint for extending the capabilities of language models into any domain that has an API. The possibilities are limited only by our imagination.
Have questions or feedback about this tutorial? Download the code and other awesome projects from Vonage-Community. We always welcome community involvement. Share your thoughts with us on X (formerly Twitter) or join the discussion in our Vonage Community Slack channel quoting this article for quick response. You can also connect with me on Twitter.
Share:
Atique is a computer graduate and proficient Python developer with a passion for exploring new technologies. With a strong background in programming and system engineering, he holds over 10 years of experience in automation, testing, and integration. His interests span single-board computers, software-defined radios, and continuous experimentation with generative AI tools.