
Share:
Héctor is a Computer Systems Engineer based in El Salvador. He works on DevOps, technical writing, and QA. He has plenty of experience with web applications and cloud services. When he is not in front of the computer he loves playing music, videogames and going on adventures with the love of his life: his wife ❤️
How to Build a Learning Platform With React, Express and Apollo GraphQL
Time to read: 18 minutes
2020 has been an atypical year for all of us. Many industries have had to "re-think" the way they do business and chances are that these strategies are not temporary but are here to stay.
One of these changes is how we learn. Many schools, universities, and academies around the world have experienced a rise in remote services, often relying on private solutions for providing these.
Today we'll take a look at how it's possible to build our own learning platform with video/audio capabilities, SMS notifications, and passwordless authentication.
To build and run the application you'll need the following resources:
A Vonage API account.
A Vonage Video API account. Sign up free here.
A Virtual Phone Number. Once you have your Vonage API account see how you can get a number here.
A pair of key & secret for a Vonage Video API project. You can create a project from your Vonage Video API account page.
An AWS account and a key & secret pair.
An AWS S3 bucket to upload files.
Node 12 and NPM 6 installed in your system.
We will build a web application that allows teachers to create instant video/audio classes that a student can join with just the link. Teachers will be able to create a list of students, identified by their phone numbers, and can later send them the link for the call through SMS.
The teacher can also create assignments. The students can later identify themselves using passwordless authentication and upload files that can be later reviewed by the teacher.
To keep things simple and be time-effective some capabilities, such as authentication (login and logout) and an actual database, have been left out. Instead, all the pages are publicly available and data will be stored in memory using JavaScript arrays.
If you’re interested in experiencing the final product yourself, I created a Github repository that you can clone locally. The repo has a final folder where you can see the finished example, and a starter one--with React, Express, and Apollo GraphQL already preconfigured--that you can use to follow along and build it step by step.
The demo code is divided into a server folder that contains an Apollo GraphQL Server with Express, and a client folder that contains a basic React application. The backend code is written in plain JavaScript while the frontend uses TypeScript, that way if you're not familiar with the differences between these two you can compare them side by side.
Before you start make sure to go into each folder and install dependencies using npm, as shown below:
You also need to configure secrets. In the client folder all you need to do is to rename the .env file to .env.local.
In the server folder, on the other hand, rename app.envs file to .env you also need to replace the placeholder values in the file with your own AWS keys, S3 Bucket name, Vonage keys, and Vonage Virtual Number.
If you want to run the finished product, open two separate terminal windows and use npm to start both applications as shown below:
A browser window will open automatically and you'll see the application in action there. The first thing you see is a window with a button that allows you to create a class. Before getting into it, head to the Students page and create a couple of students using valid phone numbers.
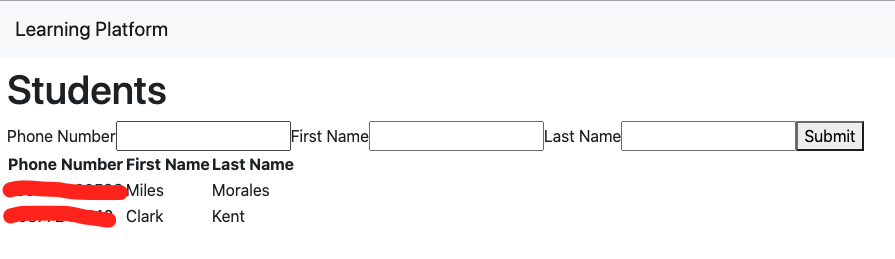 The Students Page
Now, head back to the main screen by clicking on the application title. Next, start a new class.
After a couple of seconds, you will be in a Vonage Video API session. Using the student list, you can send the students an SMS notification so that they can join the class by just clicking the Invite button.
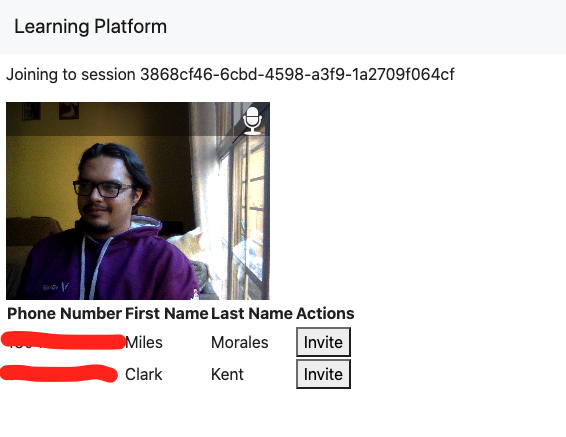 Starting a class
Now let's say you want to create an assignment where students have to upload a PDF document. You can do that in a way that it's not required that they have an actual account, but they can authenticate just by using their phone.
To do so, head to the Homeworks page and create a new Homework by setting a description. Then, as a student, click on the Upload link.
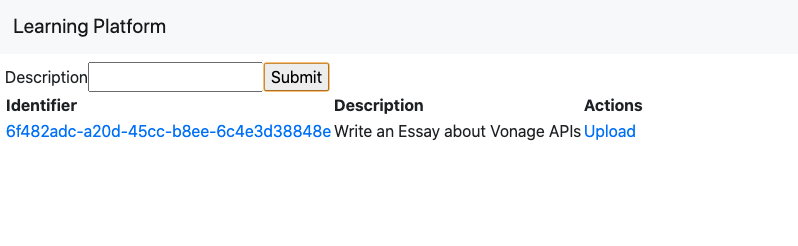 Creating an Assignment
To upload the file, the student has to provide the same phone number that was used by the teacher at creation time. A verification code will be sent to the phone number and after providing it to the application, the student can upload the file.
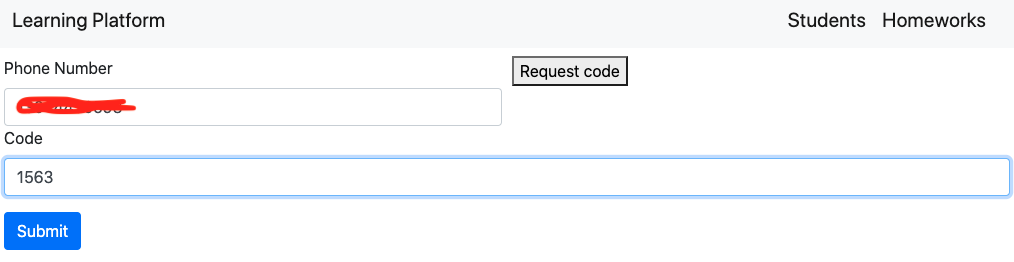 Passwordless Login
 Uploading a File
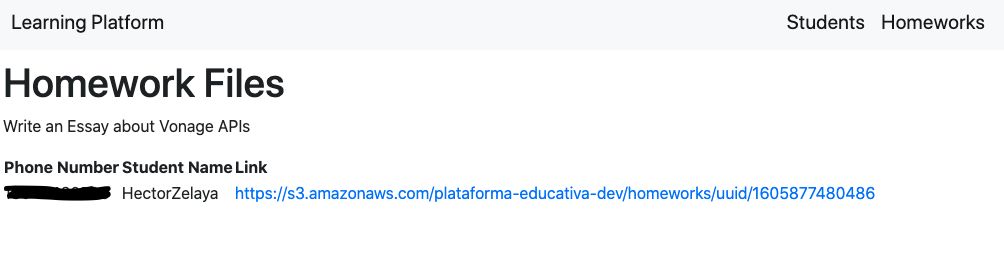
The teacher can see the files each student has uploaded per assignment by clicking the automatically generated UUID of the homework.
 Seeing assignments
If you want to follow along but you're not familiar with some of the technologies used here, we've got you covered. In this section, we will briefly describe what these are, how it is configured in the starter code, and provide some useful links so you can get more information. If you're already a pro with GraphQL and React, then you can skip this section and go straight to create classes, although you may want to read it anyway to know how these pieces fit together in the demo code.
GraphQL provides a query language and runtime for querying data from a server (commonly from multiple sources). It allows you to clearly describe the data and gives the client the power of asking exactly what it needs.
Apollo GraphQL is an industry-standard implementation of GraphQL. It provides server and client libraries that allow you to easily combine and consume databases, APIs, and microservices in a single graph.
The server folder is composed of a GraphQL server powered by Express. The configuration is in the server/index.js file. The most important pieces of the configuration are the Type Definitions and Resolvers.
Type Definitions is where GraphQL describes the data that a client can consume. This is done using types. Type Definitions are configured in the server/src/typeDefs.js file. Below are some examples of the types for the demo code:
type Student {
  phoneNumber: String!
  firstName: String!
  lastName: String!
}

type Homework {
  uuid: String!
  description: String!
}The most important types are the Query and Mutation types, which actually expose what "queries" and "mutations" a client can perform with the data.
Below are the queries and mutations defined for the demo code:
type Query {
  homeworks: [Homework]
  homework(uuid: String): Homework
  homeworkFiles(uuid: String): [HomeworkFile]
  sessionDetails(uuid: String) : SessionResponse
  students: [Student]
  student(phoneNumber: String): Student
}

type Mutation {
  addHomeworkFile(url: String!, uuid: String!, token: String!): HomeworkFile
  checkCode(requestId: String!, code: String!, number: String!): CheckCodeResponse
  inviteStudent(phoneNumber: String!, url: String!): OperationResponse
  presignDocument(fileName: String!, isPublic: Boolean, token: String!): String!
  saveHomework(id: Int, description: String!): Homework
  saveStudent(
    id: Int
    phoneNumber: String!
    firstName: String!
    lastName: String!
  ): Student
  startVideocallSession: SessionResponse
  verifyRequest(number: String!): VerifyRequestResponse
}The beauty with GraphQL is that you define the behavior of these queries and mutations using your own custom code, which allows you to retrieve the information from multiple databases, REST APIs, or even other GraphQL servers. That custom code you create is known as resolvers.
In the demo code, resolvers are assigned to each query and mutation in the server/src/resolvers.js file, while the actual resolver functions are located under the server/src/graphql folder. Currently, the resolvers are only throwing a NOT_IMPLEMENTED exception, but we will change that throughout this article.
const saveHomework = async (_, { description }, __, ___) => {
  throw new Error(NOT_IMPLEMENTED);
};Apollo also provides a library for client-side code that allows you to easily consume data from the server. It maintains a cache so that the client doesn't have to request data from the server if the data already exists.
If you want to know more about GraphQL and Apollo Graphql you can check the following links:
React is a JavaScript library for building user interfaces using a component-based approach. Each component can be reused and maintains its own state that automatically updates the user interface when changed.
This project uses functional components which provide a simple yet powerful way to write React components. It also uses hooks to provide additional functionality such as state and communication with the server.
The demo code features a basic React application written in TypeScript. It uses the Apollo Client library to connect with the server and also to provide a cache for storing the data retrieved from the server.
The whole application is wrapped inside the ApolloProvider which allows access to its context across all the components.
ReactDOM.render(
  <ApolloProvider client={client}>
    <Pages />
  </ApolloProvider>,
  document.getElementById('root')
);If you want to know more about React and its integration with the Apollo server you can check the following links:
Ok, if you want to follow along it's time to get our hands dirty. Get your favorite code editor and open the starter folder. The first thing we will do is add the ability to create new classes.
Since we have our code split into server and browser code, it makes sense to start setting up the backend code before working on what the user will see. So let's start by making a GraphQL mutation that creates a session in the Vonage Video API service.
To create an audio/video session in the Vonage Video API we will be using the opentok package, which is already installed. The first thing we need to do is to initialize the client by passing the API key and secret pair.
In the server/src/services/vonage/videoApi.js file, let's populate the initializeOpentok function. We will return a singleton instance of the opentok variable, this will ensure that the same instance is returned every time we call the function. Note how we are importing the key and secret we defined previously as an environment variable using the apiKey and apiSecret values from an already configured ../../utils/envs file.
const { vonageVideoApiKey : apiKey, vonageVideoApiSecret : apiSecret } = require('../../util/envs');

let opentok = null;
...
const initializeOpentok = () => {
  opentok = opentok ? opentok : new OpenTok(apiKey, apiSecret);
}The next step is to actually create the session. To do so we will use the opentok.createSession function. This function receives an object that sets the session as routed. A routed session means that we will use Vonage's Media Servers, which allows decreasing bandwidth usage in multiparty sessions and also permits us to enable advanced capabilities such as recordings and SIP interconnect.
// server/src/services/vonage/videoApi.js
...
const opentokSessionArgs = {
  mediaMode: 'routed',
};
...
const createSession = () => {
  return new Promise((resolve, reject) => {
    opentok.createSession(opentokSessionArgs, (err, session) => {
      if (err) {
        reject(err);
      } else {
        resolve(session);
      }
    });
  });
};Finally, we will be adding a function for generating JWT tokens that will be used to authenticate users in the context of a session and also set permissions.
// server/src/services/vonage/videoApi.js
...
const generateToken = (sessionId) => {
  return opentok.generateToken(sessionId);
}
...Now that we have the functionality in place, all that remains is to actually expose that to the clients. To do so, we will create a pair of mutations that the React client can consume in order to allow teachers to create sessions and students to join these.
Let's open the server/src/graphql/videoApi.js file and populate the placeholder resolvers.
For creating sessions these are the steps we will follow:
Initialize the opentok client.
Create the session.
Generate an ID for the session to be used as part of the URL. For this we will use the
uuidnpm package.Save the session in persistent storage. To keep things simple we will store things in memory using arrays defined in
server/src/services/db/index.js, but in a real-world application, an actual database makes more sense.Generate a token for the session.
Return the data, honoring the format defined in the type definition for the mutation response.
// server/src/graphql/videoApi.js
...
const startSession = async (_, __, ___, ____) => {
  try {
    // initialize opentok
    initializeOpentok();

    // create the session
    const session = await createSession();

    // generate an id
    const uuid = uuidv4();

    // save the session
    videocalls.push({
      uuid,
      sessionId: session.sessionId,
    });

    // generate a token with moderator privileges
    const token = session.generateToken({
      role: 'moderator',
      data: `role=moderator`,
    });

    // return date honoring the format for SessionResponse type
    return {
      uuid,
      token,
      session: session.sessionId,
      apiKey,
    };
  } catch (e) {
    console.error('An error occurredocurred when creating opentok session', e);
  }
};
...The Mutation for starting the session, along with the response type, is already defined at server/src/typeDefs.js.
// server/src/typeDefs.js
...
type SessionResponse {
  uuid: String!
  token: String!
  session: String!
  apiKey: String!
}
...
type Mutation {
  ...
  startVideocallSession: SessionResponse
  ...
}The resolver function is already assigned too. We can see this in the server/src/resolver.js file:
// server/src/resolvers.js
const {
  ...,
  // here we reference the startSession function we have just created
  videoApi: { joinSession, startSession },
} = require('./graphql');
...
const resolvers = {
  ...
  Mutation: {
    ...
    // here we assign that function as the resolver for the startVideocallSession mutation
    startVideocallSession: startSession,
    ...
  },
};Next, we need to create a resolver function that allows students to join an already created session. To do so, these are the steps we will follow:
Check that a UUID has been provided.
Look for the videocall in the database.
Initialize the opentok client.
Use the session to generate a token for the student.
Return data, honoring the format set in the type definition for the mutation.
// server/src/resolvers.js
const {
  ...,
  // here we reference the startSession function we have just created
  videoApi: { joinSession, startSession },
} = require('./graphql');
...
const resolvers = {
  ...
  Mutation: {
    ...
    // here we assign that function as the resolver for the startVideocallSession mutation
    startVideocallSession: startSession,
    ...
  },
};Same as with the previous function, the resolver is already connected with the type definition. The only difference is that this time instead of a mutation, it's a query.
// server/src/typeDefs.js
type Query {
  ...
  sessionDetails(uuid: String) : SessionResponse
  ...
}

// server/src/resolvers.js
const {
...
  videoApi: { joinSession, startSession },
} = require('./graphql');
...
const resolvers = {
  Query: {
    sessionDetails: joinSession,
  ...
  },
};Now we're ready to build the user interface.
First, let's create a couple of React components. Inside the client/src/components/ folder create a new Videocall folder.
Now create a file named Room.tsx inside the newly created folder. This is the component that will host the session.
To build the component we will use the opentok-react npm package. The component will receive an uuid property that will be used in the query to retrieve the information about the session.
// client/src/components/Videocall/Room.tsx
import React from 'react';
import { useQuery } from '@apollo/client';
import { GET_START_CALL_SETTINGS } from '../../data/queries';
import { OTSession, OTPublisher, OTStreams, OTSubscriber } from 'opentok-react';

const Room = (props: any) => {
  // get the uuid from props
  const { uuid } = props;

  // make a query to the server (or not??? we'll talk about this later)
  const { data, loading, error } = useQuery(GET_START_CALL_SETTINGS, {
    variables: { uuid },
  });

  if (loading) {
    return <p>Loading...</p>;
  }

  if (error) {
    return <p>Error!</p>;
  }

  // after the query is complete, get the session details...
  const { apiKey, session, token } = data.sessionDetails;

  // ... and pass them to opentok-react
  return (
    <OTSession apiKey={apiKey} sessionId={session} token={token}>
      <OTPublisher />
      <OTStreams>
        <OTSubscriber />
      </OTStreams>
    </OTSession>
  );
};

export default Room;Next, let's add a button to create the session. Here, we will explore a powerful feature of Apollo client: the cache.
Currently, the Room component attempts to retrieve the session details from the server based on the UUID of an already created session.
Since we also get those same details when creating the session, it doesn't make sense to do a second request when joining. Instead we will write it to the cache so that the Room component can get it from there and doesn't have to make a new request to the server.
Create a StartButton.tsx file and populate it as follows:
// client/src/components/Videocall/StartButton.tsx
import { useMutation } from '@apollo/client';
import React from 'react';
import { useHistory } from 'react-router-dom';
import { START_VIDEOCALL_SESSION } from '../../data/mutations';
import { GET_START_CALL_SETTINGS } from '../../data/queries';

const startCallButton = {
  padding: '10pt',
  borderRadius: '3px',
  border: '0px',
};

const StartButton = () => {
  // we use the useMutation hook to create a mutate function
  const [startSession] = useMutation(START_VIDEOCALL_SESSION, {
    // the update() function allows to run code after running the mutation
    update(client, { data: { startVideocallSession } }) {
      // here we write the resulting data into the cache
      client.writeQuery({
        query: GET_START_CALL_SETTINGS,
        data: {
          sessionDetails: startVideocallSession
        },
        variables: {
          uuid: startVideocallSession.uuid
        }
      });
    },
    onCompleted({startVideocallSession}) {
      // after creating the session we move to a different page
      history.push(`/session/${startVideocallSession.uuid}`);
    }
  });
  const history = useHistory();

  // we render the button and call the mutate function on click
  return (
    <div>
      <button
        style={startCallButton}
        onClick={() => {
          startSession();
        }}
      >
        Start Call
      </button>
    </div>
  );
};

export default StartButton;Before getting into adding the pages, let's create an index.tsx file under client/src/components/Videocall that will expose both components under the same import:
// src/components/Videocall/index.tsx
export { default as StartButton } from './StartButton';
export { default as Room } from './Room';Now simply create a new page under client/src/pages/ named VideoSession.tsx, and then add the Room component. Note how we don't need to specify the Room file but just import it at the folder level. This is thanks to the index.tsx file we have just added
// src/pages/VideoSession.tsx
import React from 'react';
import { useParams } from 'react-router-dom';
import { Room } from '../components/Videocall';
import { VideoSessionParams } from '../models';

const VideoSession = () => {
  // get the uuid from the url
  const { uuid } = useParams<VideoSessionParams>();

  // render the Room component and pass the UUID property
  return (
    <>
      <p>Joining to session {uuid}</p>
      <Room uuid={uuid} />
    </>
  );
};

export default VideoSession;Next, add the VideoSession route in the src/pages/index.tsx file:
// src/pages/index.tsx
...
import VideoSession from './VideoSession';

function Pages() {
  return (
    <Router>
      <Navigation />
      <div id="roots" className="p-2">
        <Route path="/session/:uuid" exact component={VideoSession} />
        <Route path="/" exact component={Inicio} />
      </div>
    </Router>
  );
}
...Finally, add the button to the src/pages/Home.tsx page:
// src/pages/Home.tsx
...
import { StartButton } from '../components/Videocall';

const Inicio = () => {
  return (
    <div>
      <StartButton />
    </div>
  );
};
...
The next step is allowing a teacher to create a list of students. The whole idea is that when a call is started, the teacher can review the list and send SMS notifications to the students to invite them to the call.
As with the classes, we will start by making the required mutations and queries in the GraphQL server. Then we will add the user interface.
Let's start working on the server code by allowing a teacher to create a student. To keep things simple we will be storing students in an array, but in a real-world application, a database would make more sense.
Open the server/src/graphql/student.js file, and populate the resolver functions as follows:
// server/src/graphql/student.js
// import the "database" service
const { students } = require('../services/db');
...
const saveStudent = async (_, student, __, ___) => {
  try {
    // push the new student into the array
    students.push(student);

    // return the newly created student
    return student;
  } catch (err) {
    console.error('Error while trying to create student', err);
    throw new Error(INTERNAL_ERROR);
  }
};

const getStudents = (_, __, ___, ____) => {
  // return all the students
  return students;
};Next, let's add the Vonage magic to send notifications. To do so we will use the @vonage/server-sdk npm package which is already preinstalled and initialized as a singleton instance in the server/src/services/vonage/vonage.js file:
// server/src/services/vonage/vonage.js
// import the npm package
const Vonage = require('@vonage/server-sdk');
// import the Vonage credentials from the environment variables
const { vonageApiKey : apiKey, vonageApiSecret : apiSecret } = require('../../util/envs');

// define the Vonage client
let instance = null;

const getVonageClient = () => {
  // if the client is not already define then initialize it
  if (!instance) {
    instance = new Vonage({
      apiKey,
      apiSecret
    });
  }

  // return the client
  return instance
}

// export the function
module.exports = {
  getVonageClient
}Open the server/src/services/vonage/sms.js file and populate the sendSms function as follows:
// server/src/services/vonage/sms.js
...
const sendSms = (to, text) => {
  return new Promise((resolve, reject) => {
    // get the Vonage client
    const vonageClient = getVonageClient();
    // get the Virtual Phone Number used to send the sms
    const from = vonageSenderNumber;

    // Call the sendSms method
    vonageClient.message.sendSms(from, to, text, (err, responseData) => {
      if (err) {
        reject(false);
      } else {
        if (responseData.messages[0]['status'] === '0') {
          console.log('Message sent successfully.');
          resolve(true)
        } else {
          console.log(
            `Message failed with error: ${responseData.messages[0]['error-text']}`
          );
          reject(false);
        }
      }
    });
  });
};
...
First, let's create some components that we will later reuse when creating students and inviting them to a video session.
Create a new folder under client/src/components named Students, and inside it create three more files: index.tsx, StudentForm.tsx and StudentsList.tsx.
When creating the form we will adopt a similar approach to the one used when creating a class, where after calling the mutation that creates the student in the server we are also updating the local cache to prevent subsequent requests to the server.
For the actual form we will use controlled components so that its values are managed by React's state. Since we're using functional components, we will use the useState hook to provide a state to the formit.
Populate the StudentForm.tsx file as follows:
// client/src/components/Students/StudentForm.tsx
import { useMutation } from '@apollo/client';
import React, { useState } from 'react';
import { ADD_STUDENT } from '../../data/mutations';
import { GET_STUDENTS } from '../../data/queries';
import { Student, StudentData, StudentVars } from '../../models';

const StudentForm = () => {
  // set the state for the form
  const [phoneNumber, setPhoneNumber] = useState('');
  const [firstName, setFirstName] = useState('');
  const [lastName, setLastName] = useState('');

  // create the mutate function for adding student
  const [addStudent] = useMutation<{ saveStudent: Student }, StudentVars>(
    ADD_STUDENT,
    {
      onCompleted() { // set the onCompleted function to reset the state
        setPhoneNumber('');
        setFirstName('');
        setLastName('');
      },
      update(cache, { data }) { // set the update function to update local cache
        const existingStudentsdata = cache.readQuery<StudentData>({
          query: GET_STUDENTS,
        });
        cache.writeQuery({
          query: GET_STUDENTS,
          data: {
            students: [
              ...(existingStudentsdata?.students as Student[]),
              data?.saveStudent,
            ],
          },
        });
      },
    }
  );

  // render the form
  return (
    <form
      className="form-inline"
      onSubmit={(e) => {
        e.preventDefault();
        phoneNumber &&
          firstName &&
          lastName &&
          addStudent({
            variables: {
              phoneNumber,
              firstName,
              lastName,
            },
          });
      }}
    >
      <label htmlFor="phone">
        Phone Number
      </label>
      <input
        type="text"
        id="phone"
        name="phone"
        value={phoneNumber}
        onChange={(e) => setPhoneNumber(e.target.value)}
      />

      <label htmlFor="firstName">
        First Name
      </label>
      <input
        type="text"
        id="firstName"
        name="firstName"
        value={firstName}
        onChange={(e) => setFirstName(e.target.value)}
      />

      <label htmlFor="lastName">
        Last Name
      </label>
      <input
        type="text"
        id="lastName"
        name="lastName"
        value={lastName}
        onChange={(e) => setLastName(e.target.value)}
      />

      <button type="submit">
        Submit
      </button>
    </form>
  );
};

export default StudentForm;When creating the list of students, we will add an actions property that will be an array of "actions" that can be applied to a student.
For each action, we will add a button in the table under the "Actions" column, that will trigger a custom function. Think of actions such as "edit", "delete" or "disable". We will later use this property to "invite" a student to a class.
Populate the StudentsList.tsx file as follows:
// client/src/components/Students/StudentsList.tsx
import React from 'react';
import { useQuery } from '@apollo/client';
import { GET_STUDENTS } from '../../data/queries';
import { Student, StudentListProps } from '../../models';

const StudentsList = ({ actions = [] }: StudentListProps) => {
  // create the query
  const { data, loading, error } = useQuery(GET_STUDENTS);

  // render the table
  return (
    <>
      {loading && <p>Loading...</p>}
      {error && <p>Error!</p>}
      {data && (
        <table>
          <thead>
          <tr>
            <th>Phone Number</th>
            <th>First Name</th>
            <th>Last Name</th>
            {actions.length > 0 && <th>Actions</th>}
          </tr>
          </thead>
          <tbody>
          {data.students.map((student: Student) => {
            return (
              <tr key={student.phoneNumber}>
                <td>{student.phoneNumber}</td>
                <td>{student.firstName}</td>
                <td>{student.lastName}</td>
                <td>
                  {actions.map((action) => (
                    <button key={action.actionName} onClick={() => action.onAction(student)}>
                      {action.actionName}
                    </button>
                  ))}
                </td>
              </tr>
            );
          })}
          </tbody>
        </table>
      )}
    </>
  );
};

export default StudentsList;Now let's expose both newly-created components in the index.tsx as follows:
// client/src/components/Students/index.tsx
export {default as StudentsList} from './StudentsList';
export {default as StudentForm} from './StudentForm';And now let's create the client/src/pages/StudentPage.tsx page, and then add the route in the client/src/page/index.tsx index. Note how we are importing both StudentForm and StudentsList components from the same namespace. (Thanks again, index.tsx!)
// client/src/pages/StudentPage.tsx
import React from 'react';
import { StudentsList, StudentForm } from '../components/Students';

const Students = () => {
  return (
    <>
      <h1>Students</h1>
      <StudentForm />
      <StudentsList />
    </>
  );
};

export default Students;

// client/src/pages/index.tsx
...
import StudentPage from './StudentPage';

function Pages() {
  return (
    <Router>
      <Navigation />
      <div id="roots" className="p-2">
        ...
        <Route path="/students" exact component={StudentPage} />
      </div>
    </Router>
  );
}
...We now should be able to create new students and view them in the list.
The whole idea of having students is to be able to invite them to a call. Remember the actions property we talked about earlier? Here's where that feature will shine, as it will allow us to provide that functionality to the list of students while allowing us to reuse the very same component we created before.
Let's create a new component called Attendees.tsx under client/src/components/Videocall/. In this new component, we will create a custom action that will trigger the inviteStudent mutation.
// client/src/components/Videocall/Attendees.tsx
import { useMutation } from '@apollo/client';
import React from 'react';
import { useLocation } from 'react-router';
import { INVITE_STUDENT } from '../../data/mutations';
import { Student, StudentListAction } from '../../models';
import { StudentsList } from '../Students';

const Attendees = () => {
  // create the mutate function
  const [inviteStudent] = useMutation(INVITE_STUDENT)
  // get the session url
  const location = useLocation();

  // create the custom action in an array
  const actions = new Array<StudentListAction>(
    {
      // set a name
      actionName: 'Invite',
      // set the action
      onAction: (student: Student) => {
        inviteStudent({
          variables: {
            phoneNumber: student.phoneNumber,
            url: window.location.origin + location.pathname
          }
        })
      }
    }
  )

  // render the StudentsList and pass the action
  return (
    <>
      <StudentsList actions={actions}/>
    </>
  )
}

export default Attendees;Also add the newly created component to the Videocall index:
// src/components/Videocall/index.tsx
...
export { default as Attendees } from './Attendees';And finally, add the Attendees component to the VideoSession page:
// src/pages/VideoSession.tsx
...
import { Room, Attendees } from '../components/Videocall';
...

const VideoSession = () => {
  ...

  return (
    <>
      ...
      <Attendees />
    </>
  );
};Now create a couple of students using valid phone numbers, start a class, and click on the “invite” button to invite them.
The final step in our demo is allowing students to send assignments. To make sure that we are able to identify which student a homework file belongs to, we will use passwordless login based on the phone number used to register the student.
The first thing we need to do is allow for actual homework and homework files to be created. We also need to give users the ability to upload files. We will be using an S3 bucket with Presigned POST Requests for the latter.
Let's start with the resolvers for creating and retrieving homework and homework files. Open the server/src/graphql/homework.js file, under server, and populate the resolvers as follow:
// src/graphql/homework.js
...
const saveHomework = async (_, { description }, __, ___) => {
  const uuid = uuidv4();

  try {
    const homework = {
      uuid,
      description
    }
    homeworks.push(homework);

    return homework;
  } catch (err) {
    console.error('Error while trying to create homework', err);
    throw new Error(INTERNAL_ERROR);
  }
};

const getHomeworks = (_, __, ___, ____) => {
  return homeworks;
};

const getHomework = (_, { uuid }, __, ___) => {
  const [homework] = homeworks.filter((homework) => homework.uuid === uuid);
  return homework;
};

const addHomeworkFile = async (_, { url, uuid, token }, __, ___) => {
  // This token comes from the passwordless login
  if (!token) {
    throw new Error(NOT_AUTHENTICATED);
  }

  try {
    const decodedToken = jwt.verify(token, accessTokenSecret);
    const [student] = students.filter((student) => student.phoneNumber === decodedToken.phoneNumber)
    const [homework] = homeworks.filter((homework) => homework.uuid === uuid);
    const homeworkFile = {
      url,
      student,
      homework,
    };
    homeworkFiles.push(homeworkFile);

    return homeworkFile;
  } catch (err) {
    console.log('An error occurredocurred when trying to save homework file', err);
    throw new Error(INTERNAL_ERROR);
  }
};

const getHomeworkFiles = (_, { uuid }, __, ___) => {
  return homeworkFiles.filter(homeworkFile => homeworkFile.homework.uuid === uuid);
};
...Next, let's add a mutation for pre-signing a POST request that can be used later in the client-side code to upload the file to S3. To do so, we are using the aws-sdk npm package. The service is already configured in server/src/services/aws/s3.js.
// server/src/services/aws/s3.js
...
const presignedPostDocument = (keyName, isPublic = false) => {
  const acl = isPublic ? 'public-read' : 'private';
  return new Promise((resolve, reject) => {
    const params = {
      Bucket: s3Bucket,
      Fields: {
        Key: keyName,
      },
      Expires: 300,
      Conditions: [
        ['content-length-range', 0, 5242880],
        ['eq', '$Content-Type', 'application/pdf'],
        { acl },
      ],
    };
    s3.createPresignedPost(params, (err, data) => {
      if (err) {
        reject('Error while creating presigned post', err);
      } else {
        resolve(data);
      }
    });
  });
};
...So all we need to do is to actually consume the service in a new mutation. Open the server/src/graphql/s3.js file, and populate the presignDocument resolver function as follows:
// server/src/graphql/s3.js
...
const presignDocument = async (_, { fileName, isPublic, token }, __, ___) => {
  // This token comes from the passwordless login
  if (!token) {
    throw new Error(NOT_AUTHENTICATED);
  }

  try {
    // identify the student
    const data = jwt.verify(token, accessTokenSecret);
    console.info(
      `Student with id ${data.id} is presigning filename ${fileName}`
    );
    // presign the post requests
    const uploadData = await s3.presignedPostDocument(fileName, isPublic);
    // return the response as a stringified JSON
    return JSON.stringify(uploadData);
  } catch (err) {
    console.log('An error ocurred when presigning document:', err);
    throw new Error(INTERNAL_ERROR);
  }
};
...
Now it's time to set up the Vonage magic for passwordless authentication. To do this, we will use the Verify API. First, let's create the service. Open the server/src/services/vonage/verify.js file, and populate the verifyRequest and checkCode functions as follows:
// server/src/services/vonage/verify.js
...
const verifyRequest = (number) => {
  return new Promise((resolve, reject) => {
    // get the Vonage client
    const vonageClient = getVonageClient();
    const brand = 'Vonage APIs';

    // Create a verification request for the given number
    vonageClient.verify.request({number, brand}, (err, result) => {
      if (err) {
        reject(false);
      } else {
        // return the request id which will be used when verifying the code
        resolve(result.request_id);
      }
    });
  });
};

const checkCode = (code, request_id) => {
  return new Promise((resolve, reject) => {
    // get the Vonage client
    const vonageClient = getVonageClient();

    // here pass both the request id and the code sent by the student
    vonageClient.verify.check({
      request_id,
      code
    }, (err, result) => {
      if (err) {
        reject(false);
      } else {
        // if code is correct we authenticate the student
        if (result.status === '0') {
          resolve(true);
        } else {
          reject(false);
        }
      }
    });
  })
}
...Finally, let's expose these services through GraphQL. Open the server/src/graphql/vonage.js file and populate the verifyRequestResolver and checkCodeResolver resolver functions as follows:
// server/src/graphql/vonage.js
...
const verifyRequestResolver = async (_, { number }, __, ___) => {
  try {
    const requestId = await verifyRequest(number);
    return {
      requestId,
    };
  } catch (err) {
    console.error(err);
    throw new Error(INTERNAL_ERROR);
  }
};

const checkCodeResolver = async (_, { requestId, code, number }, __, ___) => {
  try {
    const result = await checkCode(code, requestId);

    // if verification is successful, we return a JWT token
    if (result) {
      const [student] = students.filter(
        (student) => student.phoneNumber === number
      );

      // create the token
      const token = jwt.sign(
        {
          phoneNumber: student.phoneNumber,
        },
        accessTokenSecret,
        {
          expiresIn: '15min',
        }
      );

      return {
        token,
      };
    } else {
      return {
        token: null,
      };
    }
  } catch (err) {
    console.error('An error ocurred when trying to check code', err);
    return {
      token: null,
    };
  }
};
...
Let's start by creating a form for creating Homeworks and a simple table to list these.
Create a Homeworks folder under client/src/components and then create HomeworkForm.tsx and HomeworkList.tsx inside it. Populate the first file as follows to create the form:
// client/src/components/Homeworks/HomeworkForm.tsx
import { useMutation } from '@apollo/client';
import React, { useState } from 'react';
import { Homework } from '../../models';
import { ADD_HOMEWORK } from '../../data/mutations';
import { GET_HOMEWORKS } from '../../data/queries';

const HomeworkForm = () => {
  // declare the state for the controlled form
  const [description, setDescription] = useState('');

  // setup the mutate function that creates the homework
  const [addHomework] = useMutation<
    { saveHomework: Homework },
    { description: string }
  >(ADD_HOMEWORK, {
    // on completion, reset the state
    onCompleted() {
      setDescription('');
    },
    // after creating the homework, add it to the local cache
    update(cache, { data }) {
      const existingHomeworksData = cache.readQuery<{ homeworks: Homework[] }>({
        query: GET_HOMEWORKS,
      });
      cache.writeQuery({
        query: GET_HOMEWORKS,
        data: {
          homeworks: [
            ...(existingHomeworksData?.homeworks as Homework[]),
            data?.saveHomework,
          ],
        },
      });
    },
  });

  return (
    <>
      <form
        className="form-inline"
        onSubmit={(e) => {
          // when submit the form call the mutate function
          e.preventDefault();
          description &&
            addHomework({
              variables: {
                description,
              },
            });
        }}
      >
        <label htmlFor="description">
          Description
        </label>
        <input
          type="text"
          id="description"
          value={description}
          onChange={(e) => setDescription(e.target.value)}
        />

        <button type="submit">
          Submit
        </button>
      </form>
    </>
  );
};

export default HomeworkForm;And then populate the HomeworkList.tsx file as follows to create a simple table that lists the created homework. Note that we are also setting a couple of Links under the "Identifier" "Action" columns. These links will allow a teacher to review the homework files of a given homework and allow students to upload the actual files.
We will work on the pages these links will open in a moment.
// client/src/components/Homeworks/HomeworkList.tsx
import React from 'react';
import { useQuery } from '@apollo/client';
import { Link } from 'react-router-dom';
import { GET_HOMEWORKS } from '../../data/queries';
import { Homework } from '../../models';

const HomeworkList = () => {
  // query the list of homeworks
  const { data, loading, error } = useQuery(GET_HOMEWORKS);

  // render the component with the retrieved homework
  return (
    <>
      {loading && <p>Loading...</p>}
      {error && <p>Error!</p>}
      {data && (
        <table>
          <thead>
            <tr>
              <th>Identifier</th>
              <th>Description</th>
              <th>Actions</th>
            </tr>
          </thead>
          <tbody>
            {data.homeworks.map((homework: Homework) => {
              return (
                <tr key={homework.uuid}>
                  <td>
                    <Link to={`/homeworks/${homework.uuid}/list`}>
                      {homework.uuid}
                    </Link>
                  </td>
                  <td>{homework.description}</td>
                  <td>
                    <Link to={`/homeworks/${homework.uuid}/upload`}>
                      Upload
                    </Link>
                  </td>
                </tr>
              )
            })}
          </tbody>
        </table>
      )}
    </>
  )
}

export default HomeworkList;Now, let's expose the newly created components by creating an index.tsx file under client/src/components/Homeworks with the following content:
// client/src/components/Homeworks/index.tsx
export {default as HomeworkList} from './HomeworkList';
export {default as HomeworkForm} from './HomeworkForm';Then create the HomeworksPage.tsx under client/src/pages/ as follows:
// client/src/pages/HomeworksPage.tsx
import React from 'react';
import { HomeworkForm, HomeworkList } from '../components/Homeworks';

const HomeworksPage = () => {
  return (
    <>
      <HomeworkForm />
      <HomeworkList />
    </>
  )
}

export default HomeworksPage;And don't forget to add it to the index.tsx file in the same folder:
// client/src/pages/index.tsx
...
import HomeworksPage from './HomeworksPage';

function Pages() {
  return (
    <Router>
      <Navigation />
      <div id="roots" className="p-2">
        ...
        <Route path="/homeworks" exact component={HomeworksPage} />
        <Route path="/" exact component={Home} />
      </div>
    </Router>
  );
}
For the passwordless login let's create two new components: one that will serve as a login page, and another one that will have the form that students will see after authenticating.
Create PasswordlessLogin.tsx and HomeworkFileForm.tsx under client/src/components/Homeworks.
First, let's focus on creating the login form. To do so, our component will define one mutation for creating a verification request and another for making the actual verification.
The user interface will consist of a text box that requests the phone number and a button for initiating the request. After a requestId has been successfully returned by the server we want to show an additional text field for entering the code and a button for verification.
Populate the PasswordlessLogin.tsx file as follows:
// client/src/components/Homeworks/PasswordlessLogin.tsx
import { useMutation } from '@apollo/client';
import React, { useState } from 'react';
import { VERIFY_REQUEST, CHECK_CODE } from '../../data/mutations';

// the component receives a custom onLogin function that runs after a student has successfullysuccesfully authenticated
const PasswordlessLogin = ({
  onLogin,
}: {
  onLogin: (token: String) => void;
}) => {
  // setup the state for the controlled form
  const [number, setNumber] = useState('');
  const [code, setCode] = useState('');
  const [requestId, setRequestId] = useState<string | null>(null);

  // setup mutate functions for both request a verification and check the code
  const [verifyRequest] = useMutation<{
    verifyRequest: { requestId: string };
    verifyRequestVars: { number: string };
  }>(VERIFY_REQUEST, {
    // after getting the request id add it to the state
    onCompleted(data: { verifyRequest: { requestId: string } }) {
      setRequestId(data.verifyRequest.requestId);
    },
  });
  const [checkCode] = useMutation<{
    checkCode: { token: string };
    checkCodeVars: { requestId: string; code: string; number: string };
  }>(CHECK_CODE, {
    // after authenticating call the custom onLogin function
    onCompleted(data: { checkCode: { token: string } }) {
      if (data.checkCode.token) {
        onLogin(data.checkCode.token);
      }
    },
  });

  return (
    <>
      <form
        onSubmit={(e) => {
          // on submit check the code
          e.preventDefault();
          number && code && requestId && checkCode({
            variables: {
              requestId,
              code,
              number
            }
          });
        }}
      >
        <div className="form-row">
          <div className="col">
            <label htmlFor="number">Phone Number</label>
            <input
              type="text"
              className="form-control"
              id="number"
              placeholder="Enter phone number"
              value={number}
              onChange={(e) => setNumber(e.target.value)}
            />
          </div>
          <div className="col">
            <button
              onClick={(e) => {
                // when clicking this button initiate the verification
                number &&
                  verifyRequest({
                    variables: {
                      number,
                    },
                  });
              }}
            >
              Request code
            </button>
          </div>
        </div>
        {requestId && ( // only show the elements below if a requestId has been successfullysuccesfully returned by the server
          <>
            <div className="form-group">
              <label htmlFor="code">Code</label>
              <input
                type="text"
                className="form-control"
                id="code"
                placeholder="Enter one time code"
                value={code}
                onChange={(e) => setCode(e.target.value)}
              />
            </div>
            <button type="submit" className="btn btn-primary">
              Submit
            </button>
          </>
        )}
      </form>
    </>
  );
};

export default PasswordlessLogin;Next, create the form for uploading the file. This form will slightly differ from the ones we have previously built in this tutorial because it will be an uncontrolled form. Also, some extra steps need to be taken to upload the file to S3 before calling the mutate function.
Populate the HomeworkFileForm.tsx as follows:
// client/src/component/HomeworkFileForm.tsx
import React from 'react';
import { useMutation, useQuery } from '@apollo/client';
import {
  ADD_HOMEWORK_FILE,
  PRESIGN_HOMEWORK_FILE_UPLOAD,
} from '../../data/mutations';
import { GET_HOMEWORK } from '../../data/queries';
import { Homework } from '../../models';

// this components receives the uuid of the homework and the authentication token as properties
const HomeworkFileForm = ({ uuid, token }: { uuid: string; token: string }) => {
  // create a reference of the html element
  let homeworkFileRef: HTMLInputElement;

  // use the uuid to retrieve the information of the homework
  const { data, loading, error } = useQuery<
    { homework: Homework },
    { uuid: string }
  >(GET_HOMEWORK, {
    variables: {
      uuid
    }
  });

  // setup the mutate functions for presiging the file and for adding the reference to the database
  const [presignHomeworkFileUpload] = useMutation(PRESIGN_HOMEWORK_FILE_UPLOAD);
  const [addHomeworkFile] = useMutation(ADD_HOMEWORK_FILE);

  render the component
  return (
    <>
      {loading && <p>Loading...</p>}
      {error && <p>Error!</p>}
      {data && (
        <>
          <p>Description: {data.homework.description}</p>
          <form
            onSubmit={async (e) => {
              e.preventDefault();

              try {
                // get the file from the html element reference
                const file =
                  homeworkFileRef &&
                  homeworkFileRef.files &&
                  homeworkFileRef.files[0];

                // make sure a file was provided
                if (!file) {
                  throw new Error('file is not defined');
                }

                // get the presign informatio from the server
                const { data } = await presignHomeworkFileUpload({
                  variables: {
                    fileName: `homeworks/uuid/${Date.now()}`,
                    isPublic: true,
                    token,
                  },
                });

                // parse the stringified JSON
                const imageData = JSON.parse(data.presignDocument);

                // create a form programatically for sending the file to S3
                const formData = new FormData();

                // add the required headers
                formData.append('Content-Type', file?.type);
                formData.append('acl', 'public-read');

                // add the signing information
                Object.keys(imageData.fields).forEach((key) => {
                  formData.append(key, imageData.fields[key]);
                });

                // and finally add the file
                formData.append('file', file);

                // use fetch to send a POST requests to S3
                const result = await fetch(imageData.url, {
                  method: 'POST',
                  body: formData,
                });

                // if the file was uploaded sucessfully then add the file information to the database
                if (result.status >= 200 && result.status <= 299) {
                  addHomeworkFile({
                    variables: {
                      url: imageData.url + '/' + imageData.fields.Key,
                      uuid,
                      token,
                    },
                  });
                }
              } catch (err) {
                console.error('An error ocurred', err);
              }
            }}
          >
            <input
              id="homeworkFile"
              type="file"
              name="homeworkFile"
              ref={(node: HTMLInputElement) => (homeworkFileRef = node)}
            />
            <button type="submit">Send</button>
          </form>
        </>
      )}
    </>
  );
};

export default HomeworkFileForm;Now let's create a page that will show a different component depending on if the student has logged in or not. Create the client/src/pages/AddHomeworkFilePage.tsx file and populate as follows:
// client/src/pages/AddHomeworkFilePage.tsx
import React, {useState} from 'react';
import { useParams } from 'react-router-dom';
import { PasswordlessLogin, HomeworkFileForm } from '../components/Homeworks';

const AddHomeworkFilePage = () => {
  // setup the state for storing the token
  const [ token, setToken ] = useState<string | null>(null);
  // get the homework uuid from the url
  const { uuid } = useParams<{ uuid: string }>();

  // if a token exists show the homework form, if not show the login form
  return token ? <HomeworkFileForm token={token as string} uuid={uuid} /> : <PasswordlessLogin onLogin={(token) => setToken(token as string)} />
}

export default AddHomeworkFilePage;Again, don't forget to add the newly created page to the index.tsx in the same folder:
// client/src/pages/index.tsx
...
import AddHomeworkFilePage from './AddHomeworkFilePage';

function Pages() {
  return (
    <Router>
      <Navigation />
      <div id="roots" className="p-2">
        ...
        <Route path="/homeworks/:uuid/upload" exact component={AddHomeworkFilePage} />
       ...
      </div>
    </Router>
  );
}
...
The last thing we need to do is allow the teacher to actually check the homework files students have sent. To do so we will simply create a HomeworkFileList component similar to the ones we have just created for Students and Homeworks.
Create a new client/src/components/Homeworks/HomeworkFileList.tsx and populate it as follows to create the list of homework files:
// client/src/components/Homeworks/HomeworkFileList.tsx
import React from 'react';
import { useQuery } from '@apollo/client';
import { GET_HOMEWORK_FILES } from '../../data/queries';
import { HomeworkFile } from '../../models';

// the component get the uuid of the homework as property
const HomeworkFileList = ({ uuid }: { uuid: string }) => {
  // retrieve the submitted files for the given homework
  const { data, loading, error } = useQuery<
    { homeworkFiles: HomeworkFile[] },
    { uuid: string }
  >(GET_HOMEWORK_FILES, {
    variables: {
      uuid,
    },
  });

  // render the html elements
  return (
    <>
      {loading && <p>Loading...</p>}
      {error && <p>Error!</p>}
      {data && (
        <>
          <h1>Homework Files</h1>
          <p>{data.homeworkFiles.length > 0 && data.homeworkFiles[0].homework.description}</p>
          <table>
            <thead>
              <tr>
                <th>Phone Number</th>
                <th>Student Name</th>
                <th>Link</th>
              </tr>
            </thead>
            <tbody>
              {data.homeworkFiles.map((homeworkFile) => {
                return (
                  <tr key={homeworkFile.student.phoneNumber}>
                    <td>{homeworkFile.student.phoneNumber}</td>
                    <td>
                      {homeworkFile.student.firstName}
                      {homeworkFile.student.lastName}
                    </td>
                    <td>
                      <a
                        target="_blank"
                        rel="noopener noreferrer"
                        href={homeworkFile.url}
                      >
                        {homeworkFile.url}
                      </a>
                    </td>
                  </tr>
                );
              })}
            </tbody>
          </table>
        </>
      )}
    </>
  );
};

export default HomeworkFileList;Lastly, create the ListHomeworkFilesPage.tsx file under client/src/pages as shown below:
// client/src/pages/ListHomeworkFilesPage.tsx
import React from 'react';
import { useParams } from 'react-router-dom';
import { HomeworkFileList } from '../components/Homeworks';

const ListHomeworkFilesPage = () => {
  const { uuid } = useParams<{uuid: string}>();

  return <HomeworkFileList uuid={uuid} />
}

export default ListHomeworkFilesPage;And for the last time, don't forget to add the route to the index.tsx file in the same folder:
// client/src/pages/index.tsx
...
import ListHomeworkFilesPage from './ListHomeworkFilesPage';

function Pages() {
  return (
    <Router>
      <Navigation />
      <div id="roots" className="p-2">
        ...
        <Route path="/homeworks/:uuid/list" exact component={ListHomeworkFilesPage} />
        ...
      </div>
    </Router>
  );
}
...
And that's it! Hopefully, this post has given you an idea of what you can do to adapt to the "new normality" and how the cool stuff that is being developed at Vonage can help you to achieve it.
Share:
Héctor is a Computer Systems Engineer based in El Salvador. He works on DevOps, technical writing, and QA. He has plenty of experience with web applications and cloud services. When he is not in front of the computer he loves playing music, videogames and going on adventures with the love of his life: his wife ❤️