Share:
Steve is a self-proclaimed Mathlete, and King of Snark. He is also a lover of Greyhounds, twisty puzzles, and European Board Games. When not talking math to non-math people, and Java to non-Java people, he can be found sipping coffee and hacking on code.
Handle Keypad Input (DTMF) with Java
Time to read: 10 minutes
In a previous tutorial, we showed you how to create an application that can Receive a Phone Call with Java. In this tutorial, you will create an application that can receive a phone call and respond to user input using the Vonage Voice API.
To work through this tutorial, you will need a Vonage account. Sign up now if you don't already have an account.
You will be using Gradle to manage your dependencies and run your application. Additionally, you'll need to make sure you have a copy of the JDK installed. I will be using JDK 8 in this tutorial.
This tutorial will walk you through the following steps:
Using Gradle to setup a new Java project.
Using the Spark framework for controlling the call.
Purchasing a number and configuring your Vonage account to use that number with your application.
You will use Gradle to manage your dependencies and to create and run your Java application. From the command line, create a new Java project with the following commands:
The gradle init --type java-application command will create all of the folders you will need as well as a sample class where you will write your code.
You will use the Spark framework to intercept the HTTP call that Vonage uses when your number receives a call, and for the request that Vonage sends when input is received.
Add the following to your dependencies block in your build.gradle file:
compile 'com.sparkjava:spark-core:2.7.2'
compile 'com.nexmo:client:4.0.1'Your dependencies block should look like this:
dependencies {
    // This dependency is found on compile classpath of this component and consumers.
    compile 'com.google.guava:guava:23.0'
    compile 'com.sparkjava:spark-core:2.7.2'
    compile 'com.nexmo:client:4.0.1'

    // Use JUnit test framework
    testCompile 'junit:junit:4.12'
}
Gradle will create the App class in the src/main/java folder. Inside of this class is a getGreeting and a main method. You won't need the getGreeting method, so feel free to remove it.
Replace the contents of the main method, resolving any imports, with:
/*
* Route to answer incoming calls.
*/
Route answerRoute = (req, res) -> {
    TalkAction intro = new TalkAction
            .Builder("Hello. Please press any key to continue.")
            .build();

    InputAction input = new InputAction.Builder()
            .eventUrl(String.format("%s://%s/webhooks/dtmf", req.scheme(), req.host()))
            .maxDigits(1)
            .build();


    res.type("application/json");

    return new Ncco(intro, input).toJson();
};

/*
* Route to print out call event info.
*/
Route eventRoute = (req, res) -> {
    System.out.println(req.body());
    return "";
};

Spark.port(3000);
Spark.get("/webhooks/answer", answerRoute);
Spark.post("/webhooks/events", eventRoute);
This code will setup a route on http://localhost:3000/webhooks/answer which will respond with the following Nexmo Call Control Object (NCCO):
[
  {
    "text": "Hello please press any key to continue.",
    "action": "talk"
  },
  {
    "maxDigits": 1,
    "action": "input",
    "eventUrl": [
      "http://localhost:3000/webhooks/dtmf"
    ]
  }
]The talk action will instruct Vonage to speak the text property back to the caller. The input action will instruct Vonage to capture a single digit that the caller inputs and to send a POST request to eventUrl with this information.
A route will also be setup on http://localhost:3000/webhooks/events which Vonage will use to communicate call status changes.
When the caller presses a digit on their device, a Dual-Tone Multi-Frequency (DTMF) signal is created. Vonage uses this DTMF signal to determine which set of keys were pressed. Once this happens, Vonage sends a POST request to the eventUrl defined in the InputNcco.
Here is an example of the POST request which contains a JSON body:
{
    "dtmf": "5",
    "timed_out": false,
    "uuid": "some-uuid",
    "conversation_uuid": "some-conversation",
    "timestamp": "2018-08-14T19:59:02.528Z"
}In order to read this information in Java, you will need to a class which will map the JSON properties to Java properties. The Nexmo Java Client Library contains the InputEvent class for handing this mapping.
In the main method of the App class add the following route below the eventRoute:
/*
* Route which returns NCCO saying which DTMF code was received.
*/
Route inputRoute = (req, res) -> {
    InputEvent event = InputEvent.fromJson(req.body());

    TalkAction response = new TalkAction
            .Builder(String.format("You pressed %s, Goodbye.", event.getDtmf()))
            .build();

    res.type("application/json");

    return new Ncco(response).toJson();
};
Next, register the route by adding the following at the end of the main method:
Spark.post("/webhooks/dtmf", inputRoute);This route will respond with the following NCCO:
[
  {
    "text": "You pressed 6, Goodbye.",
    "action": "talk"
  }
]where 6 is the dtmf property of the json sent to /webhooks/dtmf.
You will need a Vonage number in order to receive phone calls. If you do not have a number you can use the Vonage CLI to find and then purchase one. Firstly pick an available number to buy:
And then buy one of the numbers available:
Take note of the number that is assigned to you on purchase. You will need this number to link your application and for testing.
In order to send an HTTP request to your application, Vonage needs to know the URL that your application is running on.
Instead of configuring your local network or hosting your application on an external service, you can use ngrok to safely expose your application to the internet.
Download ngrok and run the following command:
Take note of the forwarding address as you will need it when you configure your account. In the following picture, the forwarding address is http://99cad2de.ngrok.io.
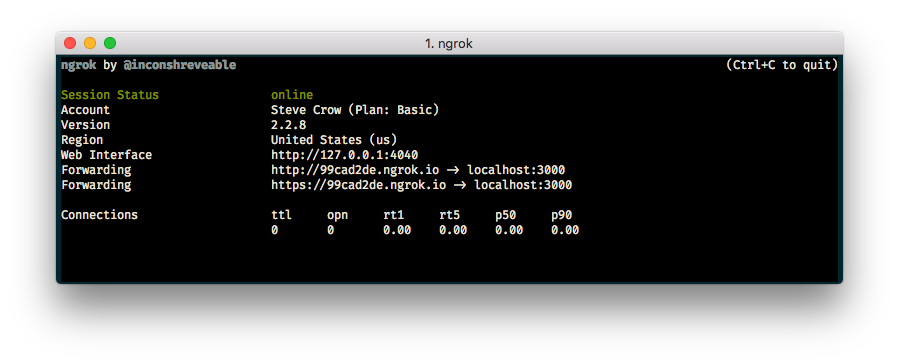 screenshot of ngrok
If you do not have an application you can use the Vonage CLI to create one using your ngrok forwarding address:
After running this command, you will be shown an an application id. For example: notreal-1111-2222-3333-appid. You will need this application id to link your phone number to the application.
You can use the Vonage CLI to link your phone number and application:
This command instructs Vonage to create a new application on your account. The application will send a request to the first URL when it receives a phone call. The application will send requests to the second URL when the call status changes.
Start your application with the gradle run command inside of your handle-user-input directory.
Make a call to your Vonage number and test out your application. You will hear the message, "Hello please press any key to continue." Press a digit on your phone's keypad and you will then hear the message, "You pressed 6, Goodbye" where 6 is the number that you pressed.
In a few lines of code you have created an application that can receive a phone call, capture user input, and respond with that input. Experiment with other ways you can use a user's input to control the call.
Check out our documentation on Nexmo Developer where you can learn more about call flow or Nexmo Call Control Objects. See our Nexmo Quickstart Examples for Java for full code examples on this tutorial and more.