Share:
Steve is a self-proclaimed Mathlete, and King of Snark. He is also a lover of Greyhounds, twisty puzzles, and European Board Games. When not talking math to non-math people, and Java to non-Java people, he can be found sipping coffee and hacking on code.
Forward a Phone Call via Voice Proxy with Java
Time to read: 10 minutes
Making phone calls is a necessity for some of us. But every time you put your phone number out there, you're exposing it to strangers. The balance between security and convenience is a fine line. What if you could mask your phone number by giving them a different phone number to call?
A voice proxy is a technique that allows you to protect private information between callers by masking each other's phone number behind an intermediary phone number.
In this tutorial, you will learn how to protect both caller and callee phone numbers by creating a voice proxy. When a person calls your Vonage number the phone call will be routed to your personal phone. The person calling you will only need to know your Vonage number and, as a bonus, you won't know their phone number either.
You will be using Gradle to manage your dependencies and run your application. Additionally, you'll need to make sure you have a copy of the JDK installed. I will be using JDK 11 in this tutorial, but anything JDK 8 and higher should work.
Finally, you'll need the Vonage CLI installed. You'll use it to purchase a phone number and configure your Vonage account to point at your new application.
This tutorial will walk you through the following steps:
Using Gradle to set up a new Java project.
Using the Spark framework for controlling the call.
Purchasing a number and configuring your Vonage account to use that number with your application.
You will use Gradle to manage your dependencies and to create and run your Java application.
The gradle init --type=java-application command will create all of the folders you will need as well as a sample class where you will be writing your code.
From the command line, create a new Java project with the following commands, accepting any of the default prompts from Gradle:
Gradle will create the App class in the src/main/java/forward/phone/call folder.
Inside of this class is a getGreeting and main method. You won’t need the getGreeting method, so feel free to remove it.
Your App class should look like this:
/*
 * This Java source file was generated by the Gradle 'init' task.
 */
package forward.phone.call;

public class App {
    public static void main(String[] args) {
        // Future Code Goes Here
    }
}
You will use the Spark framework to receive an HTTP call made by Vonage when your number gets a call.
Add the following to the dependencies block in your build.gradle file:
// Spark Framework
implementation 'com.sparkjava:spark-core:2.8.0'

// Vonage Java Client
implementation 'com.nexmo:client:4.2.1'Your dependencies block should look like this:
dependencies {
    implementation 'com.sparkjava:spark-core:2.8.0'
    implementation 'com.nexmo:client:4.2.1'

    // Use JUnit test framework
    testImplementation 'junit:junit:4.12'
}
When a call is received, Vonage will send a request to a pre-defined webhook URL. It expects to receive a Vonage Call Control Object (NCCO) containing a list of actions to execute.
You will be using the connect action to forward incoming calls to Vonage to your phone. The connect action is used to connect calls to endpoints such as phone numbers.
This is the resulting NCCO that your application will create:
[
    {
        "endpoint": [
            {
                "number": "16165551234",
                "type": "phone"
            }
        ],
        "from": "16165559876",
        "action": "connect"
    }
]You will use the ConnectAction and PhoneEndpoint classes from the Vonage Java Client Library for building the above NCCO.
This will require two variables, the phone number that you want to connect calls to, and the Vonage number you want to make the call with.
First, define the phone number you want to connect calls to by adding the following constant to the App class. The phone number you replace it with should start with a country code and no leading +:
private static final String YOUR_SECOND_NUMBER = "16165551234";Vonage sends the to parameter to your webhook which contains the Vonage number that was called. You can use this same number to call you by adding it as a from parameter.
Now define the answer route by adding the following code to the main method of the App class, resolving any imports:
/*
* Route to answer incoming calls with an NCCO response.
*/
Route answerRoute = (req, res) -> {
    String vonageNumber = req.queryParams("to");

    ConnectAction connect = ConnectAction.builder()
            .endpoint(PhoneEndpoint.builder(YOUR_SECOND_NUMBER).build())
            .from(vonageNumber)
            .build();

    res.type("application/json");

    return new Ncco(connect).toJson();
};
To use the answer route, you need to configure Spark. Your application will listen on port 3000, and the route will be configured on /webhooks/answer.
Add the following to the main method of the App class:
Spark.port(3000);
Spark.get("/webhooks/answer", answerRoute);
You will need a Vonage number to receive phone calls. If you do not have a number you can use the Vonage CLI to purchase one.
First, search for an available number with voice capability (in this example, we use US for the country code):
Pick a number from the list generated and then insert it in the following command:
Take note of the number that is assigned to you. You will need this number to link your application and for testing.
To send an HTTP request to your application, Vonage needs to know the URL that your application is running on.
Instead of configuring your local network or hosting your application on an external service, you can use ngrok to expose your application to the internet safely.
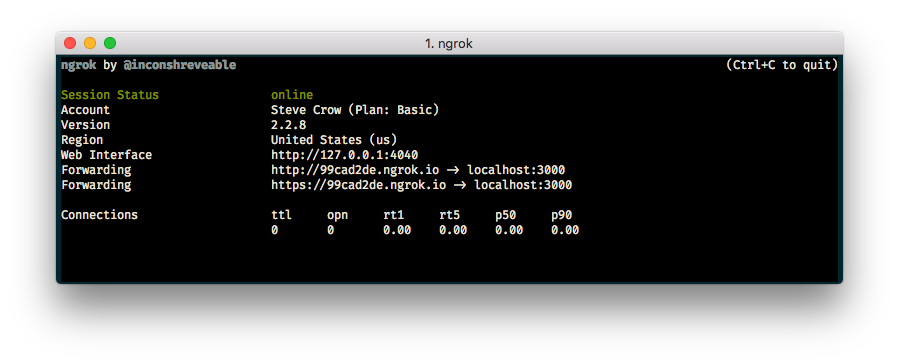
Download ngrok and run the following command:
Take note of the forwarding address as you will need it when you configure your account. In the following picture, the forwarding address is http://99cad2de.ngrok.io.
If you do not have an application you can use the Vonage CLI to create one using your ngrok forwarding address:
After running this command, you will be shown an application id. For example: notreal-1111-2222-3333-appid. You will need this application id to link your phone number to the application.
You can use the Vonage CLI to link your phone number and application:
Start your application with the gradle run command inside of your forward-phone-call directory.
Grab a friend, colleague, or a second phone and call your Vonage number. Your other phone should start ringing. Upon answering the phone, you will both be connected as if you called each other directly.
In a few lines of code, you have created an application that can forward phone calls from your Vonage number to your personal phone.
Check out our documentation on Vonage Developer where you can learn more about call flow or Vonage Call Control Objects. You can also take a look at the Connect an Inbound Call code snippet for this example and more.