
Share:
IOS Developer turned Data Science / Machine Learning enthusiast. I want people to understand what machine learning is and how we can use it in our applications.
Building a Dog Breed Detector Using Machine Learning
Time to read: 10 minutes
Here, at Nexmo, we use Facebook Workplace as one of our many channels for communication. If you haven't used it or heard about it, it's just like Facebook, but for companies. All of us here at Nexmo have an account, and we are able to view and join different groups throughout the organization.
A few months ago, one of our coworkers created a group for showing our pets, and it was a great idea, and a lot of members on the team post photos of their pets. I check the group almost everyday, and it’s a good way to enjoy the finer things in life (puppies!).
 wp-group
So after looking at everyone's photo of their dog, cat, and even bunnies, some people asked, "What breed is that?". Once I saw that, I had an idea, to build a machine learning algorithm to figure out what dog breed was in the photo.
In this post, we’re going to learn how to build a dog breed detector using Keras, which is a very popular framework for building machine learning models.
This post assumed you know some Python as well as having a very basic understanding of machine learning. You should know what Keras is and how to train a basic machine learning model.
In order to tackle many machine learning problems, you need data, and lots of it. Specifically, we need photos of a lot of dogs, and what kind of breeds there are. For this project, we are going to use the dataset from the Dog Breed Identification Challenge on Kaggle. This dataset contains over 10,000 images of dogs, categorized by breed.
First, let’s start with building the model. I'll be using Google Colab to build my Jupyter Notebook, in Python. A Jupyter Notebook is a open sourced web app that lets you write code, as well as text and images. It’s a great way to get started. Google Colab is a free service that will host your Jupyter Notebooks.
Note: If you want to see how the model is built, you can view my notebook here.
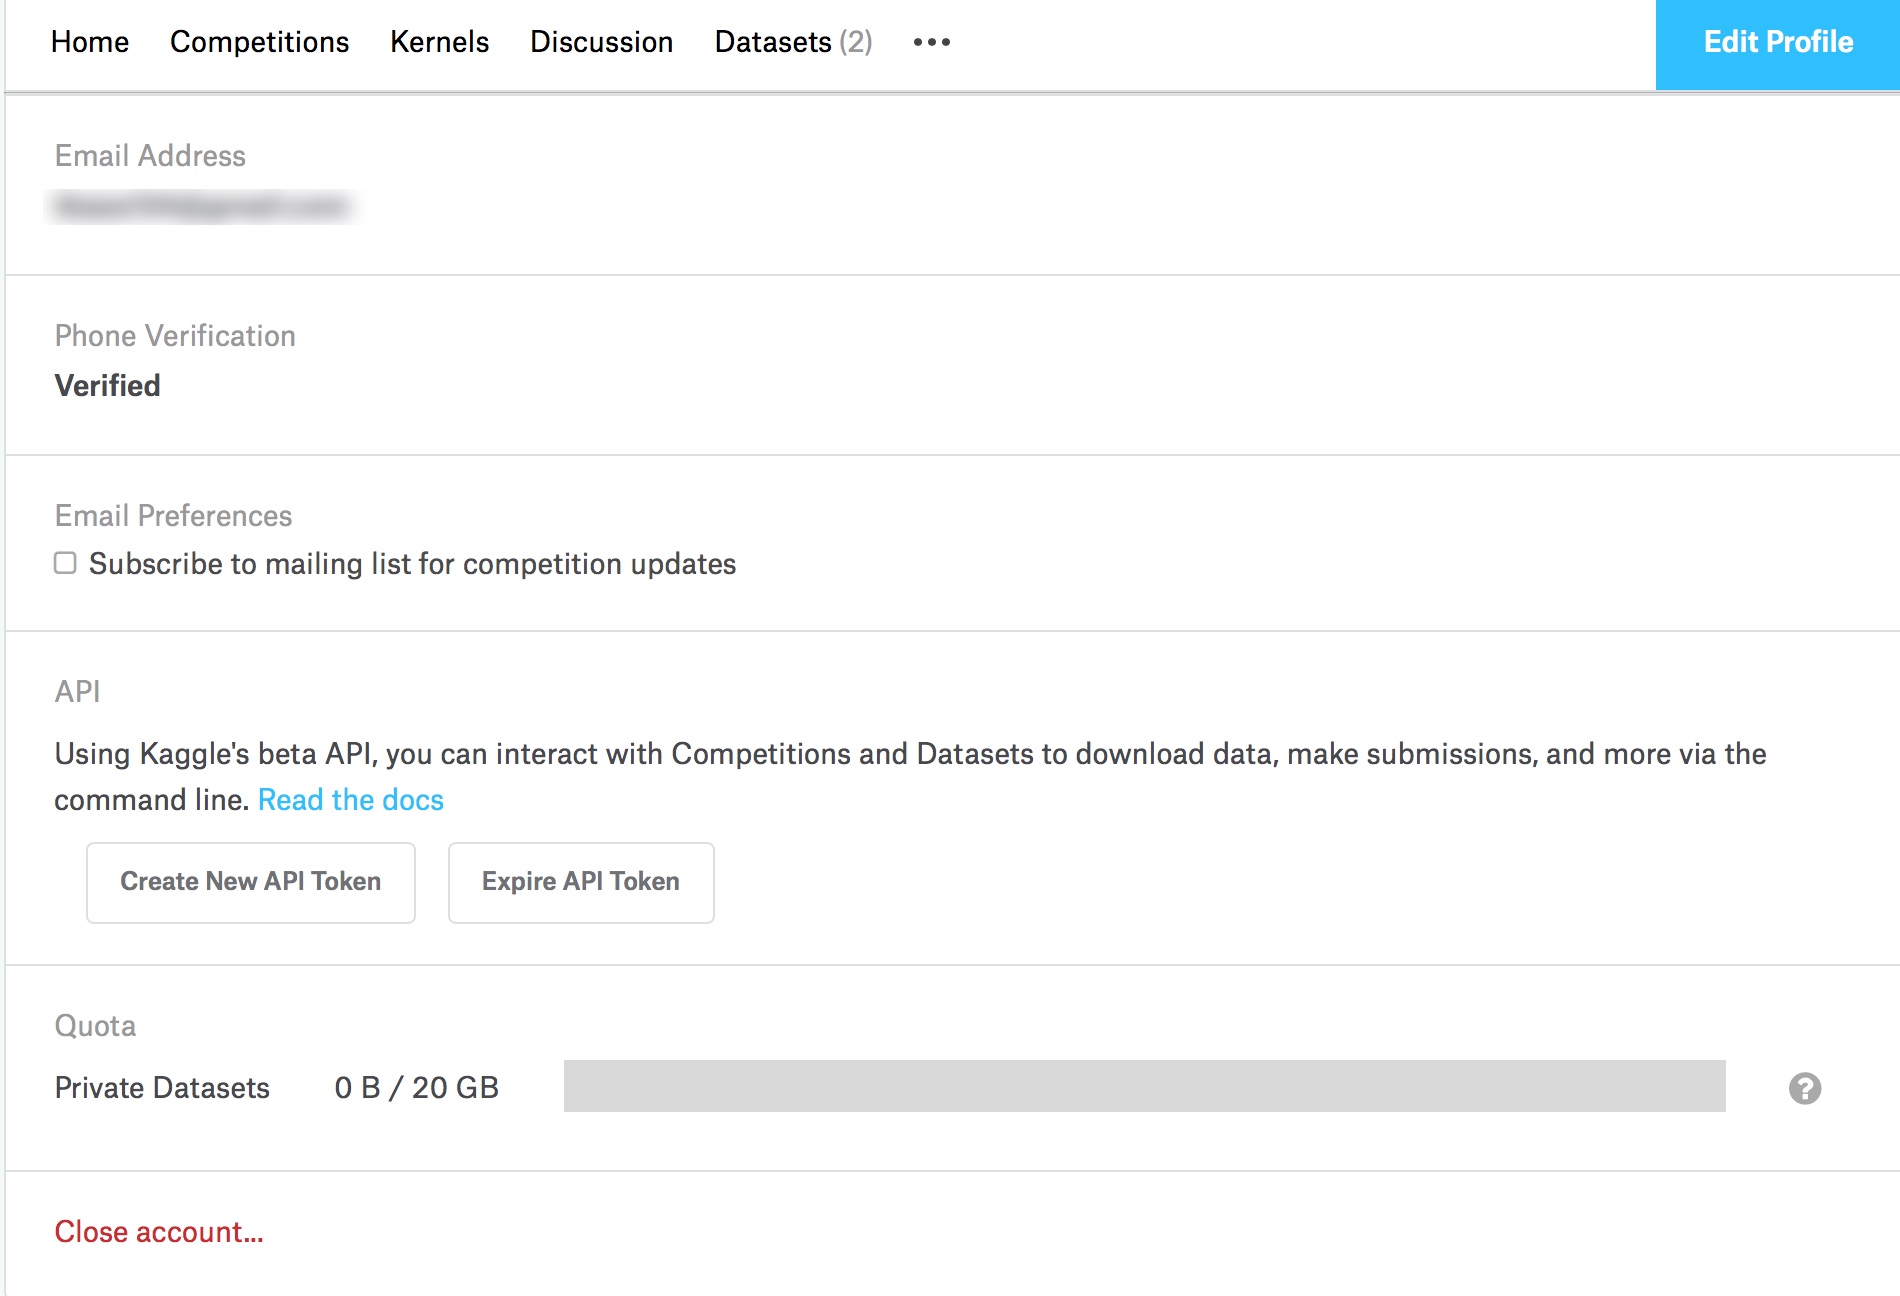
Before building the model, we need to get the data, which is hosted on Kaggle. To load the data, we need to use a package to download the data to our notebook, using the Kaggle API. This will allow us to download the dataset for the Dog Breed Competition. Before we can download the dataset, we need to create an account on Kaggle, and get your Kaggle API key and secret.
 kaggle-create-api-token
Go to "Create New API Token", and save the file to your machine. To download the data, we'll run this cell.
# Run this cell and select the kaggle.json file downloaded
# from the Kaggle account settings page.
from google.colab import files
files.upload()
# Let's make sure the kaggle.json file is present.
!ls -lha kaggle.json
# Next, install the Kaggle API client.
!pip install -q kaggle

# The Kaggle API client expects this file to be in ~/.kaggle,
# so move it there.
!mkdir -p ~/.kaggle
!cp kaggle.json ~/.kaggle/

# This permissions change avoids a warning on Kaggle tool startup.
!chmod 600 ~/.kaggle/kaggle.json

#download the dataset for the dog-breed identification challenge https://www.kaggle.com/c/dog-breed-identification
!kaggle competitions download -c dog-breed-identification

#unzip the downloaded files
!unzip labels.csv.zip
!unzip test.zip
!unzip train.zipIf you don’t understand every line in this code and any other section of code, don’t worry. You will be able to copy and paste the source to run everything yourself, without having to worry about the details.
When you run this cell, it will prompt you to select a file. Find the JSON file that was downloaded from Kaggle, and upload to the cell. You will then be able to run the Kaggle API and download the dataset into the notebook. Once the files are downloaded, we’ll unzip the files using !unzip. The ! before the command allows you to run a command line action inside Google Colab. The !unzip command just unzip’s each file.
The downloaded files from Kaggle contain the following:
Training Images, located the
\trainfolderTest Images, located in the
\testfolderA CSV file called
labels.csv, containing the breed name and the filename, which points to the image in the training folder.
Now, we can load our data into a Dataframe, using Pandas. A DataFrame, is a simple data structure that contains rows and columns, kind of like a CSV. Pandas is a Python package that provides high-performance, easy-to-use data structures and data analysis tools. It’s used in a lot of machine learning applications. If you do any machine learning applications, one of the first packages you’ll be using is Pandas. If you want to learn more about Pandas, check out their own tutorial, 10 minutes tutorial to pandas.
Using Pandas, we can import the csv from the Kaggle dataset into a Pandas Dataframe.
#import the necessary packages
import pandas as pd
import numpy as np
#constants
num_classes = 12 # the number of breeds we want to classify
seed = 42 # makes the random numbers in numpy predictable
im_size = 299 # This size of the images
batch_size = 32
#read the csv into a dataframe, group the breeds by name and append the path the to image in the `filename` column
df = pd.read_csv('labels.csv')
selected_breed_list = list(df.groupby('breed').count().sort_values(by='id', ascending=False).head(num_classes).index)
df = df[df['breed'].isin(selected_breed_list)]
df['filename'] = df.apply(lambda x: ('train/' + x['id'] + '.jpg'), axis=1)
breeds = pd.Series(df['breed'])
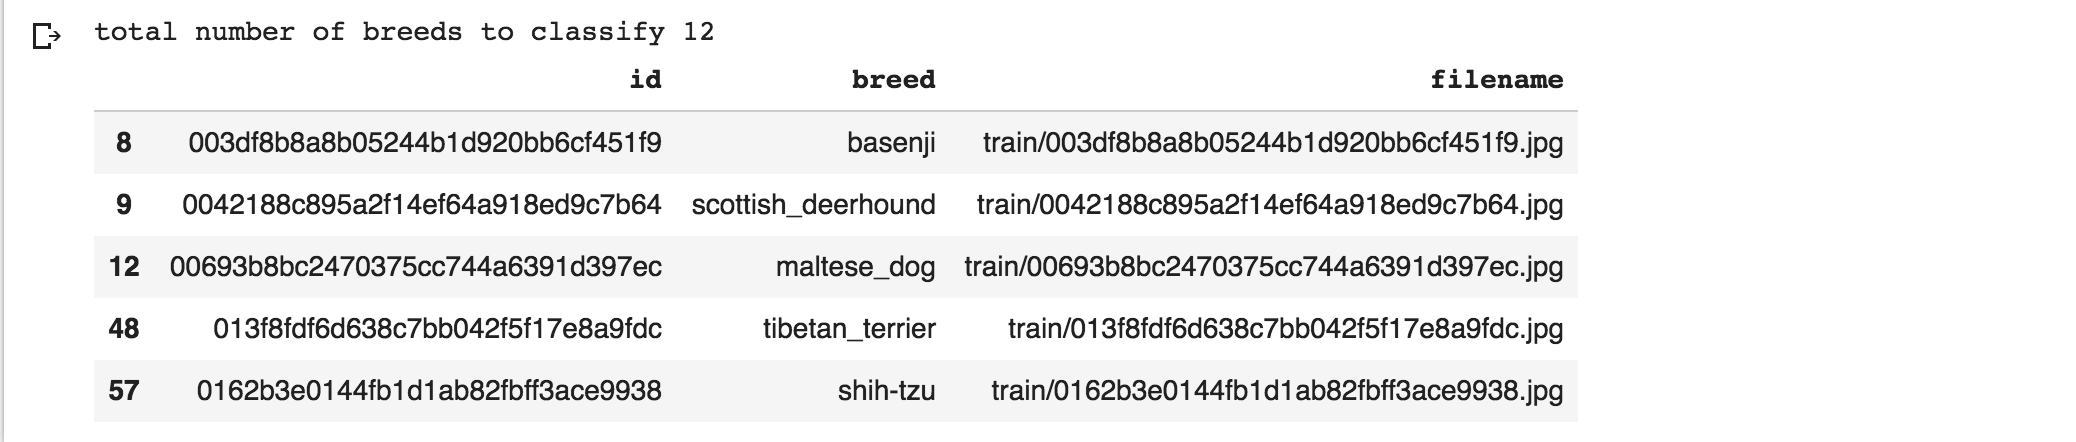
print("total number of breeds to classify",len(breeds.unique()))
df.head()This takes the csv, loads it into a DataFrame pd.read_csv('labels.csv'), then sorts the DataFrame by breed alphabetically. Then, we print out the first 10 rows using df.head()
 df_head
Next, we need to write a function that will resize all the images to the size we need, which is 299x299px. It will be clear why we need to resize the image later.
from keras.preprocessing import image

def read_img(img_id, train_or_test, size):
    """Read and resize image.
    # Arguments
    img_id: string
    train_or_test: string 'train' or 'test'.
    size: resize the original image.
    # Returns
    Image as numpy array.
    """
    path = train_or_test + "/" + img_id + ".jpg"
    img = image.load_img(path, target_size=size)
return image.img_to_array(img)The read_img() function will load the image at the size we need (299x299px) and convert it to a multi-dimensional numpy array. Numpy is another Python package that is used in machine learning very frequently. It makes it easier to work with these types of arrays in Python.
Next, we need to convert the breed names (basenji, scottish_deerhound) into vectors (1 dimensional array of numbers), since our machine learning model can only deal with numbers. To do this, we'll use Scikit Learn's LabelEncoder. A LabelEncoder takes all the breed names and converts the name of the breed into a integer. Each number will be different for each breed (0 for basenji, 1 for scottish_deerhound etc). Scikit-Learn is another another open source package that makes getting into machine learning easier.
Next, we'll split the dataset in two, one for training and the other for testing. When we train our model, we'll use the data from the training set to train the model, then, when we need to see how well it did, we'll test the model on the test set.
from sklearn.preprocessing import LabelEncoder
label_enc = LabelEncoder()
np.random.seed(seed=seed)
rnd = np.random.random(len(df))
train_idx = rnd < 0.9 valid_idx = rnd >= 0.9
y_train = label_enc.fit_transform(df["breed"].values)
ytr = y_train[train_idx]
yv = y_train[valid_idx]
Finally, we'll take all the images in the training set, and resize them using the read_img function we created earlier. Then we need to process each image to put it in the correct format that our model is expecting .
from tqdm import tqdm
from keras.applications import xception

x_train = np.zeros((train_idx.sum(), im_size, im_size, 3), dtype='float32')
x_valid = np.zeros((valid_idx.sum(), im_size, im_size, 3), dtype='float32')
train_i = 0
valid_i = 0
for i, img_id in tqdm(enumerate(df['id'])):
    img = read_img(img_id, 'train', (im_size, im_size))
    x = xception.preprocess_input(np.expand_dims(img.copy(), axis=0))
    if train_idx[i]:
        x_train[train_i] = x
        train_i += 1
    elif valid_idx[i]:
        x_valid[valid_i] = x
        valid_i += 1
print('Train Images shape: {} size: {:,}'.format(x_train.shape, x_train.size))

[00:06, 201.73it/s]Train Images shape: (1218, 299, 299, 3) size: 326,671,254In this function, we loop through every item in our DataFrame (for i, img_id in tqdm(enumerate(df['id'])): and call the read_image function, which takes the img_id, which is ID of the image, which correlates to the file name of the image from the \train folder, and resize to 299x299px. We then call the xception.preprocess_input function.
Before we get to what this function does, we’ll need to understand what xception is.
Training models from scratch requires a lot more images than the amount we have (10k), as well as a lot of computing time and resources. In order to accelerate this process, we can use a technique called Transfer Learning. Than means, we can use a model than was pre trained, on another dataset, such as Imagenet dataset. Xception is one of those pretrained models. We can count on the pretrained model with extracting features from the image. We will then just train model for our specific use case: determining the breed.
I’ve experimented with a few models, and found that Xception gives the best results for the breed detection use case, with the images dataset we’re using.
For other datasets, there may be other models that are more suited to your needs for better results. So make sure to make a few tests before deciding on which model to use. To learn more about this and other pretrained models, check out this (https://www.pyimagesearch.com/2017/03/20/imagenet-vggnet-resnet-inception-xception-keras/). This post also goes over what ImageNet is and how it related to this pretrained models.
OK, now let’s get back to what the xception.preprocess_input() function does. This takes the image, which is now a numpy array, and converts it into a format that the Xception model is expecting, in which all the values in the array are between -1 and 1, which is known as normalization.
Now, we can build our model.
Since we are using Xception as our base model, our custom model is very simple. For our own model, we'll load the output from Xception, which is all the layers that have already been trained on images from Imagenet, then build a Sequential model.
From the Keras blog: "The Sequential model is a linear stack of layers." - Getting started with the Keras Sequential model
All this means is that we can stack other layers on top of the Xception model. This will allow our model to train on our dog images.
Here's our model. Source
from keras.layers import GlobalAveragePooling2D, Dense, BatchNormalization, Dropout
from keras.optimizers import Adam, SGD, RMSprop
from keras.models import Model, Input

# create the base pre-trained model
base_model = xception.Xception(weights='imagenet', include_top=False)
# first: train only the top layers (which were randomly initialized)
# i.e. freeze all convolutional Xception layers
for layer in base_model.layers:
    layer.trainable = False

# add a global spatial average pooling layer
x = base_model.output
x = BatchNormalization()(x)
x = GlobalAveragePooling2D()(x)
# let's add a fully-connected layer
x = Dropout(0.5)(x)
x = Dense(1024, activation='relu')(x)
x = Dropout(0.5)(x)
# and a logistic layer and set it to the number of breeds we want to classify,
predictions = Dense(num_classes, activation='softmax')(x)

# this is the model we will train
model = Model(inputs=base_model.input, outputs=predictions)First we take our base_model, which is Xception, then, Freeze the layers. This means that we won't do any training on those layers, since they have already been trained. Next, we'll take the output from the base_model and add the following layers:
BatchNormalization - applies a transformation that maintains the mean activation close to 0 and the activation standard deviation close to 1.
GlobalAveragePooling2D layer - reduces the number of parameters to learn.
Dropout - randomly turns off inputs to prevent overfitting.
Dense layer - which connects every neuron in the network.
followed by another Dropout layer.
Finally, we create another Dense layer, and set it to the number of breeds we are training for.
Selecting these layers are based on trial and error. There is no known way to determine a good network structure when building your model. When building your own models, Stack Overflow is your best friend.
Now, we’ll start building out actually training the model. The way I am training the model is very basic. You'll see this type of code when going through other models in Keras. Source
import datetime
from keras.callbacks import EarlyStopping, ModelCheckpoint

epochs = 1
learning_rate = 0.001

# checkpoints
early_stopping = EarlyStopping(monitor='val_acc', patience=5)
STAMP = "{}_dog_breed_model".format(datetime.date.today().strftime("%Y-%m-%d"))

bst_model_path = "{}.h5".format(STAMP)
model_checkpoint = ModelCheckpoint(bst_model_path,
save_best_only=True,
save_weights_only=False,
verbose=1)
# compile the model
optimizer = RMSprop(lr=learning_rate, rho=0.9)
model.compile(optimizer=optimizer,
loss='sparse_categorical_crossentropy',
metrics=["accuracy"])

hist = model.fit_generator(train_generator,
steps_per_epoch=train_idx.sum() // batch_size,
epochs=epochs, callbacks=[early_stopping, model_checkpoint],
validation_data=valid_generator,
validation_steps=valid_idx.sum() // batch_size)

model.save(bst_model_path)We first add some callback functions, which are functions that we run after each round of training, also known as a epoch. We have 2 callbacks:
early_stoppingwith thepatienceparameter of 5: This will stop the training if the model does not improve after 5 epochs.model_checkpoint: This saves the model to a file for later use.
Next we set the optimizer to RMSprop. An optimizer is how the model 'learns'. For each epoch, the model calculates the loss function, which is how bad the model did, as compared the test set. The goal is to make this loss as low as possible, which is called Gradient Descent. Keras supports many optimizers, and in my experiments, RMSProp, which performs Gradient Descent, seemed to work best.
Next we'll build the model using model.compile function, which accepts the optimizer, what loss function we want to calculate (sparse_categorical_crossentropy), and setting the metrics parameter to accuracy, which will tell us how accurate the model is after each epoch.
After that, we'll do our training by calling model.fit_generator(). This function’s parameters are: ImageDataGenerator's for both our training set and test set, how many steps we will run, number of epochs, what to validate on, and the number of steps to validate. We'll train this model for 10 epoch's for now, just to see how we did.
Epoch 1/10
38/38 [==============================] - 40s 1s/step - loss: 0.5477 - acc: 0.8281 - val_loss: 0.0555 - val_acc: 0.9766

*skipping output for readability*

Epoch 10/10
38/38 [==============================] - 33s 857ms/step - loss: 0.2426 - acc: 0.9358 - val_loss: 0.0457 - val_acc: 0.9905So, we have a model that is 99% accurate when predicting 12 breeds!
Now, we can test our model on some images of dogs and see if we are able to get the correct breed from that image. We'll write a function that takes an image from the internet, format it to what the model expects (299x299px image) and make the prediction using model.predict(). This function takes in a image, as a numpy array, and returns the output as a list of probabilities for each breed. We use np.argmax() to find the index of the highest probability from the output of model.predict(). To return the name of the breed, we use the labels.csv that we loaded from the Kaggle dataset which contains the 12 breed names. We'll then sort the list alphabetically and return the breed name.
from keras.models import load_model
from keras.preprocessing import image
import matplotlib.pyplot as plt
import numpy as np
import os

def predict_from_image(img_path):
    img = image.load_img(img_path, target_size=(299, 299))
    img_tensor = image.img_to_array(img) # (height, width, channels)
    img_tensor = np.expand_dims(img_tensor, axis=0) # (1, height, width, channels), add a dimension because the model expects this shape: (batch_size, height, width, channels)
    img_tensor /= 255.

    pred = model.predict(img_tensor)
    predicted_class = sorted_breeds_list[np.argmax(pred)]
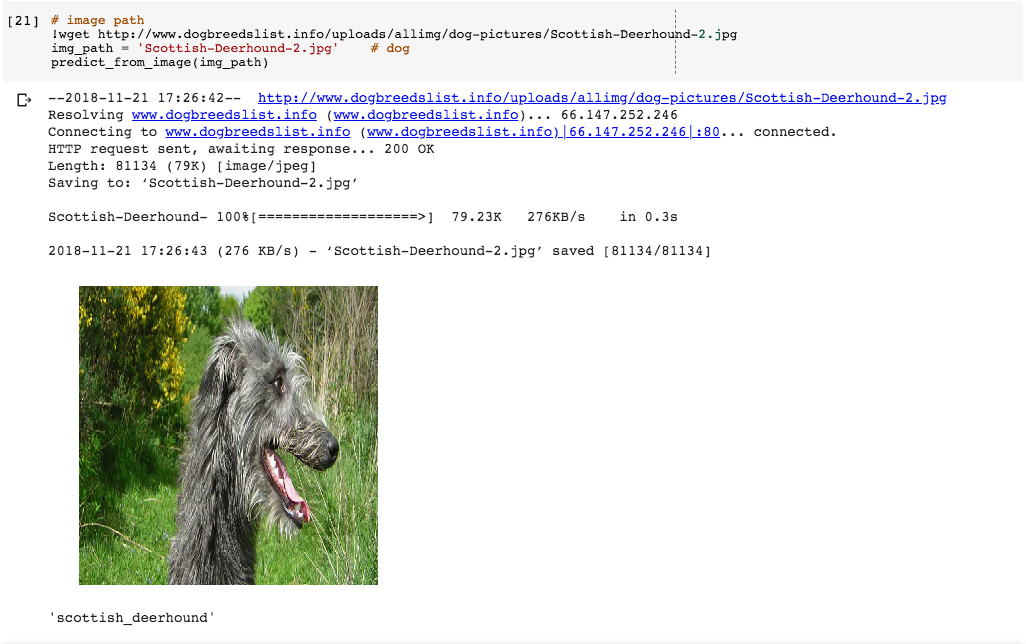
return predicted_classNow let’s just test this function, just to be sure it’s working. We’ll download a photo of a Scottish Deerhound, using wget, which is command line utility to download files, and see how the model does.
 predict
Nice! The model predicts that the dog in the photo is a Scottish Deerhound, which it is!
From this post, we’ve learned how to build our own machine learning model using Keras, train our model by using Transfer Learning and learned how to make predictions using our model.
In a future post, we’ll go over how to deploy this model to a server as a simple API for others to use. Then, we’ll go about building a Workplace Bot that allows anyone in our Workplace` group to ask what breed of dog is in a photo from a Workplace post.