Dockerize Python Queue Manager Project for Easy Deployment
Last month, I showed you how to build an SMS-based queue management application with Python and Flask. That application was great for showing a basic example of using the Nexmo SMS API, but it was really only good for prototyping and doing local development. In this post, I'll walk through a few steps you can take to make that application more production ready, with the end result being a Dockerized version of the application that you can deploy straight to Heroku.
Along the way, we'll talk a little bit about:
Best practices for managing secrets
Containers and why they are useful
Working with an application server that can handle production traffic
A Heroku account
The Heroku CLI
ngrok (for testing locally)
If you followed along with my first post on building a queue management app, all you need to get started with this one is to cover all the prequisites listed above. If you're just joining, you can clone the finished app from before:
git clone https://github.com/nexmo-community/sms-queue-notify.gitYou can also start with the finished, Dockerized version of the project:
git clone https://github.com/nexmo-community/docker-queue-manager.gitMany of the setup steps and build commands in this post will still need to be done, but you won't have to make any changes to the code.
Wherever you're starting, make sure you're currently in your project directory:
cd sms-queue-notifyor
cd docker-queue-manager
Previously, I had you place your Nexmo key, secret, and phone number directly at the top of main.py. While this worked for demonstrating a simple app without a lot of moving pieces, in general you would want to make sure your credentials are seperate from your code. So the first modification we'll make to main.py is to read our secrets directly from environment variables. Change the following lines:
NEXMO_KEY = <Your Nexmo Key>
NEXMO_SECRET = <Your Nexmo Secret>
NEXMO_NUMBER = <Your Nexmo Number>to:
NEXMO_KEY = os.environ['NEXMO_KEY']
NEXMO_SECRET = os.environ['NEXMO_SECRET']
NEXMO_NUMBER = os.environ['NEXMO_NUMBER']Next, you'll want to make sure you don't accidentally publish your secrets anywhere public. If you don't already have one, create a .gitignore file and make sure you have .env listed. While you're at it, create a .dockerignore file with the following:
.env
.gitNow you can create a new file named .env to hold your sensitive information. The contents of the file should be:
NEXMO_KEY=<Your Nexmo Key>
NEXMO_SECRET=<Your Nexmo Secret>
NEXMO_NUMBER=<Your Nexmo Number>Note that formatting is important here. There are no spaces around the equal signs, and unlike when you had these values in main.py, they should not be enclosed in quotes.
If you wanted to test your app now, you could run the following in the terminal to set environment variables based on the .env file:
set -o allexport
source .env
set +o allexportWe'll be using Docker to test the changes to our app, which can read from the .env file directly.
At the very end of main.py, you'll see the following:
if __name__ == '__main__':
app.run(debug=True, threaded=True)This configuration, with debug=True, is great for testing the application, as it allows changes to made without having to restart the server every time. This debug mode is only meant for development purposes, and should not be used in production.
The other piece of configuration, threaded=True, relates to server-sent events, which require threading to work properly. As you'll learn shortly, we'll be handling requests with a separate application server, so we can remove this bit of configuration as well. The updated main.py should look like:
if __name__ == '__main__':
    app.run()
To make our project easy to deploy, we're going to package everything up into a Docker container. Containers are a lightweight way to make sure your application has all the resources it needs to run, including the correct operating system and dependencies. Bundling our application as a container makes it possible to deploy across a variety of platforms without having to worry about what other processes, configuration, and software already exists.
Docker builds container images using something called a Dockerfile, which lists line-by-line the steps that are needed to create the environment your app will run in. It's a recipe that tells Docker how to replicate the setup you know is needed for your application to run correctly. Each line of the Dockerfile creates a layer, and when you rebuild a Docker image only the layers that have changes will be rebuilt. This means you want to start with the most general setup at the top (OS and required packages) and work towards more specific requirements.
For our application, let's start with a new file named Dockerfile that contains the following:
FROM python:3.6-slim-buster

COPY requirements.txt requirements.txt

RUN pip install -r requirements.txtThis tells Docker to start with a base image that includes a lightweight version of the Debian Buster OS as well as Python version 3.6. This is a standard base image that is available from Docker Hub, a public registry of container images.
The next two lines of the Dockerfile ensure that the required dependencies for our application (Flask, Flask-SQLAlchemy, and the Nexmo SDK) are installed. Unless changes to requirements.txt are made or a different base image is used, these steps will only need to be done once. Subsequent builds (for things like changes to the code) can use these already existing layers.
Flask has a built-in web server for testing purposes, which is what we used in the previous post. This server is not intented for production use—it's meant primarily to handle one request at a time, and it won't scale to handle the traffic expected of a production application.
In production, you want to make sure you have a dedicated web server and a separate application server that handles communication with your Python application. Two common choices for these are Nginx and Gunicorn. As we are planning to deploy to Heroku, which provides a web server for you, we'll only need to include Gunicorn (as well as gevent to handle threading). Add the following to your Dockerfile:
RUN pip install gunicorn gevent
If you recall from the first post, we created our database using some Python commands directly at the command line. This doesn't work so well when you're deploying your app in a container, as you don't want to be doing manual steps to set up your environment. To help keep things automated, create a new create_db.py file that looks like this:
from main import db
db.create_all()That was easy! Now we can finish up our Dockerfile with the following:
COPY . /app

WORKDIR /app

CMD python create_db.py && gunicorn -k gevent -b 0.0.0.0:$PORT main:app
These last steps copy the contents of you project directory to a folder named /app in the container, which is then set as the working directory. The last line tells the container what commands to run when it is started up: first create the database, and when that is done kick off a gunicorn server to run our app. The $PORT environment variable is set by Heroku when the container runs.
Now that the Dockerfile is complete, it's easy to test that everything is working locally. First, be sure that Docker is running on your computer. Then run the following in your project directory to build a Docker image, using --tag to set an easy-to-reference name:
docker build --tag queue_app .If that builds successfully, you can now run the container:
docker run -d -p 5000:5000 --env-file .env -e PORT=5000 queue_appNotice that we are loading our secrets from the .env file and setting the PORT environment variable ourselves.
Once you container is running, you should be able to open a browser, go to localhost:5000, and see your app!
There's still one more step if you want to fully test your app. In the previous post you set up ngrok to make your application accessible via the web. You'll need to do this again if you want to test sending an SMS message to the app. Open a new terminal window and run the following:
ngrok http 5000Then make sure to go to the Nexmo dashboard and copy the forwarding URL into your number's settings in the Inbound Webhook URL field, like so: https://<your ngrok ID>.ngrok.io/webhooks/inbound-sms (see previous post for details).
Now you should be able to interact with your application via text just like before! Only now, if you stop your container and restart, you'll find the database will be completely reset.
In our development version of the app, we used a SQLite database to store information about who was waiting in the queue. SQLite created the database as a file in the project directory, which made setup straightforward. In a container-based setup this doesn't work, as the container's file system won't persist if the container needs to be restarted. It also makes it tough to scale the app across multiple containers, as there's no shared datasource.
Luckily, we used Flask-SQLAlchemy to abstract the database specifics from our code, so swapping our SQLite for a Heroku-provided Postgres database is incredibly simple. The Postgres database sits outside the container, so it will persist even when the container is restarted and can be accessed by multiple containers.
When Heroku creates a Postgres database, the database url is stored in the DATABASE_URL environment variable. The only change we need to make to our code to switch from SQLite to the Heroku Postgres database is replacing this line in main.py:
db_path = "sqlite:///queue.db"with this:
db_path = os.environ['DATABASE_URL']Then we need to update the line of our Dockerfile that says:
RUN pip install gunicorn geventto say:
RUN pip install gunicorn gevent psycopg2-binaryThe psycopg2 package is a Postgres database adapter specifically made for Python.
The final step is to create a Postgres database on Heroku, which requires you to first log in to the Heroku CLI and create a Heroku application:
heroku login
heroku create <your application name>Next, create the database, being sure to include your application name:
heroku addons:create heroku-postgresql:hobby-dev -a <your application name>
With your application and database initialized on Heroku, there are only a few more steps necessary to get your Dockerized app deployed. First, you'll want to set your Nexmo credentials as Heroku Config Vars, which is done on the Heroku dashboard under "Settings":
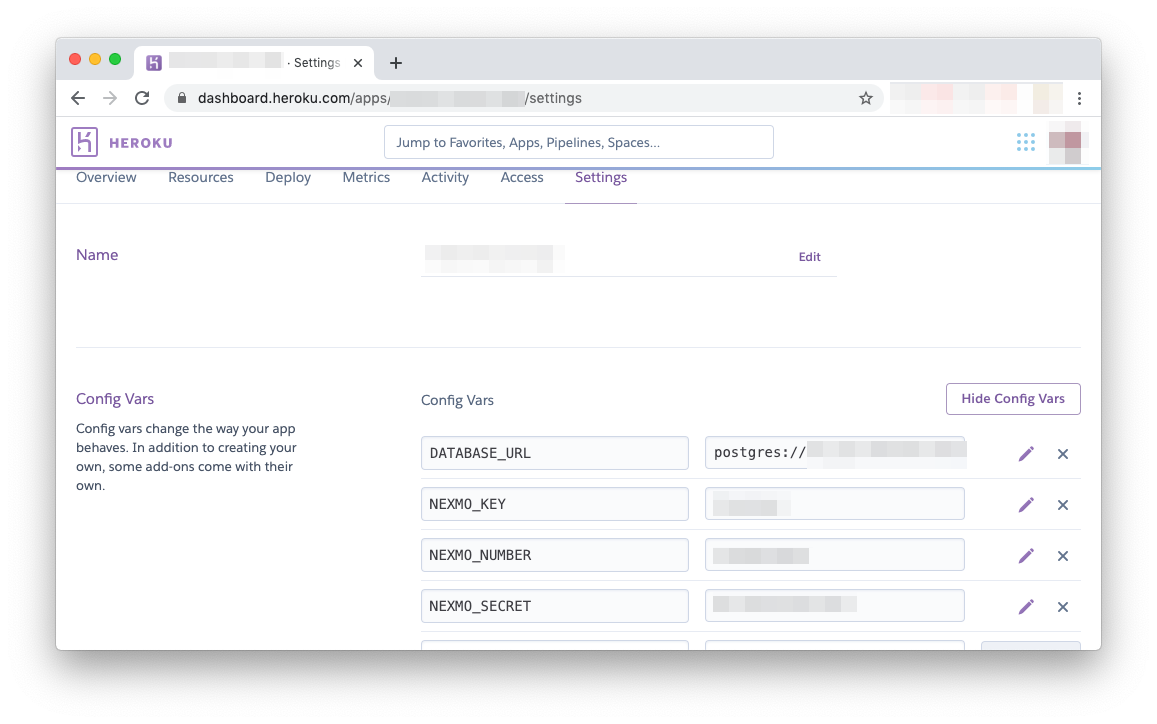 Config Vars interface in Heroku
Next, you'll want to rebuild your Docker container to make sure you pick up recent changes:
docker build --tag queue_app .Then you'll need to log in to the Heroku container registry:
heroku container:loginAnd finally, you'll push and release your container to Heroku:
heroku container:push web -a <your application name>
heroku container:release web -a <your application name>That's it! Well, almost. Launch your application from your Heroku dashboard to make sure it's working, then go to your Nexmo dashboard and update your number's Inbound Webhook URL field to look like this: https://<your application name>.herokuapp.com/webhooks/inbound-sms.
You've done it! With the power of containerization, you now have a production-ready application that is easily scalable and replicable.
If you run into any issues or have questions, reach out to us on our Community Slack. Thanks for reading!