
Share:
Anita Achu is a software engineer, passionate about technical writing. She loves backend technologies and using these technologies to solve problems. Also, she is an ardent believer that rap is the best genre of music.
Deploying PythonAnywhere With the Messages API
Time to read: 14 minutes
To make an application available for end-users to view and use, the application has to be deployed. Application or software deployment is one of the most important processes; the application becomes available to the intending users by this process.
Deployment involves the process of moving an application, updates, modules, and so on from the development server to production, where users can access this application via the internet or intranet.
Most software companies and developers deploy applications through a manual or automated process or, most times, both. The processes involved include software and package installation, testing, software release, and deployment for the deployment.
In this tutorial, we will be focusing on deploying Vonage Message API to production on PythonAnywhere. Vonage Message API integrates with SMS, MMS, and popular social chat apps—so users can communicate with your customers on whichever channel they choose. To access the API, you must create an account on the Vonage Developer Dashboard, where you are provided with credit to start testing the API.
First, we will be creating a simple application on PythonAnywhere that sends WhatsApp messages to users, which we will then deploy subsequently.
<sign-up number></sign-up>
A PythonAnywhere account either free or paid account.
Python application installed on your system.
A basic knowledge of Python.
PythonAnywhere is a cloud-based development and hosting environment for python applications.
This platform is used for hosting both python web applications and scripts. PythonAnywhere serves as a hosting environment; developers can code, run and host python applications and scripts; these python applications include Django, Flask, web2py, and Bottle applications.
It is free, beginner-friendly, and provides a good number of python extensions installed by default. Another unique feature of PythonAnywhere that it is explicitly built for python projects; therefore, it does not provide empty Linux and Ubuntu servers, unlike other cloud service providers.
To begin with, if you do not have a PythonAnywhere account, head over to https://www.pythonanywhere.com/pricing/and create a "Beginner account", this allows you to create a free account and will be sufficient to carry out this project. Fill the form and create your account.
You must choose a username wisely because the username will serve as your website domain name, i.e. https://www.your-username.pythonanywhere.com. Agree to the "Terms and Conditions" and then check your mail for a verification mail.
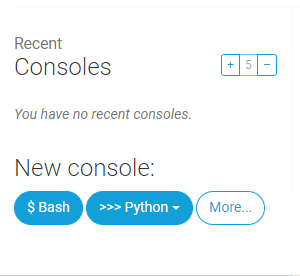
Once you log in to your account, you will have a dashboard with different sections. Click on the "consoles" section and choose your preferred console, between python and bash console; this tutorial will be using the bash console. Click on the "$ bash", and a bash console will open up in your browser window.
For this tutorial, we will be deploying a Whatsapp bot using the Vonage API. We will be creating a simple bot to send WhatsApp messages using the Flask framework. This bot will take the user's WhatsApp number and the Vonage number provided. We will be creating a flask file for this and making some imports but before we begin, I will briefly show you how to set up your Vonage account and add your number to the sandbox.
Flask is a lightweight python web application framework. Which we could be using to create our application
Vonage is an API library which offers flexible voice, messaging, video and Communication APIs
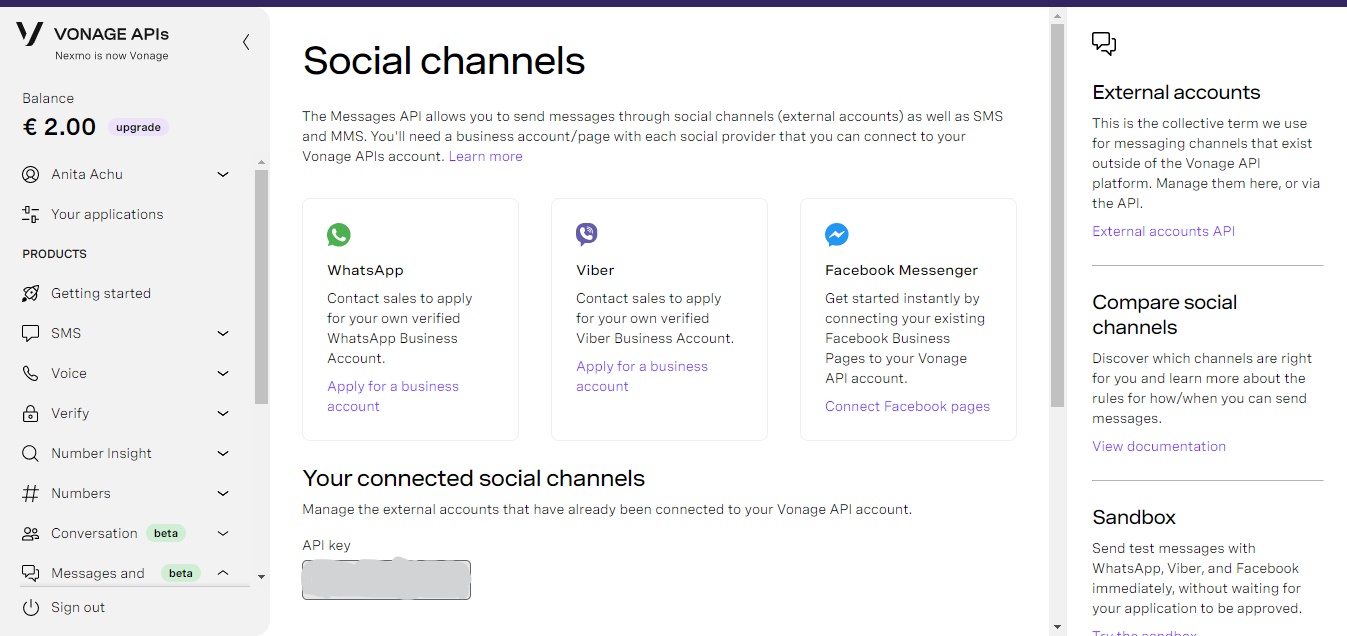
Vonage Messages API allows users to send messages to a WhatsApp number via the WhatsApp channel. Firstly, to access Vonage API, create a Vonage API account on the Vonage Developer dashboard. Afterwards, you'll get free credits to use the API and an API Key and API Secret at the top of the Vonage Dashboard. Lastly, to use the WhatsApp Channel, you need to set up a sandbox.
To set up Vonage Message API sandbox, click on Messages and Dispatch, followed by Sandbox. The image below shows an example of the screen you'll see:
Under the WhatsApp section, add WhatsApp to the sandbox. Afterwards, this will be displayed on the screen.
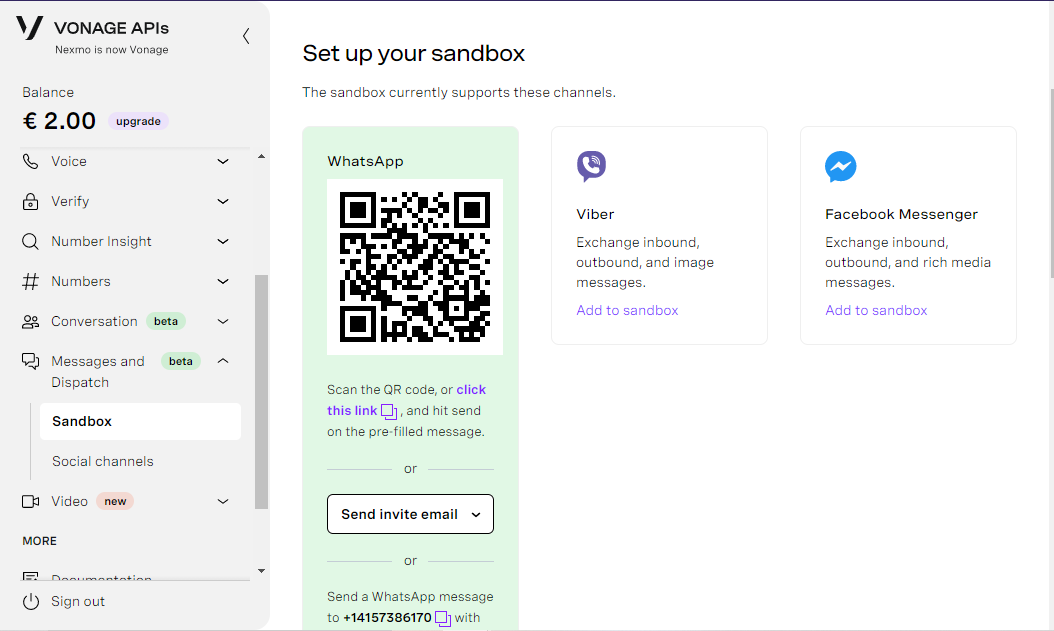
You can either scan the QR code or click for an invite email. The link navigates to the WhatsApp application, containing a default message in the input field required by the Vonage API.
The image below shows an example of how the page is displayed:

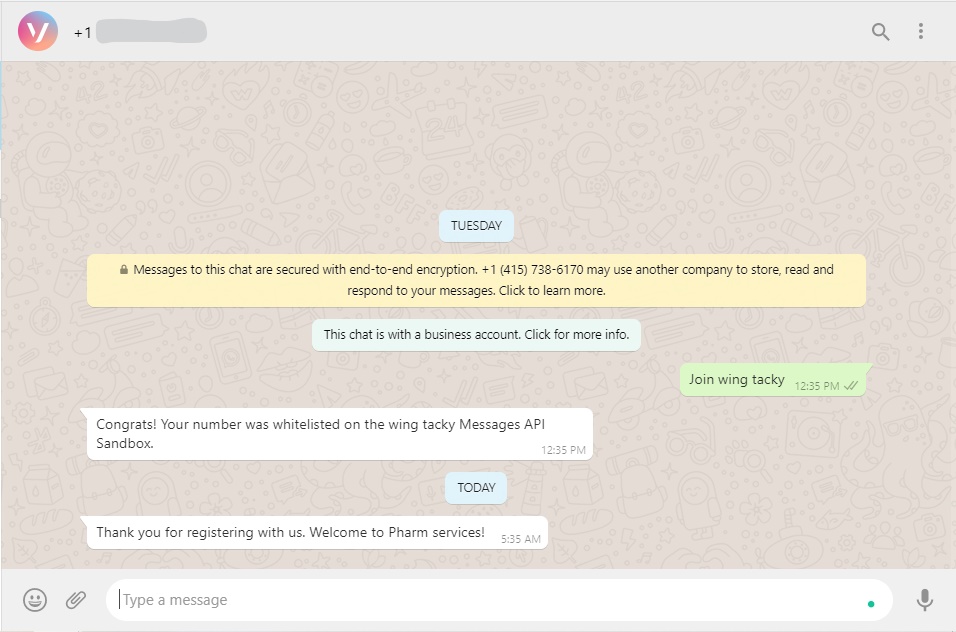
In this tutorial, our default message is, "Join wing tacky". When you send this message, your number gets added to the whitelist for the Sandbox. You can add more numbers by sending the same text to the recipient using the WhatsApp number you wish to add.
Once this the process is complete, we'll then create our Flask application in a file called whatsapp.py
import requests
import os
from os.path import join, dirname
from dotenv import load_dotenv
import vonage
from vonage import Client
from dotenv import load_dotenv

app = Flask(__name__)

dotenv_path = join(dirname(__file__), "../myapp.env")
load_dotenv(dotenv_path)

client = vonage.Client(
    key=os.getenv("VONAGE_API_KEY"), secret=os.getenv("VONAGE_API_SECRET")
)

data= {
    "from": {
        "type": "whatsapp",
        "number": "VONAGE NUMBER",
     },
    "to": {
        "type": "whatsapp",
        "number": "YOUR NUMBER" },
    "message": {
      "content": {
        "type": "text",
        "text": "Thank you for registering with us. Welcome to Pharm services!"
      }
    }
}

url = "https://messages-sandbox.nexmo.com/v0.1/messages"
resp = requests.post(url, json=data, auth=(os.getenv("VONAGE_API_KEY"), os.getenv("VONAGE_API_SECRET")))

print (resp)

if __name__ == '__main__':
app.run()In the code above, we imported Vonage, our API library. It has already been installed in our terminal; we also imported a request to send a request to our POST request to call our environment variable and Client to send messages through our Message API.
N.B: Add Vonage number and your number in the required section of the above and do not add '+' or '000' to the number. Just your country code, for example, "234817542367".
Once this is done successfully, run python whatsapp.py on your terminal. You will receive a 202 response.
For the purpose of this tutorial, we are running this project using python3. To ensure your using this version of python run the following command to check the version of python you are running on:
python --versionIf your version output is Python 2. Please update any commands you run with python3.
A requirements.txt which contains all the python packages is required to install the application on PythonAnywhere. Here is our requirements.txt
argcomplete==1.12.3
boto3==1.17.66
botocore==1.20.66
cachetools==4.2.2
certifi==2020.12.5
cffi==1.14.5
cfn-flip==1.2.3
chardet==4.0.0
click==7.1.2
cryptography==3.4.7
csrf==0.1b1
Deprecated==1.2.12
dialogflow==1.1.0
durationpy==0.5
Flask==1.1.2
future==0.18.2
google-api-core==1.26.3
google-auth==1.30.0
googleapis-common-protos==1.53.0
grpcio==1.37.1
hjson==3.0.2
idna==2.10
itsdangerous==1.1.0
Jinja2==2.11.3
jmespath==0.10.0
jwt==1.2.0
kappa==0.6.0
MarkupSafe==1.1.1
packaging==20.9
pep517==0.10.0
pip-tools==6.1.0
placebo==0.9.0
protobuf==3.15.8
pyasn1==0.4.8
pyasn1-modules==0.2.8
pycparser==2.20
PyJWT==2.1.0
pyparsing==2.4.7
python-dateutil==2.8.1
python-dotenv==0.17.1
python-slugify==5.0.0
pytz==2021.1
PyYAML==5.4.1
requests==2.25.1
rsa==4.7.2
s3transfer==0.4.2
six==1.15.0
text-unidecode==1.3
toml==0.10.2
tqdm==4.60.0
troposphere==2.7.1
urllib3==1.26.4
vonage==2.5.5
Werkzeug==0.16.1
wrapt==1.12.1
wsgi-request-logger==0.4.6
zappa==0.52.0In your PythonAnywhere bash console, we will be using the nano text editor. The next step is adding the whatsapp.py and requirements.txt to our PythonAnywhere account; the best step is to copy and paste the code to the clipboard. Then open the bash console using your text editor:
This line of code takes you to the nano editor, paste the code from [whatsapp.py](http://whatsapp.py) file. Afterwards, exit the editor by entering Ctrl-X and 'Yes' to save changes.
Repeat the same process for your requirements.txt
With the above steps, you have moved the code from your local machine to PythonAnywhere for it to be hosted.
Firstly, we begin by creating a virtual environment. Ensure the virtual environment is installed on your system; to do this, run the python package manager - **pip** *command.*
Once virtual env is installed, proceed to creating and activating a virtual environment.
virtualenv envActivate the virtual environment by running the following commands:
source env/bin/activateOnce the virtual environment is running, we proceed to install the required packages for this project as seen in our requirements.txt file:
Now let's create a web application on PythonAnywhere.
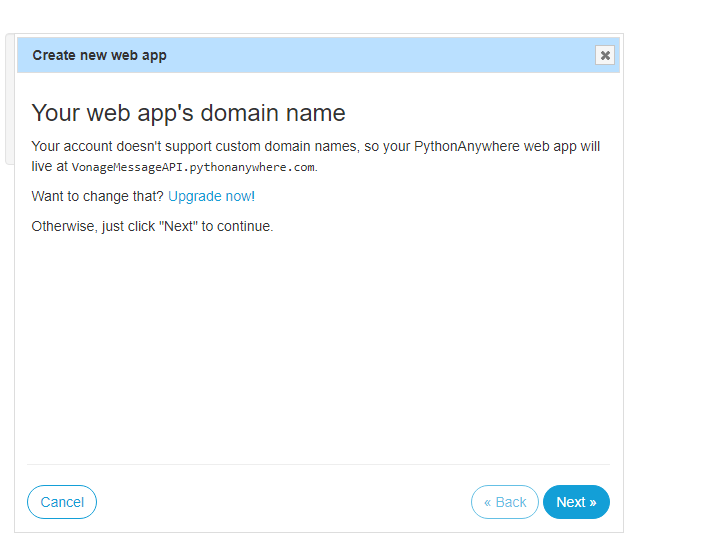
To begin, click on "web" in the navigation bar. Then "Add a new web app".
Except you have a paid PythonAnywhere account, where you can use a custom domain name, else PythonAnywhere will create a domain for you, using this format "your username.pythonanywhere.com".
Click the "Next" button to proceed.
Again, click "Next". On the next page, select your preferred python web framework for this project. Though our application is written in Flask, we will be using the Manual configuration because it works for all WSGI compatible framework.
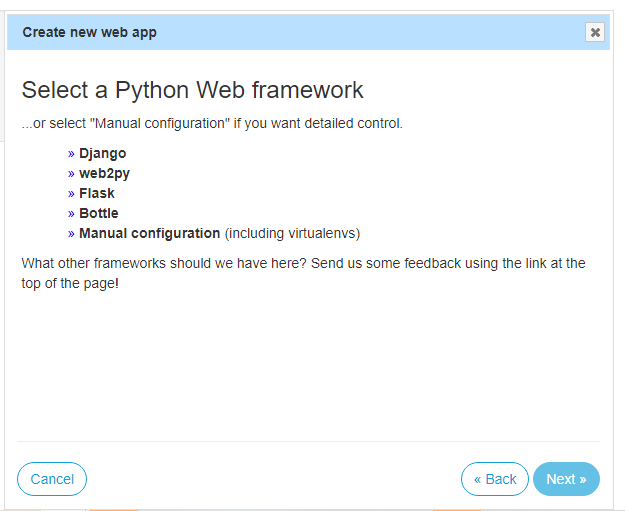
Click on 'Manual configuration' then 'Next'. On **the next page, select a python version. I'll be using "Python 3.8", then click "**Next".**
The following page contains information on Manual Configuration. Click "Next" to create a WSGI file with a simple "Hello World" application.
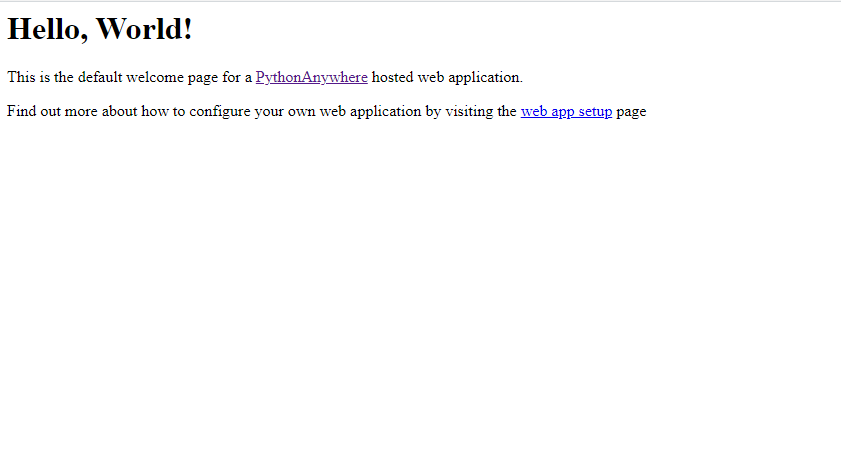
Afterwards, the next page is the last configuration page containing details of your web application. Your simple "Hello World" application has been created.
We can now view this application, open a new tab on your web browser. Add the following URL: "<your_username>.pythonanywhere.com". This URL will allow us to check whether the application deployment was successful. The page you're presented with will look similar to the example below:
In the PythonAnywhere page, go to the "Virtualenv" section, where we will configure the location of the virtual environment. Click on "Enter path to a virtualenv" and add /home/yourusername/env i.e., if your username is MessageAPI. You should enter /home/messageapi/env
On the configuration page, there is a section, "Code". Under Code, the WSGI configuration file has the path of the WSGI configuration file added by PythonAnywhere.
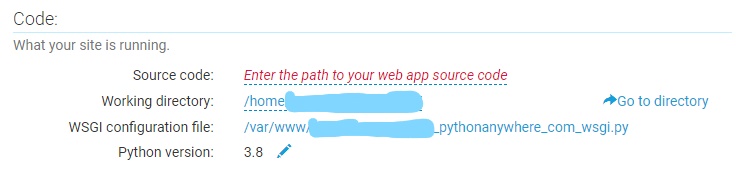
Take note of the WSGI configuration file, or copy it out the path to the clipboard if you prefer. Click on your bash console under the "Your consoles" section after clicking "Consoles" in the navigation bar. The bash session is what you'll see next.
Open the WSGI configuration file in a text editor and add the copied path :
PythonAnywhere will generate a long template file that contains some instructions. Still, for this tutorial, you'll need to remove the contents of this file and replace them with the following Python code:
At the beginning of each line press Ctrl+k to delete it.
This line renames the "app**"** variable specified in whatsapp.py to "application" and imports it. The WSGI application exported by the Flask system stores this variable. PythonAnywhere will use the full name "application" to access it.
Once you've made these changes, save the WSGI configuration file. Then, return to "Web" on the PythonAnywhere dashboard section and click on the "Reload" button to reload the web application with the final configuration.
On the Vonage "Message API sandbox" page, scroll down to "Webhooks". In this section, enter the webhook's URL. This URL consists of the PythonAnywhere URL followed by the /whatsapp route to the webhook. The URL will be in the format http://<your-username>.pythonanywhere.com/bot in general. As shown below:
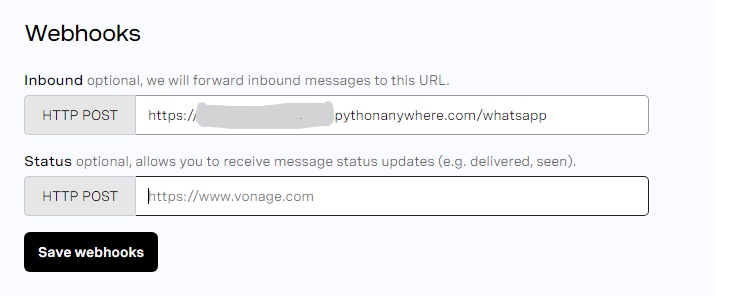
Save the webhooks. Now lets run our application
With this step, you can create an application that sends customers a message; once they register on your site, it sends a request to the bot's endpoint running on PythonAnywhere.
Here's an example:
In this tutorial, we learned how to deploy a Vonage Message API to production on PythonAnywhere. I hope you find these guidelines helpful. Asides from the Message API, Vonage has several products you could use in your application.
If you wish to keep using PythonAnywhere, you can upgrade to a paid account with no limitations. PythonAnywhere, in particular, allows free applications to be manually confirmed every three months.
You can also deploy Vonage application on Heroku or any other deployment platform. Happy coding!