Share:
Manik is a Senior Software Engineer. He enjoys working with developers and crafting APIs. When he's not building APIs or SDKs, you can find him speaking at conferences and meetups.
Publishing Custom Video Streams with the OpenTok API
Time to read: 4 minutes
Growing up, I always wanted to be near the snow during the holiday season, but unfortunately, I live near San Francisco, so we never get snow. To make it feel like it's snowing, let's build a video chat app using the OpenTok API with moving snowflakes in our video stream!
Before we get started, please make sure you have a TokBox account and the API Key and Secret from an API project.
Create a directory and name it whatever you’d like:
We’ll go ahead and create a couple of files inside the directory using the following command:
Our project structure should now look like this:
publisher-with-snowflakes
├── index.js
├── index.htmlNow that we’ve created our project let’s add some OpenTok code to our index.js file.
const apiKey = '';
const sessionId = '';
const token = '';

const session = OT.initSession(apiKey, sessionId);
const publisher = OT.initPublisher('publisher');

session.on({
 streamCreated: event => {
   session.subscribe(event.stream);
 },
 sessionConnected: event => {
   session.publish(publisher);
 },
});

session.connect(token, (error) => {
 if (error) {
   console.log(`There was an error connecting to the session ${error.message}`);
 }
});
In the code above, we’ve initialized Session and Publisher objects using OT.initSession and OT.initPublisher methods,respectively. We then proceed to set event listeners on the session object for streamCreated and sessionConnected where we subscribe to a stream when it’s created and publish our stream when we’re connected to the session. After setting the session event listeners, we attempt to connect to the session using an OpenTok Token.
Let's go ahead and add the index.js file to the index.html along with the OpenTok.js SDK.
<html>
  <head>
    <script src="https://static.opentok.com/v2/js/opentok.min.js"></script>
    <script src="index.js"></script>
  </head>
    <body>
    <div id="publisher"></div>
  </body>
</html>
Now that we know how to create a publisher and publish in a session, we need to create a custom video source using the Canvas API and the snowflake-greenscreen.mp4 video file.
const closeToGreen = (r, g, b) => {
 // 86, 246, 61
 if (g > (b * 1.4) && g > (r * 1.4)) {
   return true;
 }
 return false;
};

const getCanvasStream = () => {
 let canvas;
 let videoElement;
 let filterVideo;
 let ctx;
 let stopped = false;
 let filterCtx;
 let filterCanvas;
 let cameraCtx;
 let cameraCanvas;

 const drawFrame = () => {
   cameraCtx.drawImage(videoElement, 0, 0, cameraCanvas.width, cameraCanvas.height);
   filterCtx.drawImage(filterVideo, 0, 0, filterCanvas.width, filterCanvas.height);

   const cameraData = cameraCtx.getImageData(0, 0, cameraCanvas.width, cameraCanvas.height);
   const filterData = filterCtx.getImageData(0, 0, filterCanvas.width, filterCanvas.height);
   const res = new Uint8ClampedArray(cameraData.data.length);
   for (let i = 0; i < cameraData.data.length; i += 4) {
     let imgData = cameraData;
     if (!closeToGreen(filterData.data[i], filterData.data[i+1], filterData.data[i+2])) {
       imgData = filterData;
     }
     res[i] = imgData.data[i];
     res[i + 1] = imgData.data[i + 1];
     res[i + 2] = imgData.data[i + 2];
     res[i + 3] = imgData.data[i + 3];
   }
   ctx.putImageData(new ImageData(res, cameraData.width, cameraData.height), 0, 0);
   if (!stopped) {
     requestAnimationFrame(drawFrame);
   } else {
     ctx = null;
   }
 };

 canvas = document.createElement('canvas');
 ctx = canvas.getContext('2d');
 canvas.width = 640;
 canvas.height = 480;

 // Get the Camera video
 OT.getUserMedia({
   audioSource: null
 }).then((stream) => {
   videoElement = document.createElement('video');
   videoElement.srcObject = stream;
   videoElement.play();
   cameraCanvas = document.createElement('canvas');
   cameraCanvas.width = videoElement.width = 640;
   cameraCanvas.height = videoElement.height = 480;
   cameraCtx = cameraCanvas.getContext('2d');

   requestAnimationFrame(drawFrame);
 });

 // Get the filter video
 filterVideo = document.createElement('video');
 filterVideo.setAttribute('loop', true);
 filterCanvas = document.createElement('canvas');
 filterVideo.src = 'snowflake-greenscreen.mp4';
 filterCanvas.width = filterVideo.width = 640;
 filterCanvas.height = filterVideo.height = 480;
 filterVideo.play();
 filterCtx = filterCanvas.getContext('2d');

 return {
   canvas,
   stop: () => {
     stopped = true;
   }
 };
};
In the code above, we use OT.getUserMedia, a wrapper of navigator.mediaDevices.getUserMedia, to get a MediaStream object. We then use the video MediaStreamTrack, from the MediaStream object to draw an image onto the canvas. After attaching the video MediaStreamTrack, we modify the image of the canvas by applying the snowflake filter.
Now that we've created a mechanism to capture the camera stream and add a snowflake filter to it let's set the videoSource property for the publisher.
const canvasStream = getCanvasStream();
const publisher = OT.initPublisher('publisher', {
  videoSource: canvasStream.canvas.captureStream(30).getVideoTracks()[0],
});Note that in the code above, we used the captureStream method of the canvas object to get the resulting MediaStream object and call getVideoTracks()[0] on that object to get the video MediaStreamTrack object.
To start publishing your custom video in the session, add the apiKey, sessionId, and token values!
When you load your app, you should see the video from your camera with the moving snowflake filter:
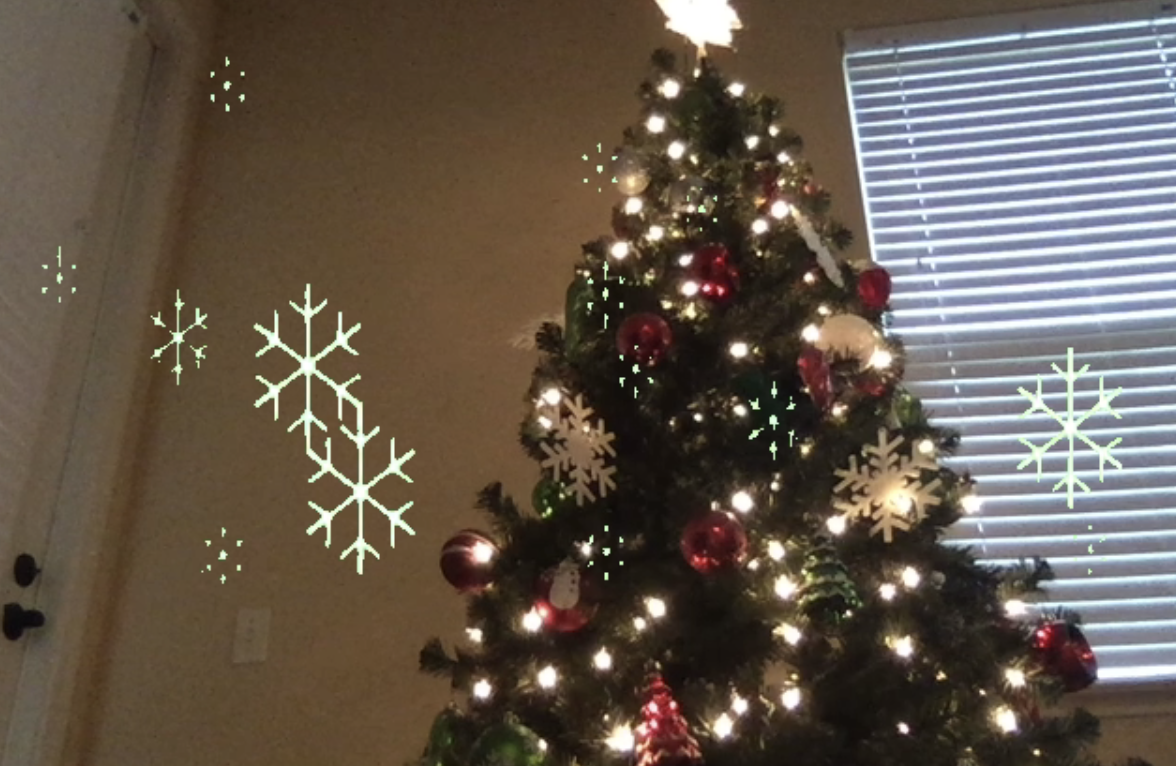 Video stream with snowflakes
The custom streaming API works on Chrome 51+, Firefox 49+ and Safari 11+. It does not work in IE or Edge browsers.
If the browser window loses focus—for example when you open a new tab—then the video will pause or become slow.
You can find all of the code for this sample application here. To see more samples of using OpenTok with Canvas, please visit the OpenTok-Web-Samples repo.