Share:
Liam is a full-stack engineer who primarily focuses on PHP and Javascript. He loves to learn and tinker with new tools and technology.
Creating a Phone Status Checker with Nexmo and PHP
Time to read: 9 minutes
Working at a web agency brings a lot of challenges because we are tasked with juggling multiple different clients. Our focus should always be on those clients, to make sure their requirements are met and they are satisfied with the work we’re doing. So, something you probably do not want is outside distractions. This is what happened at our office on a nearly daily basis.
The daily scenario would go as follows. A manager would pick up the phone to call a client, the phone did not dial, the manager would then shout across the open office “Phones are down,” which would then be taunted across the office towards the engineer in charge of the phone system. They would stop what they were doing, walk to the phone in defeat and return back to their desk in five minutes after fixing the issue. Again, this happened almost daily.
This wasn’t the only scenario though. My personal favorite scenario was at one time, calls from phones ending in 87 would fail to connect to our phone system.
After about the twenty-seventh time this happened, I knew there must have been a better solution to this issue. Whilst five minutes might not seem like much, the engineers' flow and concentration were still disrupted leading to another twenty minutes of picking up where you left off, remembering what you were doing and getting back into the flow.
So, I started doing some designing.
My initial idea was to create a simple form where a manager or admin could set a custom phone number, and that number would then try and call the phone system. If the number successfully connects to the phone system, no action is required. If we fail to connect, some possible fixes are automated, and if those don't work, the fallback is notifying the engineer of the issue for further investigation.
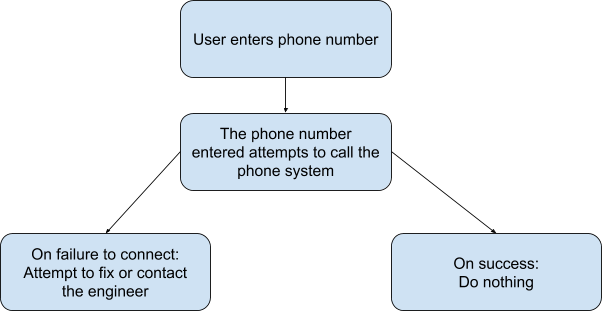 Phone number tree
This is what we’re going to build today. I am going to show you how to create an application using PHP and Nexmo’s Voice API. For this tutorial, I am going to assume you have at least some experience with PHP. So, let's get started!
Before we can write any code, we need to set up a Voice Application. The Voice Application handles security and URL webhooks.
For what we’re doing we will need an Application Name, an Event URL, and to generate a Public/Private key pair.
The application name isn’t going to be referenced anywhere in our code, it’s purely used for our own management and organization within the Nexmo dashboard. I suggest calling the application “Phone System Debugger.”
The Event URL will become very important later. This will send our application a status request during every step throughout a call. For now, this can just be a placeholder URL and we’ll come back to this option later.
The Public Key/Private Key will be used to give us secure access to the Nexmo API, think of it as a digital passport. We’ll need to download the Private Key and store it in our application for later consumption by the Nexmo API.
Once you’ve entered all these details and saved the application, we will then be given an Application ID and API Key. We’ll also need these details when building our web application.
One of the bonuses of using PHP is that Nexmo has built its own third-party client, which can handle the interaction between our application and Nexmo. This will lower our workload and can be used later on to abstract all our Nexmo logic into a single small service.
We are going to install this client as a dependency using Composer. Composer is a tool for managing third-party dependencies in your project.
To use the Nexmo client we will need to inject several credentials into the client. These credentials are:
API Key
API Secret
Application Key
Private Key File Location
Thankfully we already have these credentials as we generated them when we built our Voice Application.
For the purpose of a quick demonstration, we are just going to implement the client into an `index.php` script, with the main purpose of just sending a test call to ourselves. We will later expand on what we learn here.

<?php

use Nexmo\Client;

require_once 'vendor/autoload.php';

$basic = new Nexmo\Client\Credentials\Basic(
   'API_KEY',
   'API_SECRET'
);

$keypair = new Nexmo\Client\Credentials\Keypair(
 file_get_contents('PRIVATE_KEY_PATH'),
 'APPLICATION_ID'
);

$container = new Nexmo\Client\Credentials\Container([$basic, $keypair]);

$client = new Nexmo\Client($container);

$client->calls()->create([
   'to' => [[
       'type' => 'phone',
       'number' => 'YOUR_PHONE_NUMBER',
   ]],
   'from' => [
       'type' => 'phone',
       'number' => '447418347739',
   ],
   'ncco' => [
       [
           'action' => 'talk',
           'text' => 'Hello world',
       ]
   ]
]);
?>
So, what we have done in the above example is passed our credentials into two separate classes, the Basic Credential Class, which holds your general Nexmo account details and the Key pair Credentials, which contain our Voice Application details.
Your API Key and Secret can be found on the ‘Getting Started’ page on your Nexmo Account. The Application ID was generated when we created our voice application and the contents of our Private Key, and can be downloaded from the application management page.
These two Credential Classes are then passed into the credential container class as an array and the newly instantiated container is passed into the Client. We can now fully use the Voice API.
Then followed up with creating a call request in an array with who we want to call, who the call is from and what we’re going to say to the recipient using the NCCO object.
Now that we’ve added the Nexmo Client and created a simple example, you should now have a taste of how powerful this tool can be.
For what we are doing I am not going to explore the NCCO, but it is a really powerful tool. I would really advise you reading the documentation and playing around; it’ll really reveal the possibilities of what you can achieve with the Voice API.
We’re now going to expand on what we have created here to fulfill the criteria I laid out earlier. Skipping a few areas of setup, I’m going to write the following examples as if I was using a framework, I’m going to keep it fairly abstract so please use any framework you like. I personally recommend using Symfony or Slim for what we’re doing here. We just need to have access to a router to listen to API requests.
<?php

namespace App\Service;

use Nexmo\Client;

class NexmoService
{
    /** @var Client */
    private $client;

    public function __construct(Client $client)
    {
        $this->client = $client;
    }

    public function makeCall(string $message, string $fromNumber)
    {
        $this->client->calls()->create([
            'to' => [[
                'type' => 'phone',
                'number' => $_ENV['DEFAULT_RECEIVER_NUMBER'],
            ]],
            'from' => [
                'type' => 'phone',
                'number' => $fromNumber,
            ],
            'ncco' => [
                [
                    'action' => 'talk',
                    'text' => $message,
                ]
            ]
        ]);
    }
}
So, what I’ve done here is abstract what we did in our simple script and packaged it into a reusable service class. We'll now call that class in our controller with a message and phone number, which the user will input in a form.
What I have yet to cover is how we are going to tell the current state of our phone system from calling via Nexmo, which is where Nexmo's Event Url comes in.
The Event webhook is sent after every event while in a call. What we’re going to do in our application is react based on the current status of the call. The event we want to react to is ‘failed’ and we’ll ignore all other statuses for the time being.
So, what we are going to do is create a controller that will be called when an event webhook is sent, this will check the status of that event. If the status is ‘failed’ then we will just echo out an alert to the user.
First, we need a way for Nexmo to actually send the event to our application while we’re still developing locally. I recommend using a tool called Ngrok. Ngrok is a free tool for opening a port number to the publicly accessible web address.
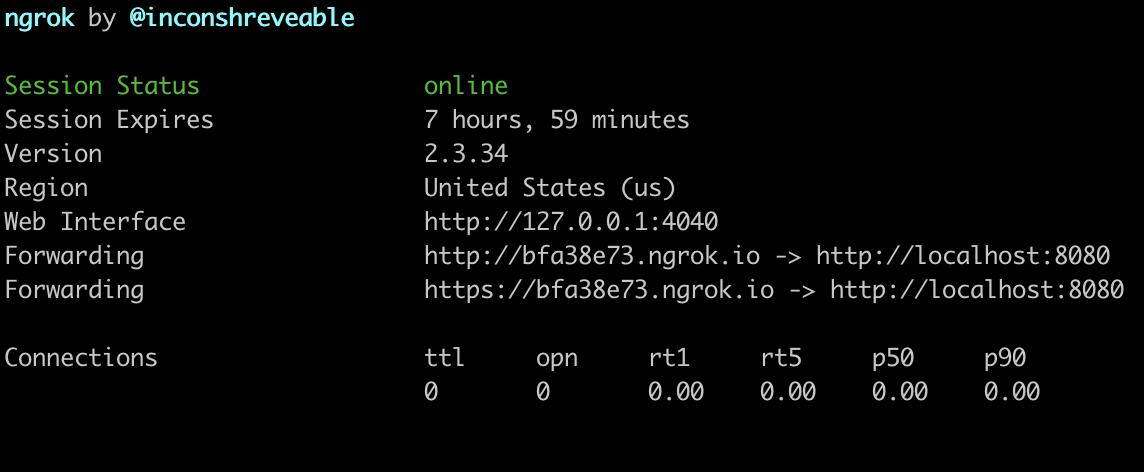 Ngrok Example
I’ve set up Ngrok to forward my 8080 port and updated my application to use the Ngrok address.
 Ngrok url
Finally, we will create a function to get the data from our request, check the status of the event.
This code example is not very exciting, so what we will do now is add the ability to send ourselves an SMS when the Event webhook returns the status of ‘failed’.
To do this we can use the existing Nexmo Client to easily set up and send an SMS to our mobile number. This addition is very easy to do, so what we’ll do is expand on our Nexmo service to include SMS functionality.
<?php

namespace App\Service;

use Nexmo\Client;

class NexmoService
{
    /** @var Client */
    private $client;

    public function __construct(Client $client)
    {
        $this->client = $client;
    }

    public function makeCall(string $message, string $fromNumber)
    {
        $this->client->calls()->create([
            'to' => [[
                'type' => 'phone',
                'number' => $_ENV['DEFAULT_RECEIVER_NUMBER'],
            ]],
            'from' => [
                'type' => 'phone',
                'number' => $fromNumber,
            ],
            'ncco' => [
                [
                    'action' => 'talk',
                    'text' => $message,
                ]
            ]
        ]);
    }

    public function sendSMS(string $message)
    {
       $this->client->message()->send([
           'to' => $_ENV['MOBILE_NUMBER'],
           'from' => 'Phone Debugger',
           'text' => $message
       ]);
    }
}
With eight extra lines, we have now easily added the functionality to send SMS messages to our mobile phone. All we have done is pass an array of the number we want to call, the person it’s coming from, and the message we want to send. Notice how our from number is just a string; this is supported by Nexmo’s messaging functionality.
There is another way to add SMS support to our application. This is via the Messaging API, currently, this API isn’t supported by the Nexmo client, but does bring the additions of WhatsApp, Facebook Messenger, and Viber. This is not needed for our application; however, I do recommend investigating the Messaging API if you are looking for a way to expand your application.
/**
* Route: api/event-webhook
*/
public function postEvent(Request $request)
{
   //Get data as an array
   $data = $request->getContent();

   if (isset($data['status']) && $data['status'] === 'failed') {
       $this->nexmoService->sendSMSMessage('Phone System is down!!!');
   }
}
Finally, I’ve just added a call to the new SMS function in our controller class to be called when the Event Webhook returns a failed status. And voilá! We have a simple phone status checker.
To recap what we have accomplished: We have created an application that takes a phone number, attempts to call that number and, based on the status of that call, alerts someone if the call fails.
I have created a Github repo with everything we have covered in this article. So if you have found anything confusing or having issues with your application, please feel free to download and play around with that example.
Now we are just scratching the surface with what you can do with this tool. Possible enhancements could be validating a number before attempting to call the system, which can be accomplished with Nexmo’s Number Insight. You could add a link between phone calls and their status and storing them in a database and display the calls in a table.
If you’d like some inspiration on how you can expand on this application, please feel free to check out my Nexmo Status project on GitHub, which was the first iteration of the phone debugger. If you have any questions please feel free to leave a comment.