
Share:
Manik is a Senior Software Engineer. He enjoys working with developers and crafting APIs. When he's not building APIs or SDKs, you can find him speaking at conferences and meetups.
Connecting WebRTC and PSTN with OpenTok and Nexmo
Time to read: 5 minutes
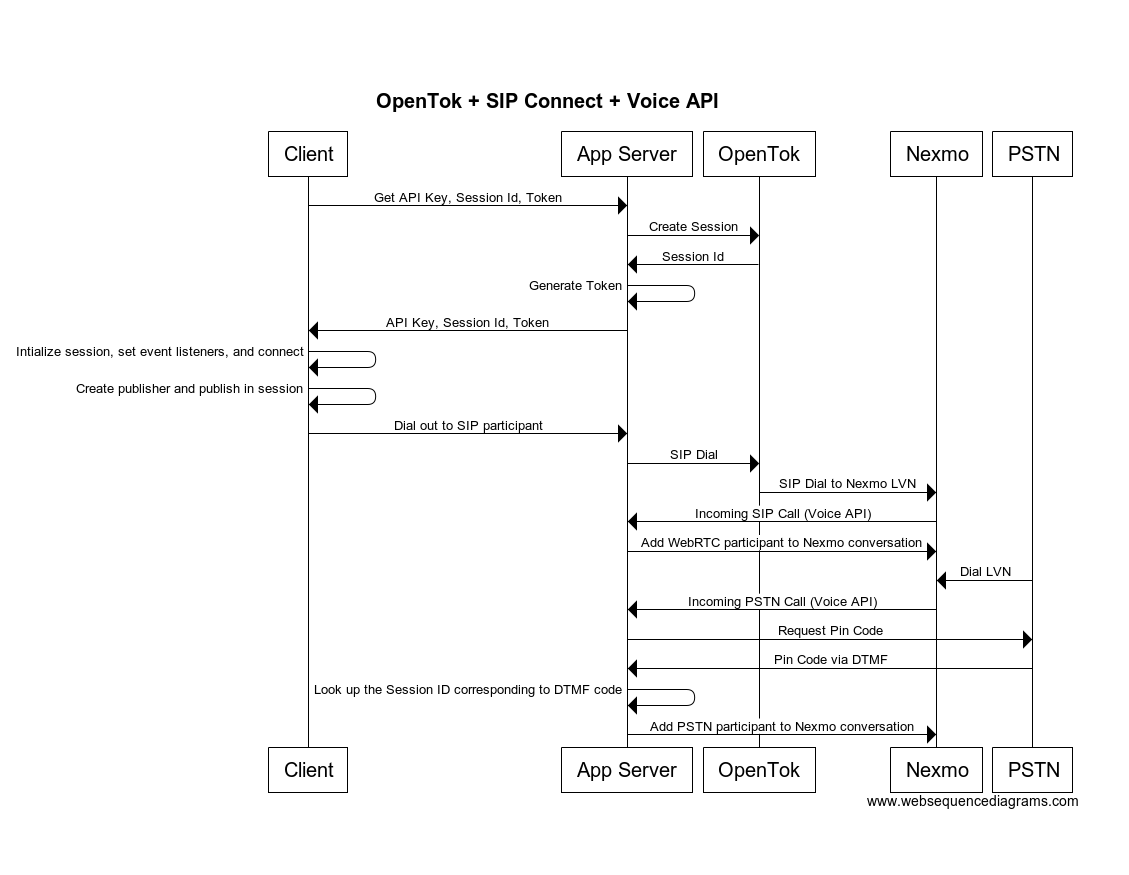
At Nexmo, we recently announced SIP Connect which allows you to connect WebRTC endpoints with the Nexmo Voice API. This feature makes it possible for PSTN users to dial into an OpenTok video session.
In this post, we’re going to build a real-time video web application using OpenTok and connect PSTN users with it using SIP Connect and the Voice API.
Before we get started, please make sure that you have the following:
Please create an TokBox API project because you will need an apiKey and apiSecret to add the real-time voice and video to the web app. In addition to the TokBox credentials, you will need to create a Nexmo Voice application and set event and answer webhooks.
Don't worry about what they are right now because we'll explain them as we work with them. Lastly, you will need to purchase a Nexmo virtual number and forward all incoming calls to the number to the application you created.
To get started, please clone the opentok-nexmo-sip repository and change into the Dial-In-Conference directory.
In the project directory, you'll see a config.example.js file. Please go ahead and copy the contents of this file into a new file called config.js.
Make sure to add the TokBox and Nexmo credentials that you generated earlier to the
config.jsfile because we'll be using them for the app.
In this case, we're using JavaScript for the web, but you can use the same concepts with the OpenTok iOS, Android, and Windows SDKs.
As you can see below, in the opentok.js file, located in the public/js folder, we initialize a session by calling the initSession method on the OT object. We then create a Publisher object using the initPublisher method.
We then proceed to set the following session events:
streamCreatedstreamDestroyedsessionConnected
These events are triggered when a stream is created, a stream is destroyed, or when the client connects to the session, respectively.
After setting the event listeners, we connect to the session by passing in the token and an error handler. The error handler is used to to make sure there weren’t any errors while attempting to connect to the session. In on our app, if there is an error, we log it to the console, but in a production application, we should display a UI element and attempt to reconnect.
const session = OT.initSession(apiKey, sessionId);
const publisher = OT.initPublisher('publisher');
session.on({
 streamCreated: (event) => {
   const subscriberClassName = `subscriber-${event.stream.streamId}`;
   const subscriber = document.createElement('div');
   subscriber.setAttribute('id', subscriberClassName);
   document.getElementById('subscribers').appendChild(subscriber);
   session.subscribe(event.stream, subscriberClassName);
 },
 streamDestroyed: (event) => {
   console.log(`Stream ${event.stream.name} ended because ${event.reason}.`);
 },
 sessionConnected: (event) => {
   session.publish(publisher);
 },
});

session.connect(token, (error) => {
 if (error) {
   console.log('error connecting to session');
 }
});
This opentok.js file is imported into the view located in views/index.ejs file.
In addition to this code, we also create a couple of buttons that trigger API requests to the app server to dial out via SIP.
In this app, this view is being rendered by our server, but you can choose to render it however you’d like. To see the code where this view is being rendered, please check out the following link.
Now that we have our client set up, let’s check out the server code.
You’ll notice that we’re importing express, opentok, and body-parser packages. We’re using Express.js for our server, the OpenTok Node SDK, and body parser library which will be used to parse the body of incoming requests.
Note that we're also importing the
configthat we set in theconfig.jsfile.
We then move on to create the following endpoints:
/room/:roomId/dial-out/hang-up/nexmo-answer/nexmo-dtmf/nexmo-events
The /room/:roomId path is main path for our app. It renders the index.ejs view with the appropriate OpenTok credentials. When this happens, the app server makes a request to OpenTok to create a session which then responds with a session object containing the sessionId.
The sessionId is then used to generate an OpenTok token. We then generate a 4 digit pin code and map that to the sessionId and room name. This is important because we’ll need this to look up the sessionId when the PSTN user dials in. We’ve also added some logic to put the users in the same session when they make a request with the same roomId.
/**
* When the room/:roomId request is made, either a template is rendered is served with the
* sessionid, token, pinCode, roomId, and apiKey.
*/

app.get('/room/:roomId', (req, res) => {
  const { roomId } = req.params;
  let pinCode;
  if (app.get(roomId)) {
    const sessionId = app.get(roomId);
    const token = generateToken(sessionId);
    pinCode = app.get(sessionId);
    renderRoom(res, sessionId, token, roomId, pinCode);
  } else {
    pinCode = generatePin();
    OT.createSession({
      mediaMode: 'routed',
    }, (error, session) => {
      if (error) {
        return res.send('There was an error').status(500);
      }
      const { sessionId } = session;
      const token = generateToken(sessionId);
      app.set(roomId, sessionId);
      app.set(pinCode, sessionId);
      renderRoom(res, sessionId, token, roomId, pinCode);
    });
  }
});
To dial out to the SIP endpoint, the browser will make a request to the /dial-out endpoint and the server will generate a token and use our Nexmo credentials (API Key and API Secret) along with the SIP uri (sip:lvn@sip.nexmo.com) to make a request to OpenTok to dial out for the session. If this succeeds, we get connection information via the callback for the SIP participants.
/**
* When the dial-out get request is made, the dial method of the OpenTok Dial API is invoked
*/

app.get('/dial-out', (req, res) => {
  const { roomId } = req.query;
  const { conferenceNumber } = config;
  const sipTokenData = `{"sip":true, "role":"client", "name":"'${conferenceNumber}'"}`;
  const sessionId = app.get(roomId); // grabbing the sessionId from the mapping we created earlier
  const token = generateToken(sessionId, sipTokenData);
  const options = setSipOptions();
  const sipUri = `sip:${conferenceNumber}@sip.nexmo.com;transport=tls`;
  OT.dial(sessionId, token, sipUri, options, (error, sipCall) => {
    if (error) {
      res.status(500).send('There was an error dialing out');
    } else {
      app.set(conferenceNumber + roomId, sipCall.connectionId);
      res.json(sipCall);
    }
  });
});
Dialing into the Nexmo Voice API via SIP will trigger the event webhook, /nexmo-events in our case, for any status changes i.e. started, ringing, etc.
app.get('/nexmo-events', (req, res) => {
  console.log('call event', req.query);
  res.status(200).send();
});
In addition to the event url, an answer webhook is called so the application server can tell Voice API what to do with that call.
The Voice API expects this in the format of an NCCO, a JSON object where the app server specifies the action(s).
In our case, the app server will specify the action as a conversation and use the sessionId as the name of the conversation. We determine the sessionId by either using the SIP headers that are added by OpenTok when dialing out or through the four digit pin code that the user inputs via DTMF.
app.get('/nexmo-answer', (req, res) => {
  const { serverUrl } = config;
  const ncco = [];
  if (req.query['SipHeader_X-OpenTok-SessionId']) {
    ncco.push({
      action: 'conversation',
      name: req.query['SipHeader_X-OpenTok-SessionId'],
    });
  } else {
    ncco.push(
      {
        action: 'talk',
        text: 'Please enter a a pin code to join the session'
      },
      {
        action: 'input',
        eventUrl: [`${serverUrl}/nexmo-dtmf`]
      }
    )
  }

  res.json(ncco);
});
In the code above, we have a conditional statement that checks for the headers to grab the sessionId. In this case, when there aren't any SIP headers, we can assume it's a PSTN user dialing in so we can prompt them for a pin. We do this by setting our action to talk with some text. The app server also tells the Voice API that we want to receive the dtmf code at the /nexmo-dtmf webhook.
When the /nexmo-dtmf webhook is called, we check for the dtmf code in the request body and look up the sessionId based on the mapping. This is done to make sure that we’re connecting the WebRTC and PSTN users in the same conversation. This also allows you to reuse the same virtual phone number with multiple pin codes to facilitate concurrent conferences.
app.post('/nexmo-dtmf', (req, res) => {
  const { dtmf } = req.body;
  let sessionId;

  if (app.get(dtmf)) {
    sessionId = app.get(dtmf);
  }

  const ncco = [
  {
    action: 'conversation',
    name: sessionId,
  }];

  res.json(ncco);
});
We created a /hang-up endpoint where we can use the forceDisconnect method on the OpenTok object to disconnect the SIP participant.
/**
* When the hang-up get request is made, the forceDisconnect method of the OpenTok API is invoked
*/
app.get('/hang-up', (req, res) => {
  const { roomId } = req.query;
  const { conferenceNumber } = config;
  if (app.get(roomId) + app.get(conferenceNumber + roomId)) {
    const sessionId = app.get(roomId);
    const connectionId = app.get(conferenceNumber + roomId);
    OT.forceDisconnect(sessionId, connectionId, (error) => {
      if (error) {
        res.status(500).send('There was an error hanging up');
      } else {
        res.status(200).send('Ok');
      }
    });
  } else {
    res.status(400).send('There was an error hanging up');
  }
});
Lastly, we specify a port and run the express server:
const port = process.env.PORT || '3000';
app.listen(port, () => console.log(`listening on port ${port}`));
In this post, we’ve covered bridging an OpenTok Session with PSTN users using SIP Connect and the Nexmo Voice API. To see the full code with other SIP samples, please check out the opentok-nexmo-sip repo.