
Build an Interactive SMS Delivery Notifications System Using ExpressJS
One of the amazing things about SMS is how ubiquitous it is. Whether you have a smartphone or an old '90s "dumb" phone you will be able to send and receive SMS messages. While many companies only use them as a notification service, they become really powerful when they facilitate a two way communication channel between companies and customers.
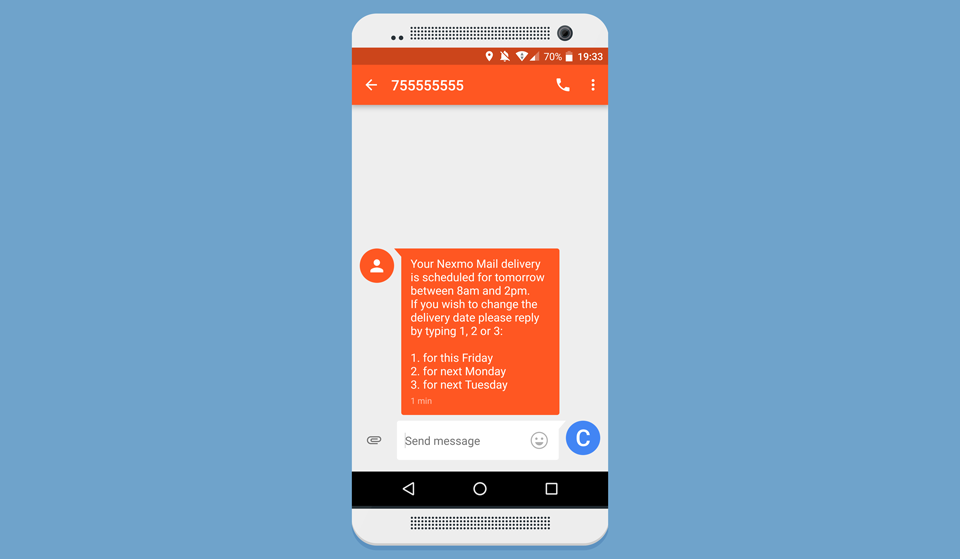
For this tutorial we'll create an interactive notifications system for a package delivery company. For this purpose we've created a simple "Nexmo Mail" app that allows an employee of the delivery company to type in a phone number and notify the recipient of a package that will be delivered.

This app serves as our starting point for this tutorial. It is a basic Express app, written in Javascript with a few extra modules to make things easier. We've added the body-parser module to parse our form submissions, and we added Bootstrap to make our UI look a bit more attractive. Finally, we added some babel modules so that we can write modern ES2015-flavored Javascript.
You can download the starting point of this tutorial from Github:
Then visit localhost:3000 in your browser and submit a phone number in international format, e.g. 447755555555.
All the code for this starting point can be found on the number-form branch on Github. All the code we will be adding below can be found on the delivery-notifications branch. For your convenience, you can see all the changes between our start and end point on Github as well.
The Vonage SMS API provides you with low latency and high deliverability. It is the most reliable way to reach users around the globe. While it has plenty of features we'll only be looking at two core elements: sending and receiving basic text messages. We will use this API to send people a notification of their delivery, offering them to change their delivery slot, and listen to any changes they send to us. To do this we are going to add the following changes to our app:
Add Vonage to our app
Send an SMS message to the number provided with their delivery slot and instructions on how to change their slot
Listen to and confirm incoming text messages from the user to change their slot
We will be hardcoding the options in our app just to keep things simple. In your app you will obviously be determining the user's options based on some amazing machine learning algorithm you've personally invented.
In order to send an SMS message via Vonage we're going to have to add the Vonage module to the project.
npm install @vonage/server-sdk dotenv --saveAs you can see, we also added the dotenv module. This is just so that the app can load the API credentials from a .env file. You can find your credentials on the settings page of your Nexmo account.
# .env
KEY='<your_api_key>'
SECRET='<your_api_secret>'
FROM='<phone_number>'We also added the Vonage phone number that we will be sending an SMS message from to the .env file. You can buy a number from the Vonage Dashboard, or you can use the vonage-cli library and buy one straight from the command line.
Setup your Vonage CLI using this guide. You only need the Installation and Setting your configuration step.
Choose one of the phone numbers from the list of phone numbers that are listed when you make command. Replace VONAGE_VIRTUAL_NUMBER in the command below with the chosen phone number, and run the command.
Now that we have our API key, secret, and Nexmo phone number, we initialize the Nexmo client.
// app.js - after the other imports
import Vonage from '@nexmo/server-sdk';
import dotenv from 'dotenv';

dotenv.config();

const vonage = new Vonage({
  key: process.env.KEY,
  secret: process.env.SECRET
});From now on we can use vonage anywhere in our app to make the API calls we need.
Currently when the employee submits a phone number it calls the POST /notify endpoint which simply outputs a text confirmation in the browser. We will need to add some code to send an SMS message with the planned delivery slot, and a list of options for them to choose from.
Let's hardcode some options for the user to change their delivery slot to.
// app.js - after the previous code
const options = [
  'this Friday',
  'next Monday',
  'next Tuesday'
];We can use these options to generate a pretty text message to send to the user.
// app.js - after the previous code
let notification = "Your Vonage Mail delivery is scheduled for tomorrow between " +
                   "8am and 2pm. If you wish to change the delivery date please " +
                   "reply by typing 1, 2 or 3:\n\n";

options.forEach((option, index) => {
  notification += `${index+1}. for ${option}\n`;
});
Note: We didn't hardcode the whole message here as we will need these options again later.
Next up all we need to do is send the message to the phone number that was submitted.
// app.js
app.post('/notify', (request, response) => {
  send(request.body.number, notification); // adding this line
  response.send('Notification sent');
});
We wrapped the actual Nexmo API call in a send function to make things more readable and reusable. The send function wraps the nexmo.sms.sendTextMessage API and prefills the Nexmo phone number we bought before.
// app.js - anywhere outside of an endpoint call
let send = function(number, message) {

  vonage.message.sendSms(process.env.FROM, number, message, (err, responseData) => {
    if (err) {
        console.log(err);
    } else {
        if(responseData.messages[0]['status'] === "0") {
            console.log("Message sent successfully.");
        } else {
            console.log(`Message failed with error: ${responseData.messages[0]['error-text']}`);
        }
    }
  });
}
If you now try and resubmit your own mobile number, you should get a text message within seconds.

Our final trick is to receive an incoming message from the user replying to our text message sent earlier. To do this, we are going to have to make our app available publicly to a Nexmo webhook.
Let's start by adding a dummy endpoint for the webhook to call.
// app.js
app.get('/response', (request, response) => {
  // TODO: Confirm selection
  response.send('Response processed');
});
You have a few options to make your app publicly reachable by the Nexmo webhooks. If you are lucky enough to have a public IP on your machine, you should be ready to go. For the rest of us, we could either deploy the app, use an SSH tunnel, or my favorite solution: use the amazing ngrok tool.
Your new Vonage virtual number and your Webhook URL need to be linked together so that Vonage knows where to send the inbound SMS messages.
As with the previous step, you could add your webhook URL to your Vonage virtual number, but this tutorial will show the example on how to make this change via the web portal.
Before you can setup, take note of the following:
VONAGE_VIRTUAL_NUMBER: The number you are trying to use.WEBHOOK_URL: Your Ngrok URL, followed by/response, so it should look something like:http://<your_url>.ngrok.io/response
Go to Numbers page in your dashboard.
Click on the "Edit" icon (looks like a pen) under "Manage" column. In the pop up under SMS > Inbound Webhook URL paste you WEBHOOK_URL and click "Save".
If you get any errors at this state please make sure you are using the Nexmo phone number on your account, and that the URL is publicly accessible.
Our last step is to expand our endpoint to take the incoming message, parse the response, check if it contains one of our options, and send another text message to confirm their selection.
// app.js
app.get('/response', (request, response) => {
  // TODO: store this selection somewhere in your database

  // parse the message the user sent us
  const selection = parseInt(request.query.text) - 1;
  const day = options[selection];

  // by default we will warn them to send us a valid response
  let message = "Please select from one of the valid options only.";

  // if the response was valid though we confirm the selection
  if (day) {
    message = `Thank you! Your delivery has been rescheduled for ${day}`;
  }

  send(request.query.msisdn, message);
  response.send('Response processed');
});
Now try replying to the message you received earlier. It might take a few seconds depending on your internet connection but you should get a confirmation within a few seconds. Also try and reply with some random text messages and see what happens.
The Vonage SMS API has a lot more options than I showed here including Flash Messages, vCard, vCal, and much more. Personally I really like how easy the Vonage CLI make it to buy phone numbers and tie them to an endpoint.
I'd love to know what you'd add next? Please drop me a tweet (I'm @cbetta) with your thoughts and ideas.