
Share:
Dillion Megida is a Software Engineer in Nigeria, who loves building software solutions on the web. He is also a passionate technical writer who loves sharing his knowledge on various web-related topics across various platforms.
Building Github Actions With the Vonage Messages API
Time to read: 11 minutes
For teams and individuals, communication is very important for the growth of a project. Not just communication between members, but also direct communication with the project. Manually checking the status of your application can be strenuous, and that's the benefit that automation using communication APIs can provide. You can easily get notified by text, voice call, social media, or any other means (depending on the API's features) when events occur in your app.
GitHub Actions is a beautiful integration in GitHub which allows you to trigger actions based on specific events that occur. This can be useful for many purposes depending on how creative a developer can be. One of the use cases is sending messages via Communication APIs.
In this article, we'll learn how to combine GitHub Actions with Vonage Messages API using the WhatsApp channel. We’ll send messages to a WhatsApp number when a specific event occurs. You can also practice with the other supported channels of the API.
Required knowledge: To get the most out of this article, a fair knowledge of how Node.js applications are created and how GitHub Actions work would be required. Here's an Introduction to GitHub Actions article you may want to check out first.
GitHub Actions allow you to execute specific commands when an event occurs; for example, when someone makes a pull request, pushes to a branch, and many more events.
GitHub Actions can be used in various ways, some of which are:
running tests on pull requests
automatic deployment after updating a branch
communicating app status, issues, or pull requests with developers
many more
The Messages API allows you to send messages to a WhatsApp number via the WhatsApp channel. To access the API, you need to create an account on the Vonage Developer dashboard. Afterward, you'll be given free credits to start testing the API. To use the WhatsApp channel, you need to set up a sandbox.
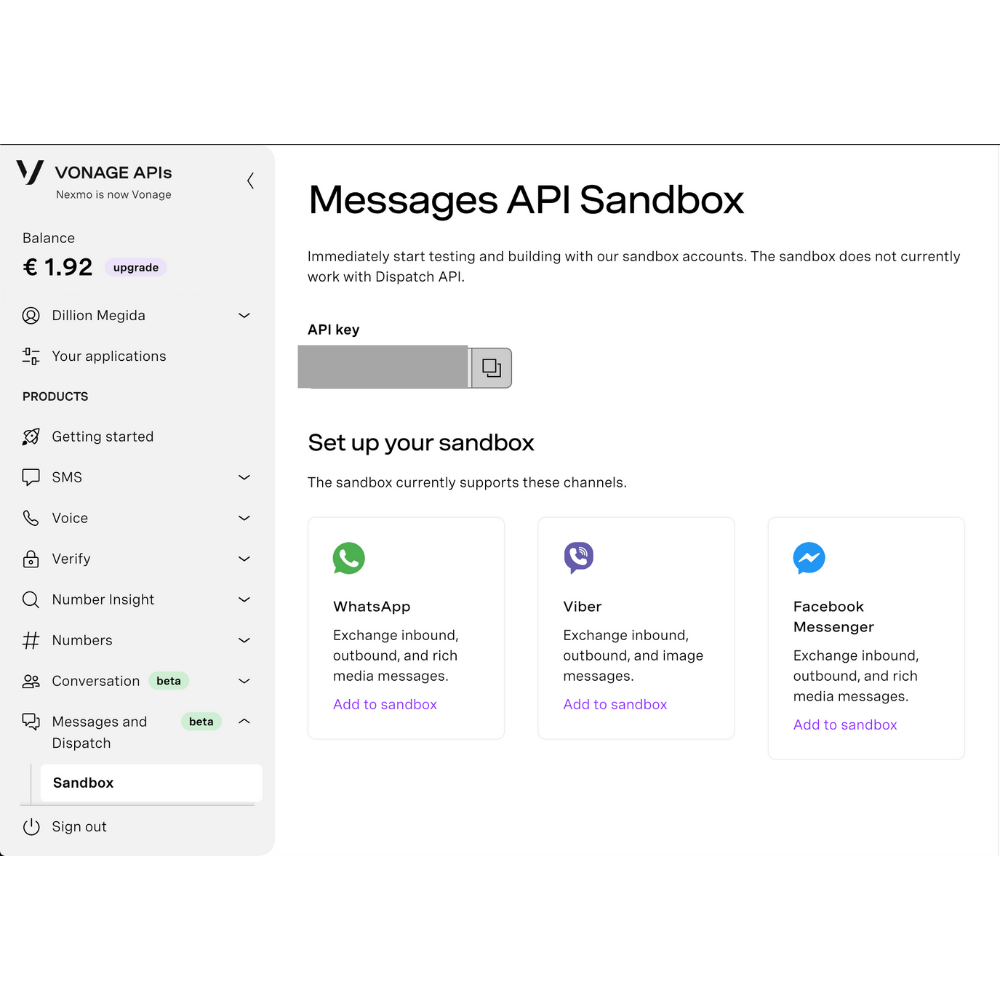 Vonage Developer dashboard for setting up a sandbox
Then, add the WhatsApp channel to the sandbox. You'll be given a link that navigates to the WhatsApp application, with a default message in the input field ready to send to Vonage. The default message varies. For this tutorial, the message generated was "Join yam slice". For the WhatsApp web app, here's a screenshot:
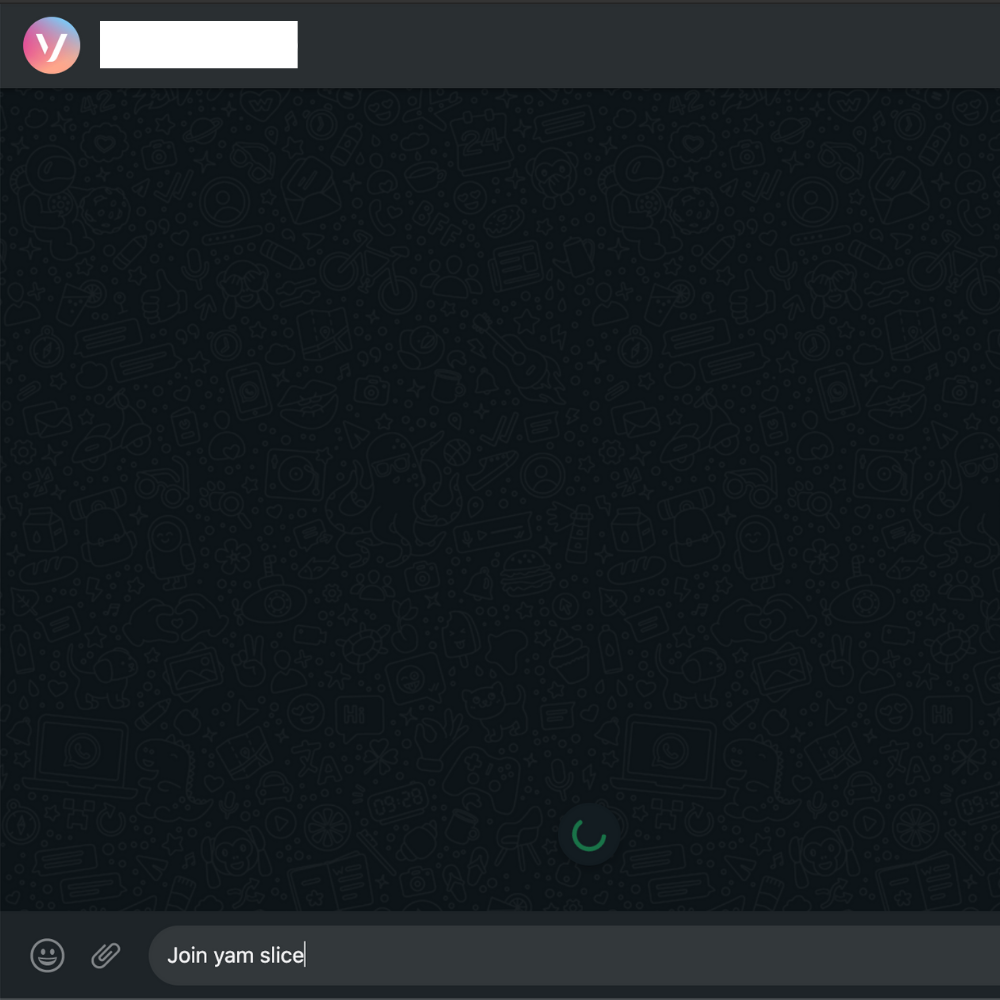 WhatsApp app after clicking generated link gotten after adding WhatsApp channel to sandbox
On sending that message, you get a message notifying you that your number has been whitelisted for the Sandbox. This means you can now send messages to that number.
If you want to add more numbers, you can simply send the same text to the same recipient using the WhatsApp number you want to add.
On the same page, you'll find something similar to this:
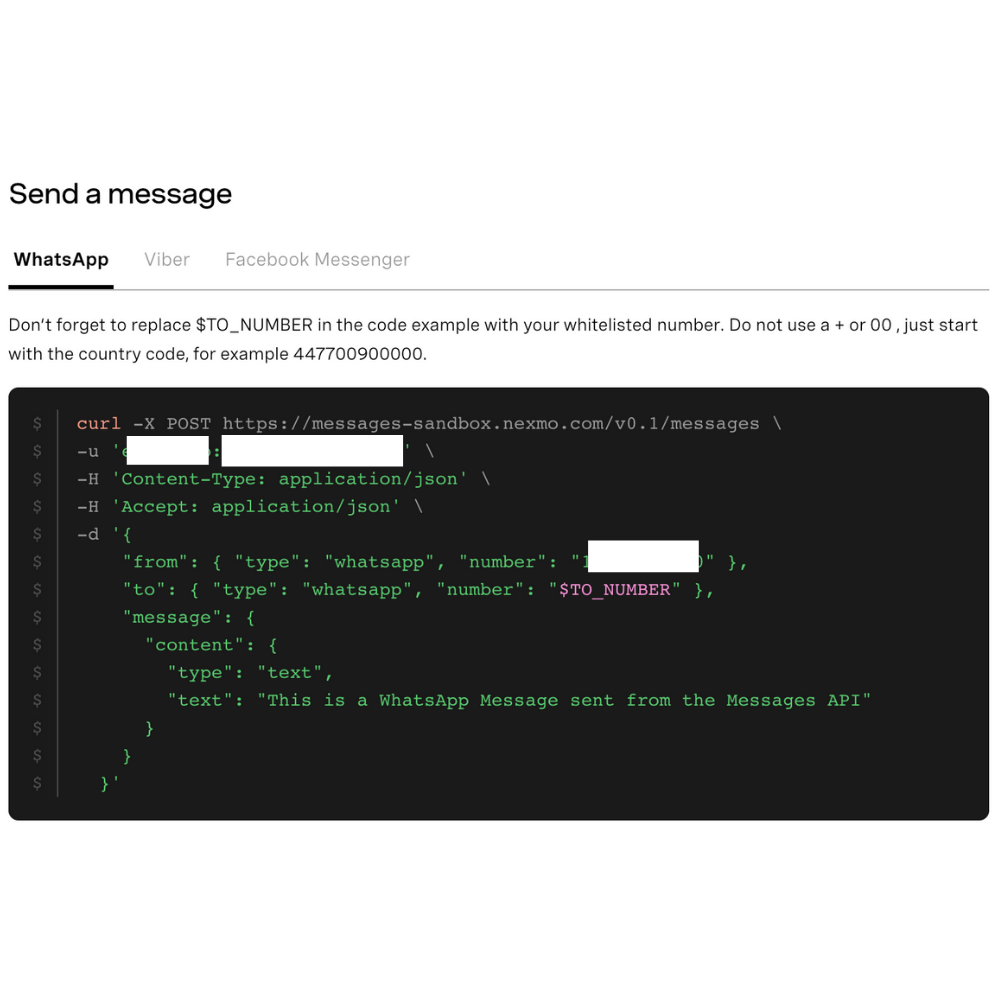 Example code for using the WhatsApp API
This shows how to call the API to send a message to a whitelisted number. This POST request shows:
The URL: https://messages-sandbox.nexmo.com/v0.1/messages
The username and password in the
-uflag (intentionally hidden in the screenshot). The first set before the colon is your API key and the second set is the password generated by Vonage.Some headers
The data, which contains the
from(the WhatsApp number given to you by Vonage for sending messages),to(the recipient, being a whitelisted number), andmessageproperty.
This is what we'll use in our GitHub Actions to send messages.
Next, let's set up an example application to see the GitHub Actions and Vonage Messages API in use.
For this example, we'll be creating an npm library that returns "I am a library" when executed. It's a very simple app, so we can focus on how GitHub Actions work with the WhatsApp API.
Using the terminal, navigate to your desired directory where you want the project to live, then do the following:
mkdir simple-lib: to create a directory called "simple-lib"cd simple-lib: to navigate into that directorynpm init -y: to set uppackage.jsontouch index.js: to create an index.js file where we'd put the execution code of our library
Add the following code to index.js:
function returnPhrase() {
  return "I am a library";
}

module.exports = returnPhrase;Let's say we wanted to set up a test suite for our library. Run the following commands on your terminal:
Mocha is a testing framework for JavaScript applications. We'll have the test suite in test.js with the following code:
const assert = require("assert");
const returnPhrase = require(".");

describe("returnPhrase", function () {
  it("should print the right phrase", function () {
    assert.strictEqual(returnPhrase(), "I am a library");
  });
});In package.json, edit the test property to the following value:
"scripts": {
  "test": "mocha"
},Now, when you run npm run test on the terminal, you'll get:
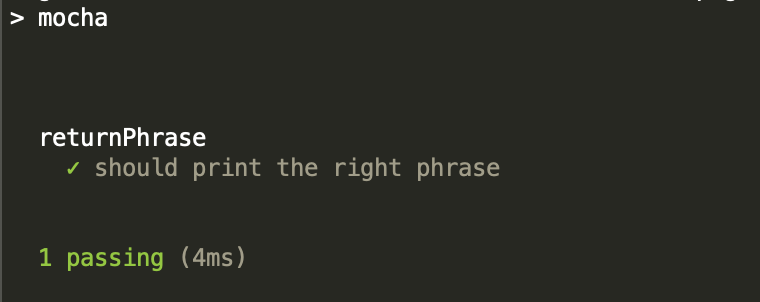 Result of executing test script
Initialize a Git repo using git init, commit changes, and push to a new GitHub repository you have created for this example.
When running GitHub Actions, you need an action runner. The action runner provides the implementation for the Messages API we want to use. Action runners require two files:
action.ymlwhich provides the schema for the runner such as inputs to receive, outputted variables, and many more.The main file (can be
dist/index.js) which provides the actual implementation referenced by theaction.yml.
For this example, create an action.yml file with the following configuration:
name: 'Vonage WhatsApp Action'
description: 'Action to send WhatsApp messages'
runs:
  using: 'node12'
  main: 'dist/index.js'
inputs:
  message:
    description: The message you want to send to the WhatsApp number
required: trueLet's create a whatsapp.js file which will be compiled to dist/index.js. This file contains the code needed to send messages using the WhatsApp channel.
Here are the contents of the whatsapp.js file:
const core = require("@actions/core");
const { default: axios } = require("axios");

const env = process.env;

const messageFromInput = core.getInput("message");

const messageToSend =
  `${messageFromInput}\n\n` +
  `Repository: ${env.GITHUB_REPOSITORY}\n` +
  `Workflow name: ${env.GITHUB_WORKFLOW}\n` +
  `Job name: ${env.GITHUB_JOB}`;

Const VONAGE_NUMBER = “<Number from Vonage>”
const WHATSAPP_NUMBER = "<A recipient>";
const API_KEY = “<API Key from your dashboard>”
const API_SECRET = “<API Secret from your dashboard>”

(async () => {
  try {
    await axios({
      method: "post",
      url: "https://messages-sandbox.nexmo.com/v0.1/messages",
      auth: {
        username: API_KEY,
        password: API_SECRET,
      },
      data: {
        from: {
          type: "whatsapp",
          number: VONAGE_NUMBER,
        },
        to: {
          type: "whatsapp",
          number: WHATSAPP_NUMBER,
        },
        message: {
          content: {
            type: "text",
            text: messageToSend,
          },
        },
      },
    });
  } catch (error) {
    core.setFailed(error.message);
  }
})();@actions/core is a library that contains several functions for accepting inputs, exporting variables, and doing many other things across actions. The importance of this is to receive inputs from the action runners on GitHub. It needs to be installed, so run:
Axios is a promise-based HTTP client for making network requests. This is used to make a POST request. It also needs to be installed, so run:
process.env gives access to environment variables that would contain the variables exposed by GitHub during the workflow execution. For example, GitHub exposes the GITHUB_REPOSITORY variable which can be accessible with process.env.GITHUB_REPOSITORY. You can find more default GitHub environment variables here.
A message input will be received (we'll see how to set up that in the GitHub Actions configuration section), which would be the same message we will send to the WhatsApp number. You can use any whitelisted number you want there but Vonage specifically says:
"Do not use a + or 00, just start with the country code, for example, 447700900000"
Then the post request is made and the WhatsApp message is sent to the number.
Just as seen in the example code from Vonage, we specify the username and password for server authentication. For Axios, this is done with the auth object containing the username and password property.
As seen above, the WhatsApp message is sent in the form:
"**TEST FAILED!!**
Repository: <Repository name>
Workflow name: <Workflow name>
Job name: <Job name>"We need to also install one more package: @vercel/ncc. This package is used to bundle Node.js files into one file. We would use this to bundle whatsapp.js and all the used dependencies into one file.
Add the following to package.json:
"scripts": {
  "test": "mocha",
  "build": "ncc build whatsapp.js -o dist"
},Before pushing, we would need to run npm run build so that everything in whatsapp.js will be exported to dist/index.js.
Firstly, create a workflows directory in the .github directory at the root of your project.This directory would contain all workflows we want for the app.
Under workflows, create a file called "whatsapp-actions.yml". GitHub Actions use the YAML syntax for describing workflows.
For this example, we want to send a WhatsApp message when a new commit is pushed to the repository and the test script fails. Here's the content of the workflow:
# .github/workflows/whatsApp-actions.yml
name: Whatsapp actions

on: push

jobs:
  run-tests:
    runs-on: ubuntu-latest
    steps:
      - uses: actions/checkout@v2
      - uses: actions/setup-node@v1
      - run: npm i
      - run: npm test
      - name: WhatsApp Message
        if: ${{ failure() }}
        uses: dillionmegida/github-actions@master
        with:
message: "*TEST FAILED*"Before we move further, let’s get a clear understanding of the configuration above.
name: Whatsapp actionsThe name property specifies the name of the workflow. This is what you see in the actions tab on GitHub.
on: pushThe on property specifies the event which triggers the workflow. For our example, the push event does that. This means the workflow is run anytime someone pushes a change to a branch in the repository. Here are more events you can use. You can also specify multiple events.
jobs:
  run-tests:
runs-on: ubuntu-latestThe jobs property specifies the jobs that would be run for that workflow. I’m naming the first job run-tests. GitHub shows every task running in your workflow under the actions tab by grouping them under their respective job names.
The next line (runs-on) specifies the OS type and version that should be used to execute the workflow.
steps:
      - uses: actions/checkout@v2
      - uses: actions/setup-node@v1
      - run: npm i
      - run: npm test
      - name: WhatsApp Message
        if: ${{ failure() }}
        uses: dillionmegida/github-actions@master
        with:
message: "*TEST FAILED*"Under the jobs section are “steps” to take. The steps block describes the execution of tasks that make up a job.
In the first two steps, the action "uses" actions/checkout@v2 and actions/setup-node@v1. actions/checkout@v2 is an action runner for checking out a repository. This is required to give your job environment access to the code within the repository. actions/setup-node@v1 is an action runner for downloading Node. This gives access to npm which we would need in the third and fourth step.
A boilerplate for creating GitHub actions can be found in the starter workflows repository. As seen there, uses: actions/checkout@v2 and actions/setup-node@v1 are also used in the steps section. These are two vital steps as they make it possible to execute the code you have in your repository using npm.
Running npm i installs all dependencies in package.json and npm test runs the test script.
The next step in the workflow is a group of steps under the name "WhatsApp Message". These lines trigger the WhatsApp message using the action configuration we have in action.yml. The step has a condition on the next line (if: ${{ failure() }}) which shows that the remaining tests would only execute when the previous steps in the job fail. You can check out more job status checks.
In the WhatsApp Message step, the action "uses" dillionmegida/github-actions@master (which is the master branch of the same repository) as an action runner for the Messages API code implementation. GitHub at this point would search for action.yml in the root directory of this repository, which we have already configured.
The action sends an input to the action runner (whatsapp.js) using the with property. The input comes with a key message and value *TEST FAILED*. The asterisks are added so that WhatsApp can make that text bold.
Now that we have everything set up, we can trigger the workflow by pushing to a repository. Before that, we need to ensure that the test fails, so that the WhatsApp message implementation would be executed.
Edit test.js to the following:
assert.strictEqual(returnPhrase(), "I am not a library");We can bundle our app (using npm run build), commit the changes, and push it to the repository.
On pushing, the workflow is triggered, and we get an error as seen below:
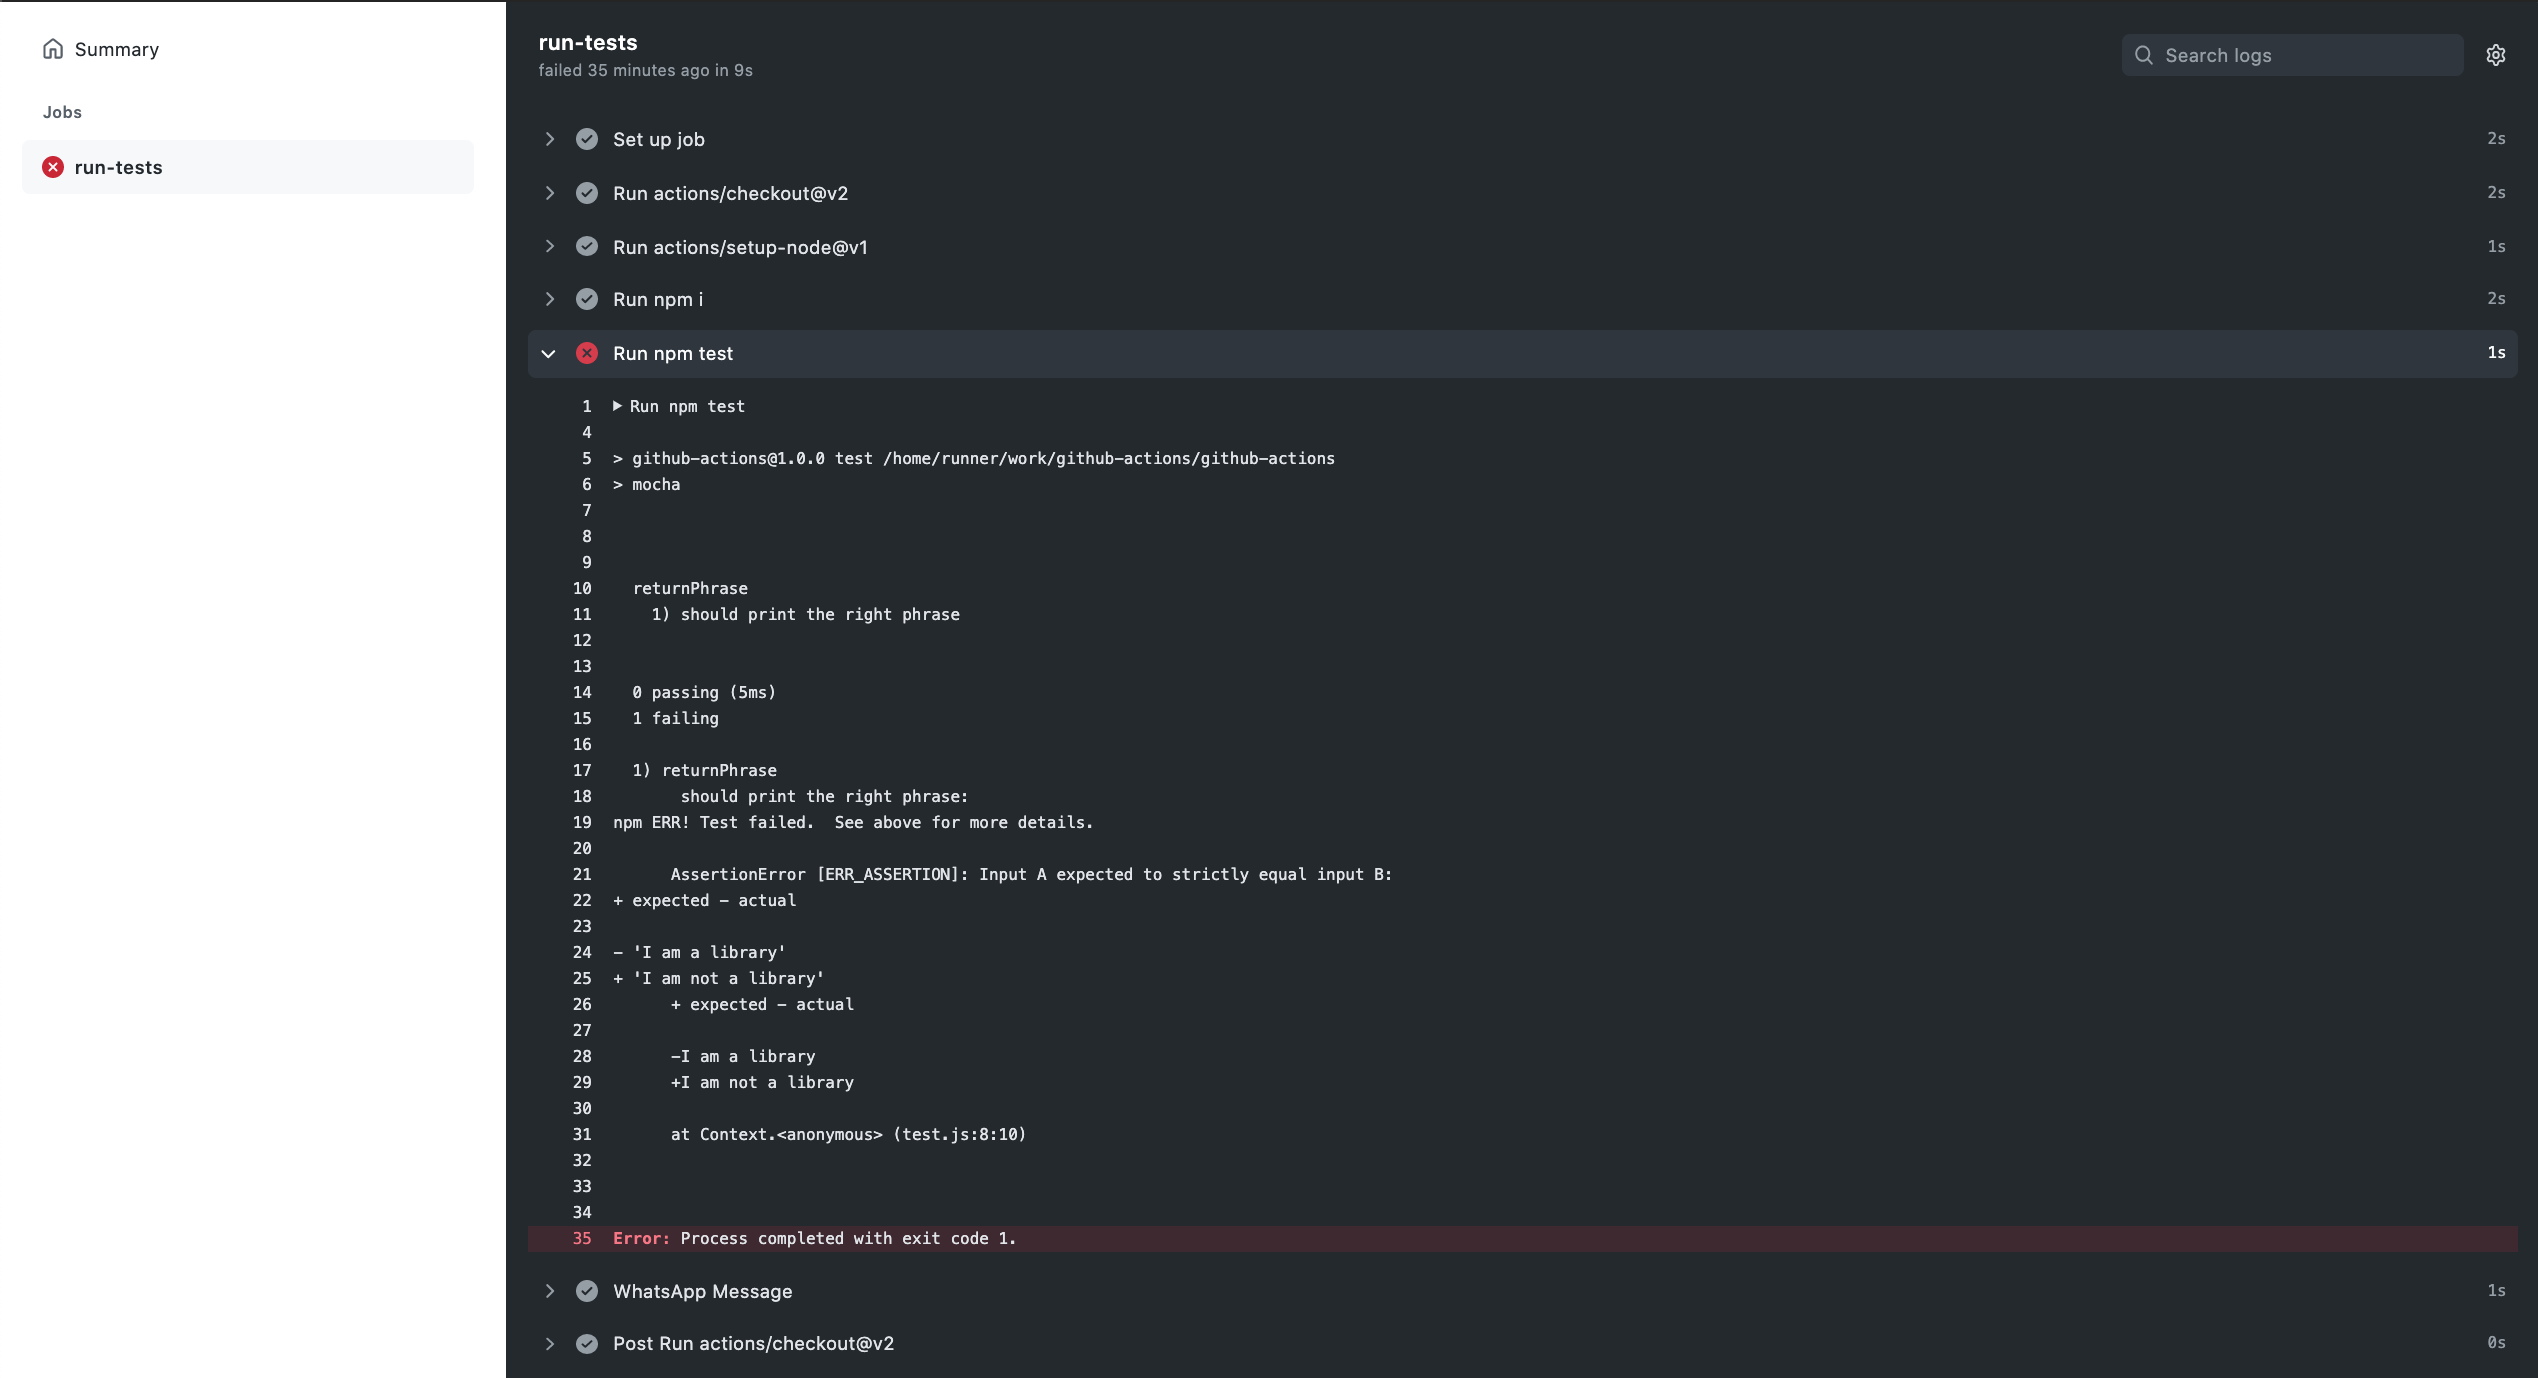 Error from running the workflow
After the error, we'll get a WhatsApp message as follows:
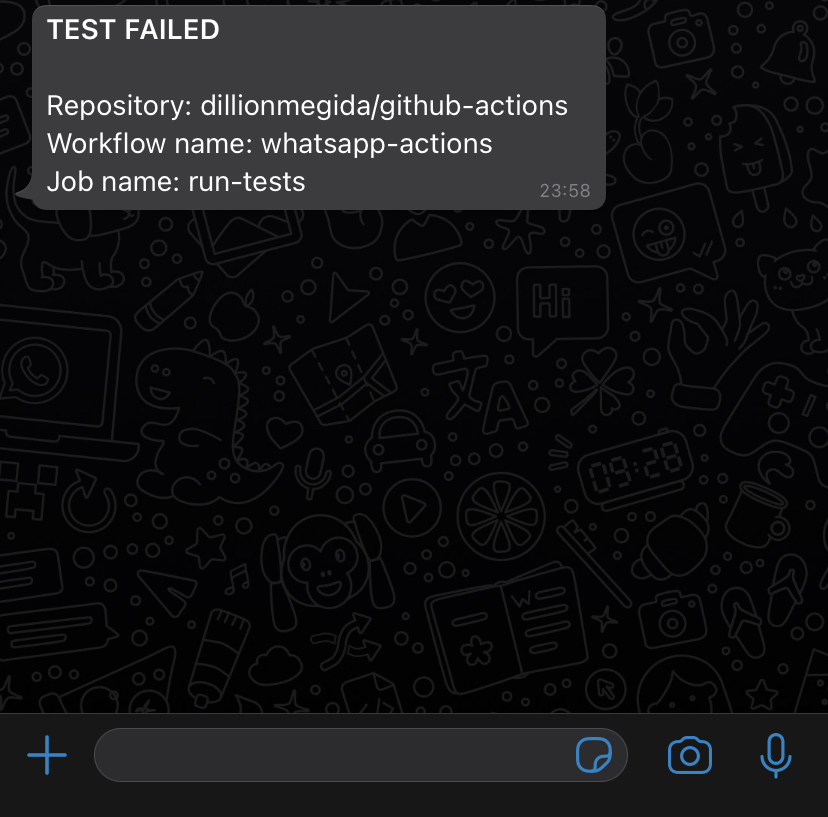 Screenshot of WhatsApp message sent to a whitelisted number
There is a lot you can do with GitHub Actions and even more with the Vonage communication APIs. You can also send messages on Viber and Facebook Messenger.
In this article, we've learned what GitHub Actions are, a few utilities that make GitHub Actions powerful, and how to integrate the Vonage Messages API for sending WhatsApp messages when a test script fails after pushing a commit to a repository.