Share:
Karl is a writer, speaker, and technology team lead. He’s currently the Chief Technology Officer at The Graide Network and runs CFP Land in his spare time.
Build an SMS Reminder Tool for Teachers Using Google Classroom
Time to read: 8 minutes
I've worked in education technology for several years now, and one challenge that I often hear from teachers is that students don't check their email accounts. There are whole businesses, like Remind, built around this communication problem.
In this walk-through, we're going to build an SMS reminder app that allows teachers to remind their students about upcoming assignments in Google Classroom. We'll use the Google Classroom API to enforce authentication and get course and assignment data, and the Vonage Messages API to power the text messages that teachers send to their students.
Before we get started, let's understand the core functionality and architecture of our application. In this tutorial, we'll address three user stories:
Teachers can log in to our application using their Google account.
Teachers can see a list of their most recent assignments and select the one they want to remind students about.
Teachers can remind each student via SMS about the upcoming assignment.
Let's look at the flow of data between our application and the two supporting APIs (Google Classroom and Vonage Messages):
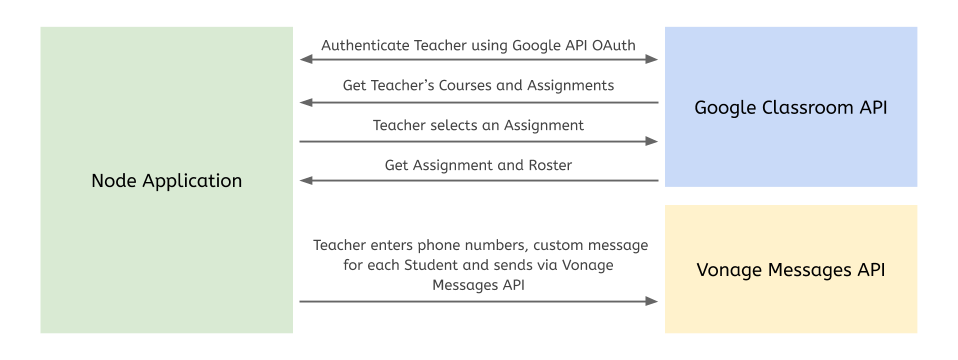
We'll use Node and Express for this demo, but Google and Vonage both offer API clients in most major programming languages. If you'd like to skip ahead, you can download the code on Github and follow the "Quick Start" section in the Readme to get the app up and running.
A Google APIs Account and Project with OAuth 2.0 Client credentials
A Google Classroom account with a class having several students in it and at least one assignment
First, let's create a new Express application that uses Handlebars for templating and express-session for session storage. We'll use the Express application generator to make this easier:
npx express-generator --hbs --git classroom-remindersThis command will create a new directory called classroom-reminders with a boilerplate Express app inside. Let's navigate into that directory and install the Express session storage package as well as our other packages provided by Express:
npm i --save express-session && npm i
In order to use the session package, we'll need to add it to our app.js file. Add the following lines where indicated in the comment:
// Add this line to the top of your app.js file
var session = require("express-session");
...
var app = express();
...
// And this block after the app has been created
app.use(session({
  secret: process.env.SESSION_SECRET,
  resave: true,
  saveUninitialized: true,
}));
...If you want to make sure everything is working so far, run SESSION_SECRET=<A SECURE STRING FOR PROTECTING SESSIONS> npm start and visit localhost:3000 in your browser. You should see the default Express welcome page.
Now that we've got a new Express application let's add authentication using Google's OAuth client.
If you haven't already, create a new Project in the Google API portal and add OAuth 2.0 credentials to it. Be sure to set your OAuth callback URL to localhost:3000 for this tutorial, but if you deploy this application to a production environment, you'll want to change the callback URL.
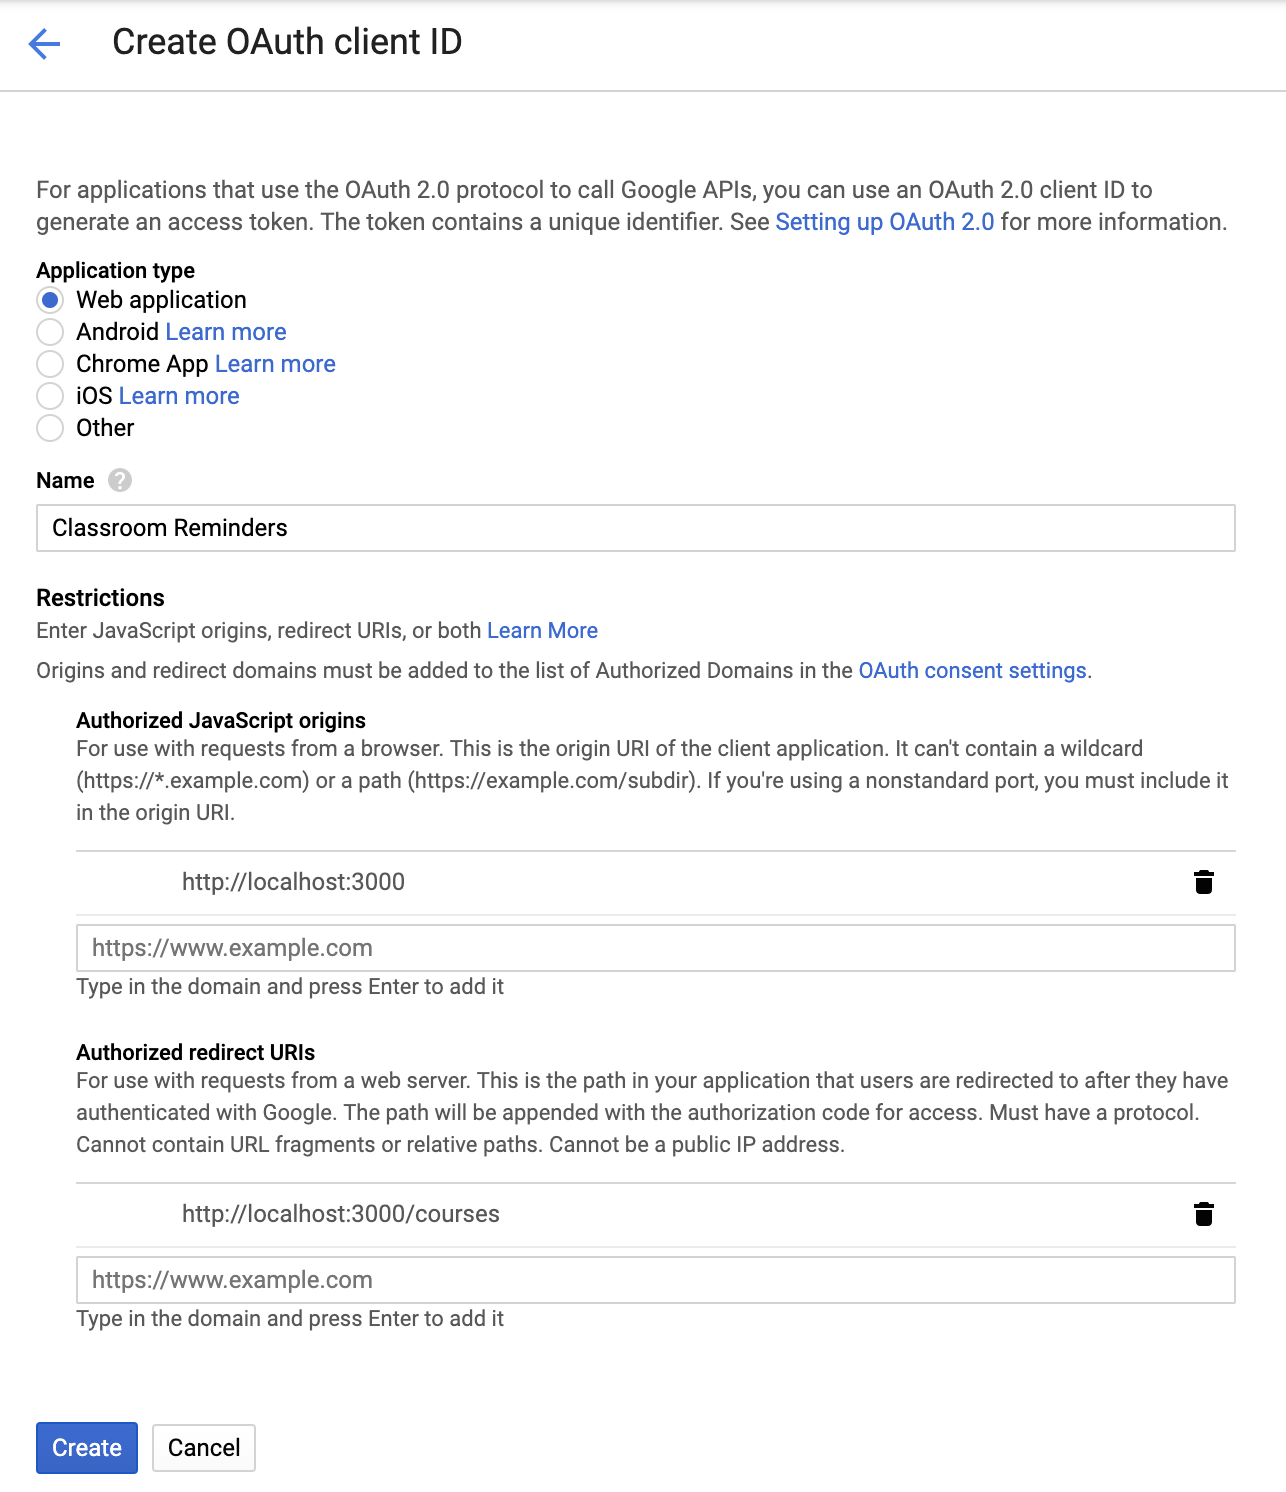 Creating a Client ID in the Google Developer Console
Google will generate a Client ID and Client Secret that we'll use throughout this tutorial.
Next, we'll install the Google APIs npm package:
npm i --save googleapisTo help keep our code organized, we'll create a new file in our classroom-reminders project just for our Google API code. Create a new folder called helpers/ and a file in it called google-api.js. Add the following to this file:
const google = require("googleapis").google;

const googleConfig = {
  clientId: process.env.GOOGLE_OAUTH_ID,
  clientSecret: process.env.GOOGLE_OAUTH_SECRET,
  redirect: process.env.GOOGLE_OAUTH_REDIRECT,
};

const createConnection = () => {
  return new google.auth.OAuth2(
    googleConfig.clientId,
    googleConfig.clientSecret,
    googleConfig.redirect
  );
};

const getConnectionUrl = (auth) => {
  return auth.generateAuthUrl({
    access_type: "offline",
    prompt: "consent",
    scope: [
      "https://www.googleapis.com/auth/userinfo.profile",
      "https://www.googleapis.com/auth/userinfo.email",
      "https://www.googleapis.com/auth/classroom.courses.readonly",
      "https://www.googleapis.com/auth/classroom.rosters.readonly",
      "https://www.googleapis.com/auth/classroom.coursework.students.readonly",
    ],
  });
};

/**
 * Exported functions
 */

module.exports.loginUrl = () => {
  const auth = createConnection();
  return getConnectionUrl(auth);
};

module.exports.getToken = async (code) => {
  const auth = createConnection();
  const data = await auth.getToken(code);
  return data.tokens;
};

module.exports.getCurrentUser = async (tokens) => {
  const auth = createConnection();
  auth.setCredentials(tokens);

  const res = await google
    .oauth2({
      auth,
      version: "v2",
    })
    .userinfo.get();

  return { ...res.data };
};
I won't dive into all the details about how OAuth works, but the three exported functions are all part of a standard server-side OAuth workflow. The loginUrl generates a unique login URL that users will see before they've authenticated. The getToken function trades a one-time code generated by Google's servers for a long-lived access token. The getCurrentUser function uses that access token to get the currently authenticated user's information from the Google API.
Another worthwhile consideration are the scopes that we're requesting:
scope: [
  "https://www.googleapis.com/auth/userinfo.profile",
  "https://www.googleapis.com/auth/userinfo.email",
  "https://www.googleapis.com/auth/classroom.courses.readonly",
  "https://www.googleapis.com/auth/classroom.rosters.readonly",
  "https://www.googleapis.com/auth/classroom.coursework.students.readonly",
],Scopes limit the data that our application can access. In general, you should ask for as little access as possible to build your application, so we're just asking for user profile information and Google Classroom read access.
Next, we'll update our Express application's routes/index.js file. This route will check for a code in the query string, and if found, will use the google-api helper file we created to trade that code for an authorization token. Then, it will save that token (along with a refresh token and expiration date) to session storage. Finally, it will redirect users to the /assignments page after they're logged in:
const express = require("express");
const router = express.Router();
const googleApi = require("../helpers/google-api");

router.get("/", function (req, res, next) {
  if (req.query.code) {
    googleApi.getToken(req.query.code).then((tokens) => {
      req.session.tokens = tokens;
      req.session.save(() => {
        res.redirect("/assignments");
      });
    });
  } else {
    res.render("index", {
      loginUrl: googleApi.loginUrl(),
    });
  }
});

module.exports = router;
We'll also need to modify the views/index.hbs file to display this login link:
<h1>Google Classroom Reminders</h1>
<p>Log in with Google to remind your students about their upcoming assignments.</p>

<p>
  <a href="{{ loginUrl }}">Login</a>
</p>If we want to test our application so far, we'll need to start it with our Google OAuth ID, secret, and redirect URL:
GOOGLE_OAUTH_ID=<YOUR GOOGLE OAUTH ID> \
GOOGLE_OAUTH_SECRET=<YOUR GOOGLE OAUTH SECRET> \
GOOGLE_OAUTH_REDIRECT=http://localhost:3000/ \
SESSION_SECRET=<A SECURE STRING FOR PROTECTING SESSIONS>  \
npm startThis time when we navigate to localhost:3000, we'll see a login link:
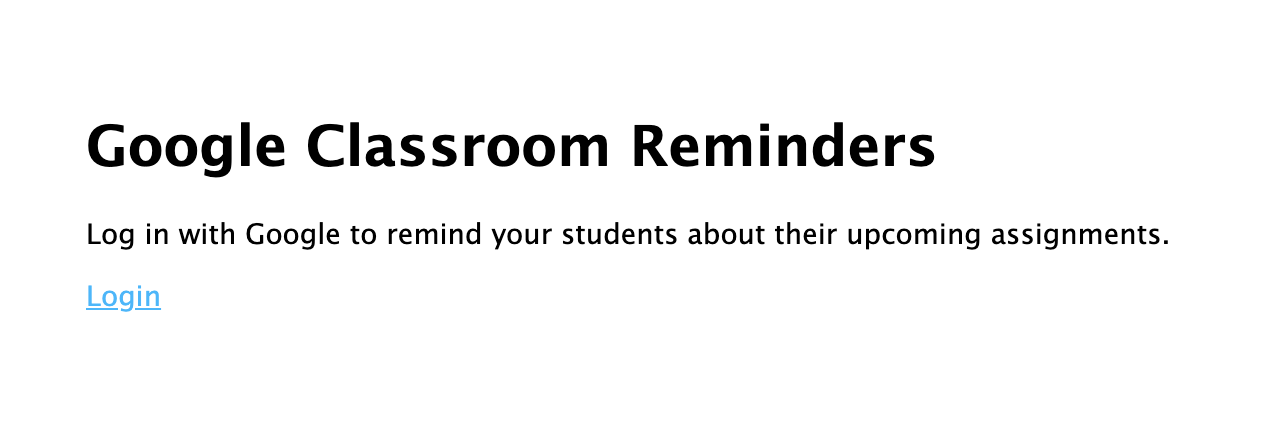 Login screen for Google Classroom Reminders application
After you click login, Google will take us through the approval process for our new app:
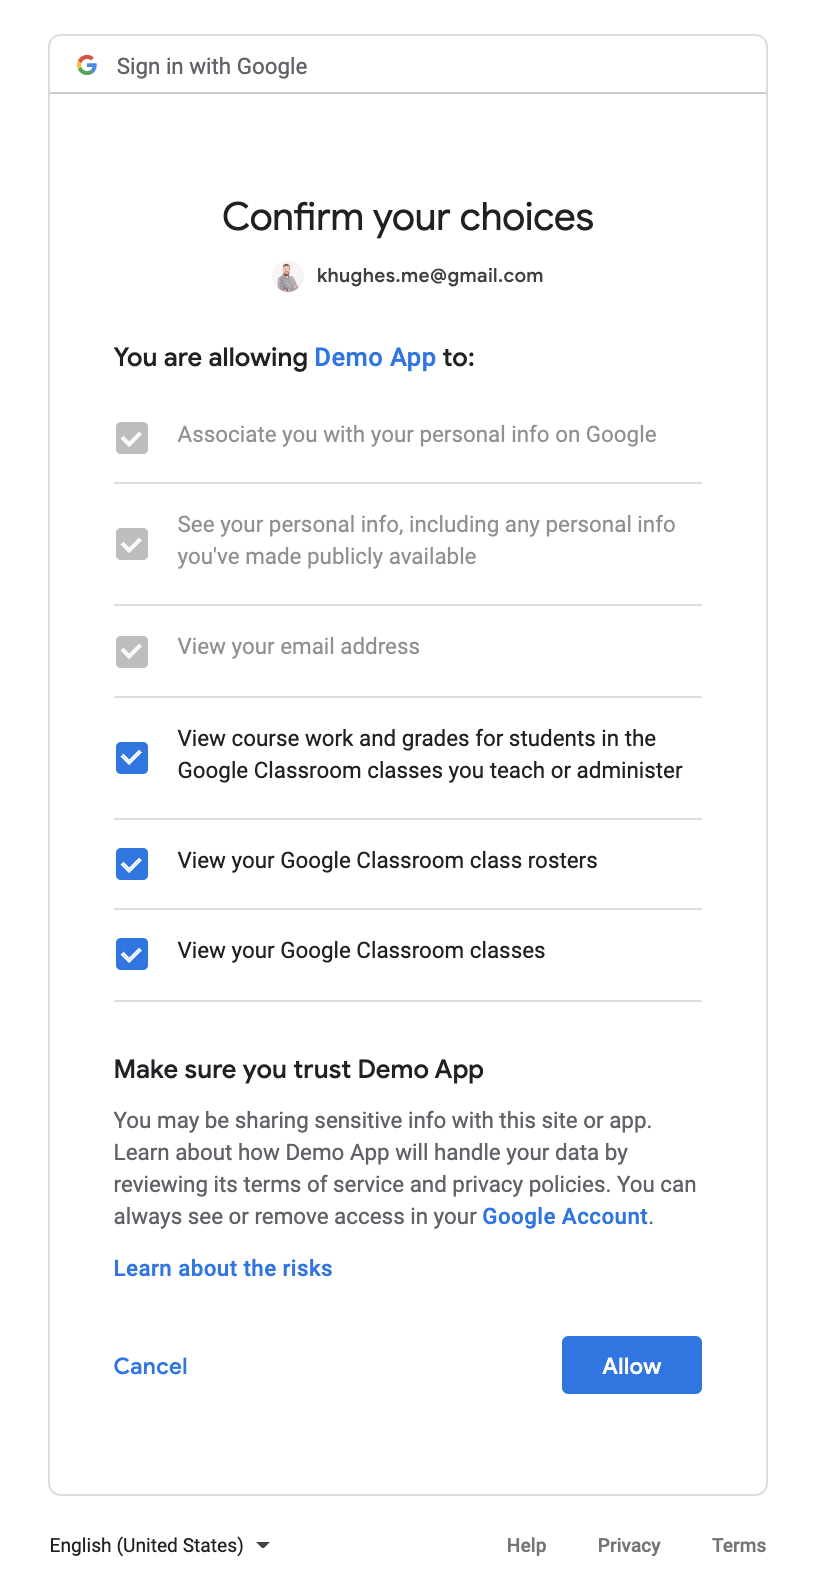 Permissions approval for Google Classroom Reminders application
After you approve our application, you'll be taken to localhost:3000/assignments, but that URL doesn't exist yet. We'll create it in the next section.
Now that we've built a login process for our application, we need to use the user's access token to get their courses and assignments from Google Classroom's API.
First, we'll need to add two new functions to the helpers/google-api.js file:
...
module.exports.getCourses = async (tokens) => {
  const auth = createConnection();
  auth.setCredentials(tokens);

  const res = await google
    .classroom({ version: "v1", auth })
    .courses.list({ teacherId: "me", courseStates: "ACTIVE" });

  return res.data.courses ? [...res.data.courses] : [];
};

module.exports.getCourseWorks = async (tokens, courseId) => {
  const auth = createConnection();
  auth.setCredentials(tokens);

  const res = await google
    .classroom({ version: "v1", auth })
    .courses.courseWork.list({ courseId: courseId, orderBy: "dueDate desc" });

  return res.data.courseWork ? [...res.data.courseWork] : [];
};
These will allow us to request a list of Courses and CourseWork (Google Classroom's name for assignments) from the Google Classroom API on behalf of the current user. Next, create a new route file at routes/assignments.js:
const express = require("express");
const router = express.Router();
const googleApi = require("../helpers/google-api");

router.get("/", function (req, res, next) {
  if (!req.session.tokens) {
    res.redirect("/");
  }

  googleApi.getCourses(req.session.tokens).then(async (courses) => {
    Promise.all(
      courses.map(async (course) => {
        course.assignments = await googleApi.getCourseWorks(
          req.session.tokens,
          course.id
        );
        return course;
      })
    ).then((courses) => {
      res.render("assignments", { courses });
    });
  });
});

module.exports = router;
This will loop through all of the user's courses and get the latest assignments for each of them. We'll also need to add this route to the app.js file:
var assignmentsRouter = require('./routes/assignments');
...
app.use('/', indexRouter);
app.use('/assignments', assignmentsRouter);
...Finally, we'll create a new view file (views/assignments.hbs) to display all of the current user's courses and assignments:
<h1>Google Classroom Reminders</h1>
<p>Select an Assignment to remind your students about.</p>

{{#each courses}}
<h2>{{ this.name }}</h2>
  {{#if assignments}}
  <ul>
      {{#each assignments}}
        <li>
          <a href="/assignments/{{ ../id }}:{{ this.id }}">{{ this.title }}</a><br/>
          Due on {{ this.dueDate.month }}/{{ this.dueDate.day }}/{{ this.dueDate.year }}
        </li>
      {{/each}}
  </ul>
  {{else}}
  <p>No assignments found</p>
  {{/if}}
{{/each}}
If you start the application as you did in the previous step and login to it again, you should see a list of your Google Classroom courses and assignments:
 Viewing Google Classroom courses and assignments
At this point, users can log in to our application using their Google account and see a list of the most recent assignments from their Google Classroom courses. Next, we'll let users drill down and view the students in each course and whether they've turned a particular assignment in or not.
To show a list of students enrolled in a course and check whether they've turned in that particular assignment, we'll need to access a few new endpoints in the Google Classroom API.
Let's add these new functions the the google-api.js helper file:
...
module.exports.getCourse = async (tokens, courseId) => {
  const auth = createConnection();
  auth.setCredentials(tokens);

  const res = await google
    .classroom({ version: "v1", auth })
    .courses.get({ id: courseId });

  return { ...res.data };
};

module.exports.getCourseRoster = async (tokens, courseId) => {
  const auth = createConnection();
  auth.setCredentials(tokens);

  const res = await google
    .classroom({ version: "v1", auth })
    .courses.students.list({ courseId: courseId });

  return res.data.students ? [...res.data.students] : [];
};

module.exports.getCourseWork = async (tokens, courseId, assignmentId) => {
  const auth = createConnection();
  auth.setCredentials(tokens);

  const res = await google
    .classroom({ version: "v1", auth })
    .courses.courseWork.get({ courseId: courseId, id: assignmentId });

  return { ...res.data };
};

module.exports.getStudentSubmissions = async (
  tokens,
  courseId,
  assignmentId
) => {
  const auth = createConnection();
  auth.setCredentials(tokens);

  const res = await google
    .classroom({ version: "v1", auth })
    .courses.courseWork.studentSubmissions.list({
      courseId: courseId,
      courseWorkId: assignmentId,
    });

  return res.data.studentSubmissions ? [...res.data.studentSubmissions] : [];
};
Next, let's create a new route in the routes/assignments.js file to get the following:
A single Course
The roster of students for that Course
A single Course Work object
Student Submissions for that Course Work
Interestingly, the Google Classroom API won't let us get a single Course Work without both a Course ID and Course Work ID. In order to pass both IDs in as a single route parameter, we concatenated them with a : in the previous step. Hence this line in the views/assignments.hbs file:
...
<a href="/assignments/{{ ../id }}:{{ this.id }}">{{ this.title }}</a>
...Now we need to parse these two IDs in our new route and then pass them into the appropriate functions we created in the google-api.js file. Add the following lines to your routes/assignments.js file:
...
router.get("/:id", function (req, res, next) {
  if (!req.session.tokens) {
    res.redirect("/");
  }

  const ids = req.params.id.split(":");
  const courseId = ids[0];
  const assignmentId = ids[1];

  Promise.all([
    googleApi.getCourse(req.session.tokens, courseId),
    googleApi.getCourseRoster(req.session.tokens, courseId),
    googleApi.getCourseWork(req.session.tokens, courseId, assignmentId),
    googleApi.getStudentSubmissions(req.session.tokens, courseId, assignmentId),
  ]).then(([course, students, courseWork, submissions]) => {
    // Match submissions to students
    if (
      students &&
      students.length > 0 &&
      submissions &&
      submissions.length > 0
    ) {
      students.map((student) => {
        student.submission = submissions.find(
          (submission) => submission.userId === student.userId
        );
        if (student.submission && student.submission.state === "TURNED_IN") {
          student.turnedIn = true;
        }
        return student;
      });
    }

    res.render("assignment", {
      course,
      students,
      courseWork,
      submissions,
    });
  });
});
...
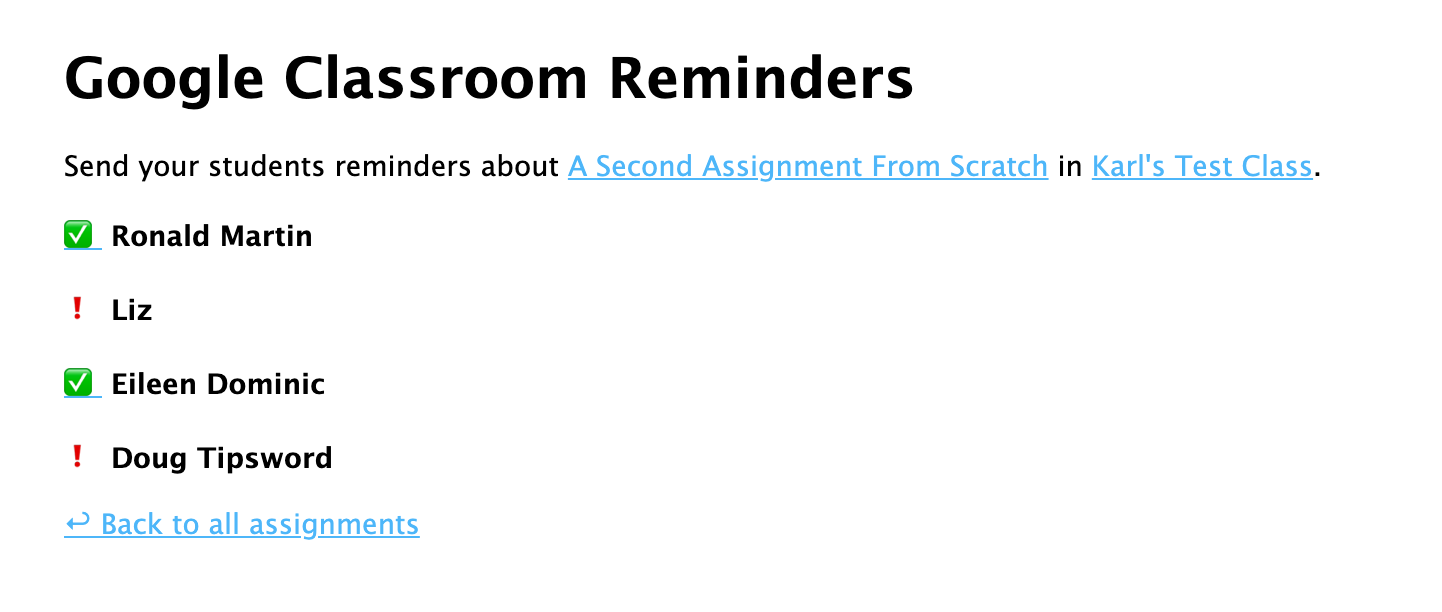
Finally, we'll need a new view to see all the students and their submission status for a particular assignment. Create a file at views/assignment.hbs and add the following:
<h1>Google Classroom Reminders</h1>
<p>
  Send your students reminders about <a href="{{ courseWork.alternateLink }}">{{ courseWork.title }}</a>
  in <a href="{{ course.alternateLink }}">{{ course.name }}</a>.
</p>

{{#if students}}
<div>
  {{#each students}}
  <p>
    {{#if this.turnedIn}}
      <a href="{{ this.alternateLink }}" title="Assignment turned in">✅</a>
    {{else}}
      <span title="Assignment not turned in">❗️</span>
    {{/if}}
    <strong>{{ this.profile.name.fullName }}</strong>
  </p>
  {{/each}}
</div>
{{else}}
<p>No students found</p>
{{/if}}
<p><a href="/assignments">↩️ Back to all assignments</a></p>Now, if we start the application and log in again, we can drill down into a particular assignment and see each student's submission status (denoted by or ❗️).
In the final step, we'll allow users to send SMS messages to students using the Vonage Messages API.
The Vonage Messages API can send and receive messages across several channels, but for this application, we'll only use SMS text messages.
Assuming you've already created a Vonage API application, the next step is to install the JavaScript client. In addition to this client, we'll also add the google-libphonenumber package to help format phone numbers:
npm i --save nexmo@beta google-libphonenumberNext, let's create another helper file for our code that formats phone numbers and sends SMS messages via the Nexmo library. Create a new file at helpers/nexmo-api.js:
const Nexmo = require("nexmo");
const PNF = require("google-libphonenumber").PhoneNumberFormat;
const phoneUtil = require("google-libphonenumber").PhoneNumberUtil.getInstance();

const nexmo = new Nexmo({
  apiKey: process.env.NEXMO_API_KEY,
  apiSecret: process.env.NEXMO_API_SECRET,
  applicationId: process.env.NEXMO_APP_ID,
  privateKey: process.env.NEXMO_PRIVATE_KEY_PATH,
});

module.exports.sendSms = (telephone, message, callback) => {
  const formattedPhoneNumber = phoneUtil.format(
    phoneUtil.parseAndKeepRawInput(telephone, "US"),
    PNF.E164
  );
  nexmo.channel.send(
    { type: "sms", number: formattedPhoneNumber },
    { type: "sms", number: process.env.NEXMO_PHONE_NUMBER },
    {
      content: {
        type: "text",
        text: message,
      },
    },
    callback,
    { useBasicAuth: true }
  );
};
In order to process inputs from a user and call the sendSms function we just created, let's make a new route file at routes/messages.js:
const express = require("express");
const router = express.Router();
const nexmoApi = require("../helpers/nexmo-api");

router.post("/", function (req, res, next) {
  if (!req.session.tokens) {
    res.redirect("/");
  }
  const { telephones, messages } = req.body;
  Promise.all(
    telephones.map((telephone, key) => {
      if (telephone) {
        return nexmoApi.sendSms(telephone, messages[key]);
      }
    })
  ).then((results) => {
    res.redirect("/assignments");
  });
});

module.exports = router;
This file iterates over an array of telephone numbers and messages and calls the sendSms method for each one that has a phone number. We'll also need to update our app.js file to use this new route:
var messagesRouter = require('./routes/messages');
...
app.use('/', indexRouter);
app.use('/assignments', assignmentsRouter);
app.use('/messages', messagesRouter);
...Because Google's API doesn't give us access to students' phone numbers, we'll have to make teachers enter these numbers in our interface along with a message for each student. Let's edit the views/assignment.hbs file to include these two form fields for each student and a submit button:
<h1>Google Classroom Reminders</h1>
<p>
  Send your students reminders about <a href="{{ courseWork.alternateLink }}">{{ courseWork.title }}</a>
  in <a href="{{ course.alternateLink }}">{{ course.name }}</a>.
</p>

{{#if students}}
<form action="/messages" method="post">
  {{#each students}}
  <p>
    {{#if this.turnedIn}}
      <a href="{{ this.alternateLink }}" title="Assignment turned in">✅</a>
    {{else}}
      <span title="Assignment not turned in">❗️</span>
    {{/if}}
    <strong>{{ this.profile.name.fullName }}</strong>
  </p>
  <div>
    <label for="message-{{ this.userId }}" style="display: block;">Reminder message</label>
    <textarea id="message-{{ this.userId }}" name="messages" maxlength="140" minlength="3" rows="5" cols="30">Hey {{ this.profile.name.givenName }}, don't forget about your assignment for {{ ../course.name }}. It's due on {{ ../courseWork.dueDate.month }}/{{ ../courseWork.dueDate.day }}/{{ ../courseWork.dueDate.year }}</textarea>
  </div>
  <div>
    <label for="telephone-{{ this.userId }}" style="display: block;">Telephone</label>
    <input type="tel" id="telephone-{{ this.userId }}" autocomplete="off" name="telephones" />
  </div>
  {{/each}}
  <div style="margin-top: 10px;">
    <input type="submit" value="Send Reminders">
  </div>
</form>
{{else}}
<p>No students found</p>
{{/if}}
<p><a href="/assignments">↩️ Back to all assignments</a></p>
Our application is basically finished, but we need to get all our Vonage credentials in order before we can use it. First, download your Vonage API private key and save it to a new file called .private_key. Now, start your application with all of the Google and Vonage API environment variables:
GOOGLE_OAUTH_ID=<YOUR GOOGLE OAUTH ID> \
GOOGLE_OAUTH_SECRET=<YOUR GOOGLE OAUTH SECRET> \
GOOGLE_OAUTH_REDIRECT=http://localhost:3000/ \
SESSION_SECRET=<A SECURE STRING FOR PROTECTING SESSIONS>  \
NEXMO_API_KEY=<YOUR VONAGE MESSAGES API KEY> \
NEXMO_API_SECRET=<YOUR VONAGE MESSAGES API SECRET> \
NEXMO_PHONE_NUMBER=<YOUR VONAGE MESSAGES PHONE NUMBER> \
NEXMO_APP_ID=<YOUR VONAGE MESSAGES APP ID> \
NEXMO_PRIVATE_KEY_PATH=./.private_key \
npm startThis time when you log in and view a single assignment, you'll be able to enter a phone number for each of your students and customize a message to send them. When you're ready, click "Send Reminders" to test the whole thing out.
 Sending SMS Reminders using Google Classroom and the Vonage Messages API
While this demo application covers a relatively simple use-case, it's easy to see how powerful the Vonage Messages API can be when coupled with an LMS like Google Classroom. There are several ways you could continue to enhance the user experience with an application like this:
Storing phone numbers in a database so that teachers don't have to enter them every time
Allowing users to change the default reminder message
Adding support for other messaging channels like Facebook, What's App, or Viber
Caching Google Classroom data to improve performance and avoid rate limits
User-friendly error and success messages
Custom design and styling
If you have questions or other ideas for implementing a reminder system using Vonage and Google Classroom, reach out to us on Twitter or the Vonage Developer Community Slack!