
Share:
Andrea Chiarelli has over 20 years of experience as a software engineer and technical writer. Throughout his career, he has used various technologies for the projects he was involved in. Currently, he is a software architect at the Italian office of Apparound and contributes to a few online magazines and blogs.
Build a One-Time Password (OTP) Service Using the Dispatch API
Time to read: 12 minutes
Product deprecation notice From August 31st 2025, the Vonage Dispatch API will be closed to new users, though the product will continue to be supported for existing users. If you are looking to build a messaging application with failover functionality, failover is now supported directly in the Messages API.
For general information about the Messages Failover feature please refer to this guide. For guidance on migrating from Dispatch API to Messages API Failover, please refer to this guide.
If you have any further questions regarding this product deprecation, please contact us on the Vonage Community Slack.
One-time passwords (OTPs) have become quite familiar in recent times, mainly due to a security requirement that traditional passwords do not guarantee. While the protection of the traditional password is the responsibility of the user, who as we well know often does not care enough, the OTP is practically self-protected because it is generated randomly, and its validity is limited in time.
You can use OTPs instead of traditional passwords, or to reinforce the traditional authentication process with two-factor authentication (2FA) approach. Actually, you can use OTPs wherever you need a mechanism that ensures a user’s identity by relying on a communication medium owned by himself: a mailbox, a phone, a specific app, etc.
In this article we will see how to implement a basic OTP service based on two Web APIs:
the first API allows you to create the OTP and to send it to the user via Facebook Messenger as the primary medium, or via SMS as a fallback medium
the second API allows the user to verify the OTP he received
The OTP service has no user interface. It is conceived as a microservice you can invoke from your application to generate and verify OTPs.
In order to use the OTP service shown in this article, you need:
Node.js 8.11+ installed on your computer
A Messenger account and a phone enabled to receive SMS
An application to send HTTP request, such as curl or Postman
As a first step, you need to clone or download the project from the GitHub repository.
Once you have the project’s code on your computer, you need to install its dependencies by moving into the project’s folder and typing the following command:
As we will see later, the application uses Express as its web framework and the Vonage client library for Node.js, in order to send the OTP to the user.
Before using the OTP service, you need to perform some configurations on the Vonage API dashboard in order to enable the message delivery through the Vonage Dispatch API.
This API allows you to send messages to your users by using multiple channels with prioritization. For example, in our case, we will send the OTP to the user via their Messenger account, as a first attempt. If the user doesn’t read it within a given amount of time, the message will be sent via SMS to their phone number.
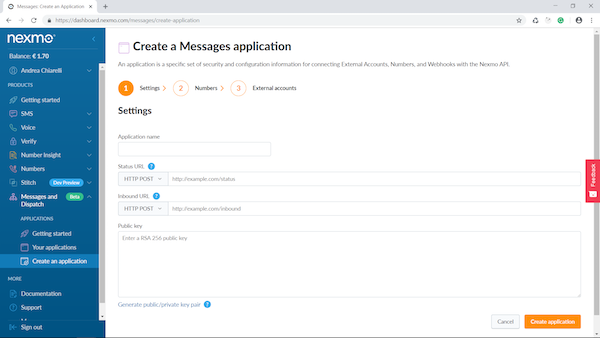
So, access your Vonage API dashboard and select the Messages and Dispatch item in the menu and then select Create an Application, as shown in the image below:
 Vonage Dashboard
In Vonage API lingo, an application is a bunch of data enabling you to use the Messages and Dispatch API. As we can see from the form above, the minimal data are:
the name of the application
the URL of a public webhook enabled to receive the delivery status of the messages
the URL of a public webhook enabled to receive incoming messages
the public key used to sign the request you send to the API (you can generate a pair of public and private keys by clicking the link under the text area)
Steps two and three of the messages application creation process allow you to assign phone numbers and/or links to external accounts for services like Messenger, WhatsApp, or Viber so that you can send SMS or messages through the Message and Dispatch API.
In particular, see this document to understand how to link your Facebook Page to your Vonage API account.
Be aware that the status and inbound URLs to be provided to a Vonage API application must be publicly accessible. If you haven’t got a public web server or you want just to try this on your computer, use ngrok, a tool that allows you to publicly expose your local web server.
You can find more details on working with Ngrok in our documentation. Keep in mind that, if you use the free plan of ngrok, a temporary URL will be generated each time you run the tool. So, you need to update the application URLs in your dashboard settings accordingly.
After creating your Vonage API application, an Application ID will be assigned to it. Take note of it.
Once you have configured the Vonage side, you have to configure the OTP service side in order to make them communicate with each other.
So, open the nexmo.json file under the src folder of the project and provide the requested data:
{
   "apiKey": "YOUR_API_KEY",
   "apiSecret": "YOUR_API_SECRET",
   "applicationId": "YOUR_APPLICATION_ID"
}You can retrieve the apiKey and the apiSecret values from the settings section of the Vonage API dashboard, while the applicationId is the value of which you took note in the previous section.
Then, take the private key associated with the public key you assigned to the application and store it into the private.key file under the src folder.
It’s time to run your OTP service. Type the following command in the root folder of the project:
After a few moments, you should get a message saying that the server is running on port 3000. You can verify if it’s working by pointing a browser to the http://localhost:3000 address. If everything is OK, you should see the message “This is the OTP service”.
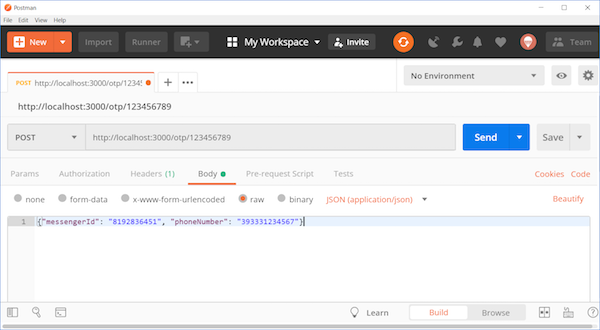
Now, imagine that your application needs to generate an OTP to be sent to a user in order to verify their identity. It needs to submit a POST request to the OTP service by providing a string acting as the identifier of your request and the contacts of the user the OTP is to be sent to.
You can do it by submitting an HTTP request like the following to the running OTP service:
POST /otp/123456789 HTTP/1.1
Host: localhost:3000
Content-Type: application/json
cache-control: no-cache
{"messengerId": "8192836451", "phoneNumber": "393331234567"}The string 123456789 attached to the API URI is the identifier of your request. We name it token, and it is up to you to provide it. The body of the request contains a JSON object with the Messenger identifier and the phone number of the user who will receive the OTP.
You can submit the request via Postman as shown by the following picture:
 Postman
The OTP service will generate an OTP composed of 5 digits and will send it to the specified Messenger identifier. As we will see later, if the user doesn’t read it within a given amount of time, the OTP will be sent via SMS to the phone number.
After a successful OTP creation, you should receive a 201 Created HTTP status code.
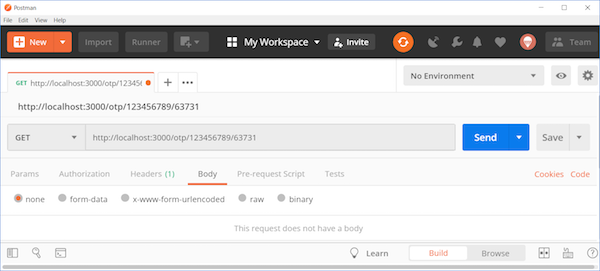
Regardless of the medium by which the message was received, the user should verify the OTP by submitting a GET request to the second API, as in the following example:
GET /otp/123456789/63731 HTTP/1.1
Host: localhost:3000
cache-control: no-cacheThe URI of the API is composed by the otp prefix, by the request token (that is the request identifier provided when you requested to create an OTP), and the OTP itself.
In Postman, it appears as follows:
 Postman
By sending such a request, you may have one of the following HTTP status code as responses:
200 OK - You get this response when your OTP is valid
404 Not Found - You get this response when your OTP is wrong, in that is it has not been generated by the OTP service
409 The code has already been verified - This response means that you or someone else have already verified the OTP
410 The code is expired - You get this response if you try to verify an OTP after its validity time
You may also receive the 404 The code is invalid for unknown reason HTTP status code when the OTP service is not able to verify your code for any other reason.
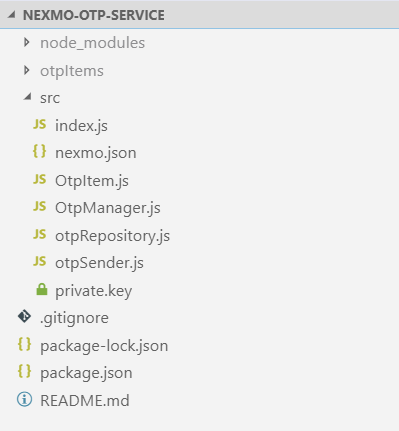
Let’s now take a look at the code that implements our OTP service. The following picture summarizes the folders and the files belonging to the project:
 Project structure
The index.js file under the src folder contains the starting code of the application and the definition of the Web APIs. The creation and verification APIs are implemented by the following code:
app.post("/otp/:token", (req, res) => {
  const otp = otpManager.create(req.params.token);
  otpSender.send(otp, req.body);
  res.sendStatus(201);
 });

 app.get("/otp/:token/:code", (req, res) => {
    const verificationResults = otpManager.VerificationResults;
    const verificationResult = otpManager.verify(req.params.token, req.params.code);
    let statusCode;
    let bodyMessage;

    switch (verificationResult) {
      case verificationResults.valid:
        statusCode = 200;
        bodyMessage = "OK";
        break;
      case verificationResults.notValid:
        statusCode = 404;
        bodyMessage = "Not found"
        break;
      case verificationResults.checked:
        statusCode = 409;
        bodyMessage = "The code has already been verified";
        break;
      case verificationResults.expired:
        statusCode = 410;
        bodyMessage = "The code is expired";
        break;
      default:
        statusCode = 404;
        bodyMessage = "The code is invalid for unknown reason";
  }
  res.status(statusCode).send(bodyMessage);
});
As you can see, both APIs rely on the otpManager to actually create and verify the OTP, and on the otpSender to send it to the user. Their initialization occurs a few lines above, in the same index.js file:
const OtpManager = require("./OtpManager");
const otpRepository = require("./otpRepository");
const otpSender = require("./otpSender")

const otpManager = new OtpManager(otpRepository, {otpLength: 5, validityTime: 5});Here you can see that the whole service is composed of three components:
otpManagerResponsible for creating and verifying the OTPotpRepositoryResponsible for persisting the OTPotpSenderResponsible for sending the OTP to the user
The existence of these three components allows you to keep the implementation of creation and verification, storage, and delivery independent of each other.
When you create the instance of the otpManager, you pass the otpRepository and an options object saying how long the OTP should be (five characters) and how long it is to be considered valid (five minutes).
The otpManager is an instance of the OtpManager class implemented in the OtpManager.js file. Its main methods are create() and verify().
The create() method generates a new OTP and is implemented as follows:
create(token) {
  const code = Math.floor(Math.random()*Math.pow(10, this.options.otpLength))
    .toString()
    .padStart(this.options.otpLength, "0");

  let otp = new OtpItem(token, code);
  this.otpRepository.add(otp);

  return otp;
}It takes a token as input and generates a random number of five digits. It ensures that the resulting code is composed of exactly five digits, even if the first digit is a zero, by converting it into a string and padding it with “0” characters.
Of course, this is a very simple implementation of the OTP creation. You might want to implement more accurate algorithms, but this is out of the scope of this article.
Once generated the code, it creates an otp object as the instance of the OtpItem class and adds the new otp instance to the otpRepository.
The OtpItem class defines the structure to represent the relevant information for the OTP, and is implemented in the OtpItem.js file:
class OtpItem {
  constructor(token, code) {
    this.token = token;
    this.code = code;
    this.creationDate = new Date();
    this.isChecked = false;
    this.checkDate = null;
  }
}The verify() method checks if the passed code for a given token has been generated and if it is still valid. Here is its implementation:
verify(token, code) {
    const id = `${token}-${code}`;
    const otp = this.otpRepository.getById(id);
    let verificationResult = VerificationResults.notValid;

    if (otp) {
      switch (true) {
        case otp.isChecked:
          verificationResult = VerificationResults.checked;
          break;
        case isOtpExpired(otp, this.options.validityTime):
          verificationResult = VerificationResults.expired;
          break;
        default:
          otp.isChecked = true;
          otp.checkDate = new Date();
          this.otpRepository.update(otp);
          verificationResult = VerificationResults.valid;

      }
    }

    return verificationResult;
  }
}The method builds an OTP identifier by concatenating the token and the code. This identifier is used to get the otp instance from the otpRepository. If such an instance exists, the method verifies if it has been already verified and if it is not expired. The value returned is an enumerated value representing the OTP validity status.
The otpRepository stores the instance of an OtpItem into the file system as a plain JSON file in the otpItems folder. This is a very simple solution that works for a demo case. You might want to implement it by storing data into a database.
Here is the implementation code you can find in the otpRepository.js file:
const fs = require("fs");
const path = require("path");

const baseRepositoryPath = "./otpItems";

function add(otpItem) {
  checkBaseFolder();
  fs.writeFileSync(path.join(baseRepositoryPath, `${otpItem.token}-${otpItem.code}`), JSON.stringify(otpItem));
}

function getById(id) {
  const content = getFileContent(path.join(baseRepositoryPath, id));
  let otpItem = null;

  if (content) {
    otpItem = JSON.parse(content);
  }

  return otpItem;
}

function update(otpItem) {
    fs.writeFileSync(path.join(baseRepositoryPath, `${otpItem.token}-${otpItem.code}`), JSON.stringify(otpItem));

    return otpItem;
}

function checkBaseFolder() {
  if (!fs.existsSync(baseRepositoryPath)){
    fs.mkdirSync(baseRepositoryPath);
  }
}

function getFileContent(fileName) {
  let content = null;

  try {
    content = fs.readFileSync(fileName);
  } catch (error) {
    console.log(error);
  }

  return content;
}

module.exports = {
  getById,
  add,
  update
};As you can see, it implements the getById() method to retrieve an OtpItem instance, the add() method to store an OtpItem instance and an update() method to update it.
The otpSender component sends the OTP to the user by using the Vonage Dispatch API. It is implemented by the otpSender.js file as follows:
const Nexmo = require('nexmo')
const nexmoConfig =require("./nexmo.json");
const path = require("path");

nexmoConfig.privateKey = path.join(__dirname, "private.key");

const nexmo = new Nexmo(nexmoConfig);

function send(otp, recipientAdresses) {
  const message = `Insert the following code: ${otp.code}`;

  nexmo.dispatch.create("failover", [
    {
      "from": { "type": "messenger", "id": "YOUR_MESSENGER_ID" },
      "to": { "type": "messenger", "id": recipientAdresses.messengerId },
      "message": {
        "content": {
          "type": "text",
          "text": message
        }
      },
      "failover":{
        "expiry_time": 120,
        "condition_status": "read"
      }
    },
    {
      "from": {"type": "sms", "number": "NEXMO"},
      "to": { "type": "sms", "number": recipientAdresses.phoneNumber},
      "message": {
        "content": {
          "type": "text",
          "text": message
        }
      }
    },
    (err, data) => {
      console.log(data.dispatch_uuid);
    }
  ])
}

module.exports = {
  send
};It composes a configuration by merging data from the nexmo.json file and the private.key file. This configuration is passed to the library constructor in order to get a nexmo instance. This instance will be used in the implementation of the send() function. The function takes an OtpItem instance and a recipientAddresses object as arguments and builds the message to send to the user and the payload for the Dispatch API
Through the nexmo.dispatch.create() method, you are creating a delivery workflow with failover. The second argument of the method is an array containing three items:
The first item is an object specifying the sender, the receiver, and the text of the message to send. The type of the sender and of the receiver states that this is a Messenger communication. It also has a
failoverproperty that specifies when the delivery has to be considered failed. In our case, it is considered failed if the message is not read within 120 secondsThe second item is another object specifying the sender, the delivery, and the text of the message to send when the Messenger delivery fails. In this case, the type of the sender and of the receiver states that the message is to be sent via SMS.
The last item is a callback function executed after the workflow has been submitted to the Vonage API server. In our case, we simply write to the console the workflow identifier (dispatch_uuid) returned by Vonage.
This increases the chances that the generated OTP will be delivered to the user regardless of the communication medium used.
Share:
Andrea Chiarelli has over 20 years of experience as a software engineer and technical writer. Throughout his career, he has used various technologies for the projects he was involved in. Currently, he is a software architect at the Italian office of Apparound and contributes to a few online magazines and blogs.