
Share:
Shreyas Sreenivas is a High School Student currently residing in Bangalore, India. He has experience in building applications in JavaScript, TypeScript, Python and PHP. He's also a huge fan of React, GraphQL, Graph Databases and Serverless.
Build a WhatsApp and Messenger GraphQL Bot To Find Hospital Beds
Time to read: 13 minutes
COVID has impacted all of us, but some more than others. One of the major problems people faced and are continuing to face is the shortage of hospital beds. A few months back I created a GraphQL API which returns the availability of beds in multiple cities and districts in India. The data is scraped off official websites and normalized to a uniform format which is then exposed in the form of a GraphQL API.
Note, the data is only available for select cities in India.
You can also explore the API in the GraphQL Playground.
Using the Bedav API and the Vonage Messages API, we're going to be building a chatbot that works with WhatsApp and Facebook Messenger using JavaScript. The function of this chatbot is to help users search for hospitals in a city, find a hospital with available beds, and provide additional info about the hospital such as its phone number and address. We'll also be creating a command with which the user can get directions to a hospital.
A Vonage account
Even though the code for this can be found in the GitHub repository, it's recommended that you follow this tutorial and use the repository only as a reference.
Start by creating a new folder, initializing npm and creating a src folder within it:
We'll be creating our webhooks and server using Express. Axios will be used to send requests to the Messages API and graphql-request will be used to send requests to the Bedav GraphQL API. You can install them along with additional utilities by running the following command:
And finally, install Nodemon as a dev dependency so that we won't have to restart our node server every time we make a change:
Let's also add a script to our package.json to start our Nodemon dev server:
// package.json

{
  "scripts": {
    "dev": "nodemon src/app.js"
  }
}
Before we get into any code, what are webhooks? Webhooks are essentially a URL that gets called every time a certain action or event is performed. Webhooks could be considered similar to callbacks, however, they are most often used to interact between to separate and independent applications. In our case, we need to expose two webhooks: one that gets triggered when the user sends a message and another when there's a status update on a message from the API (for example, when the user reads a message you sent).
First, let's get Express set up in src/app.js, where we have our main Express application and main functions responsible for handling commands:
// src/app.js

const express = require("express")

const app = express()
app.use(express.json())Next, let's add two endpoints, one for the message webhook and another for the status webhook:
// src/app.js

const { fixedMessages, sendMessage } = require("./utils")

app.post("/webhooks/inbound", (request, response) => {
  console.log(request.body)
)

app.post("/webhooks/status", (request, response) => {
  console.log(request.body)
  response.status(200).end()
})

app.listen(3000, () => {
  console.log("Listening on port 3000")
})
Ngrok lets you test your webhooks by exposing them to the internet using a temporary URL. To get started with ngrok, you can go to their site and create an account. Once you've done that and logged in, you should see the instructions to install and connect your account on their dashboard.
Now that we have ngrok installed and configured let's start our dev server by running npm run dev. Use ngrok to create a public URL for our local server by running ./ngrok http 3000. This command tells ngrok to create an HTTP proxy to the server running on localhost:3000.
Login to the Vonage Dashboard and head over to the Sandbox section under Messages and Dispatch.
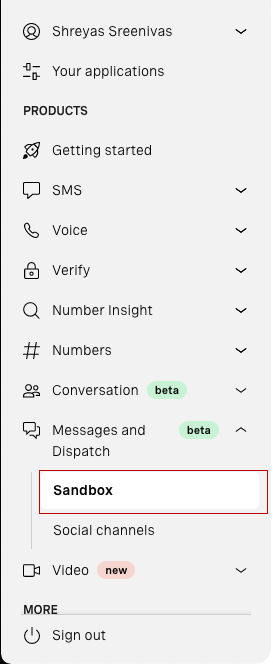
To create the WhatsApp sandbox, click on Add to sandbox in the WhatsApp section. The Vonage Sandbox needs to verify your identity and to do so you can follow the steps given in the dashboard. You can follow similar steps to create the Sandbox for Facebook Messenger.
You've now successfully activated the WhatsApp sandbox! But wait, we're not done yet. We still need to provide Vonage with the URL where our webhooks are present. If you scroll down on the Sandbox page, you should see the Webhooks section that looks something like below:
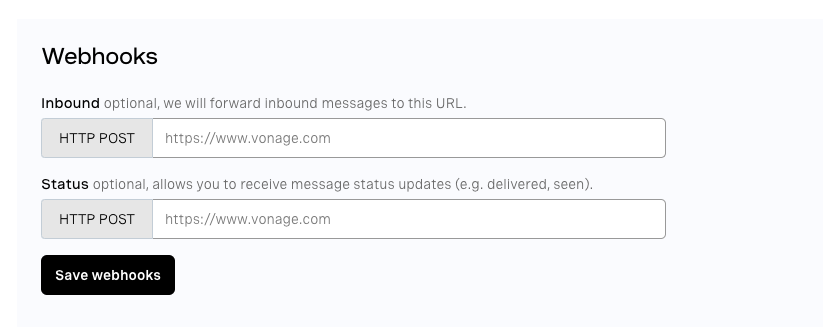
The first is the inbound webhook which will be on the route webhooks/inbound, so set that field to https://<your-ngrok-https-url>/webhooks/inbound. Similarly, set the URL of the status webhook to https://<your-ngrok-https-url>/webhooks/status. And we are now done setting up our sandbox and test environment!
Note: Every time you restart ngrok, you will be provided with a new and different URL which you will have to manually change in the Vonage Dashboard.
We'll need a helper function which will be used to send messages back to the user.
First, we'll need to set up our Vonage API credentials so that we can make use of the Messages API. These credentials will be stored in environment variables. Create a .env file in the root of the folder. To load the environment variables to the node environment, we'll be using the dotenv package. Add the fields as listed below:
VONAGE_API_KEY = // Your Vonage API key
VONAGE_API_SECRET = // Your Vonage API Secret
WHATSAPP_NUMBER = // The from number in the case of the WhatsApp Sandbox
MESSENGER_ID = // The from ID of the Messenger SandboxOnce that's done, add the following code to the top of app.js to add the environment variables:
// src/app.js
require("dotenv").config()Create a new file named utils.js in the src folder. This is going to contain our utility functions, such as formatting and sending a message to the user.
We'll be making a request to the Messages REST API to send a message. In case of the Messages Sandbox, the URL for the API will be https://messages-sandbox.nexmo.com/v0.1/messages. We'll be using Axios to send the requests. We can use the auth option to add our API credentials as shown below:
// src/utils.js

const axios = require("axios")

// default message type will be `text`
const sendMessage = async (to, message, type = "text") => {  let from = {
    // either 'WhatsApp' or 'messenger'
    type: to.type,
  }

  if (to.type === "whatsapp") {
    // the WhatsApp Sandbox number
    from.number = proccess.env.WHATSAPP_NUMBER
  } else if (to.type === "messenger") {
    // the Messenger Sandbox ID
    from.id = process.env.MESSENGER_ID
  }

  await axios.post(
    "https://messages-sandbox.nexmo.com/v0.1/messages",
    {
      to,
      from,
      message: {
        content: {
          type,
          [type]: message,
        },
      },
    },
    {
      auth: {
        username: process.env.VONAGE_API_KEY,
        password: process.env.VONAGE_API_SECRET,
      },
    }
  )
}

module.exports = {
  sendMessage,
}
The message type is dynamic as we'll be sending a message of type location when the user requests for directions to a hospital. On WhatsApp, a message of type location will attach a thumbnail of the location on Google Maps along with the provided name and address.
Now we can work on creating our commands:
help- Get a menu of all the commands you can usecities- Get a list of all the cities availablesearch <hospital-name> in <location>- Search for a hospital in a particular location. For example,search sakra in bangaloresearches for hospitals with the name Sakra in Bangalore.get directions to <hospital-id>- Get directions to a hospital with a particular ID. For example,get directions to 87will send the location of the Hospital with ID 87.
Let's create a function that handles the requests to the inbound webhook at /webhooks/inbound. This function parses the message sent by the user, and passes the message to the handler of the command the user is trying to use. It sends back the appropriate message and returns a status code of 200.
Note, the webhook must respond with a status code of 200, else the Messages API will keep sending a request to the webhook until it gets a 200 response.
We use regular expressions to check if the user is trying to use the search or directions command, and then pass the message to the appropriate handler. If the message is help, hi, or hello, the help message is sent to the user. If the message is cities, the list of cities available is sent to the user. And finally, if the message doesn't match any command, an invalid message is sent to the user.
// src/app.js

const handleInbound = async (request, response) => {
  const content = request.body.message.content

  const text = content.text.toLowerCase().trim()

  // whom we have to reply to
  const to = request.body.from

  const searchRegex = /^search .* in .*$/i
  const directionsRegex = /^get directions to .*/i

  if (text.match(searchRegex)) {
    handleSearch(text, to)
  } else if (text.match(directionsRegex)) {
    handleDirections(text, to)
  } else if (["help", "hi", "hello"].includes(text)) {
    sendMessage(to, fixedMessages.help)
  } else if (text === "cities") {
    sendMessage(to, fixedMessages.cities)
  } else {
    sendMessage(to, `Sorry, invalid message. Type *help* to get a list of all commands.`)
  }

  response.status(200).end()
}
Now, let's modify the inbound webhook endpoint handler to use the handleInbound function.
// src/app.js
app.post("/webhooks/inbound", handleInbound)
When the user first messages our service, we'll need a message to greet them with. This message should contain information on what our bot does and the different commands that are available to use. We'll also need a help message that will be sent whenever the user doesn't know what to do and types help. These messages can be similar.
The Bedav API only has information on hospitals in certain regions. We'll also need a message to give a list of the regions where the information is available.
As implemented in the handleInbound function, the help message is sent when the user types hi, hello, or help and the message on the cities available is sent when the user types cities.
Since both these messages will be constant, we can create a constant object at the top level to define all the fixed messages. We also use outdent to remove the extra spaces in our string which are supposed to be indentation in our code. Append the code to utils.js:
// src/utils.js

const outdent = require("outdent")

const fixedMessages = {
  help: outdent`
    The Bedav Bot gives you information on the availability of beds in hospitals and the contact information and location of those hospitals as well.

    You can use the following commands:
    1. *help* - Get this menu and all the commands you can use
    2. *cities* - Get a list of all the cities available
    2. *search* _<hospital-name>_ *in* _<location>_ - Search for a hospital in a particular location. For example, "search sakra in bangalore" searches for hospitals with the name Sakra in Bangalore
    3. *get directions to* _<hospital-id>_ - Get directions to a hospital with a particular ID. You can get the hospital ID from the search results. The serial number preceding the Hospital name is the Hospital ID. For example, if the search result has _(87) Sakra Hospital_, send _get directions to 87_ to get directions to Sakra Hospital.
  `,
  cities: outdent`
    The cities/districts currently available are:

    *Karnataka*
      1. Bangalore/Bengaluru

    *Maharashtra*
      2. Pune
      3. Kohlapur
      4. Sangli
      5. Satara
      6. Solapur

    *Andhra Pradesh*
      7. Anantapur
      8. Chittoor
      9. East Godavari
      10. Guntur
      11. Krishna
      12. Kurnool
      13. Prakasam
      14. Nellore
      15. Srikakulam
      16. Vishakapatanam
      17. Vizianagaram
      18. West Godavari
      19. Kadapa
  `,
}

module.exports = {
  ...
  fixedMessages,
}
To make querying to the GraphQL API simple, we'll be using the graphql-request library. To set up the GraphQL client, we create an instance of GraphQLClient and provide the URL of the GraphQL API.
// app.js

const { GraphQLClient } = require("graphql-request")
const client = new GraphQLClient("https://bedav.org/graphql")
As mentioned in the description of hospitalId field in the API docs, it is a Base64 encoded string which can be decoded to Hospital:<hospitalId> where hospitalId is a whole number unique to the hospital. For reasons you will see in the next section, let's create two utility functions: one to get the number of the Hospital ID and another to encode a whole number to a Base64 string of the form Hospital:<hospitalId>. We'll be using the js-base64 library which we added to our project earlier to work with the base64 encoded strings.
// src/utils.js

const { encode, decode } = require("js-base64")

const getHospitalId = (encodedId) => {
  return decode(encodedId).slice(9)
}

const getEncodedString = (hospitalId) => {
  return encode(`Hospital:${hospitalId}`)
}

module.exports = {
  ...
  getEncodedString,
}
Let's create two more utility functions to format the hospital data, one for formatting an individual hospital and another which uses that function to format a group of hospitals.
// src/utils.js

const getFormattedHospital = (hospital) => {
  const index = getHospitalId(hospital.id)

  const roundedString = (occupied, total) => {
    return `${Math.floor((occupied * 100) / total)}% Occupied`
  }

  const h = hospital

  // Percentages of beds available
  const percentages = {
    icu: roundedString(h.icuOccupied, h.icuTotal),
    hdu: roundedString(h.hduOccupied, h.icuTotal),
    oxygen: roundedString(h.oxygenOccupied, h.icuTotal),
    general: roundedString(h.generalOccupied, h.icuTotal),
    ventilators: roundedString(h.ventilatorsOccupied, h.icuTotal),
  }

  const formatted = outdent`
    *(${index}) ${hospital.name}*
      ${h.icuTotal !== 0 && h.icuAvailable !== null ? `_ICU Available_: ${h.icuAvailable} (${percentages.icu})` : ""}
      ${h.hduTotal !== 0 && h.icuAvailable !== null ? `_HDU Avalable_: ${h.hduAvailable} (${percentages.hdu})` : ""}
      ${h.oxygenTotal !== 0 && h.oxygenAvailable !== null ? `_Oxygen Available_: ${h.oxygenAvailable} (${percentages.oxygen}})` : ""}
      ${h.generalTotal !== 0 && h.generalAvailable !== null ? `_General Available_: ${h.generalAvailable} (${percentages.general})` : ""}
      ${
        h.ventilatorsTotal !== 0 && h.ventilatorsAvailable !== null
          ? `_Ventilators Available_: ${h.ventilatorsAvailable} (${percentages.ventilators})`
          : ""
      }
      ${h.phone !== null ? `_Phone_: ${h.phone}` : ""}
      ${h.phone !== null ? `_Website_: ${h.website}` : ""}
  `

  return removeEmptyLines(formatted)
}
Not every hospital has beds available in the ICU, HDU and General Ward nor do they all have oxygen and ventilators available. If the hospital doesn't have one of these available, we can omit that information from the message. The hospital doesn't have a certain kind of bed, oxygen or ventilators available if the total available is zero or if the value of the available field is null.
We also print the Hospital ID as the user has to provide the ID of the hospital in the get directions command. We're also showing the user the percentage of beds occupied in brackets.
A blank line is still left if a bed, ventilator, or oxygen is not available. To fix this, we create another helper function to remove these blank lines.
To check for empty lines we use a short regular expression that checks if the line has more than a single space character:
// src/utils.js

const removeEmptyLines = (string) => {
  const lines = string.split("\n")
  const newLines = []

  for (const line of lines) {
    // Continue if the line is a blank line
    if (line.match(/^\s*$/)) continue
    newLines.push(line)
  }

  return newLines.join("\n")
}
Next, create the function for formatting a list of hospitals by looping over all the hospitals, getting the formatted string for that hospital, and adding an empty line between each hospital:
// src/utils.js

const getFormattedHospitals = (hospitals) => {
  let message = ""

  for (const hospital of hospitals) {
    const formattedHospital = getFormattedHospital(hospital)
    message += formattedHospital + "\n\n"
  }

  return message
}

module.exports = {
  ...
  getFormattedHospitals,
}
All the GraphQL queries will be stored in the queries.js file in the src folder.
We use the GraphQL query below to search for a hospital in a certain location and retrieve the required data. The name argument of the locality field is used to tell the API which location’s data we are querying. The first argument of the hospitals field specifies how many hospitals we want the API to return, and the searchQuery argument provides the search query.
// src/queries.js

const searchGraphQLQuery = gql`
  query($location: String, $query: String) {
    # get hospitals from a city named Bengaluru in the state of Karnataka
    locality(name: $location) {
      hospitals(first: 5, searchQuery: $query) {
        edges {
          node {
            id
            name
            phone
            website
            address
            latitude
            longitude

            icuAvailable
            hduAvailable
            oxygenAvailable
            generalAvailable
            ventilatorsAvailable

            icuOccupied
            hduOccupied
            oxygenOccupied
            generalOccupied
            ventilatorsOccupied

            icuTotal
            hduTotal
            oxygenTotal
            generalTotal
            ventilatorsTotal
          }
        }
      }
    }
  }
`

module.exports = {
  searchGraphQLQuery,
}
`Note, we don't need to wrap our GraphQL query with the
gqltag. But, with the right extensions and tooling, we can get some nice syntax highlighting and type checking.
Next, we need to map the location names to the name argument of the locality field which is of the form <city/district_name>-<state_name>. The mapping of the city/district to the locality name can be converted to the below object in JavaScript:
// src/utils.js

const locationKey = {
  bangalore: "bengaluru-karnataka",
  bengaluru: "bengaluru-karnataka",
  pune: "pune-maharashtra",
  kohlapur: "kohlapur-maharashtra",
  sangli: "sangli-maharashtra",
  satara: "satara-maharashtra",
  solapur: "solapur-maharashtra",
  anantapur: "anantapur-andhra pradesh",
  chittoor: "chittoor-andhra pradesh",
  "east godavari": "east godavari-andhra pradesh",
  guntur: "guntur-andhra pradesh",
  krishna: "krishna-andhra pradesh",
  kurnool: "kurnool-andhra pradesh",
  prakasam: "prakasam-andhra pradesh",
  nellore: "spsr nellore-andhra pradesh",
  srikakulam: "srikakulam-andhra pradesh",
  vishakapatanam: "vishakapatanam-andhra pradesh",
  vizianagaram: "vizianagaram-andhra pradesh",
  "west godavari": "west godavari-andhra pradesh",
  kadapa: "kadapa-andhra pradesh",
}

module.exports = {
  ...
  locationKey,
}The text the user enters to search for a hospital in a certain location will be of the format search <search-query> in <location>. Let's create the handleSearch function which gets the search query and location from the user’s message. This function is responsible for running the search query and sending the appropriate response back to the user:
// src/app.js

const { fixedMessages, sendMessage, locationKey, getFormattedHospitals } = require("./utils")

const handleSearch = async (message, to) => {
  // extract the search query and location from the message
  const searchRegex = /^search (?<searchQuery>[a-zA-Z0-9_ ]+) in (?<location>[a-zA-Z0-9_ ]+)$/i
  const match = searchRegex.exec(message)

  if (match === null) {
    sendMessage(to, "Please enter the hospital name you want to search for and the location")
    return
  }

  const { groups: { searchQuery, location } } = match

  if (!Object.keys(locationKey).includes(location)) {
    sendMessage(to, "Invalid location entered. Type *cities* to look at all the cities available")
    return
  }

  try {
    const data = await client.request(searchGraphQLQuery, {
      location: locationKey[location],
      query: searchQuery,
    })

   const { edges } = data.locality.hospitals
    const hospitals = edges.map((item) => item.node)

    if (edges.length === 0) {
      sendMessage(to, "Sorry, there were no hospitals that matched your search 🙁")
      return
    }

    const formattedMessage = getFormattedHospitals(hospitals)
    sendMessage(to, formattedMessage)
  } catch (error) {
    sendMessage(to, "Sorry, there were no hospitals that matched your search 🙁")
  }
}
The final command left to implement is the get directions command. The format of the command is get directions to <hospital-id>.
First, create the query that will get the information of the hospital that's required to send the location of the hospital to the user:
// src/queries.js

const directionsGraphQLQuery = gql`
  query($id: ID!) {
    hospital(id: $id) {
      id
      longitude
      latitude
      name
      address
    }
  }
`

module.exports = {
  ...
  directionsGraphQLQuery,
}Now, let's create a handleDirections function that will send the directions to the hospital requested by the user. If the user is using WhatsApp, we send a message of type location which includes the name and address of the hospital. Since there's no message of type location on Messenger, we send a message of type text which contains a Google Maps link to the hospital’s location:
// src/app.js

const handleDirections = async (message, to) => {
  const directionsRegex = /^get directions to (?<hospitalId>\d+)$/i
  const match = directionsRegex.exec(message)

  if (match === null) {
    sendMessage(to, "Please enter a valid Hospital ID")
    return
  }

  const hospitalId = getEncodedString(parseInt(match.groups.hospitalId))

  try {
    const { hospital } = await client.request(directionsGraphQLQuery, {
      id: hospitalId,
    })

    if (to.type === "whatsapp") {
      sendMessage(
        to,
        {
          type: "location",
          location: {
            longitude: hospital.longitude,
            latitude: hospital.latitude,
            name: hospital.name,
            address: hospital.address,
          },
        },
        "custom"
      )
    } else {
      const link = `https://maps.google.com/maps?q=${hospital.latitude},${hospital.longitude}`
      const message = `${link}\n*${hospital.name}*\n${hospital.address}\n`

      sendMessage(to, message)
    }
  } catch (error) {
    sendMessage(to, "Please enter a valid Hospital ID")
  }
}And that's it, we're done! You can try out all the commands yourself in the Sandbox and it should look something like below!
Right now, our webhook is open to the entire internet. We need a way to make sure only the Vonage Messages API can access the endpoint. Read more about limiting access using JWT tokens.
If you're into Machine Learning, you could use Natural Language Processing to make the bot more natural to use.
Using the Hospital ID in the get directions command is not the best user experience. Instead, try implementing a command where the user enters the name of the hospital to which the user wants to get directions to. If there are multiple hospitals with a similar name, return a list of hospitals along with their IDs and ask the user to enter the ID of the hospital they want to get directions to.
The final code for the tutorial can be found on GitHub.