
Share:
Benjamin Aronov is a developer advocate at Vonage. He is a proven community builder with a background in Ruby on Rails. Benjamin enjoys the beaches of Tel Aviv which he calls home. His Tel Aviv base allows him to meet and learn from some of the world's best startup founders. Outside of tech, Benjamin loves traveling the world in search of the perfect pain au chocolat.
Build a Real-Time Interactive RCS Experience with Node.js and Vonage
Time to read: 7 minutes
Rich Communication Services (RCS) is changing the way brands engage with fans and customers. Whether you’re running a global sports event, a music festival, or just want to build richer, more interactive conversations, RCS offers innovative messaging features to keep your audience engaged.
In this tutorial, we’ll combine RCS suggested replies, standalone rich cards, and rich card carousels into a single, seamless user journey that you can adapt for sports, music, or any real-time user experience. All using the Vonage Messages API!
>> TL;DR: See the complete project on GitHub
RCS lets you go far beyond SMS. With rich media, interactive buttons, and real-time feedback, you can:
Boost engagement and conversions
Deliver personalized content instantly
Create memorable, branded experiences right inside the user’s default messaging app
Today, you’ll build an app that guides users through a dynamic, multi-step experience. This example is perfect for live events, fan voting, or exclusive offers.
Here’s how the user journey works:
User receives: “Who will win?” (Brazil, Germany, Draw)
User taps Brazil → receives a “Man of the Match” voting card (Ronaldinho, Ronaldo, Pelé)
User taps Ronaldinho → receives a carousel of Ronaldinho merchandise
You can easily extend this flow for music events, product launches, or any real-time experience.
Before you start, you’ll need:
Node.js installed on your machine
ngrok installed for exposing your local server
A Vonage API account
A registered RCS Business Messaging (RBM) Agent
An RCS-capable phone for testing
>> Note: RCS via Vonage requires a managed account. Contact your Vonage account manager for Developer Mode access. Please contact our sales team if you do not have a managed account.
Your Node application will be relatively simple, with a bit of modular organization to keep the code clean and up to the best modern practices. But before creating your Node app, start by creating a Vonage app to use the Messages API and running our ngrok dependency.
To receive webhooks from Vonage, your local server must be accessible over the internet. Use ngrok to expose your server. In your terminal, run:
ngrok http 3000Note the HTTPS URL provided by ngrok:
e.g. https://your-ngrok-subdomain.ngrok.io
You can read more about testing with ngrok in our developer portal tools.
Now, create your Vonage application in the Vonage Dashboard. Give the app a name and turn on the Messages capability.
 Creating a new Vonage Messages API application for an RCS-based interactive football experience
In your Vonage application settings:
Set the Inbound URL to
https://YOUR_NGROK_URL/inbound.Set the Status URL to
https://example.com/rcs_status.
** Message statuses will be covered in a future article.Generate a public and private key by clicking the button. Ensure to move your
private.keyfile to the project root directory (rcs-interactive-football) in the next section.Save the changes.
Then link your RCS Agent by clicking the “Link external accounts” tab:
 Dashboard view showing the Vonage-Node-RCS application linked to the Vonage RoR RCS external account, with voice and message capabilities enabled.
We’re keeping things simple and flat with our application. You can check the GitHub repo to see the code cleaned up and organized a bit more.
Your file structure will look like:
rcs-interactive-football/
├── index.js
├── config.js
├── messageTemplates.js
├── messagingService.js
├── .env
├── package.json
└── private.key
So, go ahead and create a new directory and initialize a Node.js project:
mkdir rcs-interactive-football
cd rcs-interactive-football
npm init -yInstall the necessary node packages with Node Package Manager:
npm install express dotenv @vonage/server-sdkexpress: Creates the web server.dotenv: Loads environment variables securely.@vonage/server-sdk: The Vonage Node SDK for interacting with the Messages API
And create your project files:
touch index.js config.js messageTemplates.js messagingService.js .envYou can now move your private.key file that you downloaded from the Vonage dashboard and move it into the root of your project.
In the .env file, add your Vonage credentials and configuration:
VONAGE_APPLICATION_ID=your_application_id
VONAGE_API_SIGNATURE_SECRET=your_api_secret
VONAGE_PRIVATE_KEY=./private.key
RCS_SENDER_ID=your_rbm_agent_id
PORT=3000VONAGE_APPLICATION_ID: Your Vonage application ID, found in the API dashboard.VONAGE_API_SIGNATURE_SECRET= Your Vonage Signature Secret. Found in account settings.VONAGE_PRIVATE_KEY: Your private key file.RCS_SENDER_ID: Your RBM SenderID (the Name of the Brand). The SenderID requires special formatting, such as not having any spaces. Check with your account manager if you’re unsure.PORT: Port number for the Express server.
This app centralizes all configurable values (environment variables, image URLs, and external links) into a single config.js file. This creates a clean separation between content and logic. This approach gives you a single source of truth for values that might change. This organization allows you to quickly swap media assets or update merchandise links while keeping the core messaging flow intact.
// config.js
require('dotenv').config();
module.exports = {
  port: process.env.PORT || 3000,
  vonage: {
    applicationId: process.env.VONAGE_APPLICATION_ID,
    privateKey: process.env.VONAGE_PRIVATE_KEY,
    signatureSecret: process.env.VONAGE_API_SIGNATURE_SECRET,
  },
  rcsSenderId: process.env.RCS_SENDER_ID,
  images: {
    footballMatch: "https://github.com/Vonage-Community/tutorial-messages-node-rcs_realtime_football/blob/main/public/football_match.png?raw=true",
    manOfMatch: "https://github.com/Vonage-Community/tutorial-messages-node-rcs_realtime_football/blob/main/public/man_of_match.png?raw=true",
    jersey: "https://github.com/Vonage-Community/tutorial-messages-node-rcs_realtime_football/blob/main/public/ronaldinho_jersey.png?raw=true",
    photo: "https://github.com/Vonage-Community/tutorial-messages-node-rcs_realtime_football/blob/main/public/ronaldinho_photo.png?raw=true",
    tshirt: "https://github.com/Vonage-Community/tutorial-messages-node-rcs_realtime_football/blob/main/public/ronaldinho_shirt.png?raw=true",
  },
  merchLinks: {
    jersey: "https://www.ebay.com/b/Ronaldinho-International-Club-Soccer-Fan-Jerseys/2887/bn_16948843",
    photo: "https://www.ebay.com/shop/ronaldinho-signed-photo?_nkw=ronaldinho+signed+photo",
    tshirt: "https://www.ebay.com/itm/236003366810?_skw=ronaldinho+tshirt",
  }
};
Next, we’ll fill out our messageTemplate.js file. The messageTemplates.js module encapsulates all RCS message structures in clean, reusable functions that separate presentation from business logic.
Each template function (suggested replies, standalone rich cards, or rich card carousels) follows the same pattern. It accepts a phone number parameter, pulls in the appropriate media and URLs from our config module, and then returns a properly formatted RCS message object ready for the Vonage API.
This modular approach makes our interactive flow easy to understand and modify, allowing developers to quickly adapt the templates for their own real-time engagement scenarios without wading through complex messaging logic.
So, for instance, in the Messages documentation, you can see the example suggested reply:
vonage.messages.send({
  messageType: 'custom',
  channel: Channels.RCS,
  custom: {
    contentMessage: {
      text: 'What do you think of Vonage APIs?',
      suggestions: [
        {
          reply: {
            text: 'They\''re great!',
            postbackData: 'suggestion_1',
          },
        },
        {
          reply: {
            text: 'They\'re awesome!',
            postbackData: 'suggestion_2',
          },
        },
      ],
    },
  },
  to: MESSAGES_TO_NUMBER,
  from: RCS_SENDER_ID,
})
Similarly, you can create an initialMessage function in your messagesTemplate.js module. This modularized version abstracts the recipient and the SenderID:
// messageTemplates.js
const config = require('./config');
module.exports = {

  // Initial Suggested Reply Message to Kick-off
  initialMessage: (to) => ({
    to,
    from: config.rcsSenderId,
    channel: 'rcs',
    message_type: 'custom',
    custom: {
      contentMessage: {
        text: "Who will win?",
        suggestions: [
          { reply: { text: "Brazil", postbackData: "brazil" }},
          { reply: { text: "Germany", postbackData: "germany" }},
          { reply: { text: "Draw", postbackData: "draw" }},
        ]
      }
    }
  })
};Continue to add the templates for the RCS Standalone Rich Card and RCS Rich Card Carousel. These additionally abstract the media, which we get from our config module. First, the Standalone Card, which allows users to vote for their man of the match:
  // Standalone Rich Card for voting on Man of the Match
   manOfTheMatchMessage: (to) => ({
    to,
    from: config.rcsSenderId,
    channel: 'rcs',
    message_type: 'custom',
    custom: {
      contentMessage: {
        richCard: {
          standaloneCard: {
            thumbnailImageAlignment: "RIGHT",
            cardOrientation: "VERTICAL",
            cardContent: {
              title: "Vote Now!",
              description: "Who was the man of the match?",
              media: {
                height: "TALL",
                contentInfo: {
                  fileUrl: config.images.manOfMatch,
                  forceRefresh: true
                }
              },
              suggestions: [
                { reply: { text: "Ronaldinho", postbackData: "ronaldinho" } },
                { reply: { text: "Ronaldo", postbackData: "ronaldo" } },
                { reply: { text: "Pele", postbackData: "pele" } }
              ]
            }
          }
        }
      }
    }
})And lastly, create the message template for the RCS carousel, which shows your users the merchandise they can buy.
// RCS Rich Card Carousel for Player Merch to Present
  playerMerchCarousel: (to) => ({
    to,
    from: config.rcsSenderId,
    channel: 'rcs',
    message_type: 'custom',
    custom: {
      contentMessage: {
        richCard: {
          carouselCard: {
            cardWidth: "MEDIUM",
            cardContents: [
              {
                title: "Ronaldinho Jersey",
                description: "Authentic gameworn kit.",
                media: {
                  height: "TALL",
                  contentInfo: {
                    fileUrl: config.images.jersey,
                    forceRefresh: true
                  }
                },
                suggestions: [
                  {
                    action: {
                      text: "Buy now",
                      postbackData: "buy_now_jersey",
                      openUrlAction: {
                        url: config.merchLinks.jersey
                      }
                    }
                  }
                ]
              },
              {
                title: "Autographed Photo",
                description: "Timeless photo signed by Ronaldinho himself.",
                media: {
                  height: "TALL",
                  contentInfo: {
                    fileUrl: config.images.photo,
                    forceRefresh: true
                  }
                },
                suggestions: [
                  {
                    action: {
                      text: "Buy now",
                      postbackData: "buy_now_photo",
                      openUrlAction: {
                        url: config.merchLinks.photo
                      }
                    }
                  }
                ]
              },
              {
                title: "Fan T-shirt",
                description: "100% Cotton, 100% Passion.",
                media: {
                  height: "TALL",
                  contentInfo: {
                    fileUrl: config.images.tshirt,
                    forceRefresh: true
                  }
                },
                suggestions: [
                  {
                    action: {
                      text: "Buy now",
                      postbackData: "buy_now_shirt",
                      openUrlAction: {
                        url: config.merchLinks.tshirt
                      }
                    }
                  }
                ]
              }
            ]
          }
        }
      }
    }
})>> You can see the full messagesTemplate.js file
Now that we have our configuration and message templates set up, let's create a messaging service that abstracts the Vonage API interactions. The messagingService.js module takes those message templates that we already created and adds the necessary functionality to actually send the message through the API.
First, let's initialize the Vonage client using our configuration:
// messagingService.js
const { Vonage } = require('@vonage/server-sdk');
const config = require('./config');
const messageTemplates = require('./messageTemplates');

// Initialize the Vonage client with our application credentials
const vonage = new Vonage({
  applicationId: config.vonage.applicationId,
  privateKey: require('fs').readFileSync(config.vonage.privateKey)
});Now that our vonage client is ready, we can create the sendInitialMessage functionality by passing the message with the phone number to the client:
module.exports = {

  sendInitialMessage: async (to) => {
    try {
      const msg = messageTemplates.initialMessage(to);
      const response = await vonage.messages.send(msg);
      console.log(`Initial message sent successfully`);
      return response;
    } catch (error) {
      console.error('Error sending initial message:', error);
      throw error;
    }
  }
}We’ll create two more functions ( sendManOfTheMatchMessage and sendPlayerMerchCarousel ) to match our other two messages:
sendManOfTheMatchMessage: async (to) => {
    try {
      const msg = messageTemplates.manOfTheMatchMessage(to);
      const response = await vonage.messages.send(msg);
      console.log(`Man of the Match message sent successfully`);
      return response;
    } catch (error) {
      console.error('Error sending Man of the Match message:', error);
      throw error;
    }
  },

  sendPlayerMerchCarousel: async (to) => {
    try {
      const msg = messageTemplates.playerMerchCarousel(to);
      const response = await vonage.messages.send(msg);
      console.log(`Merchandise carousel sent successfully`);
      return response;
    } catch (error) {
      console.error('Error sending merchandise carousel:', error);
      throw error;
    }
  }
>> You can see the full messagesService.js file
Now it's time to tie everything together in our index.js file. This is where we'll create our Express server, set up our routes, and implement the interactive flow logic that makes our RCS experience dynamic and engaging.
First, we’ll configure Express and set up basic middleware so we can handle JSON and URL-encoded requests:
// index.js
const express = require('express');

const { verifySignature } = require('@vonage/jwt');
const config = require('./config');
const messagingService = require('./messagingService');

// Initialize Express app
const app = express();
app.use(express.json());
app.use(express.urlencoded());

// Constants
const PORT = config.port;
const VONAGE_API_SIGNATURE_SECRET = config.vonage.signatureSecret;

// Simple home route to confirm server is running
app.get('/', (req, res) => {
  res.send('RCS Interactive Football Demo - Server is running!');
});
This route allows us to manually start the conversation with a user. You can hit this with Postman or cURL to kick off the initial "Who will win?" message.
app.post('/send-initial-message', async (req, res) => {
    const toNumber = req.body.to;

    try {
      await messagingService.sendInitialMessage(toNumber);
      res.status(200).json({ message: 'Initial message sent successfully.' });
    } catch (error) {
      console.error('Error in /send-initial-message:', error);
      res.status(500).json({ error: 'Internal server error.' });
    }
  });
Now for the most important part: the webhook handler that processes user responses and creates our interactive flow.
Vonage sends webhook callbacks when a user interacts with your RCS message. So we check for the channel type and the message type:
if (inboundMessage.channel === 'rcs' && inboundMessage.message_type === 'reply')And we expect that interaction to come from a suggested reply, a button on a card, or a carousel item. Rich cards use the postbackData attribute, but for suggested replies, we need to fall back to an id:
const userSelection = inboundMessage.reply?.postbackData || inboundMessage.reply?.id;
Putting it all together, your inbound webhook looks like this:
app.post('/inbound', async (req, res) => {
  // Verify the message signature for security
  const token = req.headers.authorization?.split(' ')[1];

   if (!token || !verifySignature(token, VONAGE_API_SIGNATURE_SECRET)) {
      console.error('Invalid signature');
      return res.status(401).json({ error: 'Invalid signature' });
    }

  const inboundMessage = req.body;

  // Only process RCS reply messages
  if (inboundMessage.channel === 'rcs' && inboundMessage.message_type === 'reply') {
	// Retrieve the postbackData for RCS Cards, id for Suggested Replies
         const userSelection = inboundMessage.reply?.postbackData || inboundMessage.reply?.id;

    const userNumber = inboundMessage.from;

    // Log the inbound message for debugging
    console.log(`User ${userNumber} selected: ${userSelection}`);

    try {
      // Handle different user selections based on our interactive flow
      switch (userSelection) {
        case 'brazil':
          // User selected Brazil - send man of the match voting
          console.log(`Sending man of the match message to ${userNumber}`);
          await messagingService.sendManOfTheMatchMessage(userNumber);
          break;

        case 'ronaldinho':
          // User selected Ronaldinho - send merchandise carousel
          console.log(`Sending player merchandise carousel to ${userNumber}`);
          await messagingService.sendPlayerMerchCarousel(userNumber);
          break;

        default:
          // For any other selection, log a confirmation message to the service
          console.log(`Sending confirmation for ${userSelection} to ${userNumber}`);
      }

      // Always return 200 OK to Vonage
      res.status(200).end();
    } catch (error) {
      console.error('Error processing inbound message:', error);
      res.status(500).json({ error: 'Internal server error' });
    }
  } else {
    // Not an RCS reply message
    console.log('Received non-RCS reply message');
    res.status(200).end();
  }
});

// Start the server
app.listen(PORT, () => {
  console.log(`Server is running on port ${PORT}`);
  console.log('RCS Interactive Football Demo is ready!');
});
>> You can see the full index.js file
Open a new terminal tab, separate from your ngrok tab, and start your Express server:
node index.jsUse a tool like Postman or cURL to send a POST request to your /send-initial-message endpoint with the recipient's phone number:
curl -X POST https://YOUR_NGROK_URL/send-initial-message \
  -H "Content-Type: application/json" \
-d '{"to": "YOUR_RCS_TEST_NUMBER"}'Watch the interactive flow unfold on your device!
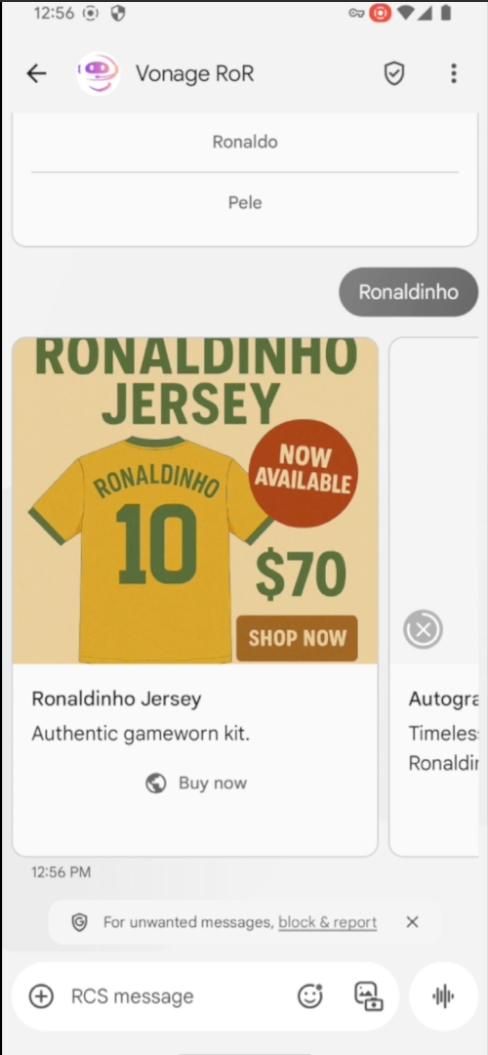 Example of an RCS Rich Card showcasing a Ronaldinho jersey as part of an interactive football campaign
Great job! You just built a real-time, multi-step RCS experience using Node.js and the Vonage Messages API. It’s modular and easy to reuse. This pattern works great for sports, music, retail, or any event where you need quick interactions and real engagement.
That said, we only built out one branch of the flow. If the user picks Germany or thinks the match will end in a Draw, nothing happens…yet! Those are your next steps. You’ve got the templates and architecture ready to go, so adding those paths should be straightforward.
But don’t stop there!
Try combining this with Vonage’s new Device Location API. If you know a user is at the stadium or watching the game at a pub, you can trigger this interactive RCS flow right when it makes the most impact.
If you build out the rest of the flow or plug this into your own event app, let us know. We’d love to see it. Tag VonageDev on X, or stop by the Vonage Developer Community Slack and show off what you're working on.
Share:
Benjamin Aronov is a developer advocate at Vonage. He is a proven community builder with a background in Ruby on Rails. Benjamin enjoys the beaches of Tel Aviv which he calls home. His Tel Aviv base allows him to meet and learn from some of the world's best startup founders. Outside of tech, Benjamin loves traveling the world in search of the perfect pain au chocolat.