
Share:
Former Developer Advocate for Vonage, where his role was to support the local tech community in London. He’s an experienced events organiser, boardgamer and dad to a cute little dog called Moo. He’s also the lead organizer for You Got This - a network of events on the core skills needed for a happy, healthy work life.
Add Overlay To Video With the Vonage Video API
Time to read: 2 minutes
When creating a Vonage Video publisher, the video stream can be sourced directly from a user camera, from an element, or an HTML element. Once pixels get drawn to the canvas, they can be easily manipulated before being used in a Video API session.
In this tutorial, you'll learn how to add a text or image overlay to your camera image that you can include in your video calls.
Several components are required to make the project work. Firstly, an element will take a stream from the user's camera. Each frame, the video element will be drawn on a canvas, where we will then add text or an image. With our desired output on a canvas, we can use the canvas as a source for a Vonage Video API publisher, which we can use in our video sessions with friends.
If you want to look at the finished code, you can find it at https://github.com/nexmo-community/video-overlay.
Create a new project folder followed by a new file index.html, populating this file with the following code:
<!DOCTYPE html>
<html>
<head></head>
<body>
  <video id="v1" width="320" height="240" autoplay></video>
  <canvas id="c1" width="320" height="240"></canvas>
  <canvas id="c2" width="320" height="240"></canvas>
  <div id="vonage-publishers"></div>
  <div id="vonage-subscribers"></div>
  <script>
    // Create references to the video and canvas elements
    const v1 = document.getElementById('v1')
    const c1 = document.getElementById('c1')
    const c2 = document.getElementById('c2')
     // Get canvas contexts
    const c1Ctx = c1.getContext('2d')
    const c2Ctx = c2.getContext('2d')
  </script>
</body>
</html>
In this tutorial, you will add text to the first canvas c1 and an image overlay to the second canvas c2.
Set the <video> element's source to the stream from the user's webcam. This snippet will pick the default camera:
navigator.mediaDevices.getUserMedia({ video: true })
  .then(stream => { v1.srcObject = stream })
Create an empty addText() function. Once the user's video device is ready and 'playing', run the functions every frame:
v1.addEventListener('play', () => {
  setInterval(addText, 0)
  setInterval(addImage, 0)
})
 function addText() {
 }
 function addImage() {
 }
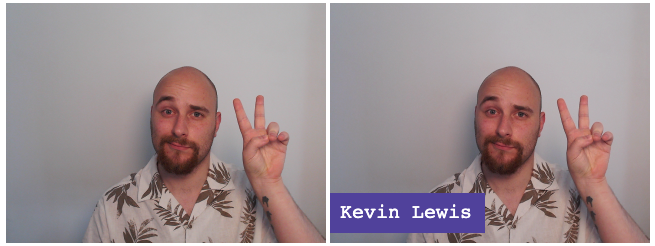
Update addText():
function addText() {
  // User Video
  c1Ctx.drawImage(v1, 0, 0, 320, 240)
   // Rectangle
  c1Ctx.beginPath();
  c1Ctx.fillStyle = "#584fa8";
  c1Ctx.rect(0, 190, 155, 40); // x, y of top-left, width, height
  c1Ctx.fill();
   // Text
  c1Ctx.font = "20px Monospace";
  c1Ctx.fillStyle = "white";
  c1Ctx.fillText("Kevin Lewis", 10, 215); // x, y of top-left
}Refresh your browser and you should now see text being overlaid on the canvas.
Firstly, at the top of your <script> tag, load in the image that you want to use for the overlay:
const overlayImg = new Image()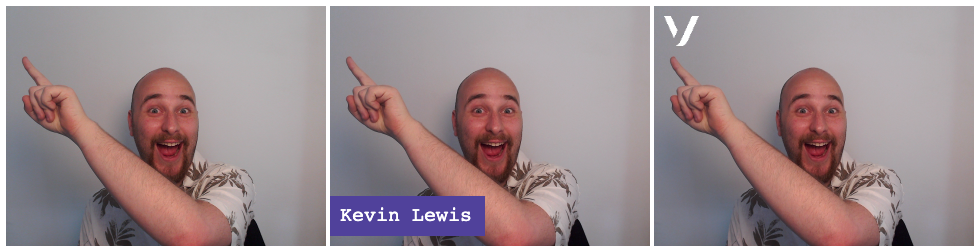
overlayImg.src = 'vonage.png'Then, update addImage():
function addImage() {
  // User Video
  c2Ctx.drawImage(v1, 0, 0, 320, 240)
   // Overlay Image
  c2Ctx.drawImage(overlayImg, 10, 10, 35, 30) // x, y of top-left, width, height
}Your page should look like this:
Create a new project in your Vonage Video Dashboard. Once created, scroll down to Project Tools and create a new Routed session. Take the Session ID and create a new token.
At the top of your <script>, create three new variables with data from the project dashboard:
const sessionId = 'YOUR_SESSION_ID'
const apiKey = 'YOUR_PROJECT_API_KEY'
const token = 'YOUR_TOKEN'Next, copy the <script> tag from the Vonage Video API Client SDK page and put it above your existing <script> tag.
At the bottom of your <script> tag, get your basic Vonage Video API session initialized and publish from the second canvas:
// Initialize session
const session = OT.initSession(apiKey, sessionId)
 // Create publisher
const publisher = OT.initPublisher("vonage-publishers", {
  // c1 is the text canvas. Substitute c2 if you want to use the overlay canvas.
  videoSource: c1.captureStream().getVideoTracks()[0],
  width: 320,
  height: 240
})
 // Once connected to session, publish the publisher
session.connect(token, () => {
  session.publish(publisher)
})
 // Show other users' streams
session.on('streamCreated', event => {
  session.subscribe(event.stream, "vonage-subscribers")
})
The <video> and <canvas> elements are required to make this work, but you probably don't want them visible in your webpage. In your <head>, add the following CSS to hide them:
<style>
  #v1, #c1, #c2 { display: none }
</style>
Hopefully, you found this blog post useful and can now create custom overlays to your heart's content. You may choose to alter the size and position of the images, or allow your users to edit it themselves.
You can find the final project at https://github.com/nexmo-community/video-overlay.
As ever, if you need any support feel free to reach out in the Vonage Developer Community Slack. We hope to see you there.
Share:
Former Developer Advocate for Vonage, where his role was to support the local tech community in London. He’s an experienced events organiser, boardgamer and dad to a cute little dog called Moo. He’s also the lead organizer for You Got This - a network of events on the core skills needed for a happy, healthy work life.