Voice APIを使い始める
このページでは、Vonage Voice APIを利用するために必要な手順を説明します。
前提条件
始める前に、以下のものが必要です:
Vonageアカウントの作成
当社のAPIを使用するには、次のものが必要です。 アカウント登録.これでAPIキーとシークレットが発行され、APIにアクセスできるようになります。
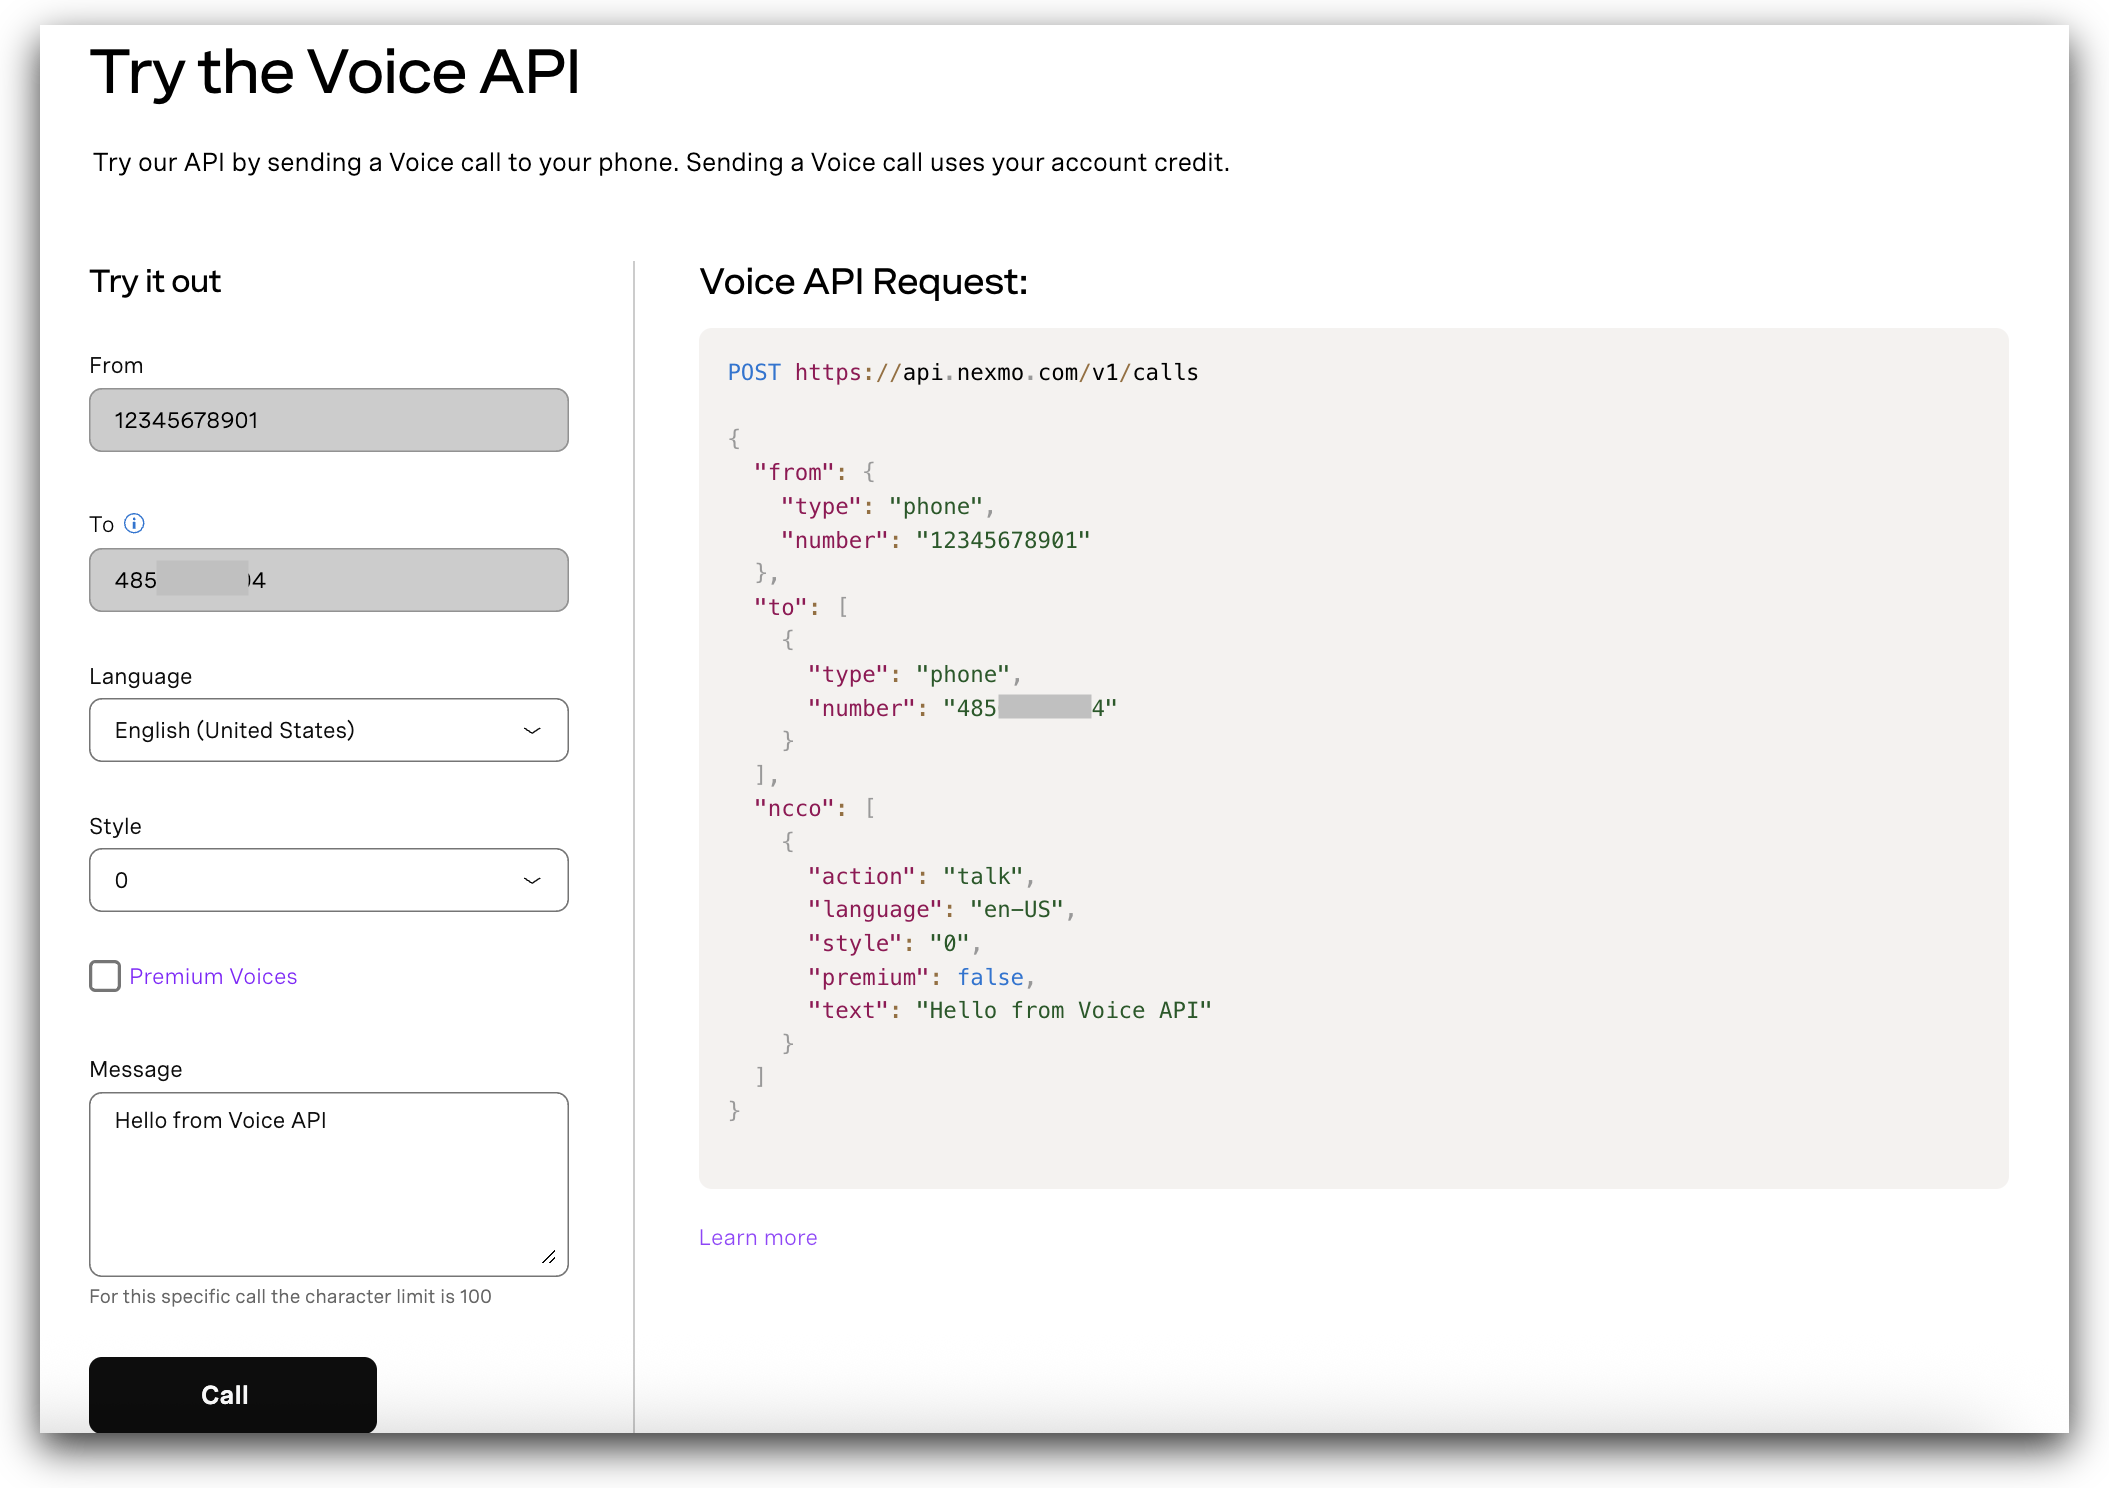
Voice APIを使って音声通話ができます。テスト番号を使う 123456789 として 発信者番号通知をクリックし、サインアップ時に入力した番号にお電話ください。この機能は、アカウントにクレジットを追加するまで、デモまたはトライアルアカウントでのみご利用いただけます。
Voice APIを試す
その後 Vonage APIアカウントへのサインアップにアクセスする。 開発者ダッシュボード に移動する。 音声通話をする セクションをご覧ください。ここでは、Voice APIの動作を確認するためのテストコールを行うことができます。
アプリケーションでVoice APIを使用する方法を学びましょう。
アプリケーションの作成
に行く。 アプリケーションのページをダッシュボードに表示し Name あなたのApplicationsのために。
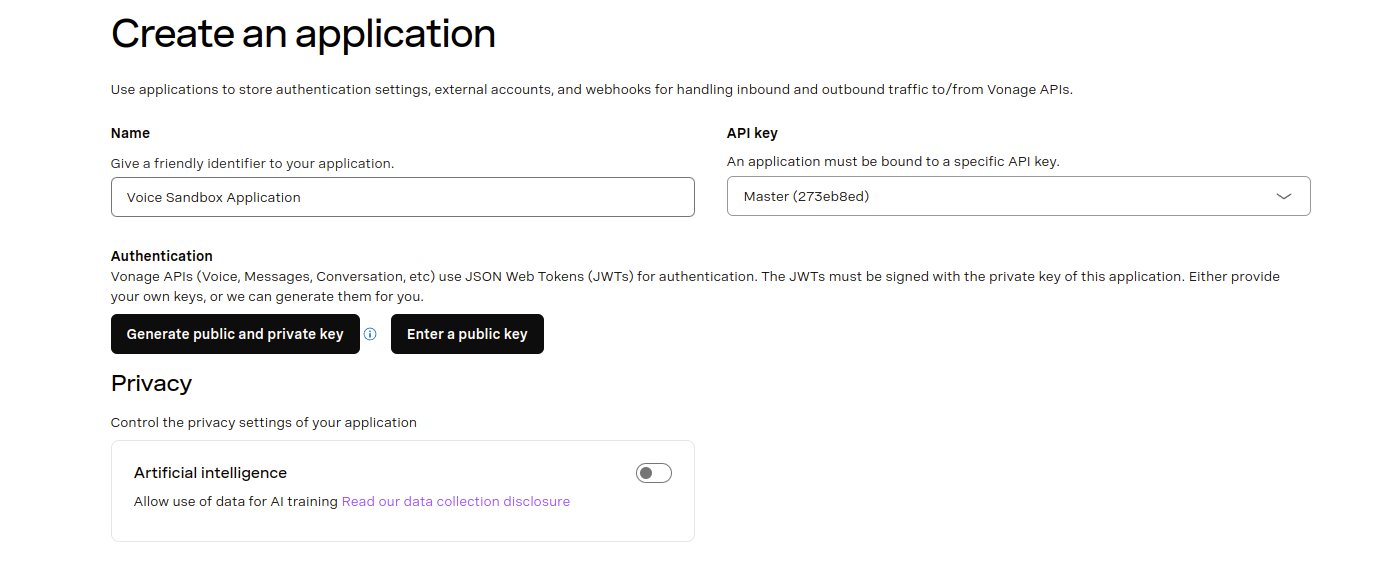
をクリックしてください。 公開鍵と秘密鍵の生成 ボタンをクリックし、ファイル private.key のあたりだ。
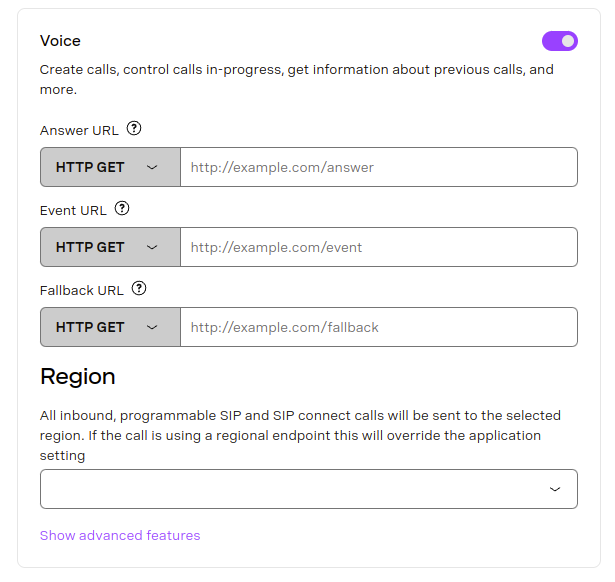
次に 声 ケイパビリティを持つ。 当面は、すべてデフォルトのままにしておいてください。
最後に 新規アプリケーションの作成 ページの一番下にある
チェックアウト Vonage CLIを始める CLIのインストールと設定方法の詳細については、こちらを参照してください。
Vonageアプリケーションを作成するには、次のコマンドを使用します:
vonage apps create 'Your application'

✅ Creating Application
Saving private key ... Done!
Application created

Name: Your application
Application ID: 00000000-0000-0000-0000-000000000000
Improve AI: Off
Private/Public Key: Set

Capabilities:
  None Enabled
vonage apps create 'Your application'

✅ Creating Application
Saving private key ... Done!
Application created

Name: Your application
Application ID: 00000000-0000-0000-0000-000000000000
Improve AI: Off
Private/Public Key: Set

Capabilities:
  None Enabled
アプリケーションができたら、次に voice WebhookのURLを自分のものに置き換えてください:
vonage apps capabilities update 00000000-0000-0000-0000-000000000000 voice `
  --voice-answer-url='https://example.com/webhooks/voice/answer' `
  --voice-event-url='https://example.com/webhooks/voice/event' `
  --voice-fallback-url='https://example.com/webhooks/voice/fallback'

✅ Fetching Application
✅ Adding voice capability to application 00000000-0000-0000-0000-000000000000

Name: Your application
Application ID: 00000000-0000-0000-0000-000000000000
Improve AI: Off
Private/Public Key: Set

Capabilities:
 VOICE:
    Uses Signed callbacks: On
    Conversation TTL: 41 hours
    Leg Persistence Time: 6 days
    Event URL: [POST] https://example.com/webhooks/voice/event
    Answer URL: [POST] https://example.com/webhooks/voice/answer
    Fallback URL: [POST] https://example.com/webhooks/voice/fallback
vonage apps capabilities update 00000000-0000-0000-0000-000000000000 voice ^
  --voice-answer-url='https://example.com/webhooks/voice/answer' ^
  --voice-event-url='https://example.com/webhooks/voice/event' ^
  --voice-fallback-url='https://example.com/webhooks/voice/fallback'

✅ Fetching Application
✅ Adding voice capability to application 00000000-0000-0000-0000-000000000000

Name: Your application
Application ID: 00000000-0000-0000-0000-000000000000
Improve AI: Off
Private/Public Key: Set

Capabilities:
 VOICE:
    Uses Signed callbacks: On
    Conversation TTL: 41 hours
    Leg Persistence Time: 6 days
    Event URL: [POST] https://example.com/webhooks/voice/event
    Answer URL: [POST] https://example.com/webhooks/voice/answer
    Fallback URL: [POST] https://example.com/webhooks/voice/fallback
アプリケーションはその後作成され、必要な機能を持ちます。アプリケーションの作成とアプリケーション機能の追加については 申請書類.
番号を借りる
番号を借りるには、まず以下の手続きが必要です。 アカウントにクレジットを追加する.
テスト番号を使用する場合は、この手順を省略できます。 123456789 として 発信者番号通知をクリックし、サインアップの際に入力した番号にお電話ください。

Vonage CLIを使用して番号をレンタルできます。次のコマンドは、米国で利用可能な番号を検索します:
vonage numbers search US

✅ Searching for numbers

There is 1 number available for purchase in United States

Number       Type    Features         Monthly Cost  Setup Cost
-----------  ------  ---------------  ------------  ----------
16127779311  Mobile  MMS, SMS, VOICE  €0.90         €0.00

Use vonage numbers buy to purchase.
Numbers を購入するにはこのコマンドを使用する:
vonage numbers buy US 16127779311
✅ Searching for numbers
Are you sure you want to purchase the number 16127779311 for €0.90? [y/n] y

✅ Purchasing number
Number 16127779311 purchased

Number: 16127779311
Country: 🇺🇸 United States
Type: Mobile
Features: MMS, SMS, VOICE
Monthly Cost: €0.90
Setup Cost: €0.00
Linked Application ID: Not linked to any application
Voice Callback: Not Set
Voice Callback Value: Not Set
Voice Status Callback: Not Set
指定する 2文字の国コード を購入する。 他国で番号を購入する。
アウトバウンドコールをかける
Vonage API音声プラットフォームとの主なやり取りは、以下の方法で行います。 パブリックAPI.アウトバウンドコールをかけるには POST リクエスト https://api.nexmo.com/v1/calls.
Voice APIを使って最初の通話を行うには、以下から言語を選択し、サンプルコードの以下の変数を置き換えてください:
| キー | 説明 |
|---|---|
VONAGE_NUMBER | 発信元のVonage番号。例 447700900000.をスキップした場合 番号を借りる ステップでは、テスト番号「123456789」を使用します。 |
TO_NUMBER | E.164形式で発信したい番号。例 447700900001.をスキップした場合 番号を借りる ステップでは、サインアップ時に入力した Numbers を使用します。 |
Prerequisites
Execute the following command at your terminal prompt to create the JWT for authentication:
export JWT=$(nexmo jwt:generate $PATH_TO_PRIVATE_KEY application_id=$NEXMO_APPLICATION_ID)Write the code
Add the following to make-an-outbound-call.sh:
curl -X POST https://api.nexmo.com/v1/calls\
  -H "Authorization: Bearer $JWT"\
  -H "Content-Type: application/json"\
  -d '{"to":[{"type": "phone","number": "'$VOICE_TO_NUMBER'"}],
      "from": {"type": "phone","number": "'$VONAGE_VIRTUAL_NUMBER'"},
"answer_url":["'"$VOICE_ANSWER_URL"'"]}'Run your code
Save this file to your machine and run it:
Prerequisites
npm install @vonage/server-sdkCreate a file named make-an-outbound-call.js and add the following code:
const { Vonage } = require('@vonage/server-sdk');

const vonage = new Vonage({
  applicationId: VONAGE_APPLICATION_ID,
  privateKey: VONAGE_PRIVATE_KEY,
});Write the code
Add the following to make-an-outbound-call.js:
vonage.voice.createOutboundCall({
  to: [
    {
      type: 'phone',
      number: VOICE_TO_NUMBER,
    },
  ],
  from: {
    type: 'phone',
    number: VONAGE_VIRTUAL_NUMBER,
  },
  answer_url: [VOICE_ANSWER_URL],
})
  .then((resp) => console.log(resp))
.catch((error) => console.error(error));Run your code
Save this file to your machine and run it:
Prerequisites
Add the following to build.gradle:
implementation 'com.vonage:server-sdk-kotlin:2.1.1'Create a class named OutboundTextToSpeechCall and add the following code to the main method:
val client = Vonage {
    applicationId(VONAGE_APPLICATION_ID)
    privateKeyPath(VONAGE_PRIVATE_KEY_PATH)
}Write the code
Add the following to the main method of the OutboundTextToSpeechCall class:
val callEvent = client.voice.createCall {
    toPstn(VOICE_TO_NUMBER)
    from(VONAGE_VIRTUAL_NUMBER)
    answerUrl(VOICE_ANSWER_URL)
}Run your code
We can use the アプリケーション plugin for Gradle to simplify the running of our application. Update your build.gradle with the following:
apply plugin: 'application'
mainClassName = project.hasProperty('main') ? project.getProperty('main') : ''
Run the following gradle command to execute your application, replacing com.vonage.quickstart.kt.voice with the package containing OutboundTextToSpeechCall:
Prerequisites
Add the following to build.gradle:
implementation 'com.vonage:server-sdk:9.3.1'Create a class named OutboundTextToSpeech and add the following code to the main method:
VonageClient client = VonageClient.builder()
        .applicationId(VONAGE_APPLICATION_ID)
        .privateKeyPath(VONAGE_PRIVATE_KEY_PATH)
.build();Write the code
Add the following to the main method of the OutboundTextToSpeech class:
client.getVoiceClient().createCall(new Call(VOICE_TO_NUMBER, VONAGE_VIRTUAL_NUMBER, VOICE_ANSWER_URL));Run your code
We can use the アプリケーション plugin for Gradle to simplify the running of our application. Update your build.gradle with the following:
apply plugin: 'application'
mainClassName = project.hasProperty('main') ? project.getProperty('main') : ''
Run the following gradle command to execute your application, replacing com.vonage.quickstart.voice with the package containing OutboundTextToSpeech:
Prerequisites
Install-Package VonageWrite the code
Add the following to MakeOutboundCall.cs:
var creds = Credentials.FromAppIdAndPrivateKeyPath(VONAGE_APPLICATION_ID, VONAGE_PRIVATE_KEY_PATH);
var client = new VonageClient(creds);

var answerUrl = "https://nexmo-community.github.io/ncco-examples/text-to-speech.json";
var toEndpoint = new PhoneEndpoint() { Number = VOICE_TO_NUMBER };
var fromEndpoint = new PhoneEndpoint() { Number = VONAGE_VIRTUAL_NUMBER };

var command = new CallCommand() { To = new Endpoint[] { toEndpoint }, From = fromEndpoint, AnswerUrl = new[] { answerUrl } };
var response = await client.VoiceClient.CreateCallAsync(command);Prerequisites
composer require vonage/clientWrite the code
Add the following to text-to-speech-outbound.php:
require_once __DIR__ . '/../config.php';
require_once __DIR__ . '/../vendor/autoload.php';

// Building Blocks
// 1. Make a Phone Call
// 2. Play Text-to-Speech

$keypair = new \Vonage\Client\Credentials\Keypair(
    file_get_contents(VONAGE_APPLICATION_PRIVATE_KEY_PATH),
    VONAGE_APPLICATION_ID
);
$client = new \Vonage\Client($keypair);

$outboundCall = new \Vonage\Voice\OutboundCall(
    new \Vonage\Voice\Endpoint\Phone(TO_NUMBER),
    new \Vonage\Voice\Endpoint\Phone(VONAGE_NUMBER)
);
$outboundCall->setAnswerWebhook(
    new \Vonage\Voice\Webhook(
        'https://raw.githubusercontent.com/nexmo-community/ncco-examples/gh-pages/text-to-speech.json',
        \Vonage\Voice\Webhook::METHOD_GET
    )
);
$response = $client->voice()->createOutboundCall($outboundCall);

var_dump($response);Run your code
Save this file to your machine and run it:
Prerequisites
pip install vonage python-dotenvWrite the code
Add the following to make-an-outbound-call.py:
from vonage import Auth, Vonage
from vonage_voice import CreateCallRequest, Phone, ToPhone

client = Vonage(
    Auth(
        application_id=VONAGE_APPLICATION_ID,
        private_key=VONAGE_PRIVATE_KEY,
    )
)

response = client.voice.create_call(
    CreateCallRequest(
        answer_url=[VOICE_ANSWER_URL],
        to=[ToPhone(number=VOICE_TO_NUMBER)],
        from_=Phone(number=VONAGE_VIRTUAL_NUMBER),
    )
)

pprint(response)Run your code
Save this file to your machine and run it:
Prerequisites
gem install vonageRun your code
Save this file to your machine and run it:
これを容易にするために、Vonageは以下を提供します。 サーバーSDK 認証や正しいリクエストボディの作成は、さまざまな言語で行われている。
次はどうする?
最初の通話ができたら、Voice APIの他の面も試してみましょう。まずは 技術詳細 のページでVonage Voice APIの包括的な概要をご覧ください。様々なコールフローを理解するには 通話フロー ガイドを参照してください。基本的な音声通知アプリケーションの作成に興味がある場合は、以下のガイドを参照してください。 音声通知 ハウツーガイド詳しくはVoice APIのドキュメントをご覧ください。