ベリファイAPI
Verify APIを使用すると、特定の番号でユーザーに連絡できることを確認できます:
- ユーザーの電話番号を正確に把握することで、いつでも連絡を取ることができます。
- 一人のユーザーが複数のアカウントを作成できないようにすることで、詐欺やスパムから保護します。
- ユーザーが特定の活動を行う際に、本人であることを確認するためのセキュリティ層を追加する。
仕組み
検証は2段階のプロセスで、2回のAPIコールを必要とする:
検証リクエスト
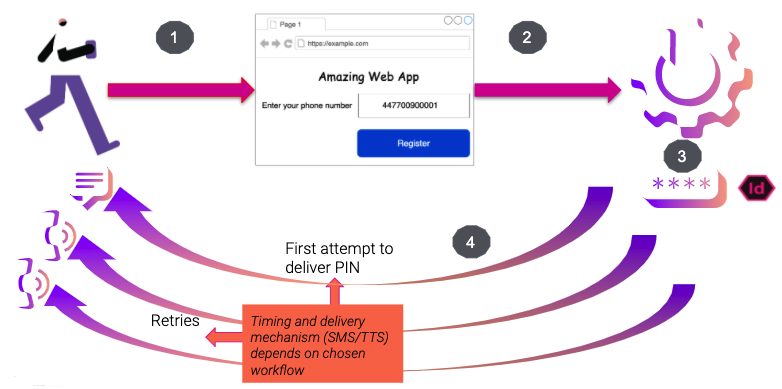
ユーザーがアプリやウェブサイトからサービスに登録し、電話番号を提供する。
ユーザーが登録した番号にアクセスできることを確認するために、アプリケーションは以下のAPIコールを行います。 検証リクエスト・エンドポイント.
Verify API は、PIN コードを生成し、それに関連付けられます。
request_id.状況によっては、独自のPINコードを提供することも可能ですので、アカウント・マネージャーにお問い合わせください。
Verify APIは次に、このPINをユーザーに配信しようとします。これらの試みの形式(SMS または音声合成(TTS))とタイミングは、選択した ワークフロー. ユーザーがアプリやウェブサイトを再度訪れ、受け取ったPINを入力しない場合、検証リクエストは最終的にタイムアウトになります。そうでない場合は、Verifyチェックを実行して、ユーザーが入力した番号を確認する必要があります。
検証チェック
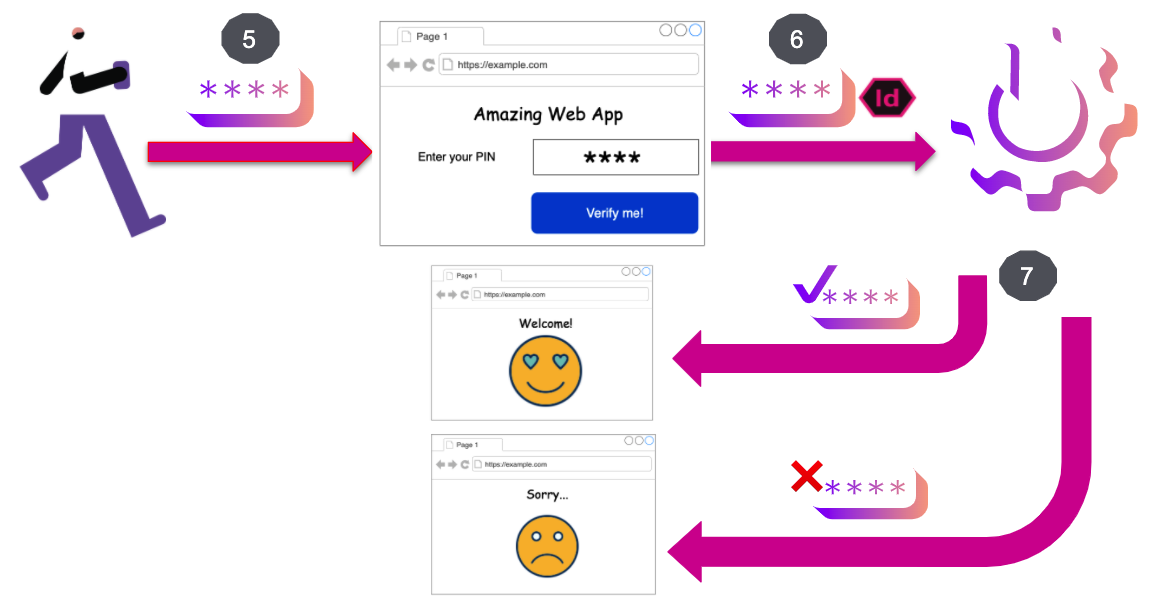
5.ユーザーはPINを受け取り、アプリケーションに入力します。
6.アプリケーションはAPIコールで 検証チェック・エンドポイントで通過する。 request_id およびユーザーが入力したPIN。
7.Verify APIは、入力されたPINが送信されたPINと一致するかどうかをチェックし、その結果をアプリケーションに返します。
はじめに
以下のサンプルでは、ユーザーに検証コードを送信して検証プロセスを開始する方法を示しています。ユーザーが入力したコードを検証する方法や、その他の操作については コード・スニペット.
Write the code
Add the following to send-verification-code.sh:
curl GET "https://api.nexmo.com/verify/json?api_key=$VONAGE_API_KEY&api_secret=$VONAGE_API_SECRET&number=$VERIFY_NUMBER&brand=AcmeInc"Run your code
Save this file to your machine and run it:
Prerequisites
Add the following to build.gradle:
implementation 'com.vonage:server-sdk-kotlin:2.1.1'Create a class named StartVerification and add the following code to the main method:
val client = Vonage {
    apiKey(VONAGE_API_KEY)
    apiSecret(VONAGE_API_SECRET)
}Write the code
Add the following to the main method of the StartVerification class:
val response = client.verifyLegacy.verify(VERIFY_NUMBER, VERIFY_BRAND_NAME)
if (response.status == VerifyStatus.OK) {
    println("Verification sent. Request ID: ${response.requestId}")
}
else {
    println("Error: ${response.errorText}")
}Run your code
We can use the アプリケーション plugin for Gradle to simplify the running of our application. Update your build.gradle with the following:
apply plugin: 'application'
mainClassName = project.hasProperty('main') ? project.getProperty('main') : ''
Run the following gradle command to execute your application, replacing com.vonage.quickstart.kt.verify.legacy with the package containing StartVerification:
Prerequisites
Add the following to build.gradle:
implementation 'com.vonage:server-sdk:9.3.1'Create a class named StartVerification and add the following code to the main method:
VonageClient client = VonageClient.builder()
        .apiKey(VONAGE_API_KEY)
        .apiSecret(VONAGE_API_SECRET)
.build();Write the code
Add the following to the main method of the StartVerification class:
VerifyResponse response = client.getVerifyClient().verify(VERIFY_NUMBER, VERIFY_BRAND_NAME);

if (response.getStatus() == VerifyStatus.OK) {
    System.out.printf("RequestID: %s", response.getRequestId());
}
else {
    System.out.printf("ERROR! %s: %s", response.getStatus(), response.getErrorText());
}Run your code
We can use the アプリケーション plugin for Gradle to simplify the running of our application. Update your build.gradle with the following:
apply plugin: 'application'
mainClassName = project.hasProperty('main') ? project.getProperty('main') : ''
Run the following gradle command to execute your application, replacing com.vonage.quickstart.verify with the package containing StartVerification:
Prerequisites
Install-Package VonageCreate a file named SendVerificationRequest.cs and add the following code:
using System.Threading.Tasks;
using Vonage.Verify;
using Vonage;Add the following to SendVerificationRequest.cs:
var credentials = Credentials.FromApiKeyAndSecret(vonageApiKey, vonageApiSecret);Write the code
Add the following to SendVerificationRequest.cs:
var request = new VerifyRequest() { Brand = brandName, Number = recipientNumber };Prerequisites
composer require vonage/clientCreate a file named request.php and add the following code:
$basic  = new \Vonage\Client\Credentials\Basic(VONAGE_API_KEY, VONAGE_API_SECRET);
$client = new \Vonage\Client(new \Vonage\Client\Credentials\Container($basic));Write the code
Add the following to request.php:
$request = new \Vonage\Verify\Request(NUMBER, BRAND_NAME);

// choose PIN length (4 or 6)
$request->setCodeLength(4);

// set locale
$request->setCountry('de');

$response = $client->verify()->start($request);

echo "Started verification, `request_id` is " . $response->getRequestId();Run your code
Save this file to your machine and run it:
Prerequisites
pip install vonage python-dotenvWrite the code
Add the following to request.py:
from vonage import Auth, Vonage
from vonage_verify_legacy import StartVerificationResponse, VerifyRequest

client = Vonage(Auth(api_key=VONAGE_API_KEY, api_secret=VONAGE_API_SECRET))

request = VerifyRequest(number=VERIFY_NUMBER, brand='AcmeInc')

response: StartVerificationResponse = client.verify_legacy.start_verification(request)
print(response)Run your code
Save this file to your machine and run it:
Prerequisites
gem install vonageCreate a file named request.rb and add the following code:
client = Vonage::Client.new(
  api_key: VONAGE_API_KEY,
  api_secret: VONAGE_API_SECRET
)Write the code
Add the following to request.rb:
response = client.verify.request(
  number: VERIFY_NUMBER,
  brand: VERIFY_BRAND_NAME
)Run your code
Save this file to your machine and run it:
ガイド
- Verify移行ガイド: このガイドは、Verify Legacy から Verify への移行を支援します。
- 認証: Verify APIによる認証
- 言語の検証: Verify API の V2 で使用可能な言語
- APIワークフローの検証: APIワークフローの検証
- テンプレート管理: Vonage Verify APIでカスタムOTPメッセージを送信するためのテンプレート管理の使用方法
- APIウェブフックの検証: Webhooks と Verify API での使用方法のガイドです。
- サイレント認証: Vonage Verify APIによるサイレント認証
- サイレント認証: Vonage Verify APIによる高度なサイレント認証
- 国別のサイレント認証登録要件: 国別のサイレント認証登録要件
- 不正防止システムのVerify: Verifyの不正防止システム
- サイレント認証およびサイレント認証アドバンス用バーチャルオペレーター: サイレント認証およびサイレント認証アドバンスドを使用したVonage Network API Playground内のバーチャルオペレータ機能の使用方法の紹介。
- ネットワーク・ブロック解除API: Vonage Network Unblock APIとは何か、またどのように使用するのかをご紹介します。
コード・スニペット
- SMSを使って検証リクエストを送信する
- WhatsAppを使って認証リクエストを送信する
- サイレント認証を使用して検証リクエストを送信する
- テンプレート・フラグメントの作成
- テンプレート・フラグメントの削除
- テンプレート・フラグメントの更新
- テンプレートの作成
- テンプレートの削除
- テンプレートの断片をリストアップ
- テンプレートの更新
- テンプレートを入手する
- テンプレート断片を取得する
- リスト・テンプレート
- 検証コードを確認する
- 検証リクエストのキャンセル
- 検証リクエストの送信(フォールバックオプション付き)
- 電子メールを使用して検証リクエストを送信する
- 音声(TTS)を使って検証リクエストを送信する