Subaccounts APIを使う
概要
このトピックでは、パートナーがSubaccounts APIを使用してエンドカスタマーをうまく管理するユースケースについて説明します。
前提条件
を熟知している必要がある。 メインコンセプト Subaccounts API に関連付けられます。
サブアカウントの作成
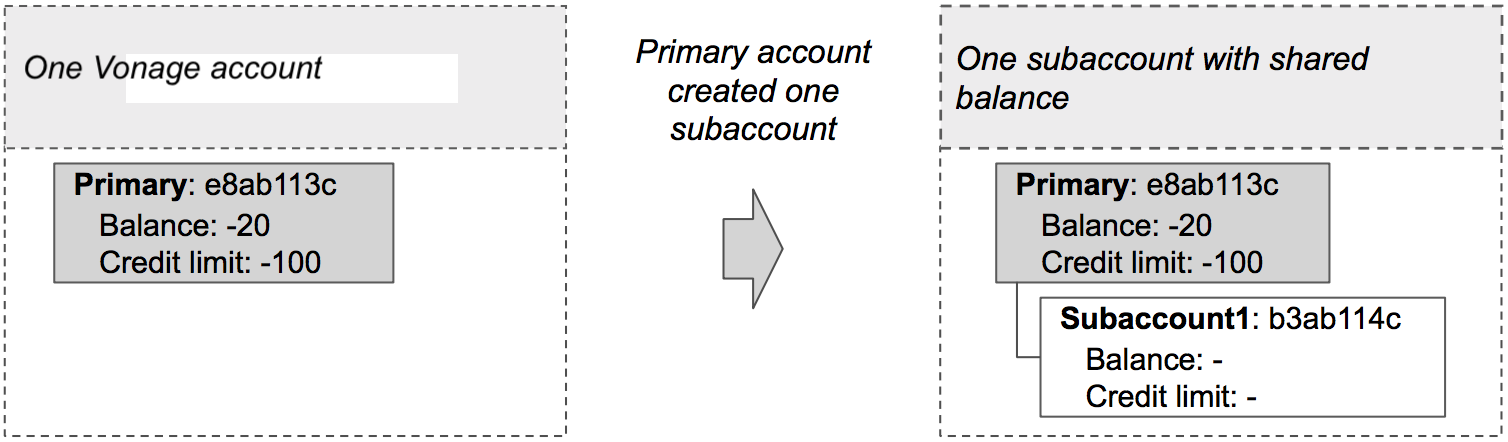
パートナーはエンドカスタマーごとにSubaccountを作成し、エンドカスタマーごとに異なるAPIクレデンシャルを使用し、その支出を見ることができます。これは以下の図に示されている:
Subaccountsを作成するには、以下のコードを使用します:
コードを書く
create-subaccount.sh に以下を追加する:
curl -X "POST" "https://api.nexmo.com/accounts/$VONAGE_API_KEY/subaccounts" -u $VONAGE_API_KEY:$VONAGE_API_SECRET   \
     -H "Content-Type: application/json"  \
-d $'{"name":"'$NEW_SUBACCOUNT_NAME'", "secret":"'$NEW_SUBACCOUNT_SECRET'"}'コードを実行する
このファイルをあなたのマシンに保存し、実行する:
前提条件
npm install @vonage/subaccountscreate-subaccount.js という名前のファイルを作成し、以下のコードを追加する:
const { SubAccounts } = require('@vonage/subaccounts');

const subAccountClient = new SubAccounts({
  apiKey: VONAGE_API_KEY,
  apiSecret: VONAGE_API_SECRET,
});コードを書く
create-subaccount.js に以下を追加する:
subAccountClient.createSubAccount({
  name: NEW_SUBACCOUNT_NAME,
  secret: NEW_SUBACCOUNT_SECRET,
})
  .then((newSubAccount) => console.log(newSubAccount))
.catch((error) => console.error(error));コードを実行する
このファイルをあなたのマシンに保存し、実行する:
前提条件
build.gradle に以下を追加する:
implementation 'com.vonage:server-sdk-kotlin:2.1.1'CreateSubaccount という名前のファイルを作成し、main メソッドに以下のコードを追加する:
val client = Vonage {
    apiKey(VONAGE_API_KEY)
    apiSecret(VONAGE_API_SECRET)
}コードを書く
CreateSubaccount ファイルのmain メソッドに以下を追加する:
val subaccount = client.subaccounts.createSubaccount(
    name = SUBACCOUNT_NAME,
    secret = SUBACCOUNT_SECRET
)コードを実行する
Gradle用のアプリケーション プラグインを使うことで、アプリケーションの実行を簡単にすることができます。build.gradle を以下のように更新する:
apply plugin: 'application'
mainClassName = project.hasProperty('main') ? project.getProperty('main') : ''以下のgradle コマンドを実行し、com.vonage.quickstart.kt.subaccounts をCreateSubaccount を含むパッケージに置き換えてアプリケーションを実行する:
前提条件
build.gradle に以下を追加する:
implementation 'com.vonage:server-sdk:9.3.1'CreateSubaccount という名前のファイルを作成し、main メソッドに以下のコードを追加する:
VonageClient client = VonageClient.builder()
		.apiKey(VONAGE_API_KEY)
		.apiSecret(VONAGE_API_SECRET)
.build();コードを書く
CreateSubaccount ファイルのmain メソッドに以下を追加する:
Account subaccount = client.getSubaccountsClient().createSubaccount(
		CreateSubaccountRequest.builder()
			.name(SUBACCOUNT_NAME)
			.secret(SUBACCOUNT_SECRET)
			.build()
);コードを実行する
Gradle用のアプリケーション プラグインを使うことで、アプリケーションの実行を簡単にすることができます。build.gradle を以下のように更新する:
apply plugin: 'application'
mainClassName = project.hasProperty('main') ? project.getProperty('main') : ''以下のgradle コマンドを実行し、com.vonage.quickstart.subaccounts をCreateSubaccount を含むパッケージに置き換えてアプリケーションを実行する:
前提条件
コードを書く
CreateSubAccountRequest.cs に以下を追加する:
var request = Vonage.SubAccounts.CreateSubAccount.CreateSubAccountRequest.Build()
.WithName(NEW_SUBACCOUNT_NAME)
.WithSecret(NEW_SUBACCOUNT_SECRET)
.Create();
var response = await client.SubAccountsClient.CreateSubAccountAsync(request);前提条件
composer require vonage/clientcreate-subaccount.php という名前のファイルを作成し、以下のコードを追加する:
$basic = new \Vonage\Client\Credentials\Basic(VONAGE_API_KEY, VONAGE_API_SECRET);
$client = new \Vonage\Client($basic);コードを書く
create-subaccount.php に以下を追加する:
$account = new \Vonage\Subaccount\SubaccountObjects\Account();
$account->setName(NEW_SUBACCOUNT_NAME);
$account->setSecret(NEW_SUBACCOUNT_SECRET);
$client->subaccount()->createSubaccount(VONAGE_API_KEY, $account);コードを実行する
このファイルをあなたのマシンに保存し、実行する:
前提条件
pip install vonage python-dotenvコードを書く
create-subaccount.py に以下を追加する:
from vonage import Auth, Vonage
from vonage_subaccounts import NewSubaccount, SubaccountOptions
client = Vonage(Auth(api_key=VONAGE_API_KEY, api_secret=VONAGE_API_SECRET))
response: NewSubaccount = client.subaccounts.create_subaccount(
SubaccountOptions(name=SUBACCOUNT_NAME, secret=SUBACCOUNT_SECRET)
)
print(response)コードを実行する
このファイルをあなたのマシンに保存し、実行する:
前提条件
gem install vonagecreate-subaccount.rb という名前のファイルを作成し、以下のコードを追加する:
client = Vonage::Client.new(
api_key: VONAGE_API_KEY,
api_secret: VONAGE_API_SECRET
)コードを書く
create-subaccount.rb に以下を追加する:
client.subaccounts.create(
name: NEW_SUBACCOUNT_NAME,
secret: NEW_SUBACCOUNT_SECRET
)コードを実行する
このファイルをあなたのマシンに保存し、実行する:
単位移行
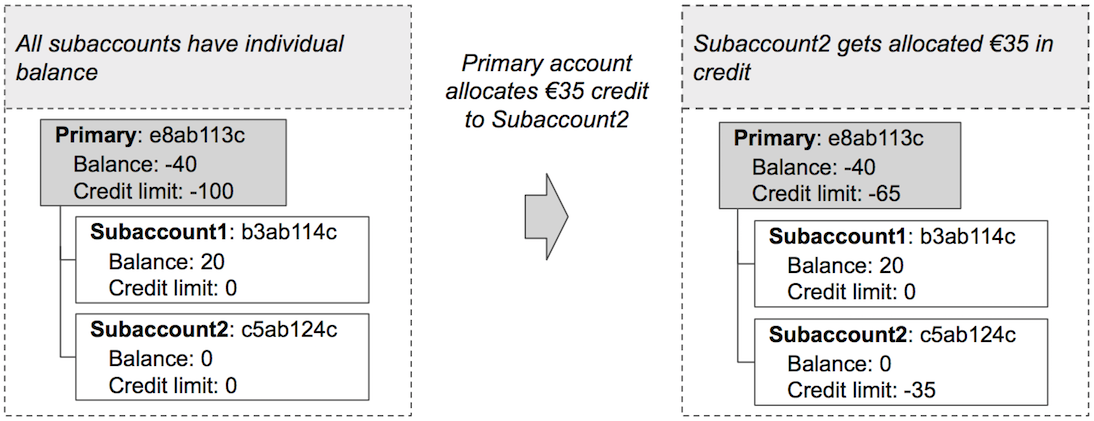
パートナーは、エンドカスタマーがすべて同じ残高を共有していたため、エンドカスタマー間の支出を管理できませんでした。あるエンドカスタマーが、共有残高をすべて消費してしまうことがあり、他のパートナーのエンドカスタマーのVonage APIへのアクセスを事実上ブロックしていました。パートナーは個別の残高を設定し、そのエンド顧客にクレジット・リミットを割り当てることにしました。
注: パートナーは口座を前払いにすることもできたはずだ。
各Subaccountには、以下の図に示すように、個別の残高と与信限度額を割り当てることができる:
次のコード・スニペットは、指定されたクレジット額を Subaccount に割り当てる例です:
コードを書く
transfer-credit.sh に以下を追加する:
curl -X "POST" "https://api.nexmo.com/accounts/$VONAGE_API_KEY/credit-transfers" -u $VONAGE_API_KEY:$VONAGE_API_SECRET \
-H "Content-Type: application/json" \
-d $'{"from":"'$VONAGE_API_KEY'", "to":"'$SUBACCOUNT_KEY'", "amount": '$AMOUNT'}'コードを実行する
このファイルをあなたのマシンに保存し、実行する:
前提条件
npm install @vonage/subaccountstransfer-credit.js という名前のファイルを作成し、以下のコードを追加する:
const { SubAccounts } = require('@vonage/subaccounts');
const subAccountClient = new SubAccounts({
apiKey: VONAGE_API_KEY,
apiSecret: VONAGE_API_SECRET,
});コードを書く
transfer-credit.js に以下を追加する:
subAccountClient.transferCredit({
from: VONAGE_API_KEY,
to: SUBACCOUNT_KEY,
amount: AMOUNT,
})
.then((creditTransfer) => console.log(creditTransfer))
.catch((error) => console.error(error));コードを実行する
このファイルをあなたのマシンに保存し、実行する:
前提条件
build.gradle に以下を追加する:
implementation 'com.vonage:server-sdk-kotlin:2.1.1'TransferCredit という名前のファイルを作成し、main メソッドに以下のコードを追加する:
val client = Vonage {
apiKey(VONAGE_API_KEY)
apiSecret(VONAGE_API_SECRET)
}コードを書く
TransferCredit ファイルのmain メソッドに以下を追加する:
val receipt = client.subaccounts.transferCredit(
from = VONAGE_API_KEY,
to = SUBACCOUNT_KEY,
amount = SUBACCOUNT_CREDIT_AMOUNT
)コードを実行する
Gradle用のアプリケーション プラグインを使うことで、アプリケーションの実行を簡単にすることができます。build.gradle を以下のように更新する:
apply plugin: 'application'
mainClassName = project.hasProperty('main') ? project.getProperty('main') : ''以下のgradle コマンドを実行し、com.vonage.quickstart.kt.subaccounts をTransferCredit を含むパッケージに置き換えてアプリケーションを実行する:
前提条件
build.gradle に以下を追加する:
implementation 'com.vonage:server-sdk:9.3.1'TransferCredit という名前のファイルを作成し、main メソッドに以下のコードを追加する:
VonageClient client = VonageClient.builder()
.apiKey(VONAGE_API_KEY)
.apiSecret(VONAGE_API_SECRET)
.build();コードを書く
TransferCredit ファイルのmain メソッドに以下を追加する:
MoneyTransfer receipt = client.getSubaccountsClient().transferCredit(
MoneyTransfer.builder()
.from(VONAGE_API_KEY).to(SUBACCOUNT_KEY)
.amount(SUBACCOUNT_CREDIT_AMOUNT).build()
);
System.out.println("Transfer successful: "+receipt.getId());コードを実行する
Gradle用のアプリケーション プラグインを使うことで、アプリケーションの実行を簡単にすることができます。build.gradle を以下のように更新する:
apply plugin: 'application'
mainClassName = project.hasProperty('main') ? project.getProperty('main') : ''以下のgradle コマンドを実行し、com.vonage.quickstart.subaccounts をTransferCredit を含むパッケージに置き換えてアプリケーションを実行する:
前提条件
Install-Package VonageTransferCreditRequest.cs という名前のファイルを作成し、以下のコードを追加する:
using Vonage;
using Vonage.Request;
using Vonage.SubAccounts.TransferAmount;TransferCreditRequest.cs に以下を追加する:
var credentials = Credentials.FromApiKeyAndSecret(VONAGE_API_KEY, VONAGE_API_SECRET);
var client = new VonageClient(credentials);コードを書く
TransferCreditRequest.cs に以下を追加する:
var request = TransferAmountRequest.Build()
.WithFrom(VONAGE_API_KEY)
.WithTo(SUBACCOUNT_KEY)
.WithAmount(amount)
.Create();
var response = await client.SubAccountsClient.TransferCreditAsync(request);前提条件
composer require vonage/clienttransfer-credit.php という名前のファイルを作成し、以下のコードを追加する:
$client = new \Vonage\Client($basic);
コードを書く
transfer-credit.php に以下を追加する:
$transferRequest = new \Vonage\Subaccount\Request\TransferBalanceRequest(VONAGE_API_KEY);
$transferRequest
->setFrom(VONAGE_API_KEY)
->setTo(SUBACCOUNT_KEY)
->setAmount(250);
$subaccount = $client->subaccount()->makeBalanceTransfer($transferRequest);コードを実行する
このファイルをあなたのマシンに保存し、実行する:
前提条件
pip install vonage python-dotenvコードを書く
transfer-credit.py に以下を追加する:
from vonage import Auth, Vonage
from vonage_subaccounts import Transfer, TransferRequest
client = Vonage(Auth(api_key=VONAGE_API_KEY, api_secret=VONAGE_API_SECRET))
request = TransferRequest(
from_=VONAGE_API_KEY, to=SUBACCOUNT_KEY, amount=SUBACCOUNT_CREDIT_AMOUNT
)
response: Transfer = client.subaccounts.transfer_credit(request)
print(response)コードを実行する
このファイルをあなたのマシンに保存し、実行する:
前提条件
gem install vonagetransfer-credit.rb という名前のファイルを作成し、以下のコードを追加する:
client = Vonage::Client.new(
api_key: VONAGE_API_KEY,
api_secret: VONAGE_API_SECRET
)コードを書く
transfer-credit.rb に以下を追加する:
client.subaccounts.transfer_credit(
from: VONAGE_API_KEY,
to: SUBACCOUNT_KEY,
amount: AMOUNT
)コードを実行する
このファイルをあなたのマシンに保存し、実行する:
すべてのSubaccountの残高確認
パートナーはモニタリングを導入することを決定する。以下のコード・スニペットを使って、すべてのSubaccountの残高を定期的にチェックすることができます:
コードを書く
get-subaccounts.sh に以下を追加する:
curl "https://api.nexmo.com/accounts/$VONAGE_API_KEY/subaccounts" -u $VONAGE_API_KEY:$VONAGE_API_SECRETコードを実行する
このファイルをあなたのマシンに保存し、実行する:
前提条件
npm install @vonage/subaccountsget-subaccounts.js という名前のファイルを作成し、以下のコードを追加する:
const { SubAccounts } = require('@vonage/subaccounts');
const subAccountClient = new SubAccounts({
apiKey: VONAGE_API_KEY,
apiSecret: VONAGE_API_SECRET,
});コードを書く
get-subaccounts.js に以下を追加する:
subAccountClient.getSubAccounts()
.then((subAccounts) => console.log(subAccounts))
.catch((error) => console.error(error));コードを実行する
このファイルをあなたのマシンに保存し、実行する:
前提条件
build.gradle に以下を追加する:
implementation 'com.vonage:server-sdk-kotlin:2.1.1'ListSubaccounts という名前のファイルを作成し、main メソッドに以下のコードを追加する:
val client = Vonage {
apiKey(VONAGE_API_KEY)
apiSecret(VONAGE_API_SECRET)
}コードを書く
ListSubaccounts ファイルのmain メソッドに以下を追加する:
val subaccounts = client.subaccounts.listSubaccounts()コードを実行する
Gradle用のアプリケーション プラグインを使うことで、アプリケーションの実行を簡単にすることができます。build.gradle を以下のように更新する:
apply plugin: 'application'
mainClassName = project.hasProperty('main') ? project.getProperty('main') : ''以下のgradle コマンドを実行し、com.vonage.quickstart.kt.subaccounts をListSubaccounts を含むパッケージに置き換えてアプリケーションを実行する:
前提条件
build.gradle に以下を追加する:
implementation 'com.vonage:server-sdk:9.3.1'ListSubaccounts という名前のファイルを作成し、main メソッドに以下のコードを追加する:
VonageClient client = VonageClient.builder()
.apiKey(VONAGE_API_KEY)
.apiSecret(VONAGE_API_SECRET)
.build();コードを書く
ListSubaccounts ファイルのmain メソッドに以下を追加する:
ListSubaccountsResponse response = client.getSubaccountsClient().listSubaccounts();コードを実行する
Gradle用のアプリケーション プラグインを使うことで、アプリケーションの実行を簡単にすることができます。build.gradle を以下のように更新する:
apply plugin: 'application'
mainClassName = project.hasProperty('main') ? project.getProperty('main') : ''以下のgradle コマンドを実行し、com.vonage.quickstart.subaccounts をListSubaccounts を含むパッケージに置き換えてアプリケーションを実行する:
前提条件
コードを書く
GetSubAccountsRequest.cs に以下を追加する:
var response = await client.SubAccountsClient.GetSubAccountsAsync();前提条件
composer require vonage/clientget-subaccounts.php という名前のファイルを作成し、以下のコードを追加する:
$basic = new \Vonage\Client\Credentials\Basic(VONAGE_API_KEY, VONAGE_API_SECRET);
$client = new \Vonage\Client($basic);コードを書く
get-subaccounts.php に以下を追加する:
$subaccounts = $client->subaccount()->getSubaccounts(VONAGE_API_KEY);コードを実行する
このファイルをあなたのマシンに保存し、実行する:
前提条件
pip install vonage python-dotenvコードを書く
list-subaccounts.py に以下を追加する:
from vonage import Auth, Vonage
from vonage_subaccounts import ListSubaccountsResponse
client = Vonage(Auth(api_key=VONAGE_API_KEY, api_secret=VONAGE_API_SECRET))
response: ListSubaccountsResponse = client.subaccounts.list_subaccounts()
print(response)コードを実行する
このファイルをあなたのマシンに保存し、実行する:
前提条件
gem install vonagelist-subaccounts.rb という名前のファイルを作成し、以下のコードを追加する:
client = Vonage::Client.new(
  api_key: VONAGE_API_KEY,
  api_secret: VONAGE_API_SECRET
)コードを実行する
このファイルをあなたのマシンに保存し、実行する:
追加クレジット配分
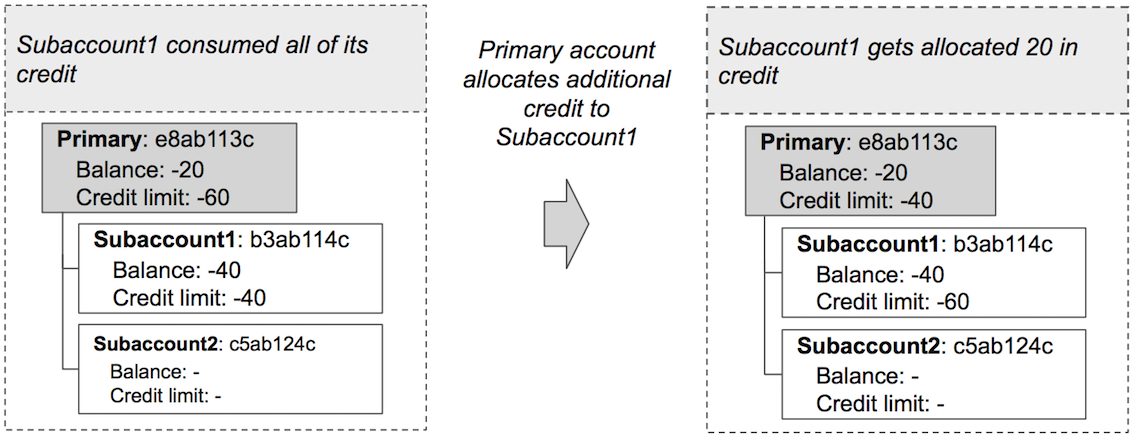
しばらくして、パートナーはエンドカスタマー1(サブアカウント1)がクレジットをすべて使い切り(40のうち40)、これ以上APIコールができないことに気づいた。パートナーは、エンド・カスタマ1が支払いを行うのを待つか(そして今度はVonageに支払いを行い、対応する残高をサブアカウントに移す)、エンド・カスタマ1がVonage APIを使い続けられるようにエンド・カスタマのクレジット・リミットを直ちに増やすかの選択を迫られた。パートナーは追加クレジットを割り当てることにした。パートナーには 40 = |-60| - |-20| の利用可能クレジットがあり、20 をサブアカウントに割り当てることにしました。これは以下の図に示されています:
月末残高振替
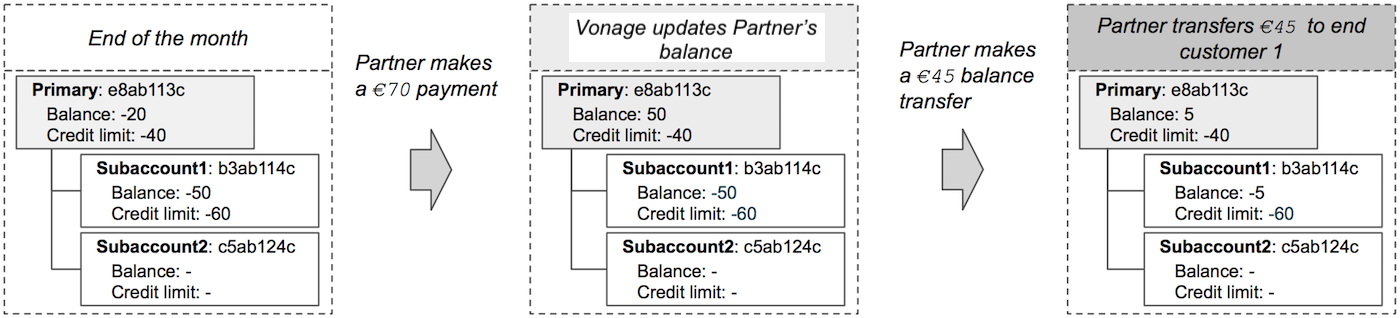
月末にパートナーはVonageから|-20| + |-50| = 70ユーロの請求書を受け取った(すべてのアカウントからのすべての支出に対して)。エンドカスタマ1(サブアカウント1)は、使用した50ユーロのうち45ユーロをカバーした。したがって、パートナーは€45をサブアカウント1の残高に送金した。これは以下の図に示されている:
次のコードは、残高をSubaccountsに移す方法を示しています:
コードを書く
transfer-balance.sh に以下を追加する:
curl -X "POST" "https://api.nexmo.com/accounts/$VONAGE_API_KEY/balance-transfers" -u $VONAGE_API_KEY:$VONAGE_API_SECRET \
-H "Content-Type: application/json" \
-d $'{"from":"'$VONAGE_API_KEY'", "to":"'$SUBACCOUNT_KEY'", "amount": '$AMOUNT'}'コードを実行する
このファイルをあなたのマシンに保存し、実行する:
前提条件
npm install @vonage/subaccountstransfer-balance.js という名前のファイルを作成し、以下のコードを追加する:
const { SubAccounts } = require('@vonage/subaccounts');

const subAccountClient = new SubAccounts({
  apiKey: VONAGE_API_KEY,
  apiSecret: VONAGE_API_SECRET,
});コードを書く
transfer-balance.js に以下を追加する:
subAccountClient.transferBalance({
from: VONAGE_API_KEY,
to: SUBACCOUNT_KEY,
amount: AMOUNT,
})
.then((balanceTransfer) => console.log(balanceTransfer))
.catch((error) => console.error(error));コードを実行する
このファイルをあなたのマシンに保存し、実行する:
前提条件
build.gradle に以下を追加する:
implementation 'com.vonage:server-sdk-kotlin:2.1.1'TransferBalance という名前のファイルを作成し、main メソッドに以下のコードを追加する:
val client = Vonage {
    apiKey(VONAGE_API_KEY)
    apiSecret(VONAGE_API_SECRET)
}コードを書く
TransferBalance ファイルのmain メソッドに以下を追加する:
val receipt = client.subaccounts.transferBalance(
from = VONAGE_API_KEY,
to = SUBACCOUNT_KEY,
amount = SUBACCOUNT_BALANCE_AMOUNT
)コードを実行する
Gradle用のアプリケーション プラグインを使うことで、アプリケーションの実行を簡単にすることができます。build.gradle を以下のように更新する:
apply plugin: 'application'
mainClassName = project.hasProperty('main') ? project.getProperty('main') : ''以下のgradle コマンドを実行し、com.vonage.quickstart.kt.subaccounts をTransferBalance を含むパッケージに置き換えてアプリケーションを実行する:
前提条件
build.gradle に以下を追加する:
implementation 'com.vonage:server-sdk:9.3.1'TransferBalance という名前のファイルを作成し、main メソッドに以下のコードを追加する:
VonageClient client = VonageClient.builder()
		.apiKey(VONAGE_API_KEY)
		.apiSecret(VONAGE_API_SECRET)
.build();コードを書く
TransferBalance ファイルのmain メソッドに以下を追加する:
MoneyTransfer receipt = client.getSubaccountsClient().transferBalance(
MoneyTransfer.builder()
.from(VONAGE_API_KEY).to(SUBACCOUNT_KEY)
.amount(SUBACCOUNT_BALANCE_AMOUNT).build()
);
System.out.println("Transfer successful: "+receipt.getId());コードを実行する
Gradle用のアプリケーション プラグインを使うことで、アプリケーションの実行を簡単にすることができます。build.gradle を以下のように更新する:
apply plugin: 'application'
mainClassName = project.hasProperty('main') ? project.getProperty('main') : ''以下のgradle コマンドを実行し、com.vonage.quickstart.subaccounts をTransferBalance を含むパッケージに置き換えてアプリケーションを実行する:
前提条件
Install-Package VonageTransferBalanceRequest.cs という名前のファイルを作成し、以下のコードを追加する:
using Vonage;
using Vonage.Request;
using Vonage.SubAccounts.TransferAmount;TransferBalanceRequest.cs に以下を追加する:
var credentials = Credentials.FromApiKeyAndSecret(VONAGE_API_KEY, VONAGE_API_SECRET);
var client = new VonageClient(credentials);コードを書く
TransferBalanceRequest.cs に以下を追加する:
var request = TransferAmountRequest.Build()
.WithFrom(VONAGE_API_KEY)
.WithTo(SUBACCOUNT_KEY)
.WithAmount(amount)
.Create();
var response = await client.SubAccountsClient.TransferBalanceAsync(request);前提条件
composer require vonage/clienttransfer-balance.php という名前のファイルを作成し、以下のコードを追加する:
$basic = new \Vonage\Client\Credentials\Basic(VONAGE_API_KEY, VONAGE_API_SECRET);
$client = new \Vonage\Client($basic);コードを書く
transfer-balance.php に以下を追加する:
$transferRequest = new \Vonage\Subaccount\Request\TransferBalanceRequest(VONAGE_API_KEY);
$transferRequest
    ->setFrom(VONAGE_API_KEY)
    ->setTo(SUBACCOUNT_KEY)
    ->setAmount(250);

$subaccount = $client->subaccount()->makeBalanceTransfer($transferRequest);コードを実行する
このファイルをあなたのマシンに保存し、実行する:
前提条件
pip install vonage python-dotenvコードを書く
transfer-balance.py に以下を追加する:
from vonage import Auth, Vonage
from vonage_subaccounts import Transfer, TransferRequest
client = Vonage(Auth(api_key=VONAGE_API_KEY, api_secret=VONAGE_API_SECRET))
request = TransferRequest(
from_=VONAGE_API_KEY, to=SUBACCOUNT_KEY, amount=SUBACCOUNT_BALANCE_AMOUNT
)
transfer: Transfer = client.subaccounts.transfer_balance(request)
print(transfer)コードを実行する
このファイルをあなたのマシンに保存し、実行する:
前提条件
gem install vonagetransfer-balance.rb という名前のファイルを作成し、以下のコードを追加する:
client = Vonage::Client.new(
  api_key: VONAGE_API_KEY,
  api_secret: VONAGE_API_SECRET
)コードを書く
transfer-balance.rb に以下を追加する:
client.subaccounts.transfer_balance(
from: VONAGE_API_KEY,
to: SUBACCOUNT_KEY,
amount: AMOUNT
)コードを実行する
このファイルをあなたのマシンに保存し、実行する:
サブアカウントの一時停止
パートナーは、サブアカウントの支出をコントロールできることを気に入り、個々の残高と30ユーロのクレジットをエンドカスタマー2(サブアカウント2)に割り当てることにした。サブアカウントの支出を監視していたパートナーは、サブアカウント2が残高の25ユーロを消費していることに気づいた。サブアカウント2の支出率に憂慮したパートナーは、サブアカウント2を一時的に停止することにした。サブアカウントを一時停止するコードをここに示す:
コードを書く
suspend-subaccount.sh に以下を追加する:
curl -X "PATCH" "https://api.nexmo.com/accounts/$VONAGE_API_KEY/subaccounts/$SUBACCOUNT_KEY" -u $VONAGE_API_KEY:$VONAGE_API_SECRET \
-H "Content-Type: application/json" \
-d $'{"suspended":true}'コードを実行する
このファイルをあなたのマシンに保存し、実行する:
前提条件
npm install @vonage/subaccountssuspend-subaccount.js という名前のファイルを作成し、以下のコードを追加する:
const { SubAccounts } = require('@vonage/subaccounts');

const subAccountClient = new SubAccounts({
  apiKey: VONAGE_API_KEY,
  apiSecret: VONAGE_API_SECRET,
});コードを書く
suspend-subaccount.js に以下を追加する:
subAccountClient.updateSubAccount(
SUBACCOUNT_KEY,
{ suspended: true },
)
.then((subAccount) => console.log(subAccount))
.catch((error) => console.error(error));コードを実行する
このファイルをあなたのマシンに保存し、実行する:
前提条件
build.gradle に以下を追加する:
implementation 'com.vonage:server-sdk-kotlin:2.1.1'SuspendSubaccount という名前のファイルを作成し、main メソッドに以下のコードを追加する:
val client = Vonage {
    apiKey(VONAGE_API_KEY)
    apiSecret(VONAGE_API_SECRET)
}コードを書く
SuspendSubaccount ファイルのmain メソッドに以下を追加する:
val subaccount = client.subaccounts.subaccount(SUBACCOUNT_KEY).suspended(true)コードを実行する
Gradle用のアプリケーション プラグインを使うことで、アプリケーションの実行を簡単にすることができます。build.gradle を以下のように更新する:
apply plugin: 'application'
mainClassName = project.hasProperty('main') ? project.getProperty('main') : ''以下のgradle コマンドを実行し、com.vonage.quickstart.kt.subaccounts をSuspendSubaccount を含むパッケージに置き換えてアプリケーションを実行する:
前提条件
build.gradle に以下を追加する:
implementation 'com.vonage:server-sdk:9.3.1'DeactivateSubaccount という名前のファイルを作成し、main メソッドに以下のコードを追加する:
VonageClient client = VonageClient.builder()
		.apiKey(VONAGE_API_KEY)
		.apiSecret(VONAGE_API_SECRET)
.build();コードを書く
DeactivateSubaccount ファイルのmain メソッドに以下を追加する:
Account subaccount = client.getSubaccountsClient().updateSubaccount(
UpdateSubaccountRequest.builder(SUBACCOUNT_KEY).suspended(true).build()
);コードを実行する
Gradle用のアプリケーション プラグインを使うことで、アプリケーションの実行を簡単にすることができます。build.gradle を以下のように更新する:
apply plugin: 'application'
mainClassName = project.hasProperty('main') ? project.getProperty('main') : ''以下のgradle コマンドを実行し、com.vonage.quickstart.subaccounts をDeactivateSubaccount を含むパッケージに置き換えてアプリケーションを実行する:
前提条件
Install-Package VonageSuspendAccountRequest.cs という名前のファイルを作成し、以下のコードを追加する:
using Vonage;
using Vonage.Request;
using Vonage.SubAccounts.UpdateSubAccount;SuspendAccountRequest.cs に以下を追加する:
var credentials = Credentials.FromApiKeyAndSecret(VONAGE_API_KEY, VONAGE_API_SECRET);
var client = new VonageClient(credentials);コードを書く
SuspendAccountRequest.cs に以下を追加する:
var request = UpdateSubAccountRequest.Build().WithSubAccountKey(SUBACCOUNT_KEY)
.SuspendAccount()
.Create();
var response = await client.SubAccountsClient.UpdateSubAccountAsync(request);前提条件
composer require vonage/clientsuspend-subaccount.php という名前のファイルを作成し、以下のコードを追加する:
$basic = new \Vonage\Client\Credentials\Basic(VONAGE_API_KEY, VONAGE_API_SECRET);
$client = new \Vonage\Client($basic);コードを書く
suspend-subaccount.php に以下を追加する:
$account = new \Vonage\Subaccount\SubaccountObjects\Account();
$account->setSuspended(true);
$subaccount = $client->subaccount()->updateSubaccount(VONAGE_API_KEY, SUBACCOUNT_KEY, $account);コードを実行する
このファイルをあなたのマシンに保存し、実行する:
前提条件
pip install vonage python-dotenvコードを書く
suspend-subaccount.py に以下を追加する:
from vonage import Auth, Vonage
from vonage_subaccounts import ModifySubaccountOptions, Subaccount
client = Vonage(Auth(api_key=VONAGE_API_KEY, api_secret=VONAGE_API_SECRET))
response: Subaccount = client.subaccounts.modify_subaccount(
subaccount_api_key=SUBACCOUNT_KEY,
options=ModifySubaccountOptions(suspended=True),
)
print(response)コードを実行する
このファイルをあなたのマシンに保存し、実行する:
前提条件
gem install vonagesuspend-subaccount.rb という名前のファイルを作成し、以下のコードを追加する:
client = Vonage::Client.new(
  api_key: VONAGE_API_KEY,
  api_secret: VONAGE_API_SECRET
)コードを書く
suspend-subaccount.rb に以下を追加する:
client.subaccounts.update(
subaccount_key: SUBACCOUNT_KEY,
suspended: true
)コードを実行する
このファイルをあなたのマシンに保存し、実行する:
Subaccountの再有効化
サブアカウント2との協議の結果、パートナーはサブアカウント2のアカウントを再有効化することを決定します。これは以下のコードで実現できる:
コードを書く
reactivate-subaccount.sh に以下を追加する:
curl -X "PATCH" "https://api.nexmo.com/accounts/$VONAGE_API_KEY/subaccounts/$SUBACCOUNT_KEY" -u $VONAGE_API_KEY:$VONAGE_API_SECRET \
-H "Content-Type: application/json" \
-d $'{"suspended":false}'コードを実行する
このファイルをあなたのマシンに保存し、実行する:
前提条件
npm install @vonage/subaccountsreactivate-subaccount.js という名前のファイルを作成し、以下のコードを追加する:
const { SubAccounts } = require('@vonage/subaccounts');

const subAccountClient = new SubAccounts({
  apiKey: VONAGE_API_KEY,
  apiSecret: VONAGE_API_SECRET,
});コードを書く
reactivate-subaccount.js に以下を追加する:
subAccountClient.updateSubAccount(
SUBACCOUNT_KEY,
{ suspended: false },
)
.then((subAccount) => console.log(subAccount))
.catch((error) => console.error(error));コードを実行する
このファイルをあなたのマシンに保存し、実行する:
前提条件
build.gradle に以下を追加する:
implementation 'com.vonage:server-sdk-kotlin:2.1.1'ReactivateSubaccount という名前のファイルを作成し、main メソッドに以下のコードを追加する:
val client = Vonage {
    apiKey(VONAGE_API_KEY)
    apiSecret(VONAGE_API_SECRET)
}コードを書く
ReactivateSubaccount ファイルのmain メソッドに以下を追加する:
val subaccount = client.subaccounts.subaccount(SUBACCOUNT_KEY).suspended(false)コードを実行する
Gradle用のアプリケーション プラグインを使うことで、アプリケーションの実行を簡単にすることができます。build.gradle を以下のように更新する:
apply plugin: 'application'
mainClassName = project.hasProperty('main') ? project.getProperty('main') : ''以下のgradle コマンドを実行し、com.vonage.quickstart.kt.subaccounts をReactivateSubaccount を含むパッケージに置き換えてアプリケーションを実行する:
前提条件
build.gradle に以下を追加する:
implementation 'com.vonage:server-sdk:9.3.1'ReactivateSubaccount という名前のファイルを作成し、main メソッドに以下のコードを追加する:
VonageClient client = VonageClient.builder()
		.apiKey(VONAGE_API_KEY)
		.apiSecret(VONAGE_API_SECRET)
.build();コードを書く
ReactivateSubaccount ファイルのmain メソッドに以下を追加する:
Account subaccount = client.getSubaccountsClient().updateSubaccount(
UpdateSubaccountRequest.builder(SUBACCOUNT_KEY).suspended(false).build()
);コードを実行する
Gradle用のアプリケーション プラグインを使うことで、アプリケーションの実行を簡単にすることができます。build.gradle を以下のように更新する:
apply plugin: 'application'
mainClassName = project.hasProperty('main') ? project.getProperty('main') : ''以下のgradle コマンドを実行し、com.vonage.quickstart.subaccounts をReactivateSubaccount を含むパッケージに置き換えてアプリケーションを実行する:
前提条件
Install-Package VonageEnableAccountRequest.cs という名前のファイルを作成し、以下のコードを追加する:
using Vonage;
using Vonage.Request;
using Vonage.SubAccounts.UpdateSubAccount;EnableAccountRequest.cs に以下を追加する:
var credentials = Credentials.FromApiKeyAndSecret(VONAGE_API_KEY, VONAGE_API_SECRET);
var client = new VonageClient(credentials);コードを書く
EnableAccountRequest.cs に以下を追加する:
var request = UpdateSubAccountRequest.Build().WithSubAccountKey(SUBACCOUNT_KEY)
.EnableAccount()
.Create();
var response = await client.SubAccountsClient.UpdateSubAccountAsync(request);前提条件
composer require vonage/clientreactivate-subaccount.php という名前のファイルを作成し、以下のコードを追加する:
$basic = new \Vonage\Client\Credentials\Basic(VONAGE_API_KEY, VONAGE_API_SECRET);
$client = new \Vonage\Client($basic);コードを書く
reactivate-subaccount.php に以下を追加する:
$account = new \Vonage\Subaccount\SubaccountObjects\Account();
$account->setSuspended(false);
$subaccount = $client->subaccount()->updateSubaccount(VONAGE_API_KEY, SUBACCOUNT_KEY, $account);コードを実行する
このファイルをあなたのマシンに保存し、実行する:
前提条件
pip install vonage python-dotenvコードを書く
reactivate-subaccount.py に以下を追加する:
from vonage import Auth, Vonage
from vonage_subaccounts import ModifySubaccountOptions, Subaccount
client = Vonage(Auth(api_key=VONAGE_API_KEY, api_secret=VONAGE_API_SECRET))
response: Subaccount = client.subaccounts.modify_subaccount(
subaccount_api_key=SUBACCOUNT_KEY,
options=ModifySubaccountOptions(suspended=False),
)
print(response)コードを実行する
このファイルをあなたのマシンに保存し、実行する:
前提条件
gem install vonagereactivate-subaccount.rb という名前のファイルを作成し、以下のコードを追加する:
client = Vonage::Client.new(
  api_key: VONAGE_API_KEY,
  api_secret: VONAGE_API_SECRET
)コードを書く
reactivate-subaccount.rb に以下を追加する:
client.subaccounts.update(
  subaccount_key: SUBACCOUNT_KEY,
  suspended: false
)コードを実行する
このファイルをあなたのマシンに保存し、実行する:
概要
このトピックでは、典型的なシナリオでエンドカスタマーを管理するために Subaccounts API を使用する方法について見てきました。