
シェア:
クリスはデベロッパー・リレーションズ・ツーリング・マネージャーで、お気に入りのツールを開発するチームを率いています。彼は15年以上、クライアントワークからビッグデータ、大規模システムに至るまで、様々な言語と種類のプロジェクトでプログラミングをしてきました。オハイオ州に住み、家族と過ごしたり、ビデオゲームやTTRPGゲームをしたりしている。
ステップバイステップ:MCPでAIエージェントにVonage APIを追加する
質問に答えるだけではない、独自のAIチャットボットを作りたいと思ったことはありませんか?もしチャットボットがあなたのアカウントの残高をチェックしたり、あなたに代わってメッセージを送ったり、他のサービスとやり取りしたりできるとしたらどうでしょう?今日、私たちが学ぶのはまさにこれです。 AnthropicのClaude APIと新しいVonage Model Context Protocol (MCP) API Bindings Server (別名:Tooling Server)を使って構築する方法を学びます。
このチュートリアルでは、あなたと会話をしながら外部ツールも使用できるチャットボットを作成します。 ツーリングMCPサーバーと統合してアカウント残高をチェックする例です。
TL;DR:完全な動作例は GitHub リポジトリ.
始める前に、あなたが持っていることを確認してください:
Node.jsのインストール(バージョン14以上)
JavaScriptの基礎知識
Vonage API アカウント (残高確認の例)
クロードは、自然言語の理解と生成を得意とするAnthropicのAIアシスタントです。APIにより、Claudeの機能をアプリケーションに統合することができます。他のAI APIとは異なり、Claudeは特に優れています:
指示に正確に従う
複雑な推論タスクの処理
ツールや関数呼び出しの操作
これまでにも MCPサーバーとは何かについては、過去にMCPとは、AIアシスタントを外部のデータソースやツールに接続するための標準化された方法です。AIアシスタントをデータベース、API、アプリケーションのような他のサービスと "会話 "させるユニバーサル・アダプターだと考えてほしい。
MCPは、サービスごとにカスタム統合を記述する代わりに、AIアシスタントがツールを自動的に発見し、対話するために使用できる標準インターフェースを提供する。
コーディングを始める前に、すべてがどのようにつながっているかを視覚化してみましょう。クロードと話すために、チャットボットはすべての可動部分を組織化する必要があります:
あなた(ユーザー)は次のようなメッセージを入力します: "Vonageアカウントの残高を確認してもらえますか?"
チャットボットは、利用可能なMCPツールのリストとともに、そのメッセージをクロードに送る。
クロード(AI)はあなたのメッセージを読み、ツールが役に立つかどうかを判断する。
もしそうなら、特別な で応答する。命令を返す。
そうでなければ、直接答えるだけだ。
チャットボットはそのツール使用要求を検出し、一致するMCPツール(この場合は「balance」)を実行し、結果を収集する。
MCPサーバーは裏でVonage APIを呼び出し、残高を取得します。
結果はクロードに返され、クロードは自然に答える:「現在の残高は15.67米ドルです。
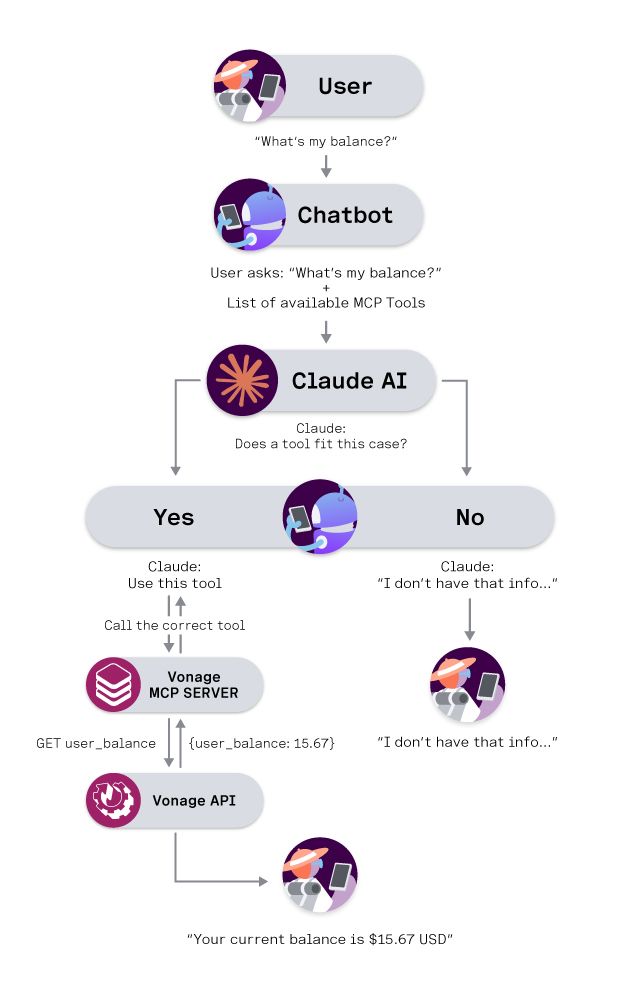 Visual diagram showing how a user request moves through the chatbot, Claude AI, and the Vonage MCP Server to retrieve a real account balance using the Vonage API.
まずはチャットボットの構造から見ていきましょう。ここでは、コアとなるコンポーネントと機能を説明しますが、いくつかの機能が省略されていることにお気づきでしょう。にジャンプしてください。 チャットボットの実行方法 セクションに進んでください。
import Anthropic from '@anthropic-ai/sdk';
import { Client } from '@modelcontextprotocol/sdk/client/index.js';
import { StdioClientTransport } from '@modelcontextprotocol/sdk/client/stdio.js';
import readline from 'readline';
import { promisify } from 'util';

class ClaudeChatbot {
  constructor() {
    // Initialize the Anthropic API client
    this.anthropic = new Anthropic({
      apiKey: process.env.ANTHROPIC_API_KEY
    });

    // Set up command line interface
    this.rl = readline.createInterface({
      input: process.stdin,
      output: process.stdout
    });

    this.question = promisify(this.rl.question).bind(this.rl);
    this.conversationHistory = [];

    // MCP-related properties
    this.mcpClients = new Map();
    this.availableTools = new Map();
    this.model = 'claude-3-5-sonnet-20241022';
  }
}
何が起きているんだ?
小さなクラス (クロード・チャットボット)を作っています。これはClaude APIに接続し、ユーザーの入力を読み取るために readlineのようなコマンドラインツールをセットアップし、私たちのコードが知っているすべてのMCPサーバーを保存する場所をセットアップします。
私たちのチャットボットの魔法は、MCPサーバーに接続する能力にあります。その方法は以下の通りです:
async loadMcpServers() {
  try {
    const configPath = path.join(process.cwd(), 'mcp-config.json');
    const configData = await fs.readFile(configPath, 'utf8');
    const config = JSON.parse(configData);

    console.log('📡 Connecting to MCP servers...');

    for (const [serverName, serverConfig] of Object.entries(config.mcpServers)) {
      await this.connectMcpServer(serverName, serverConfig);
    }

    console.log(`✅ Connected to ${this.mcpClients.size} server(s)`);
  } catch (error) {
    console.log('⚠️  No MCP configuration found, continuing without tools');
  }
}

async connectMcpServer(serverName, config) {
  try {
    // Create a transport layer for communication
    const transport = new StdioClientTransport({
      command: config.command,
      args: config.args,
      env: { ...process.env, ...config.env }
    });

    // Create an MCP client
    const client = new Client({
      name: `claude-chatbot-${serverName}`,
      version: '1.0.0'
    }, {
      capabilities: { tools: {} }
    });

    // Connect and discover available tools
    await client.connect(transport);
    const toolsResponse = await client.listTools();

    this.mcpClients.set(serverName, client);

    // Register each tool for later use
    for (const tool of toolsResponse.tools) {
      this.availableTools.set(tool.name, {
        serverName,
        tool,
        client
      });
    }
  } catch (error) {
    console.log(`⚠️  Failed to connect to ${serverName}: ${error.message}`);
  }
}
設定ファイルを読み込む、 mcp-config.jsonどのサーバーを使い、どのように接続するかを教えてくれる。各サーバーに対して StdioClientTransportオブジェクトを作成します。次にMCPサーバーに接続し、すべてのツールを取得するために listTools()メソッドを呼び出して、使用可能なすべてのツールを取得します。これらのツールはすべて保存され、後で使用できるようになります。
Vonage残高確認ツールを使用するには、MCPサーバーを設定する必要があります。サンプルを編集し、Vonage API KeyとSecretを追加します:
{
  "mcpServers": {
    "vonage": {
      "command": "npx",
      "args": ["-y", "@vonage/vonage-mcp-server-api-bindings"],
      "env": {
        "VONAGE_API_KEY": "abcd",
        "VONAGE_API_SECRET": "1234"
      }
    }
  }
}コンフィギュレーションファイルは、MCPトランスポートに特定のパッケージを実行するよう指示する、 @vonage/vonage-mcp-server-api-bindingsを実行するように指示します。また、VONAGE_API_KEYとVONAGE_API_SECRETという2つの環境変数を指定し、MCPサーバーに送信します。口座残高の確認に必要なのはAPIキーとシークレットだけですが、他のAPIではアプリケーションIDと秘密鍵を渡す必要があるかもしれません。
クロードに我々のツールを認識させ、それを使わせる:
async getClaudeResponse() {
  // Prepare the list of available tools for Claude
  const tools = this.availableTools.size > 0 ?
    Array.from(this.availableTools.values()).map(toolInfo => ({
      name: toolInfo.tool.name,
      description: toolInfo.tool.description,
      input_schema: toolInfo.tool.inputSchema
    })) : undefined;

  const messageParams = {
    model: this.model,
    max_tokens: 1000,
    messages: this.conversationHistory
  };

  // If we have tools, tell Claude about them
  if (tools && tools.length > 0) {
    messageParams.tools = tools;
  }

  const message = await this.anthropic.messages.create(messageParams);

  // Check if Claude wants to use any tools
  if (message.content.some(content => content.type === 'tool_use')) {
    return await this.handleToolUse(message);
  }

  return message.content[0].text;
}
getClaudeResponse()はMCPサーバーのリストとその設定、会話履歴をClaudeに送信します。MCPサーバーは、私たちのコードによって直接呼び出されるのではなく、バックエンドのLLMがMCPサーバーを呼び出す必要があるかどうかを判断するために渡されます。Claudeがツールを使用する必要があると判断した場合、ClaudeはMCPサーバを呼び出す必要があるかどうかを判断するためのメッセージを返す。 tool_use型のメッセージを返す。そのようなメッセージを受け取ったら、それを handleToolUse()メソッドに渡す。
クロードがメッセージに関連するツールがないと判断した場合、メッセージを変更せずに返すだけだ。
クロードが道具を使うと決めると、こうなる:
async handleToolUse(message) {
  let responseText = '';
  const toolResults = [];

  for (const content of message.content) {
    if (content.type === 'text') {
      responseText += content.text;
    } else if (content.type === 'tool_use') {
      console.log(`🛠️  Using tool: ${content.name}`);

      try {
        const toolInfo = this.availableTools.get(content.name);

        // Execute the tool through the MCP client
        const result = await toolInfo.client.callTool({
          name: content.name,
          arguments: content.input
        });

        toolResults.push({
          tool_use_id: content.id,
          content: result.content
        });

      } catch (error) {
        console.log(`❌ Tool ${content.name} failed: ${error.message}`);
        toolResults.push({
          tool_use_id: content.id,
          content: `Error: ${error.message}`,
          is_error: true
        });
      }
    }
  }

  // Send the tool results back to Claude for final response
  if (toolResults.length > 0) {
    // Add Claude's tool-use message to history
    this.conversationHistory.push({
      role: 'assistant',
      content: message.content
    });

    // Add tool results to history
    this.conversationHistory.push({
      role: 'user',
      content: toolResults.map(result => ({
        type: 'tool_result',
        tool_use_id: result.tool_use_id,
        content: result.content,
        is_error: result.is_error || false
      }))
    });

    // Get Claude's final response incorporating the tool results
    const followUpMessage = await this.anthropic.messages.create({
      model: this.model,
      max_tokens: 1000,
      messages: this.conversationHistory
    });

    return responseText + followUpMessage.content[0].text;
  }

  return responseText;
}
ツールを呼び出す場合は、クロードから返されたメッセージを解析し、クロードが呼び出すべきだと考えているツールを見つける。そして、クロードが私たちが呼び出すべきだと考えているツールのリストを繰り返し、各ツールからの応答を収集する。これらすべてがパッケージ化され、最終的なレスポンスを提供するためにクロードに送り返される。
まず、スターター・プロジェクトのコピーを作り、中に移動する:
git clone git@github.com:Vonage-Community/blog-mcp-javascript-api_tooling_chatbot.git

cd blog-mcp-javascript-api_tooling_chatbot
の名前を変更する。 に変更します。を mcp-config.json.そしてプレースホルダーをあなたのVonage認証情報で置き換える。
npm install
コマンドラインから、プロジェクトにAnthropic API Keyへのアクセス権を与えます:
export ANTHROPIC_API_KEY=your_anthropic_api_key_here>> 注意:無料のアントラホピック・ティアーをご利用の場合、最新モデルにアクセスできない可能性があります。CLAUDE_MODELを更新する必要があります。 を更新する必要があります。を更新する必要があります。
node chatbot.js
新しいチャットボットとの会話はこんな感じです:
 Animated terminal demo showing a ClaudeChatbot using the Vonage MCP Server to check a user's account balance in real time.
その短いやり取りの中で、あなたのチャットボットはワークフロー全体を処理しました:クロードはあなたの要求を理解し、MCPを通じてバランスツールを起動し、Vonage APIから実際のデータを取得しました。
この方法にはいくつかの利点がある:
チャットボットのコードは会話管理に集中している
MCPサーバーは、外部APIとの統合の複雑さを処理します。
クロードはいつ、どのように道具を使うかというインテリジェンスを扱う
気象データを追加したいですか?気象MCPサーバーを追加するだけ
データベースへのアクセスが必要ですか?データベースMCPサーバーを追加する
コアとなるチャットボットのコードを変更する必要はありません。
MCPは異なるサービス間で一貫したインターフェイスを提供
ツールは自動的に検出され、文書化される
エラー処理の標準化
クロードが工具の必要性を自動的に判断
複雑なタスクのために複数のツールを連鎖させることができる
何をしているのかを自然言語で説明してくれる。
おめでとうございます!会話だけでなく、ツールを通じて外部サービスと対話できるAIチャットボットができましたね。これは、MCPサーバーを持つほぼすべてのサービスと統合するために拡張できる強力なパターンです。
AnthropicのClaude APIとModel Context Protocolの組み合わせは、実際に以下のことができるAIアシスタントを構築するための柔軟で拡張可能なプラットフォームを作り出します。 できるできるAIアシスタントを構築するための柔軟で拡張可能なプラットフォームを構築します。
主な収穫
クロードのAPIインテリジェントな会話とツール使用の意思決定を提供
MCPAIアシスタントが外部サービスと接続する方法を標準化
ツール統合接続を設定すると自動的に行われる
このアーキテクチャは拡張性がある- コアコードを変更せずに新しい機能を追加できる
この基礎から始めて、いろいろなMCPサーバーを使って、どんなAIアシスタントを作れるか試してみてください。可能性は無限です!