
シェア:
Benjamin AronovはVonageの開発者支援者です。彼はRuby on Railsのバックグラウンドを持つ実績のあるコミュニティ・ビルダーです。Benjaminは故郷であるテルアビブのビーチを楽しんでいる。テルアビブを拠点に、世界最高のスタートアップの創設者たちと出会い、学ぶことができる。技術以外では、完璧なパン・オ・ショコラを求めて世界中を旅するのが好き。
How to Make Outbound Phone Calls with Ruby on Rails
所要時間:6 分
Want to make outbound phone calls in Ruby on Rails? With the Vonage Voice API, you can build a programmatic calling solution that supports text-to-speech, call recording, and live voice interactions in just a few lines of code.
This guide demonstrates how to send outbound text-to-speech phone calls using Ruby on Rails and the Vonage SDK.
TL;DR Skip ahead and find all the Quickstart code on GitHub
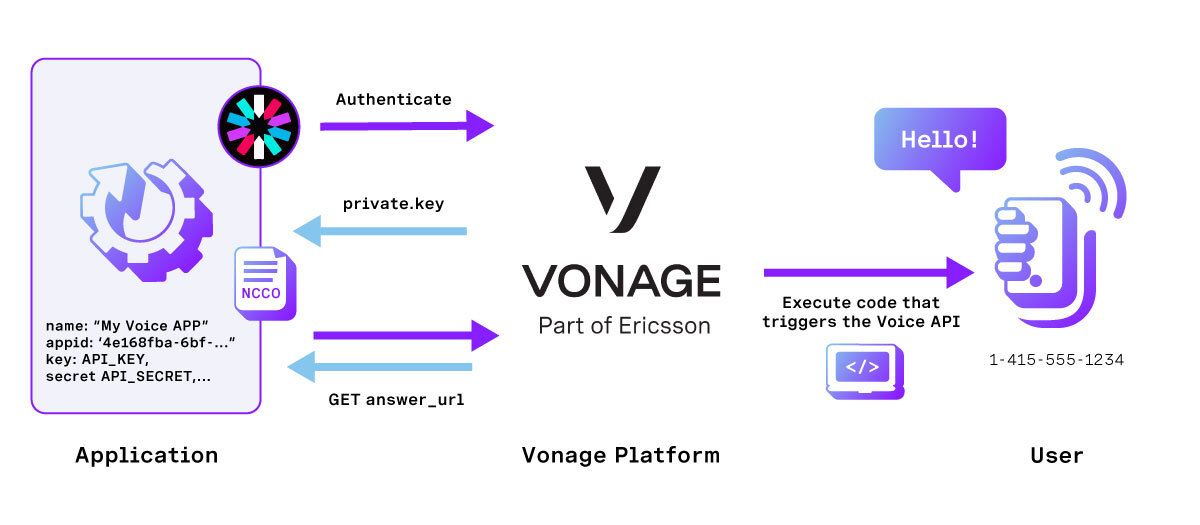 Diagram showing how an application authenticates with the Vonage Voice API to initiate a voice call to a user, using NCCO instructions and private key authentication.
Ruby and Rails installed on your machine. For any questions about Rails conventions, the documentation is quite thorough.
A Vonage API account.
A Vonage Virtual Number with voice capabilities.
バーチャル電話番号を購入するには APIダッシュボードにアクセスし、以下の手順に従ってください。
 Purchase a phone number
あなたの APIダッシュボード
BUILD & MANAGE > Numbers > Buy Numbersを開きます。
必要な属性を選択し、検索をクリックします。
ご希望の番号の横にある購入ボタンをクリックし、購入を確定する。
バーチャルナンバーを購入したことを確認するには、左側のナビゲーションメニューの「BUILD & MANAGE」から「Numbers」、「Your Numbers」の順にクリックします。
If you haven’t completed the previous articles, you’ll need to create a new Rails app and do a little bit of setup. If you already did the setup, skip ahead to the How to Set Up Environment Variables section.
Start by generating a new Rails application:
rails new vonage-voice-quickstartNavigate into the project directory:
cd vonage-voice-quickstart
Edit the Gemfile and add the Vonage SDK along with dotenv for environment variable management:
gem 'vonage'
gem 'dotenv-rails', groups: [:development, :test]Now, install the dependencies:
bundle install
Vonage will need to know what to do when a call is answered, and we’ll tell it with the information in the answer_url we provide in our NCCO. Don’t worry; more on that later. For now, you just need to understand that our Ruby on Rails application will run in development on port 3000, so we can access it locally at localhost:3000. However, that only works on our computer! We need to back our answer_url accessible to Vonage too. You can use ngrok to expose your local server publicly over HTTP in a safe way. So now, in a separate tab from where you will run your Rails server, open an ngrok tunnel on port 3000.
ngrok http 3000Add your ngrok URL as a config.host in your development.rb file. We’ll use the environment variable VONAGE_SERVER_HOSTNAME, to make our app more dynamic. We’ll define it later in the tutorial.
# config/environments/development.rb

Rails.application.configure do
config.hosts << ENV['VONAGE_SERVER_HOSTNAME']For more help, see how to get started and use ngrok in Rails.
アプリケーションを作成するには アプリケーションの作成ページでアプリケーションの名前を定義します。

Webhooksを使用するAPIを使用する場合は、秘密鍵が必要です。Generate public and private key "をクリックすると、自動的にダウンロードが始まります。この鍵は紛失すると再ダウンロードできません。この鍵は紛失しても再ダウンロードできません。 private_<あなたのアプリID>.key.この鍵はAPIコールの認証に使用できます。 注意:アプリケーションを保存するまで、キーは機能しません。
必要な機能(Voice、Messages、RTCなど)を選択し、必要なWebhook(イベントURL、応答URL、受信メッセージURLなど)を提供します。これらはチュートリアルで説明します。
保存してデプロイするには、"Generate new application "をクリックして設定を確定します。これでアプリケーションはVonage APIで使用する準備が整いました。
For this tutorial, turn on the Voice capability, and add your ngrok URLs in the webhook section. See the Enable Voice Capabilities section below to see how it should look.
Make sure to generate a private.key, click ‘Generate public and private key’. This will download a private.key file to your computer. Then, move the private.key file to the root of your Rails application.
When your application is created, take note of the application ID. You’ll need the application ID in the Environment Variables step.
With ngrok running, you can now enable the Voice API on your Vonage application. Toggle on the Voice section. You can add placeholder URLs for the webhooks for now. We will update these in further blog posts.
Answer URL: https://example.com/inbound_calls
Event URL: https://example.com/call_events
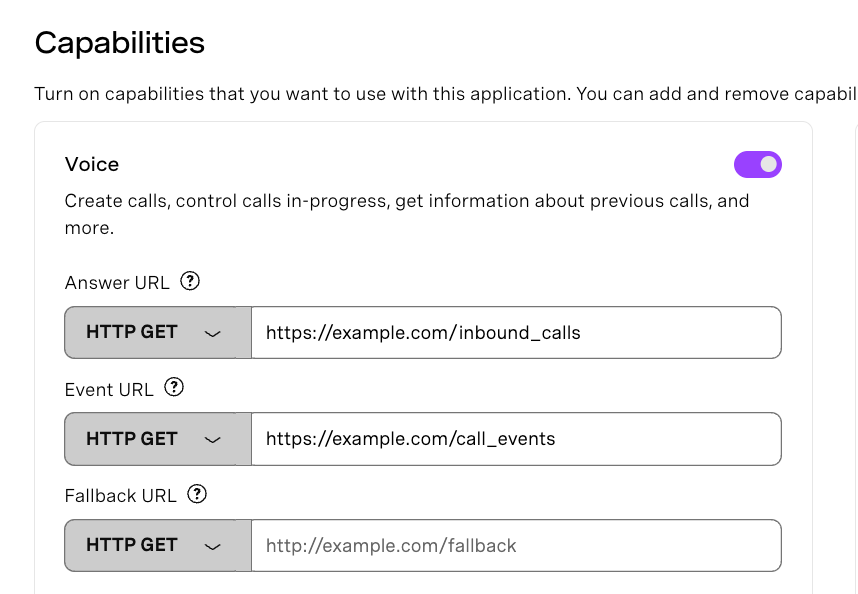 Vonage Voice API configuration screen showing Answer, Event, and Fallback URLs for handling inbound calls and call events
Create a .env file and add your Vonage credentials:
# .env

VONAGE_APPLICATION_ID='XXXX'
VONAGE_PRIVATE_KEY='./private.key'
VONAGE_SERVER_HOSTNAME='XXXXXX.ngrok.appKeep Your Credentials Secure>> Never commit .env files to your repository! Make sure .env and private.key is in your .gitignore.
For more help on ngrok, see how to get started and use ngrok in Rails.
Now, we’ll need to create our Call model, which defines its attributes and how they are stored in the database. We will use the Ruby on Rails generator to generate our models and generate our controllers.
We’ll need 6 fields:
to: the recipient of the Callfrom: the sender of the Calltext: the content of a text-to-speech Calluuid: the unique identifier of a single Call instance (an individual leg of a phone call)status: whether a Call has been successfully delivered or not. See more information in the API Referenceconversation_uuid: the unique identifier for an entire conversation, which may involve multiple phone call legs (each participant on a phone call has a unique uuid, the conversation_uuid groups them together)
is_inbound: whether the Call is sent by our application or received by our application, this will be important in the following blog posts
Run the following Rails generator and migrate:
rails g model Call to:string from:string text:text uuid:string status:string is_inbound:boolean conversation_uuid:stringLet’s create our controller to handle our logic.
rails g controller OutboundCalls new create showAnd we’ll need to update our database with the new model.
rails db:migrateLastly, let’s add our routes for outbound calls.
# config/routes.rb

Rails.application.routes.draw do
  resources :outbound_calls, only: [:new, :create, :show]
	...previous routes...
end
To use the Ruby client and the Voice API, we’ll need to initialize an instance with our Vonage credentials stored in our environment file. In addition to the Voice API, the Ruby Client allows us easy access to 15+ Vonage APIs. You can learn more about the supported APIs.
Before enabling the Ruby client in a full Rails application, let’s see how we could use it more generally in Ruby code. To use the client, we’ll just need to initialize an instance with our application information stored in our environment file.
vonage = Vonage::Client.new(
      application_id: ENV["VONAGE_APPLICATION_ID"],
      private_key: ENV["VONAGE_PRIVATE_KEY"]
    )
Now that our client is initialized, creating an outbound call becomes quite simple. We call the voice method to tell the client to use the Voice API and then call create with the required fields.
The Voice API creates a call with the to and from fields, then when the call is answered, it looks for further instructions in the answer_url. It requires an NCCO call object, which is a json file with options like play a message, connect to another number, accept user input, etc.
Learn more in the Call Control Object Guide.
response = vonage.voice.create(
  to: [{
    type: 'phone',
    number: '447700900000'
  }],
  from: {
    type: 'phone',
    number: '447700900001'
  },
  answer_url: [
    'https://raw.githubusercontent.com/nexmo-community/ncco-examples/gh-pages/text-to-speech.json'
  ]
)
Now that we’ve covered how to use the Vonage Ruby client to make outbound calls, let’s integrate outbound call functionality into our Rails app with a simple form and controller. We’ll need a nice UI to handle the to, from, and text fields. You can copy and add the form to your /app/views/outbound_calls/new.html.erb view and associated CSS.
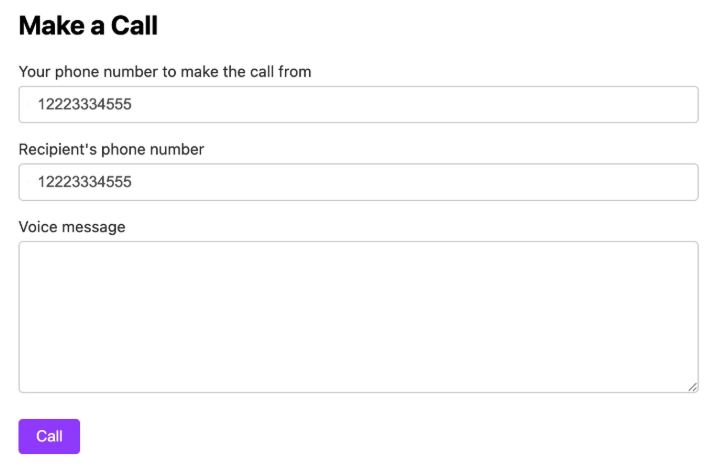 User interface for placing a call using the Vonage Voice API, allowing users to input sender and recipient phone numbers and a voice message.
Now, let’s implement the logic to make our form work. First, we’ll need to create an empty Call instance to load the form in the index. Then when the form is submitted, we call the create method, which saves the Call to our database and then sends it via the make_call method.
See the full outbound_calls_controller.rb file to see how all the code works together.
#app/controllers/outbound_calls_controller.rb


  def index
    @call = Call.new
  end

  def create
    @call = Call.new(safe_params)

    if @call.save
      make_call(@call)
      redirect_to new_outbound_call_url, notice: 'Call initiated'
      flash[:alert] = 'Something went wrong'
      render :new
    end
  end

  private

  def safe_params
    params.require(:call).permit(:to, :from, :text)
  end

end
The make_call method then initiates the phone call with the Voice API. Here, we create a dynamic answer_url, which aligns with our show method.
def make_call(call)
    options = {
      to: [{ type: 'phone', number: call.to }],
      from: { type: 'phone', number: call.from },
      answer_url: ["https://#{ENV['VONAGE_SERVER_HOSTNAME']}/outbound_calls/#{call.id}"]
    }

    response = vonage.voice.create(options)

    call.update(
      uuid: response['uuid'],
      status: response['status']
    ) if response['status'] && response['uuid']
endWhen the API looks inside the show method, it finds the NCCO, which tells it to trigger the robot caller.
  def show
    call = Call.find(params[:id])
    render json: [
      {
        "action": "talk",
        "text": call.text,
        "language": "en-AU",
        "style": 3
      }
    ]
  end
Start your Rails server:
rails sNow, visit:
http://localhost:3000/outbound_calls/new
Fill in the form and press call. You should receive a voice call with the text you entered!
*The from number needs to be a Vonage virtual number
You did it! You set up a Ruby on Rails app to make outbound voice calls. In future posts, we'll handle call events, receive inbound calls, and see more advanced voice interactions.
If you have any questions or suggestions for more Ruby content, send us a message over on the Community Slack. You can also stay in the loop on our developer content and events on X, formerly known as Twitter.