
RCSリッチカードとGeminiでストーリーテリングサービスを構築する
このチュートリアルでは、生成的なAIストーリーテリングサービスを構築する方法を紹介します。 Vonage Messages APIと GoogleのGeminiAIを使用した生成的なAIストーリーテリングサービスの構築方法を紹介します。RCSとは何か、RCSリッチカードメッセージを送受信する方法、そして短いベッドタイムストーリーを生成するためにGeminiを統合する方法を学びます。
私の幼児の就寝時の日課に触発され、何か便利なものを作りたいと思った。そこで、RCSメッセージングとジェミニAIを組み合わせて、シンプルなストーリーテリング・サービスを開発した。
 RCS Story Demonstration
完全なソースコードはVonage Community GitHub リポジトリ.
Node.jsがインストールされているがインストールされていること。
APIトンネリングサービス ngrok.
登録済みの RCSビジネスメッセージング(RBM)エージェント.
A RCS機能付き携帯電話.
VonageアプリケーションでRCSメッセージを送受信するには、登録済みのRBMエージェントとRCS機能を持つ電話が必要です。
Vonage経由のRCSは、現在マネージドアカウントでのみご利用いただけます。ご利用には アカウントマネージャーデベロッパーモードを有効にするには、アカウントマネージャーに連絡する必要があります。
マネージド・アカウントをお持ちでない場合は、下記までご連絡ください。 Vonageセールスチームまでご連絡ください。
RCS(Rich Communication Services): 従来のメッセージングをリッチメディア、ブランドコンテンツ、リードレシートで強化する業界標準。受信者のデバイスやネットワークがRCSをサポートしていない場合、メッセージは自動的にSMSにフォールバックし、確実に配信される。
詳細は RCSドキュメント.
SMS(ショート・メッセージ・サービス):従来のSMSはプレーンテキストのみをサポート。RCSでは、ブランドボタン、画像、メッセージステータスの更新が可能です。 Node.jsでSMSメッセージの送信を学ぶ.
MMS(マルチメディア・メッセージング・サービス):メディア品質が低く、ファイルサイズに制限があることが多いMMSとは異なり、RCSは高品質のメディアをサポートし、タイピングインジケーターや配信ステータスの更新などの機能を備えています。詳細はこちら MMSでできることそして で MMS を送信する方法をご覧ください。 Node.js.
アプリケーションを作成するには アプリケーションの作成ページでアプリケーションの名前を定義します。

Webhooksを使用するAPIを使用する場合は、秘密鍵が必要です。Generate public and private key "をクリックすると、自動的にダウンロードが始まります。この鍵は紛失すると再ダウンロードできません。この鍵は紛失しても再ダウンロードできません。 private_<あなたのアプリID>.key.この鍵はAPIコールの認証に使用できます。 注意:アプリケーションを保存するまで、キーは機能しません。
必要な機能(Voice、Messages、RTCなど)を選択し、必要なWebhook(イベントURL、応答URL、受信メッセージURLなど)を提供します。これらはチュートリアルで説明します。
保存してデプロイするには、"Generate new application "をクリックして設定を確定します。これでアプリケーションはVonage APIで使用する準備が整いました。
もしまだngrokを使ったことがないのなら、 ここから始められる.次のセクションの画像の下にインスタンスを実行する手順を追加した。
以下のコマンドを実行して、ngrokトンネリング・インスタンスを開始する。
ngrok http 3000出力には、https:// で始まり、.ngrok.app/ で終わる URL があります。次のステップでウェブフックを設定するために必要になるので、メモしておいてください。
Forwarding https://94cd51b63460.ngrok.app/ -> http://localhost:8000
Vonage API Dashboardに戻って、Appsの下にあるcapabilitiesの下にあるMessagesオプションを切り替えて、ngrokからあなたのサーバーのパブリックURLを受信メッセージとイベントのエンドポイントとして設定します: https://94cd51b63460.ngrok.app/webhooks/inboundのようになります。 https://94cd51b63460.ngrok.app/webhooks/statusのようになります。 ウェブフックについて Webhooksについてもっと知りたい方は、Vonageのドキュメントをご覧ください。.
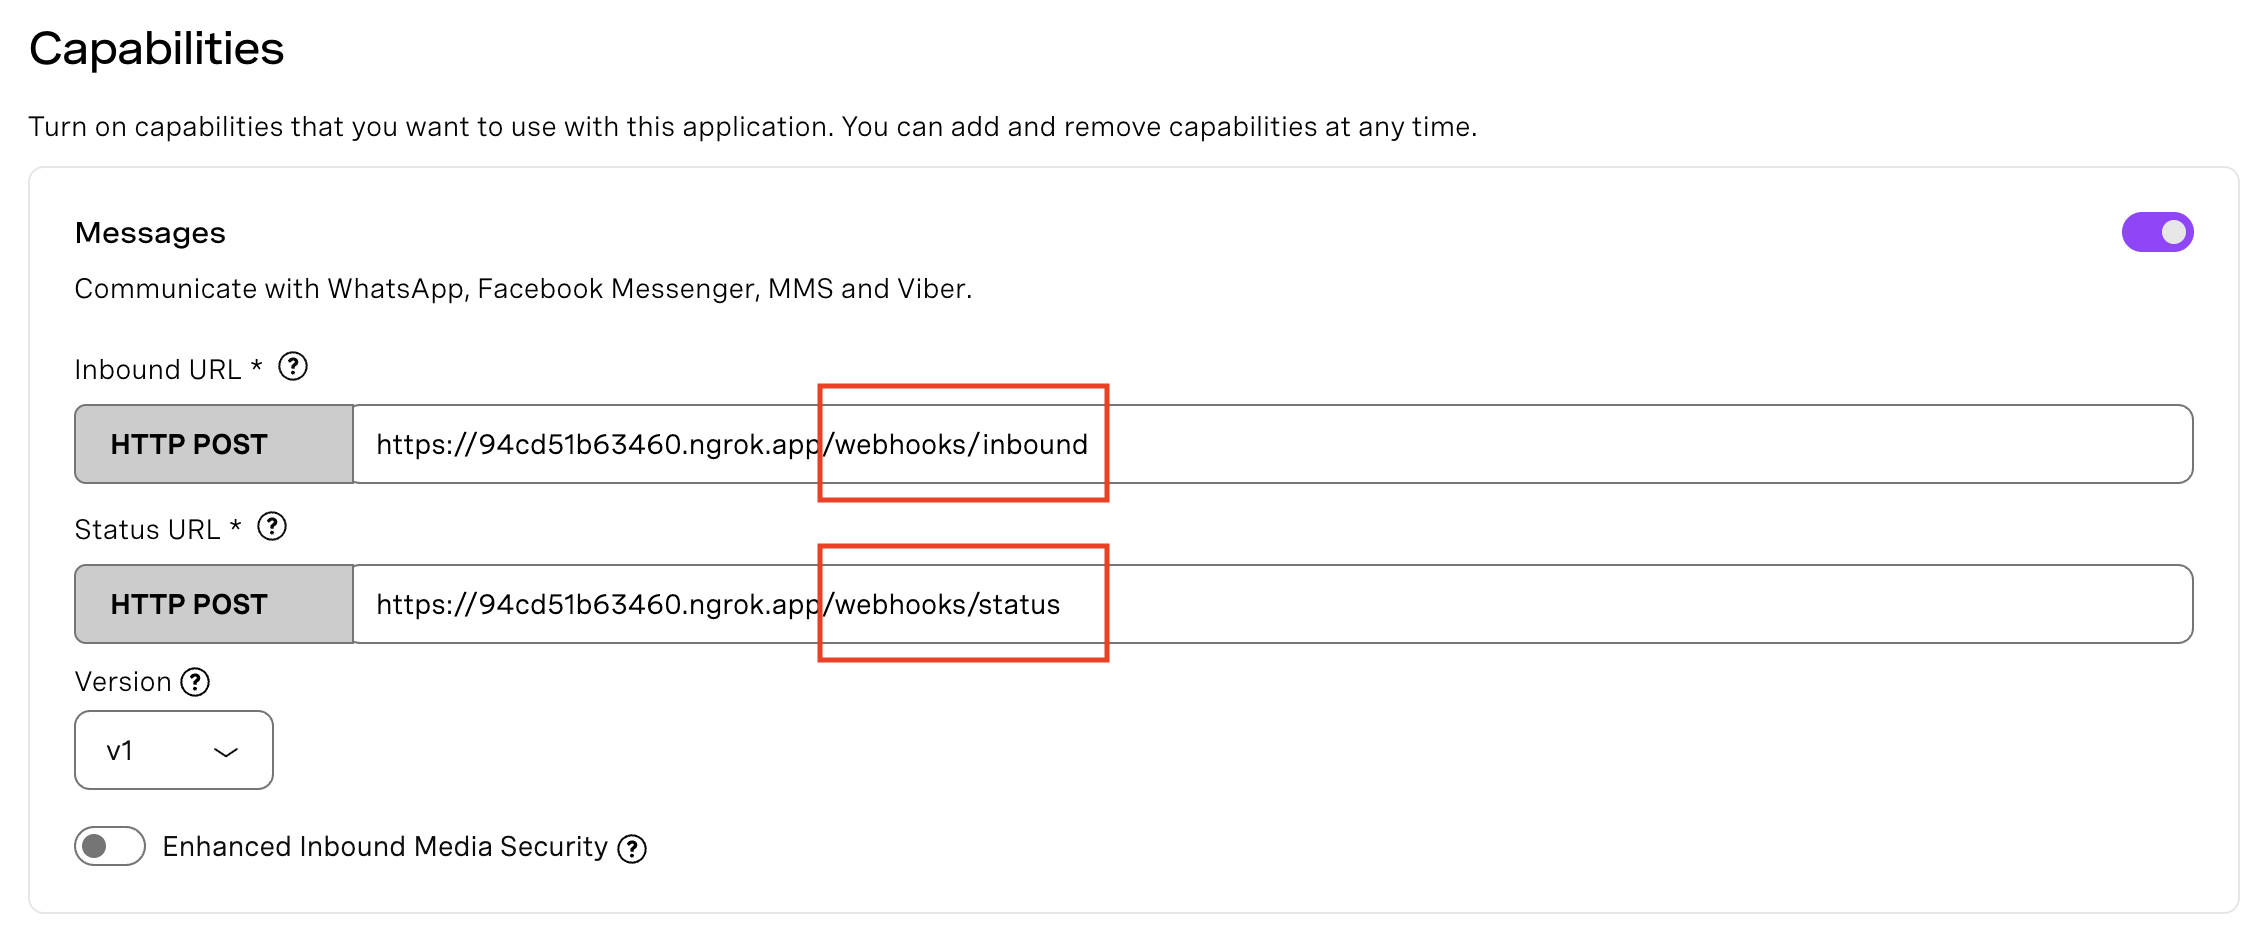 webhooks
クローン Vonage コミュニティ GitHub リポジトリこのプロジェクトと npm installをクローンしてください。
npm install express debug @vonage/messages @vonage/server-sdk dotenv
を作成します。 .envファイルを作成する。
VONAGE_APPLICATION_ID=YOUR_VONAGE_APPLICATION_ID, can be found within the application you’ve created

VONAGE_PRIVATE_KEY=./private.key, is the path to the private.key file that was generated when you created your application

RCS_SENDER_ID=YOUR_RCS_SENDER_ID

PHONE_NUMBER=YOUR_PHONE_NUMBER_E164 that will receive the RCS messages

PORT=3000

VONAGE_API_SIGNATURE_SECRET= is the secret used to sign the request that corresponds to the signature secret associated with the api_key included in the JWT claims. You can identify your signature secret on the Dashboard settingsプロジェクトの中には vonage.jsファイルがあります。
JWT検証機能を追加し、着信リクエスト(メッセージやコールなど)がVonageからのものであるかどうかを検証します。
VONAGE_API_SIGNATURE_SECRET変数は、JWTクレームに含まれるAPIキーに関連付けられた署名秘密に対応するリクエストに署名するために使用される秘密です。署名の秘密は ダッシュボードの設定.
リクエストの確認 リクエストの確認.
const verifyJWT = (req) => {
  // Verify if the incoming request came from Vonage
  const jwtToken = req.headers.authorization.split(" ")[1];
  if(!verifySignature(jwtToken, process.env.VONAGE_API_SIGNATURE_SECRET)) {
    console.error("Signature does not match");
    throw new Error("Not a Vonage API request");
  }

  console.log("JWT verified");
}vonage/jwt依存関係をインストールしてください。
npm install @vonage/jwt
あなたの server.jsファイルにあります、には、Geminiとの統合が完了したコードがありますが、RCSでリッチカードメッセージをハードコードされたテキストで送信する方法を紹介したいと思います。
まず、インポートを追加し、変数を定義することから始める。
import Express from "express";

import { RCSCustom, RCSText } from "@vonage/messages";

import { vonage } from "./vonage.js";

import "dotenv/config";

const app = new Express();

const port = process.env.PORT || 3000;

const recipientNumber = process.env.PHONE_NUMBER;

if (!recipientNumber) {

  process.exit(1);

}

if (!process.env.RCS_SENDER_ID) {

  process.exit(1);

}また、ルートでのエラー処理には非同期ラッパーを使う。
const catchAsync = (fn) => (req, res, next) => {

  fn(req, res, next).catch(next);

};

app.use(Express.json());

app.get(

  "/send-story-request",

  catchAsync(async (req, res) => {

    await sendBedtimeStoryRequest(recipientNumber);

    res.status(200).json({ message: "Bedtime story request sent!" });

  })

);エンドポイントを作成する。 /webhooks/statusエンドポイントを作成する。
app.post(

  "/webhooks/status",

  catchAsync(async (req, res) => {

    res.status(200).json({ ok: true });

  })

);
エンドポイントを作成する。 /webhooks/inboundエンドポイントを作成する。
app.post(

  "/webhooks/inbound",

  catchAsync(async (req, res) => {

    const { channel, message_type, reply, from } = req.body;

    if (channel === 'rcs' && message_type === 'reply' && reply) {

      const receivedId = reply.id;

      const receivedTitle = reply.title;

      if (receivedId === 'GENERATE_STORY_REQUEST' || receivedTitle === 'Generate Story') {

        const replyToNumber = from;

        const helloWorldMessage = "Hello world!";

        await sendRCSGreeting(replyToNumber, helloWorldMessage);

      } else {

        // Unhandled reply

      }

    } else if (channel === 'rcs' && message_type === 'text') {

      if (req.body.text && req.body.text.toLowerCase() === 'generate story') {

        await sendRCSGreeting(from, "Hello world!");

      } else {

        await sendRCSGreeting(from, "I received your message: " + req.body.text);

      }

    }

    res.status(200).json({ ok: true });

  })

);エラー処理メッセージを追加し、アプリは定義されたポート(3000)をリッスンする。
app.all("*", (req, res) => {

  res.status(404).json({

    status: 404,

    title: "Not Found",

  });

});

app.use((err, req, res, next) => {

  res.status(500).json({

    status: 500,

    title: "Internal Server Error",

    detail: err.message,

  });

});

app.listen(port);を作成する。 sendBedtimeStoryRequestこのメッセージには、新しいストーリーを生成するためのボタンが含まれている。
const sendBedtimeStoryRequest = async (number) => {

  const message = new RCSCustom({

    to: number,

    from: process.env.RCS_SENDER_ID,

    custom: {

      contentMessage: {

        richCard: {

          standaloneCard: {

            cardOrientation: "VERTICAL",

            cardContent: {

              title: "Bedtime Story Generator",

              description: 'Tap "Generate Story" for a magical tale!',

              media: {

                height: "MEDIUM",

                contentInfo: {

                  fileUrl:

                    "https://cdn-icons-png.flaticon.com/512/2917/2917637.png",

                },

              },

              suggestions: [

                {

                  reply: {

                    text: "Generate Story",

                    postbackData: "GENERATE_STORY_REQUEST",

                  },

                },

              ],

            },

          },

        },

      },

    },

  });

  try {

    await vonage.messages.send(message);

  } catch (err) {

    if (err.response) {

      err.response.text().catch(() => {});

    }

  }

};
を作成します。 sendRCSGreetingを作成し、Vonage Messages API を使用して RCS メッセージを送信します。
const sendRCSGreeting = async (to, messageText) => {

  const message = new RCSText({

    to: to,

    from: process.env.RCS_SENDER_ID,

    text: messageText,

  });

  try {

    await vonage.messages.send(message);

  } catch (err) {

    if (err.response) {

      err.response.text().catch(() => {});

    }

  }

};アプリを実行するには、サーバーを起動する:
node server.jsブラウザで以下のURLにアクセスすると、ユーザーの携帯電話に最初のメッセージが送信され、ストーリーを生成するよう招待されます。ブラウザでのJSON確認と、携帯電話で受信したRCSメッセージは、システムが機能していることを示すサインである。
http://localhost:3000/send-story-request
RCSメッセージングとWebhookが使えるようになったので、Google Geminiをストーリーテリングサービスに追加してみよう。
に移動すると AI Studioにナビゲートし、ログインして新しいチャットを作成すると、右上に「<a href="Get Code"」と表示されるので、好きなプログラミング言語を選択します。モデルを選択します。私は "Gemini 1.5 Flash Experimental "を使いましたが、あなたのプロジェクトに最も理にかなっているものを選んでください。
詳細については Gemini Developer API ドキュメントページ.
npm install @google/generative-aiGemini APIキーを .envに追加します。
GEMINI_API_KEY="YOUR_GEMINI_API_KEY"
import { GoogleGenerativeAI } from "@google/generative-ai";

const genAI = new GoogleGenerativeAI(process.env.GEMINI_API_KEY);

const geminiModel = genAI.getGenerativeModel({ model: "gemini-1.5-flash" });
Geminiが初期化されたので、私たちの /webhooks/inbound ハンドラを更新します。ユーザーが "Generate Story "をクリックすると、"Hello world!"と答える代わりに、"Bedtime Story "を呼び出す。 geminiModel.generateContent を呼び出します。
生成されたテキストは、次のようにしてユーザーに送り返される。 sendGeneratedStory.また、手動で "Generate Story "と入力するユーザーのための処理も追加しました。
この sendGeneratedStory関数は生成されたストーリー・テキストを受け取り、RCSTextを使って通常のRCSテキスト・メッセージとして送り返す。
アプリを実行するには、サーバーを(再)起動する:
node server.js次に、ブラウザで以下のURLにアクセスしてください: http://localhost:3000/send-story-request
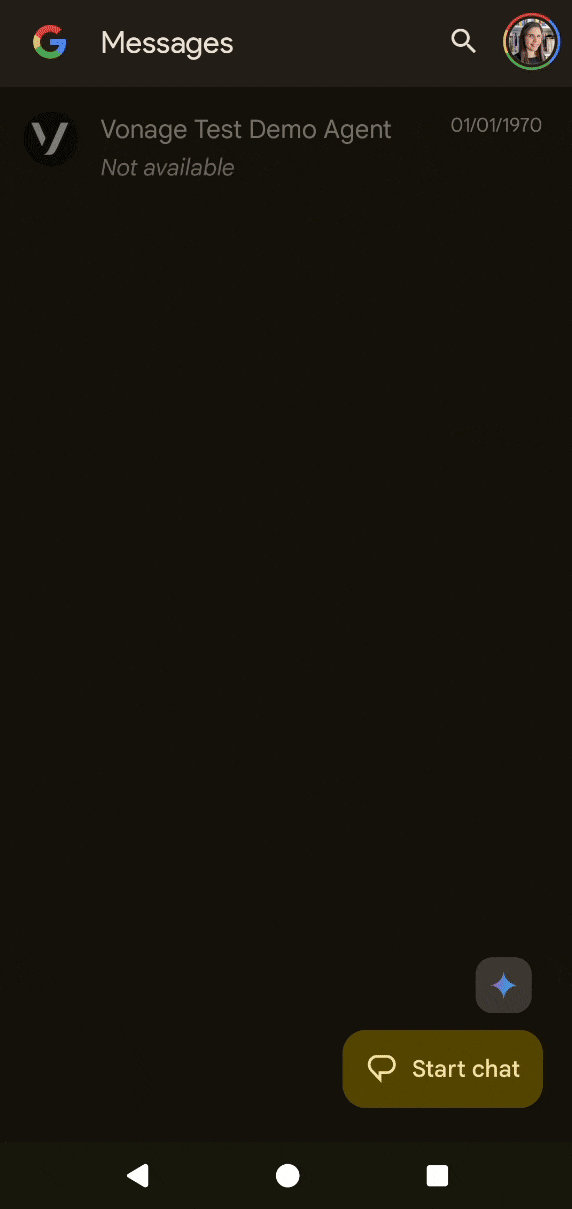
あなたのデバイスから、RCSメッセージが届きます。Generate Story」をタップすると、ジェミニが作成したベッドタイムストーリーが届きます。
 RCS Project
結論
このチュートリアルでは、VonageのRCS APIを使ってGeminiを搭載したストーリーテリングサービスを構築する方法を紹介した。私が最後にRCSに関連することをしたのは2020年のことだった。参加者全員にRCS対応のSIMカードが送られるワークショップに参加した。またRCSの仕事に戻れて嬉しかったし、このことについてもっとブログ記事を書くのが待ちきれない。
ご質問がある場合、またはあなたが作っているものを共有したい場合は、こちらをクリックしてください。
登録する 開発者ニュースレター
フォローする X(旧ツイッター)最新情報
チュートリアルを見る YouTubeチャンネル
LinkedInの LinkedIn の Vonage デベロッパーページ
最新の開発者向けニュース、ヒント、イベント情報をお届けします。