シェア:
ミーシャは カスタマー・ソリューション・エンジニアVonage のカスタマー・ソリューション・エンジニアで、Video API の開発に専念している。サンフランシスコの喧騒からウィスコンシン州ミルウォーキーの魅力へ移り、現在は中西部の隠れた魅力を発見することに余暇を費やしている。
React用Video APIリファレンスアプリで絵文字に効果音を追加する
所要時間:1 分
動画 VonageビデオAPIリファレンス・アプリ for Reactは、マルチパーティアプリケーションの開発を始めるための簡単な方法を提供します。コードは Vonage の開発者とコミュニティ・メンバーによって維持されています。参加者がユーザー名を追加し、ビデオとオーディオのデバイスを選択できる待合室や、ユーザーが互いに話したり、チャットに書き込んだり、問題を報告したり、絵文字で反応したりできる会議室など、多くの素晴らしい体験が用意されています。
待って、誰か絵文字って言った?絵文字は、誰かに謝意を表したり、次のプロジェクトに取り組んでいることを喜んだり、あるいは単に面白いビデオに反応して犬の絵文字を踊らせたりと、コミュニケーションの標準的な方法となっている。
このチュートリアルでは、絵文字のリアクションをさらにクールにする方法を探ります。 😎.そのひとつが、誰かが絵文字を送信するときに、みんなが楽しめるように効果音を追加する方法です。
Node.jsインストール済み
Reactの基礎知識
Vonage API アカウント
To complete this tutorial, you will need a Vonage API account. If you don’t have one already, you can sign up today and start building with free credit. Once you have an account, you can find your API Key and API Secret at the top of the Vonage API Dashboard.

現在、以下の絵文字が Video API Reference App for React に追加されています:
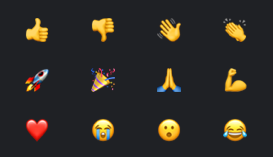 Emojis currently supported in the Vonage Video API Reference App for React, ready for sound effect mapping.
このアプリのクールなところは、あなたが好きな新しい絵文字など、新しいものをとても簡単に追加できることです。単に 絵文字マップ.
絵文字に効果音を追加するには、アプリにいくつかのものを追加する必要があります:
まずは サウンドフォルダを フロントエンド/publicディレクトリに作成します。これで全てのサウンドアセットを一箇所にまとめることができます。
その後、現在サポートされている絵文字リストに基づいて、異なる絵文字に対して異なるサウンドを再生するサウンドマップを作成します。そのために、以下のサウンドマップを フロントエンド/src/utils/emojisフォルダに追加します。これをemojiSoundMap.tsと呼ぶことにします:
// File: frontend/src/utils/emojis/emojiSoundMap.ts
const emojiSoundMap: Record<string, string> = {
  THUMBS_UP: '/sounds/sound1.mp3',
  THUMBS_DOWN: '/sounds/sound2.mp3',
  WAVE: '/sounds/sound3.mp3',
  CLAP: '/sounds/sound4.mp3',
  ROCKET: '/sounds/sound5.mp3',
  CELEBRATION: '/sounds/sound6.mp3',
  PRAY: '/sounds/sound7.mp3',
  FLEX: '/sounds/sound8.mp3',
  HEART: '/sounds/sound9.mp3',
  CRY: '/sounds/sound10.mp3',
  ASTONISHED: '/sounds/sound11.mp3',
  JOY: '/sounds/sound12.mp3',
  default: '/sounds/sound13.mp3',
};

export default emojiSoundMap;
次に、既存の にユーティリティ関数を追加します。ファイルにユーティリティ関数を追加します。 THUMBS_UPのような)キーを見つけるのを助けるユーティリティ関数を追加します。 emojiMap.これは、使用されている絵文字に基づいて再生するサウンドを決定するのに役立ちます。そのため、ファイルに以下を追加します:
// File: frontend/src/utils/emojis/emojis.ts
export const getEmojiKeyByChar = (emojiChar: string): string | undefined => {
  return Object.keys(emojiMap).find((key) => emojiMap[key as keyof typeof emojiMap] === emojiChar);
};エキサイティングなことではないが、この次のステップは正しいインポートを保証するために不可欠である。エクスポートは を更新する必要があります:
// File: frontend/src/utils/emojis/index.ts
import emojiMap, { getEmojiKeyByChar } from './emojis';

export default emojiMap;
export { getEmojiKeyByChar };この後 フックを更新します。フックを更新します。 ディレクトリにあるディレクトリにあるuseEmojiフックを更新します。ここで最初に行うべき変更は、新しい emojiSoundMapをインポートすることです。ファイルの先頭に以下を追加します:
// File: frontend/src/hooks/useEmojis.tsx
import emojiSoundMap from '../utils/emojis/emojiSoundMap';次に、絵文字をキーにマッチさせるために作成したユーティリティ関数をインポートする。次に emojiSoundMapインポートします:
// File: frontend/src/hooks/useEmojis.tsx
import { getEmojiKeyByChar } from '../utils/emojis';再生したいサウンドを検索して、それを再生する関数を追加する必要がある。それはとても簡単で良いことだ!
// File: frontend/src/hooks/useEmojis.tsx
const playEmojiSound = (emojiChar: string) => {
    const emojiKey = getEmojiKeyByChar(emojiChar);
    // We look up the sound for the emoji, defaulting to a generic sound if not found.
    const soundSource = (emojiKey && emojiSoundMap[emojiKey]) || emojiSoundMap.default;
    const audio = new Audio(soundSource);
    // Play the emoji sound at full volume so everyone can hear it
    audio.volume = 1;
    audio.play().catch((error) => {
      console.error('Error playing emoji sound:', error);
   });
};
もう少しだ!あとは onEmojiハンドラを少し変更するだけです。を呼び出している場所のすぐ後に、以下を追加します。 setEmojiQueue:
// File: frontend/src/hooks/useEmojis.tsx
// Play sound when emoji is received
playEmojiSound(emoji);以上です!これで、多人数会議の絵文字リアクションに音が追加されました。これで毎日のスタンドアップミーティングがもっと楽しくなります。
結論
このチュートリアルでは、会議をよりクリエイティブにする簡単で楽しい方法を探りました。Vonage Video API Reference App for React が提供する柔軟性は、会議をより楽しくするためにこのような楽しい拡張機能を追加するのに最適な方法です。
私たちの VonageコミュニティSlackまたは X(旧Twitter).