Share:
A trained actor with a dissertation on standup comedy, I came into PHP development via the meetup scene. You can find me speaking and writing on tech, or playing/buying odd records from my vinyl collection.
Using the Reports API with Laravel
The Vonage Reports API provides powerful, filterable usage analytics—this tutorial shows how to integrate it with Laravel to generate synchronous and asynchronous reports. So, if you heavily use, say, the Voice API or Messages API, you can get statistics from your Vonage API Dashboard. There are limitations to this, however, as you can only get the last 30 days of records. Alternatively, you can use the Reports API, which will open up API endpoints for drilling down deeper into your usage, adding specific parameters to filter data, or creating much larger reports asynchronously. Rather than 30 days, you can get back records from the last 13 months, or the last 90 days if querying Video data. If you want to use the Reports API, you’ll be charged accordingly for the number of records that are brought back in reports.
After reading this breakdown, you might already be a heavy Vonage user who requires bespoke pricing: in this case, we recommend contacting your account manager for an Unlimited Plan. Our general recommendation when choosing pricing is to switch to the Unlimited Plan if you are going to fetch more than 1 million events a month, or 12 million records per year.
In this article, we’re going to use Laravel to fetch this data as an example.
PHP8.2+
A Vonage API Account
The Laravel installer wraps around Composer’s create-project mechanism for creating boilerplate code. Create a new directory on your development machine and run laravel install reports-api-demo. The installer will give you a couple of options - you can select the default ones here, and skip the Laravel Starter Kits option, as we only want to demo how we handle data.
To keep things as simple as possible, we’re going to have three routes that correspond to the three different ways you can implement reports. These routes will be the following:
Hit a
GETendpoint that generates a synchronous report that comes back to your app, and it will spit out the resultHit a
GETendpoint that fires off aPOSTrequest to Vonage for an asynchronous report, with a callback URL that will beA
POSTendpoint that Vonage will reply to with your asynchronous report
Navigate to your routes/web.php directory and add the following code:
Route::get('/report', function () {
    $apiKey = '99913011';
    $apiSecret = 's09IJad98fa0t9j09ad8fa999';
    $url = 'https://api.nexmo.com/v2/reports/records';
    $dateStart = \Carbon\Carbon::now()->subMonth();
    $dateEnd = \Carbon\Carbon::now();

    $queryParams = [
       'product' => 'SMS',
       'direction' => 'outbound',
       'date_start' => $dateStart->format('Y-m-d\TH:i:s.vP'),
       'date_end' => $endDate->format('Y-m-d\TH:i:s.vP'),
       'account_id' => $apiKey,
     ];

    $response = Http::withBasicAuth($apiKey, $apiSecret)
       ->get($url, $queryParams);

    dd($response->json());
});(For those clever ones among you, yes, those are dummy API keys; always hide your sensitive data!). For a better idea of how to handle your environment variables, check out this blog article.
Rather than using controllers, we’re adding the logic into the route closure. Hitting /report in your application will now fire off a request to the Reports API using your key and secret (you can find these in your Dashboard) and dump out the response.
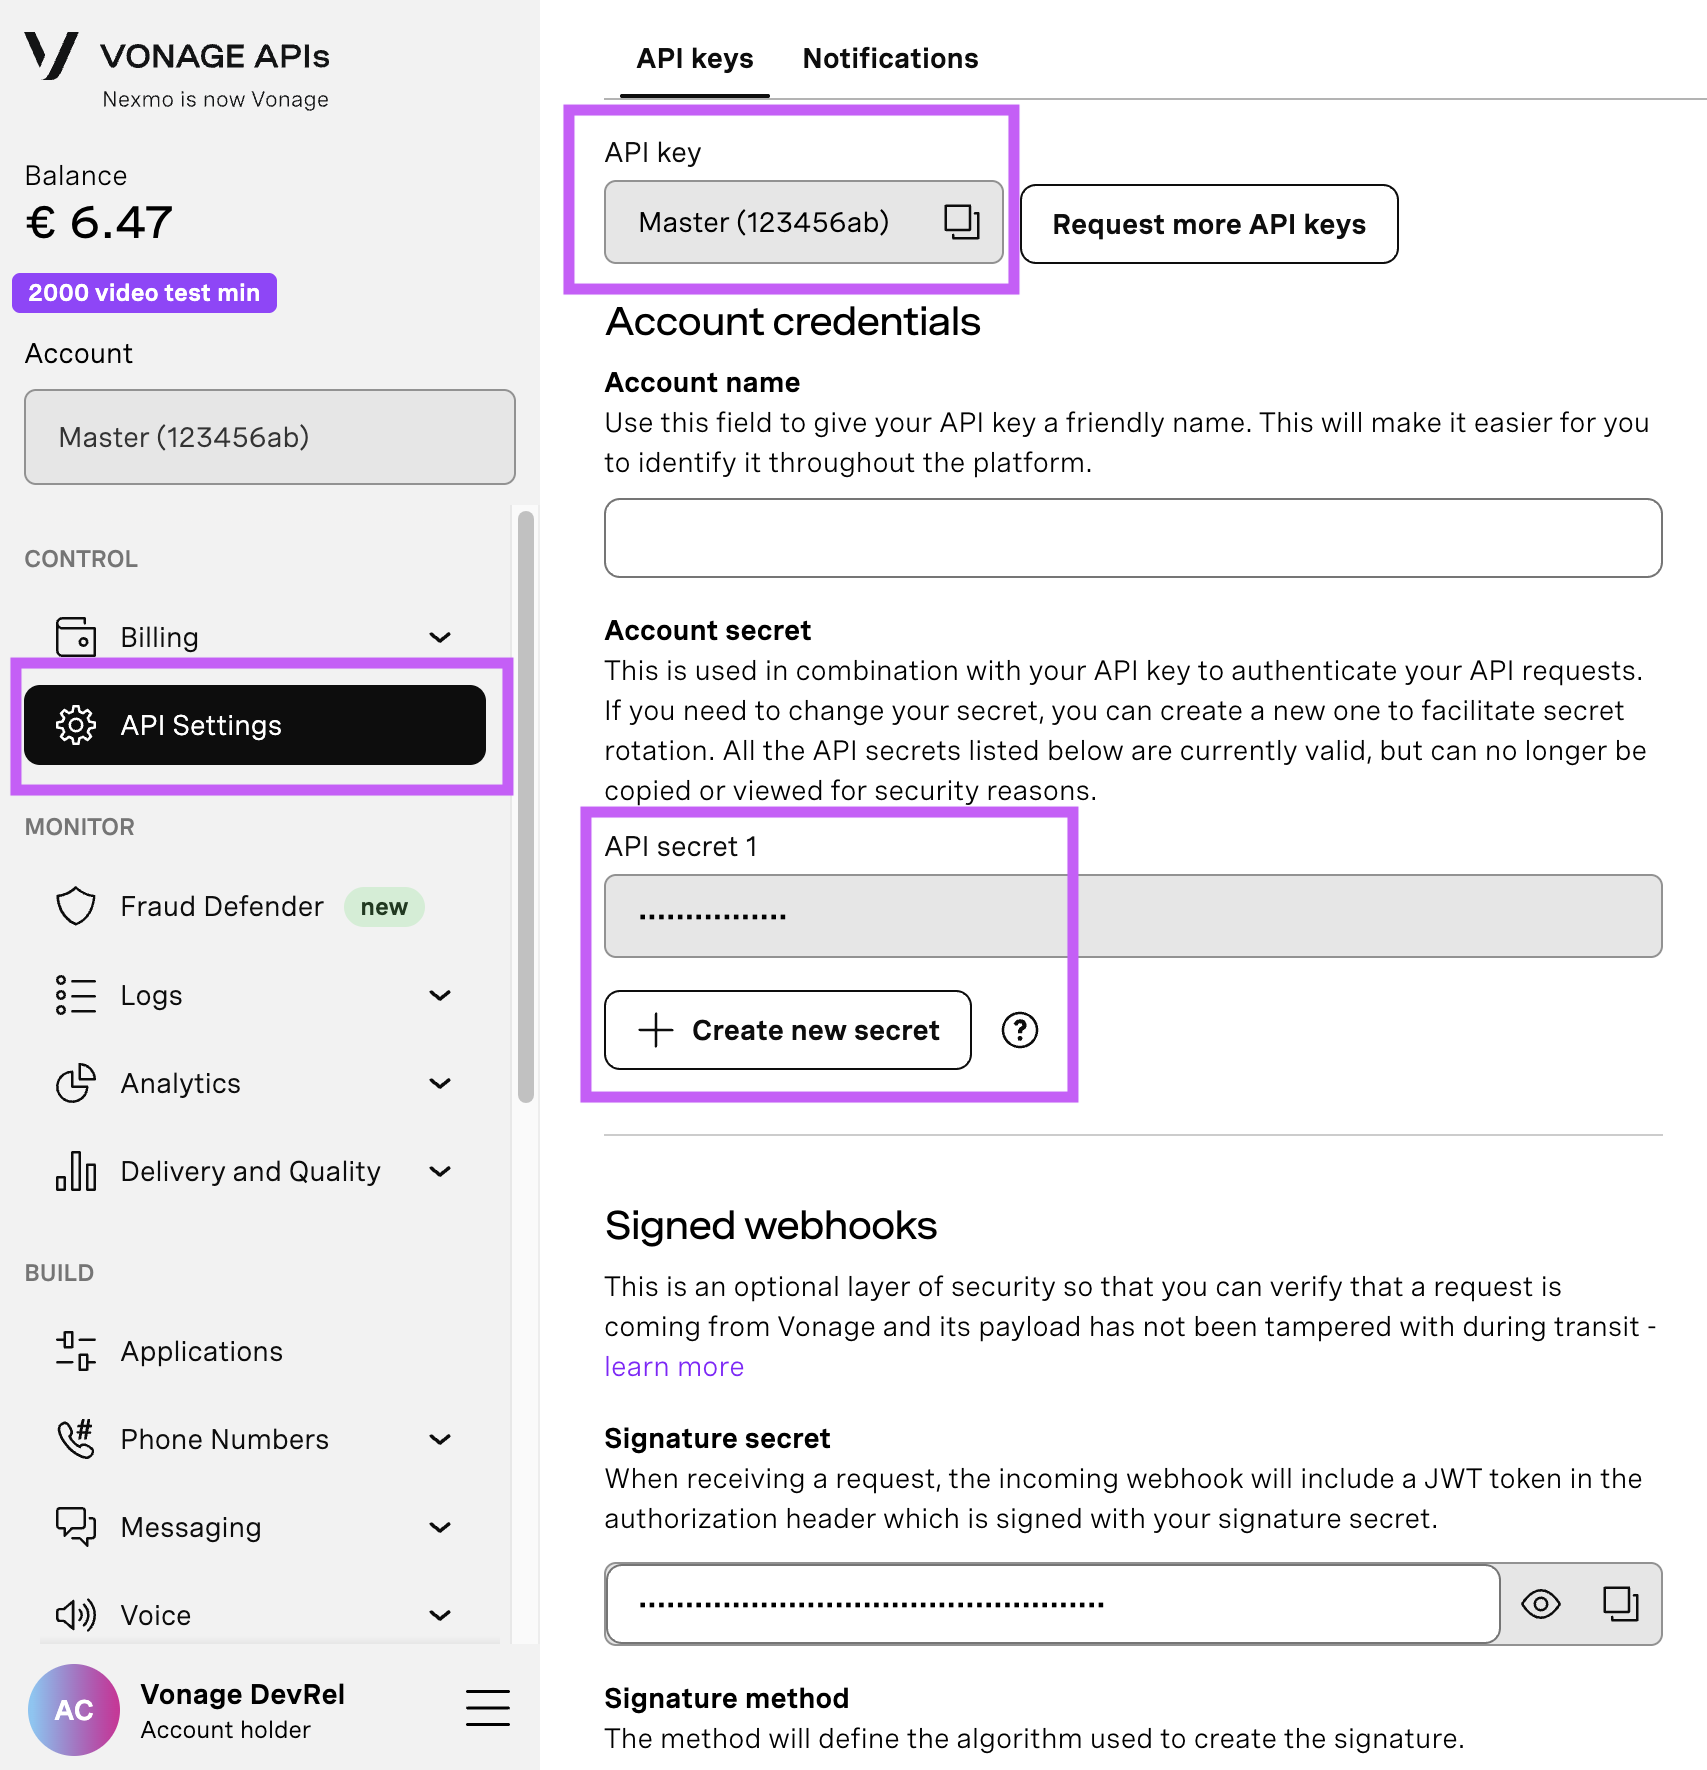
Open your API Settings Page to access your Vonage API Key and Secret, both of which are displayed as shown in the screenshot below. The API Key is located at the top of the page, and to access your API Secret, please refer to the “Account secret” subsection.
Note: In case you cannot remember your previously created API Secret, click on “+ Create new secret” and save it securely.
In this request, the report will only bring us back events from the SMS API, as we’ve filtered by that product in the query parameters. There are a lot of options available in this API to query:
SMS
Voice(includes IN-APP-VOICE, WEBSOCKET-CALL, VOICE-TTS, ASR, AMD)
Messages API (WhatsApp, RCS, SMS, Viber, SMS)
Number Insight
Verify
In-App Messaging
Network APIs
Video
This is suitable for small volumes of data, but what happens when you require millions of rows? That’s where the asynchronous report comes in.
Millions of records would be too much of a strain on both the client and the server. Therefore, you can POST a request with report query parameters in the JSON body, with a callback URL to deliver a webhook to when completed. As Vonage will need an endpoint to send the report data to, you will need to expose your application to the Internet. The quickest way to do this is using ngrok, which does exactly this. Once you have ngrok installed, run it to expose your application and note the URL.
We need an endpoint to receive the report. For the moment, as a demonstration, it will only dump out the data to the application log file.
Route::post('/incoming', function (\Illuminate\Http\Request $request) {
   \Illuminate\Support\Facades\Log::info($request->json());
});Next, we need a new GET endpoint to start off the asynchronous request:
Route::get('/async', function (\Illuminate\Http\Request $request) {
   $apiKey = '99913011';
   $apiSecret = 's09IJad98fa0t9j09ad8fa999';
   $url = 'https://api.nexmo.com/v2/reports';
   $dateStart = Carbon::now()->subMonth();
   $endDate = Carbon::now();

   $queryParams = [
       'product' => 'SMS',
       'direction' => 'outbound',
       'date_start' => $dateStart->format('Y-m-d\TH:i:s.vP'),
       'date_end' => $endDate->format('Y-m-d\TH:i:s.vP'),
       'account_id' => $apiKey,
   ];


   $response = Http::withBasicAuth($apiKey, $apiSecret)
       ->post($url, $queryParams);

   dd($response->json());
});Replace your API key and secret again with your live dashboard credentials, and replace the callback_url field with your ngrok URL, plus /async added to get Vonage to POST to the correct location. Access this GET request in your browser, and the report is triggered. It’s important to note that records are chargeable by the row, so make sure, while testing this implementation, that you’re not about to hit the servers with millions of records if you have them and just following this for testing.
You will eventually (depending on the size of the report) be able to navigate to storage/logs/laravel.log and see the asynchronous report data.
You might want to check to make sure that you haven’t missed a callback - say, for instance, if there was a parsing error that meant that the report was sent to an invalid URL. You’ll want to both view the status and, if completed, download the report. You can do this by hitting the check report endpoint.
Route::get('/status', function (\Illuminate\Http\Request $request) {
   $apiKey = 'your-api-key';
   $apiSecret = 'your-api-secret';
   $requestId = 'aaaaaaaa-bbbb-cccc-dddd-0123456789ab';
   $url = 'https://api.nexmo.com/v2/reports/' . $requestId;

   $response = Http::withBasicAuth($apiKey, $apiSecret)
       ->get($url);

   dd($response->json());
});The response will give you all the information you need. Providing that the request_status is SUCCESS, you can extract the download link from the download_report HAL field.
"request_status": "SUCCESS",
"_links": {
    "self": {
         "href": "https://api.nexmo.com/v2/reports/aaaaaaaa-bbbb-cccc-dddd-  0123456789ab"
          },
          "download_report": {
              "href": "https://api.nexmo.com/v3/media/aaaaaaaa-bbbb-cccc-dddd-0123456789ab"
           }
       }
}
And there you have it, a fully asynchronous way of querying all of your Cloud Platform Communications! The ability to query by Account ID also allows you additional options: if you are the primary user, then you will use your API Key. However, you might be a reseller of communications, in which case, you now have the ability to generate custom reports per sub-account. This also makes it especially useful for issuing invoices to clients as a reseller. You can also use the Reports API to monitor and identify your own patterns of potentially malicious requests and block numbers using the Fraud Defender functionality.
Have a question or want to share what you're building?
Subscribe to the Developer Newsletter
Follow us on X (formerly Twitter) for updates
Watch tutorials on our YouTube channel
Connect with us on the Vonage Developer page on LinkedIn
Stay connected and keep up with the latest developer news, tips, and events.