Using AWS IoT Button and Nexmo to Make a Phone Call
Time to read: 4 minutes
By integrating the Nexmo Voice API with an Amazon IoT button, guest blogger Michael Piccuirro enabled his son to make a phone call by clicking a button so he could walk to school. Here's how he did it.
My wife leaves for work early, so it’s my responsibility to get our kids ready and off to school. To save time I was thinking I would just let my 8-year-old son start walking to school by himself, but there was a problem. I drop him off about an hour before school actually starts. All the doors are locked at that time. To enter the building early you need to call the cell phone of the teacher stationed in the cafeteria, watching the early kids.
My initial instinct was to get my son a phone of this own, but I reconsidered after thinking it through a bit. There’s the monthly cost of the phone and service, he could easily lose it, and he would probably wind up playing games on it as much as he could. He really just needed something for this one moment of the day. I thought there has to be something cheap and easy out there.
After searching Amazon for a product that could solve my problem it occurred to me that I may be able to use an AWS IoT Button, they're like a blank Amazon Dash button which you can link to your own Amazon web services. These buttons are cheap and designed for a very similar use case to mine: Occasionally click a button to make one thing happen via the internet.
So the first step was getting an AWS button, putting it on my WiFi network and setting up a hello world app. If you browse the documentation you’ll find there are a few steps to follow. I got the device all wired together and I could see the event appearing in my AWS console each time I clicked the button.
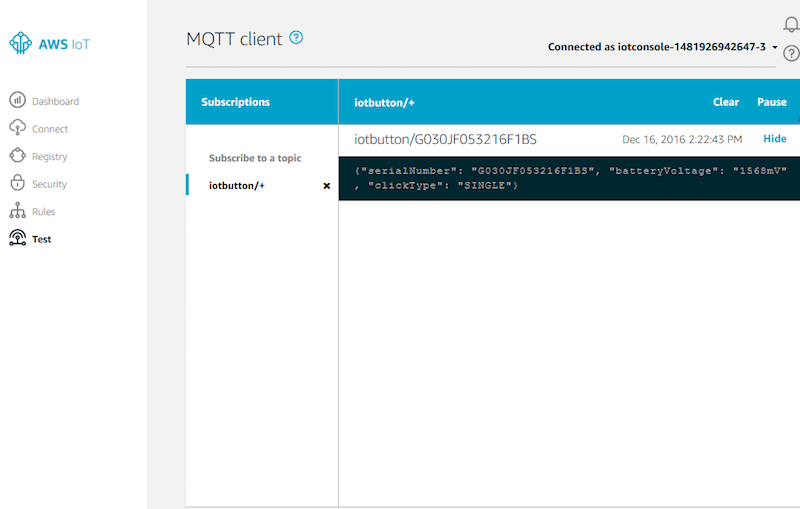 Amazon Dash, AWS IoT
Okay, now to try to connect that with some code. I used a Lambda function, which is the AWS way to get code running in the cloud without concerning yourself with any server setup. This part was much easier as they already had an IoT Button blueprint available. It automatically set up Node.js code that sent me an email when the button was hit. You can see the code for that here.
exports.handler = (event, context, callback) => {
    console.log('Received event:', event.clickType);

    // create/get topic
    createTopic('aws-iot-button-sns-topic', (err, topicArn) => {
        if (err) {
            return callback(err);
        }
        console.log(`Publishing to topic ${topicArn}`);
        // publish message
        const params = {
            Message: `${event.serialNumber} -- processed by Lambda\nBattery voltage: ${event.batteryVoltage}`,
            Subject: `Hello from your IoT Button ${event.serialNumber}: ${event.clickType}`,
            TopicArn: topicArn,
        };
        // result will go to function callback
        SNS.publish(params, callback);
    });
};
The next step was to find a service that would allow me to make an automated phone call, which is how I found the Nexmo API. Unlike the initial Dash setup, getting going on Nexmo was very easy. They have clear documentation, which stepped through exactly how to get a Node.js app going. Within a few minutes, I had something I could run locally via the terminal that sent a Robo call to my phone number. See the code for that here. After browsing the Nexmo docs I then figured out how to record my own voice and use that instead of the text-to-speech from their example.
With the two parts working I now had to put them together. I cut out all the code that sent an email from my Dash Lambda function and plugged in the Nexmo code that made the phone call.
exports.handler = (event, context, callback) => {
    console.log('Calling phone number', recipientNumber);

    nexmo.calls.create({
      to: [{
        type: 'phone',
        number: recipientNumber
      }],
      from: {
        type: 'phone',
        number: '12325551212'
      },
      answer_url: ['http://capturetheory.com/school_dash/first_call_talk.json']
    }, (err, res) => {
      if(err) {
        console.error("there is an error");
        console.error(err);
      }
      else {
        console.log(res);
      }
    });
};
You can see what the complete code looks like here.
Then I had a button that worked in my house. When you pressed it, it would call my phone. In order to call the school's phone, I had to put £10 credit onto my Nexmo account. The cost per minute is so low though I can’t imagine spending that anytime soon. I changed the Dash to use the school’s WiFi network and we were in business.
Now that I have this working I’m kicking around a few ideas to improve it.
I could have it send me a message if the call is busy or doesn’t go through, then I can call from wherever I am.
I can add a virtual number so if the teacher calls back it will ring my mobile.
The Amazon Dash also supports long-pressing the button. So that event could trigger a different message to me saying “Come pick me up” or “I’m having trouble getting into the school.”
Once the Pressto or other cellular IoT button launches I could even remove the need to be on the school WIFI network, making it much more powerful as it would work just about anywhere.
But for now my son is walking to school on his own and I have been given precious time back from my morning routine.
Here's a video of me explaining the project.