
Stream Audio into a Phone Call with Node.js
Time to read: 9 minutes
When you have your customer on a voice call, you have her undivided attention. Why not use that opportunity to tell her the latest news about your company, relay an inspiring message from your CEO, or even play her your latest advertising jingle?
In this blog post, you will learn how to play an audio file into an active call programmatically using the Vonage Voice API and Node.js.
To work through this example, you'll need Node.js. If you don't already have it, install it from the Node.js website.
You can provision a number in the Vonage Developer Dashboard, but we'll talk you through using the Vonage CLI to purchase a number, create a voice application, and then link your number to it.
Finally, you'll want the source code used in this article on GitHub.
Clone the repository and cd into the application's root directory.
Install the Vonage CLI globally using the following command:
npm install @vonage/cli -gThen, configure the CLI with your Vonage API key and secret, which you will find in the Developer Dashboard:
Vonage auth set –api-key=’VONAGE_API_KEY –api-secret=’VONAGE_API_SECRET’Replace the VONAGE_API_KEY and VONAGE_API_SECRET with your details to authenticate the CLI.
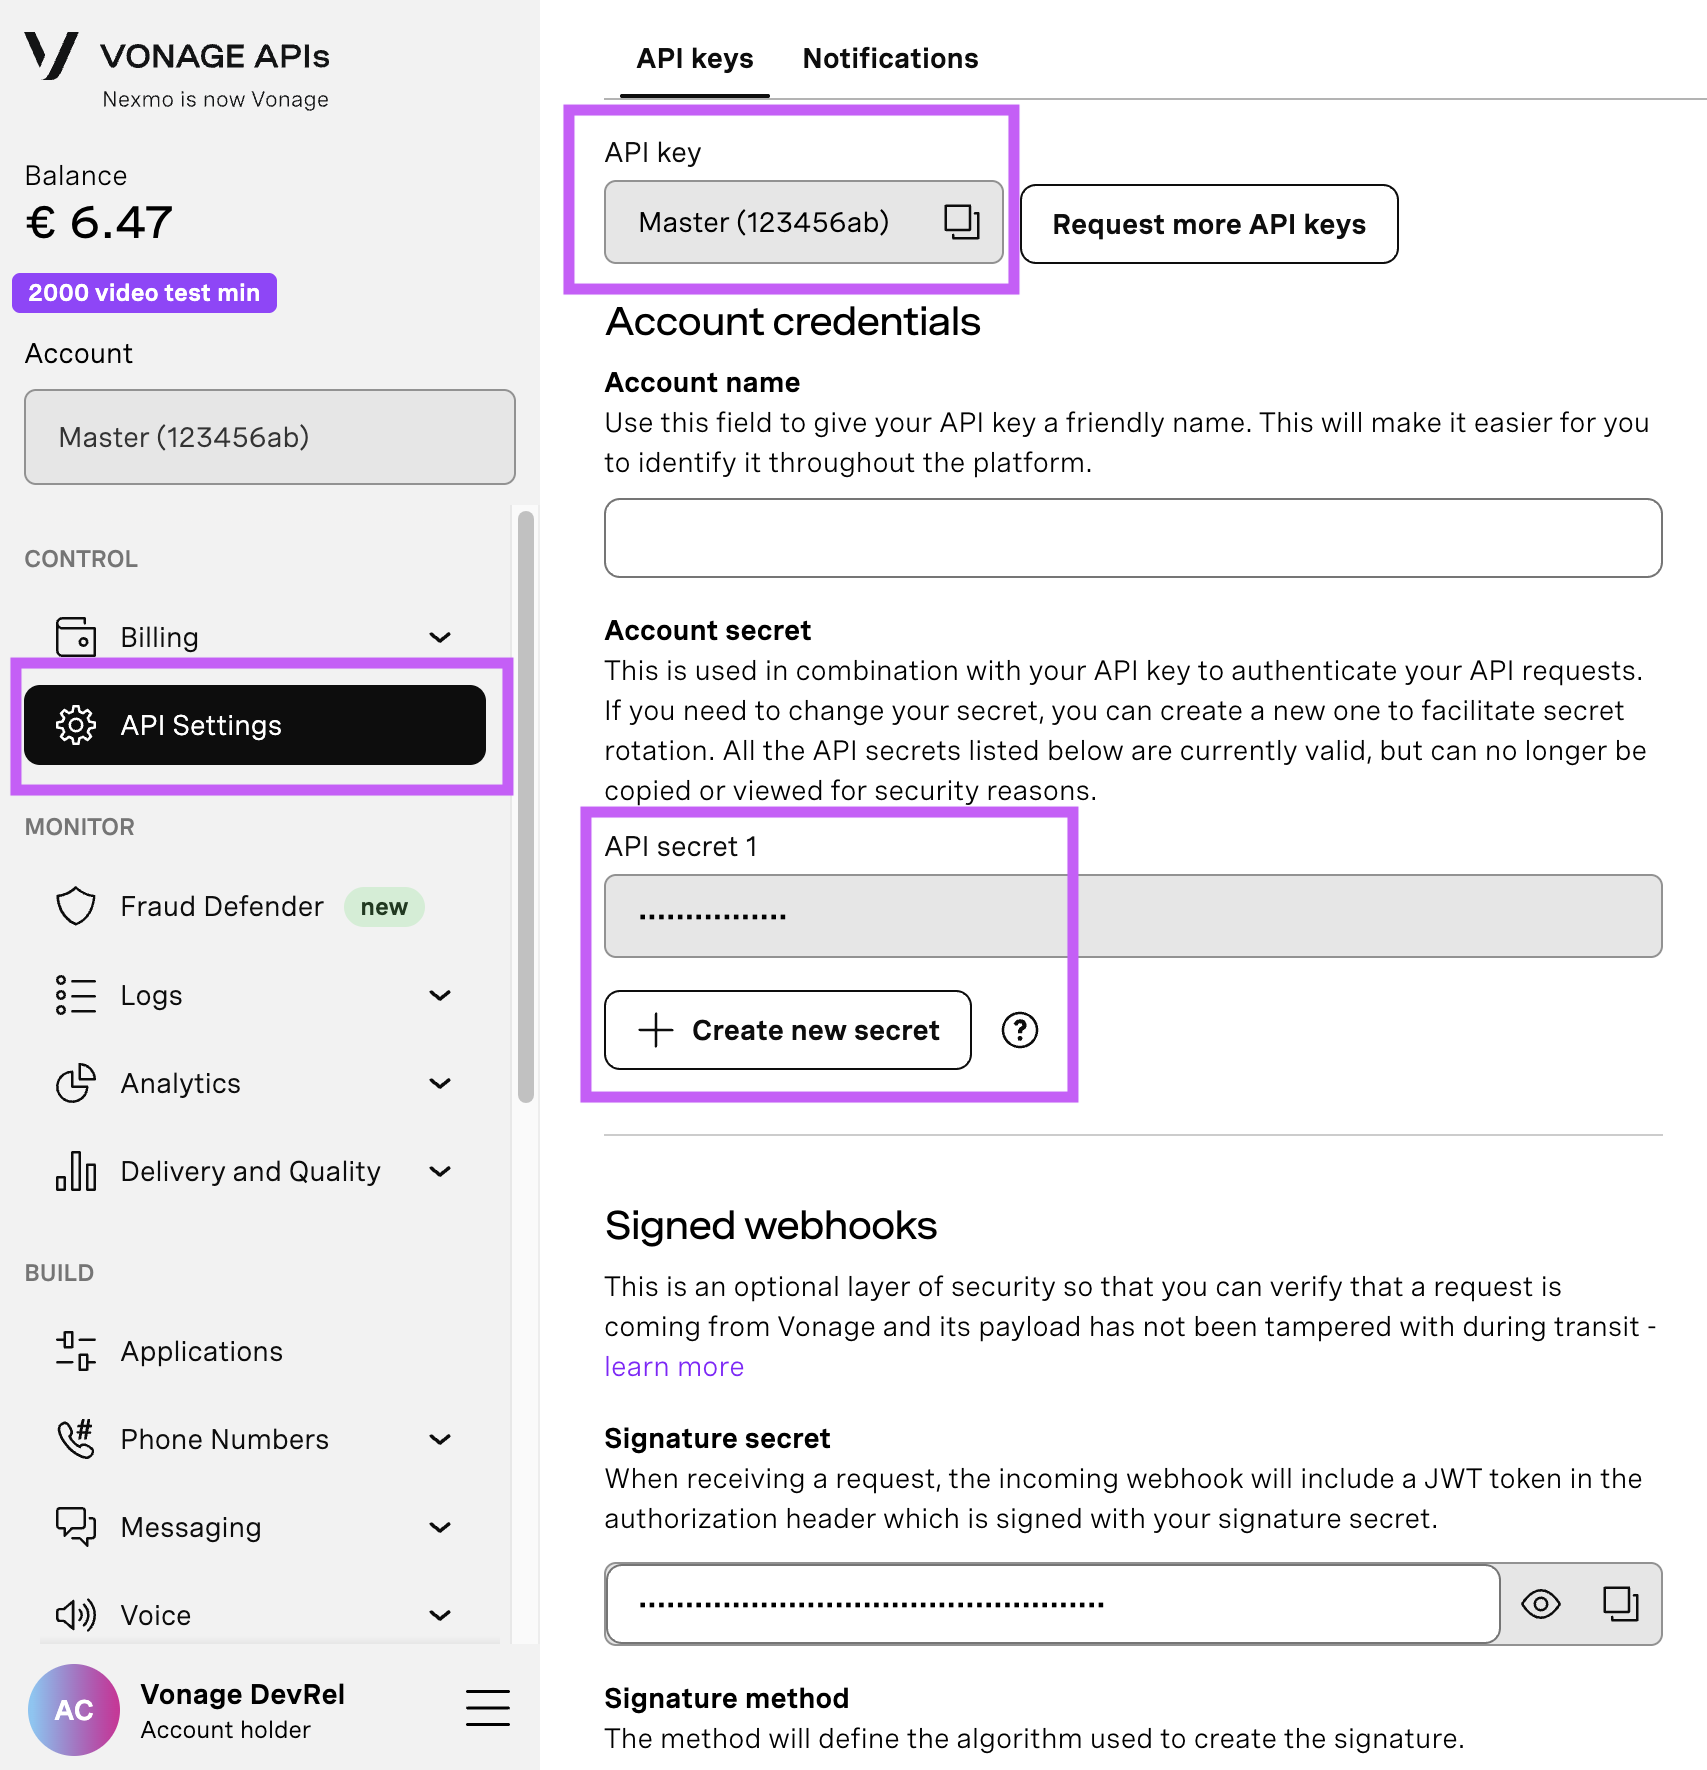
Open your API Settings Page to access your Vonage API Key and Secret, both of which are displayed as shown in the screenshot below. The API Key is located at the top of the page, and to access your API Secret, please refer to the “Account secret” subsection.
Note: In case you cannot remember your previously created API Secret, click on “+ Create new secret” and save it securely.
You can validate your authentication to make sure everything is working using the following command:
vonage auth checkIf you have installed the CLI in your local project rather than globally, you can add an extra flag to check:
vonage auth check –local
You need a number from which to make calls. Purchase one by executing the following command, replacing the country code as appropriate. For example, if you are in the USA, replace [COUNTRYCODE] with US:
vonage numbers search [COUNTRYCODE]You can purchase the phone number by running the code below from your terminal. It is important to note that some countries require address validation, and the purchase must be made via the Vonage dashboard and not the command line.
vonage numbers buy [COUNTRYCODE] [MSIDSN]Make a note of the telephone number that the command returns.
To use the Voice API, you must create a Voice API application. This is not the same thing as the web application you are building. It is merely a container for the configuration and security information you need to connect to Vonage's APIs.
vonage apps create "Play audio app" --private-key-file=~/private.keyYou will receive the following data to note down:
Name: play audio app
Application ID: 7a319bf9-49e7-413d-914b-402fe8e68228
Improve AI: Off
Private/Public Key: Set
You’ll notice that we have given the command the argument of private-key-file. This will download your private key for you once the command has executed: locate this key file (in the command, I have used the UNIX-like ~/ location, which is the home folder; you’ll want to set it to something like. C:\Users\YOUR-USER-NAME if you are using Powershell in Windows) and place the file in the root directory of the accompanying blog article code.
We have not set the application to use the Voice API yet, so run the following command to add the Voice capability:
vonage apps capabilities update [VONAGE_APPLICATION_ID] --voice-answer-url=https://example.com/answer --voice-event-url=https://example.com/event-statusYou will notice that we are setting the voice-answer-url and the voice-event-url at the application level here. These are placeholders for now, and you do not need to change these values. The reason here is that the code used to make the call will dynamically create these during the HTTP calls that are made.
To build this app, let’s take the bare minimum requirements to make a Voice call and be able to update the call instance to play audio into the call. You will need the following:
dotenv - a lightweight library that allows you to read in an environment variables file (the de-facto standard is naming it
.env. We’ll need this to inject the API key and Secret from the Vonage Dashboard at runtime.express - The lightest and most widely used node framework for basic HTTP functionality.
@vonage/voice - Vonage Voice SDK for Node.js
We can install one of these in the command line. Firstly, we’ll need to initialize the project as an npm project, which will then ask you a series of questions to define the overall project. You can choose the defaults for now; it will also ask you if there are any packages you want to install, but we’ll skip this to clarify how we add the dependencies afterward. You can also use yarn for this, so I have included that as a separate terminal snippet. Choose which works for you:
npm inityarn initHit return to choose all of the default values - you can call this package whatever you wish, as it’s not important in this context. Once you have done this, npm or yarn will create a package.json file for you. From here, we can then add the individual packages:
npm install dotenv express @vonage/server-sdk @vonage/voice
We need to expose our application to the Internet so that Vonage's servers can send our application the Voice API webhooks. We recommend using ngrok for this.
You can learn more on how to get ngrok up and running to install and run ngrok on port 3000 (this is express.js’s default port). For example:
ngrok http 3000ngrok will give you a temporary URL, such as https://914288e7.ngrok.io. Make a note of it.
Leave ngrok running while you are using the application; otherwise, the URLs will change, and you will need to reconfigure it.
Copy. example.env to .env and enter the details you have harvested from the above steps:
VONAGE_APPLICATION_ID= The Voice API application ID

VONAGE_APPLICATION_PRIVATE_KEY_PATH= private.key

VONAGE_NUMBER= The number you rented from Vonage

TO_NUMBER= The number you want the application to call

BASE_URL= The ngrok temporary URLYou are now ready to see the application in action!
Launch the application by executing the following command:
node server.jsIf your express.js app is happy, you should get a log stating that the app is listening on port 3000. Visit http://localhost:3000/call in your browser. This makes a GET request to the /call endpoint in your application and causes it to ring the TO_NUMBER in .env.
You will hear a message, followed by music that plays for 20 seconds, and then the call disconnects.
Let’s look at how this is all pieced together in the code. There are three parts to how the application works:
Make the Outbound call.
Give Vonage the NCCO object that will define what happens when the end customer answers the call.
Stream the hold music audio into an active call.
The following code is executed when you send a GET request to the /call endpoint:
try {

   console.log("Making the outbound call...");

   const resp = await voice.createOutboundCall(

     {

       to: [{ type: "phone", number: TO_NUMBER }],

       from: { type: "phone", number: VONAGE_NUMBER },

       answer_url: [answer_url],

       answer_method: HttpMethod.POST, // This will hit the NCCO response

       event_url: [event_url], // Event URL to track events like answered

     }

   );

   console.log("Outbound call response:", resp);

   res.status(200).send("Call initiated!");

 } catch (error) {

   console.error("Error making the outbound call:", error);

   res.status(500).send("Failed to make call.");

}The dotenv library takes care of importing the .env file variables, so we know who to dial. The answer_url tells Vonage what to do when the phone is answered - what we’re going to do here is give back an NCCO, which we are going to use the NCCO Builder class in the Node SDK to create.
We define the answer_url as an endpoint in our express.js app with the following code:
app.post("/audio/answer", (req, res) => {

 const builder = new NCCOBuilder();

 builder.addAction(

   new Talk('Here is some soothing music for you')

 )

 builder.addAction(

   new Stream(audio_url)

 );

 // Send back the generated NCCO

 res.json(builder.build());

});Firstly, it’s app.post() that defines the route for the application. What happens next is in two parts: Vonage is expecting instructions in the form of an NCCO to tell it what to do when the phone is answered, so there are two parts to this.
You can see that we created a new NCCOBuilder object. This class handles all the necessary methods and wraps building the NCCO JSON object neatly for the developer. The first task is to tell the end user that some lovely music is on the way, so the code then creates a. Talk() object that takes a string argument as the text-to-speech. Using the addAction(), you can add any value objects you want to instruct Vonage to do in the call. These can include capturing user input via. DTMF, capturing audio recordings and text-to-speech.
This NCCO will be constructed synchronously, so instructions in the NCCO payload will be carried out one at a time. The next instruction is to give a public URL of our hosted music file to stream into the call. This is very similar to the Talk() action. We give the builder a new sequential action to carry out, which is a Stream() action. The first argument is a string of the URL we want to point to, which we have already defined as the audio_url variable.
And there you have it! Two commands to give Vonage for the call in progress on answering the phone, and now we have lovely relaxing music while we wait in a fictional, presumably stressful queue for… concert tickets or a doctor’s appointment.
In this post, you learned how to play audio into an existing call and about the NCCO actions that govern the call flow. Feel free to experiment by substituting different audio files and NCCO actions. The following resources might help:
Using SSML in TTS (text-to-speech)
The REST API client library for Node.js
Have a question or want to share what you're building?
Subscribe to the Developer Newsletter
Follow us on X (formerly Twitter) for updates
Watch tutorials on our YouTube channel
Connect with us on the Vonage Developer page on LinkedIn
Stay connected and keep up with the latest developer news, tips, and events.