Share:
Steve is a self-proclaimed Mathlete, and King of Snark. He is also a lover of Greyhounds, twisty puzzles, and European Board Games. When not talking math to non-math people, and Java to non-Java people, he can be found sipping coffee and hacking on code.
Send a Text Message with COBOL
COBOL is all the rage in the banking and finance industry with over 95 percent of ATM swipes relying on COBOL code according to a report by Reuters.
In this tutorial, I'm going to show you a, hacked together, method for sending text messages using COBOL. So fire up your mainframe, get your 3270 terminal ready, and let's get down to writing some COBOL!
What's that, you don't have access to a multi-million dollar mainframe? Maybe your employer has one that you can borrow? No? That's OK; there's a workaround.
You will also need the Nexmo CLI. You can use it to purchase a phone number to send outgoing text messages.
You will also need a COBOL compiler which will convert your COBOL into native binaries to run on your system. For this tutorial, I'm going to be using GnuCOBOL.
GnuCOBOL is a free COBOL compiler which converts COBOL into C and compiles the translated code. It enables you to create native binaries which can run on Mac, Windows, and Unix/Linux.
You can find download links for GnuCOBOL here. Optionally, Mac users can install using homebrew:
You'll also want an editor. I had some success in using the OpenCobolIDE. You might be able to get by with a simple text editor. I'll talk about the structure of a COBOL module a little later and why having a proper IDE is somewhat essential.
This tutorial will show you how to purchase a phone number with the Nexmo CLI, and how to use that number to send text messages with COBOL.
You will need a Nexmo number to send text messages. If you do not have a number, you can use the Nexmo CLI to purchase one:
Note that in some countries you can send messages from an alpha-numeric sender id. For more information see Custom Sender ID.
Take note of the number that you just purchased. You will use it later when writing the code to create the phone call.
There are a few different ways to send a text message from COBOL. However, most of these methods vary depending on the hardware that you're using. Since you probably don't have access to a mainframe, you're going to cheat a little bit. What you're going to do is create a COBOL module that can call the Nexmo CLI to send a text message.
First, let's go over the COBOL module structure. I'm not going to give you an extensive guide on COBOL, but I think it's important to know how the modules are structured.
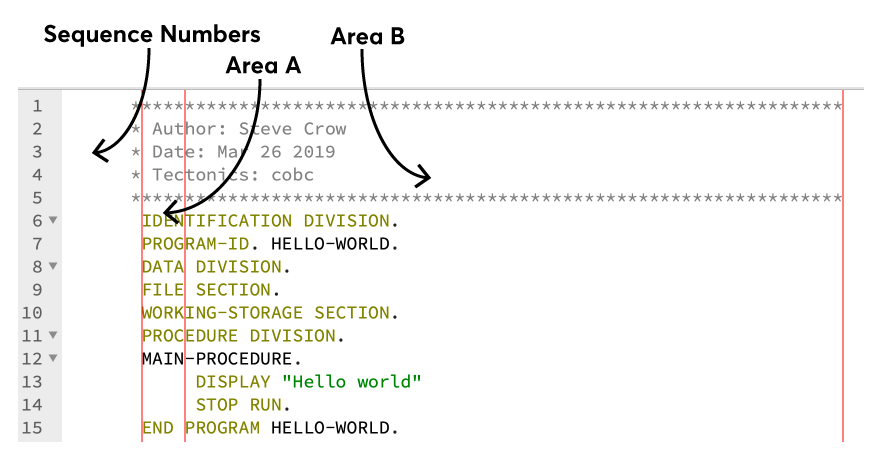
COBOL has two different formats: fixed, or free. The fixed-format requires that the code aligns to specific columns:
| Name | Column | Usage |
|---|---|---|
| Sequences | 1-6 | Used for sequence numbers. These were initially used for card and line numbers, but now the compiler ignores them. Most editors will automatically generate these. |
| Indicator | 7 | Used for indicating a comment * or a - continuation of a previous line. |
| Area A | 8-11 | Contains the start of the DIVISION and SECTION. |
| Area B | 12-72 | Contains all of your other code and programming logic not contained in the other areas. |
This picture illustrates an example hello world module with the sections pointed out:
COBOL 2002 introduced a free format which removed these column restrictions and combined areas A and B. I am not as familiar with COBOL 2002, so I've chosen to stick with a fixed format for this tutorial.
COBOL modules divided into four different regions, called divisions:
The
IDENTIFICATION DIVISIONwhich provides identification information like the module name.The
ENVIRONMENT DIVISIONwhich describes the parts of your module that rely on the computer it's running on.The
DATA DIVISIONwhere your data is defined.The
PROCEDURE DIVISIONwhere the module's programming instructions are defined.
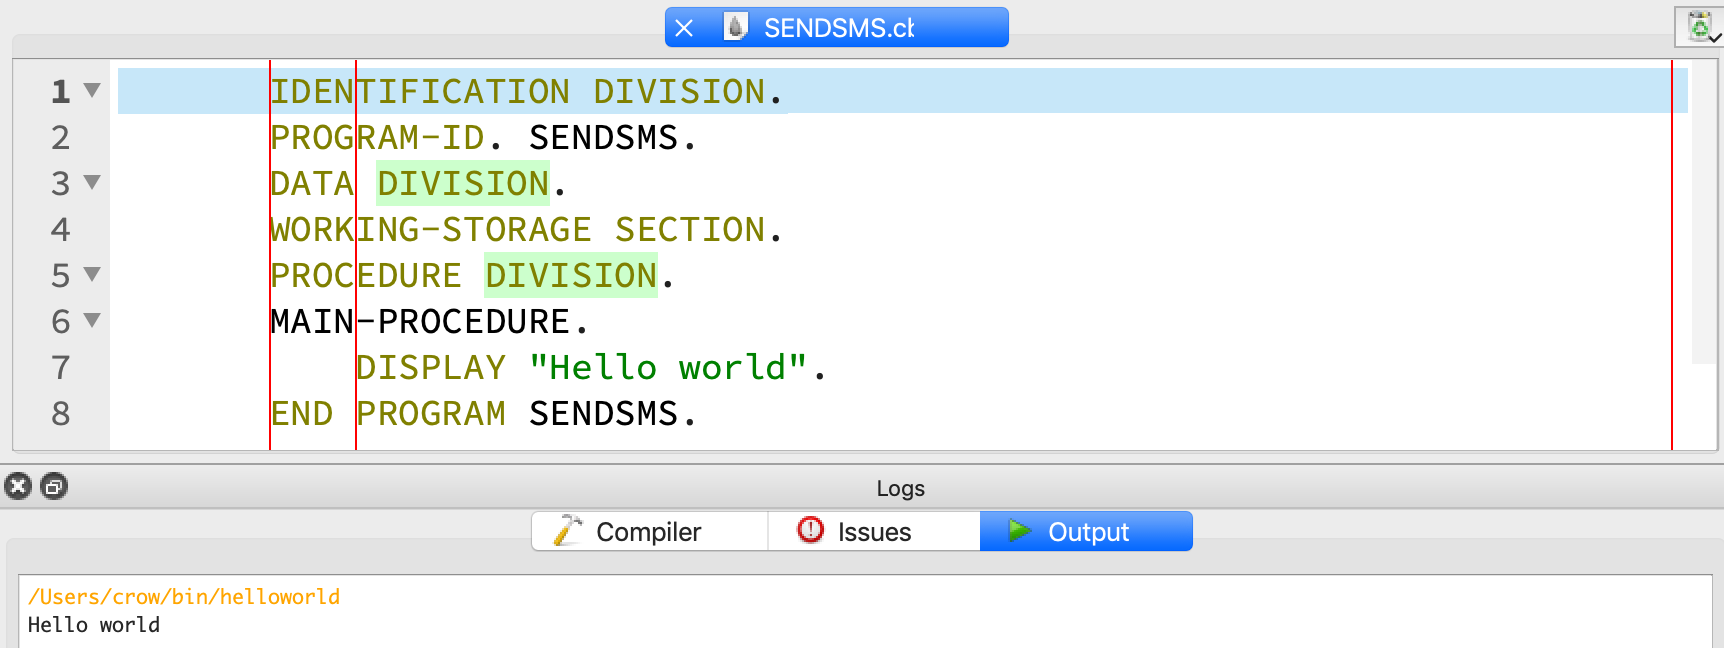
Create a new COBOL program called "SENDSMS.cbl" and add the following contents, noting that the spaces are essential before the contents of each line:
IDENTIFICATION DIVISION.
       PROGRAM-ID. SENDSMS.
       DATA DIVISION.
       WORKING-STORAGE SECTION.
       PROCEDURE DIVISION.
       MAIN-PROCEDURE.
           DISPLAY "Hello world".
END PROGRAM SENDSMS.If you're using the OpenCobolIDE you can run this module, and you should see "Hello world" in the console:
Now you are going to define the data structure to store the information required to send a text message: the number to send the text message to, the number to send the message from, and the contents of the text message.
Data items in COBOL have a hierarchical format. Each variable is given a level number with the higher level numbers being subordinate to the lower level above it.
For example, you could represent a date in the following structure:
01  WS-DATE.
           02  WS-YEAR  PIC X(4).
           02  WS-MONTH PIC X(2).
02 WS-DAY PIC X(2).This allows you to MOVE "20190401" TO WS-DATE and then retrieve each component by referring to them as WS-YEAR, WS-MONTH, and WS-DAY. The reverse is also true.
The FILLER keyword can be used to inject constants into the structure, or for ignoring certain parts of incoming data. For example, if you wanted to display the date with dashes in between, you could write the following:
01  WS-DATE.
           02  WS-YEAR  PIC X(4).
           02  FILLER   PIC X VALUE '-'.
           02  WS-MONTH PIC X(2).
           02  FILLER   PIC X VALUE '-'.
02 WS-DAY PIC X(2).Now, if you run the following code:
MOVE "2019" TO WS-YEAR.
MOVE "04" TO WS-MONTH.
MOVE "01" TO WS-DAY.
DISPLAY WS-DATEThe date displays as 2019-04-01.
You can take advantage of this by constructing the command required for the Nexmo CLI to send a text message:
To be on the safe side, let's allow up to 15 digits for each of the phone numbers, and 160 characters for the message body.
Add the following to the WORKING-STORAGE SECTION of your program:
01  WS-COMMAND.
           02 FILLER PIC X(5) VALUE "nexmo".
           02 FILLER PIC X(5) VALUE " sms ".
           02 WS-TO-NUMBER PIC X(15).
           02 FILLER PIC X VALUE SPACE.
           02 WS-MESSAGE PIC X(160).
           02 FILLER PIC X(8) VALUE " --from ".
           02 WS-FROM-NUMBER PIC X(15).
           02 FILLER PIC X(10) VALUE " --confirm".
The CALL statement is used to call other programs or modules. The SYSTEM program is similar to exec in other languages in that it allows you to run command-line programs from your program. The WS-COMMAND contains the command to send a text message via the Nexmo CLI.
Now, all you need to do is fill in the variables, and pass the WS-COMMAND to the SYSTEM program.
Add the following to the MAIN-PROCEDURE paragraph, replacing YOUR-PHONE-NUMBER with your phone number and YOUR-NEXMO-NUMBER with your purchased Nexmo number:
MOVE "YOUR-PHONE-NUMBER" TO WS-TO-NUMBER.
           MOVE "YOUR-NEXMO-NUMBER" TO WS-FROM-NUMBER.
           MOVE "HELLO WORLD FROM COBOL" TO WS-MESSAGE.
CALL "SYSTEM" USING WS-COMMAND.Here is the completed program:
       IDENTIFICATION DIVISION.
       PROGRAM-ID. SENDSMS.
       DATA DIVISION.
       WORKING-STORAGE SECTION.
      * nexmo sms <to> Hello world! --from <from> --confirm
       01  WS-COMMAND.
           02 FILLER PIC X(5) VALUE "nexmo".
           02 FILLER PIC X(5) VALUE " sms ".
           02 WS-TO-NUMBER PIC X(15).
           02 FILLER PIC X VALUE SPACE.
           02 WS-MESSAGE PIC X(160).
           02 FILLER PIC X(8) VALUE " --from ".
           02 WS-FROM-NUMBER PIC X(15).
           02 FILLER PIC X(10) VALUE " --confirm".

       PROCEDURE DIVISION.
       MAIN-PROCEDURE.
           MOVE "YOUR-NUMBER" TO WS-TO-NUMBER.
           MOVE "NEXMO-NUMBER" TO WS-FROM-NUMBER.
           MOVE "HELLO WORLD FROM COBOL" TO WS-MESSAGE.
           CALL "SYSTEM" USING WS-COMMAND.
           STOP RUN.
       END PROGRAM SENDSMS.
Now, run your program and be amazed as a new text message appears on your phone.
I hope you enjoyed this look into COBOL. It might not be your language of choice for sending text messages, and it's heavily dependent on the hardware that you're running.
If you're up for the challenge, Steve Williams has a COBOL REST Client, which you might be able to use to call the Nexmo API directly.
You might be more successful by queuing up outgoing messages into a message queue and then using Java to send a text message.
Depending on your mainframe environment, IBM has some instructions on making HTTP requests through CICS as an HTTP client.
For more information about COBOL check out The National Museum of American History. For a look into the life of Grace Hopper, the woman who led to team to develop COBOL, see this Biography of Grace Hopper.