
Share:
Kelly J Andrews is a developer advocate for Nexmo and has been tinkering with computers for over 30 years, using BASIC for the first time at the age of 5.
It wasn't until building his first webpage in 1997, and trying out JavaScript for the first time that he found a true calling. Kelly now fights for JavaScript, testable code, and fast delivery.
You can find him singing karaoke, performing magic, or cheering for the Cubs and Fighting Irish.
How to Send and Receive SMS With Firebase Functions (Tutorial)
Time to read: 12 minutes
This article was updated in October 2025
The Firebase platform allows developers to build an application backend rapidly. It's enjoyable to use as well. For this tutorial, I wanted to start using it for some SMS messaging with Vonage. Below, I’ll show you how to receive and send SMS messages using Firebase. After finishing these steps, you will be able to create an SMS message log and a response to the sender using Firebase Cloud Functions and the Realtime Database alongside the Vonage SMS API.
This blog post uses Gen 1 of Firebase; you can also learn to send SMS Messages with Cloud Functions for Firebase Gen 2 here.
You can see the full code on GitHub.
You can also find this tutorial in a video format:
You will need a few items to get going - so take a moment and make sure you have both of these ready to go.
A Firebase account.
This tutorial has three main sections:
First, we’ll show you how to set up Firebase for your project.
Next, we’ll show you how to create a function to receive SMS messages in Firebase.
Finally, we’ll cover how to create a function that sends SMS messages in Firebase.
The first step is to set up a Firebase project. The following will show you how to set up a new project using the Firebase console.
Go to the Firebase console
Click Add Project, add a project name, and click Continue.
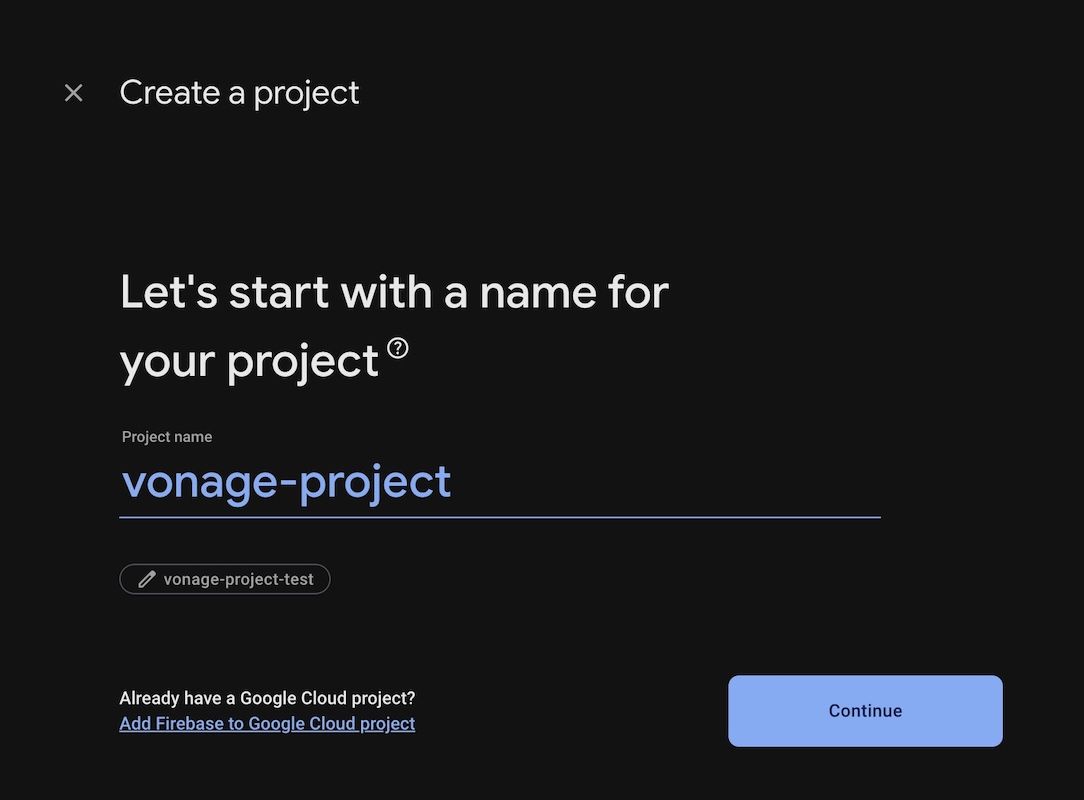 Create a Project
We will not use Google Analytics for this project but feel free to add it if you like it and then click Create Project (if added).
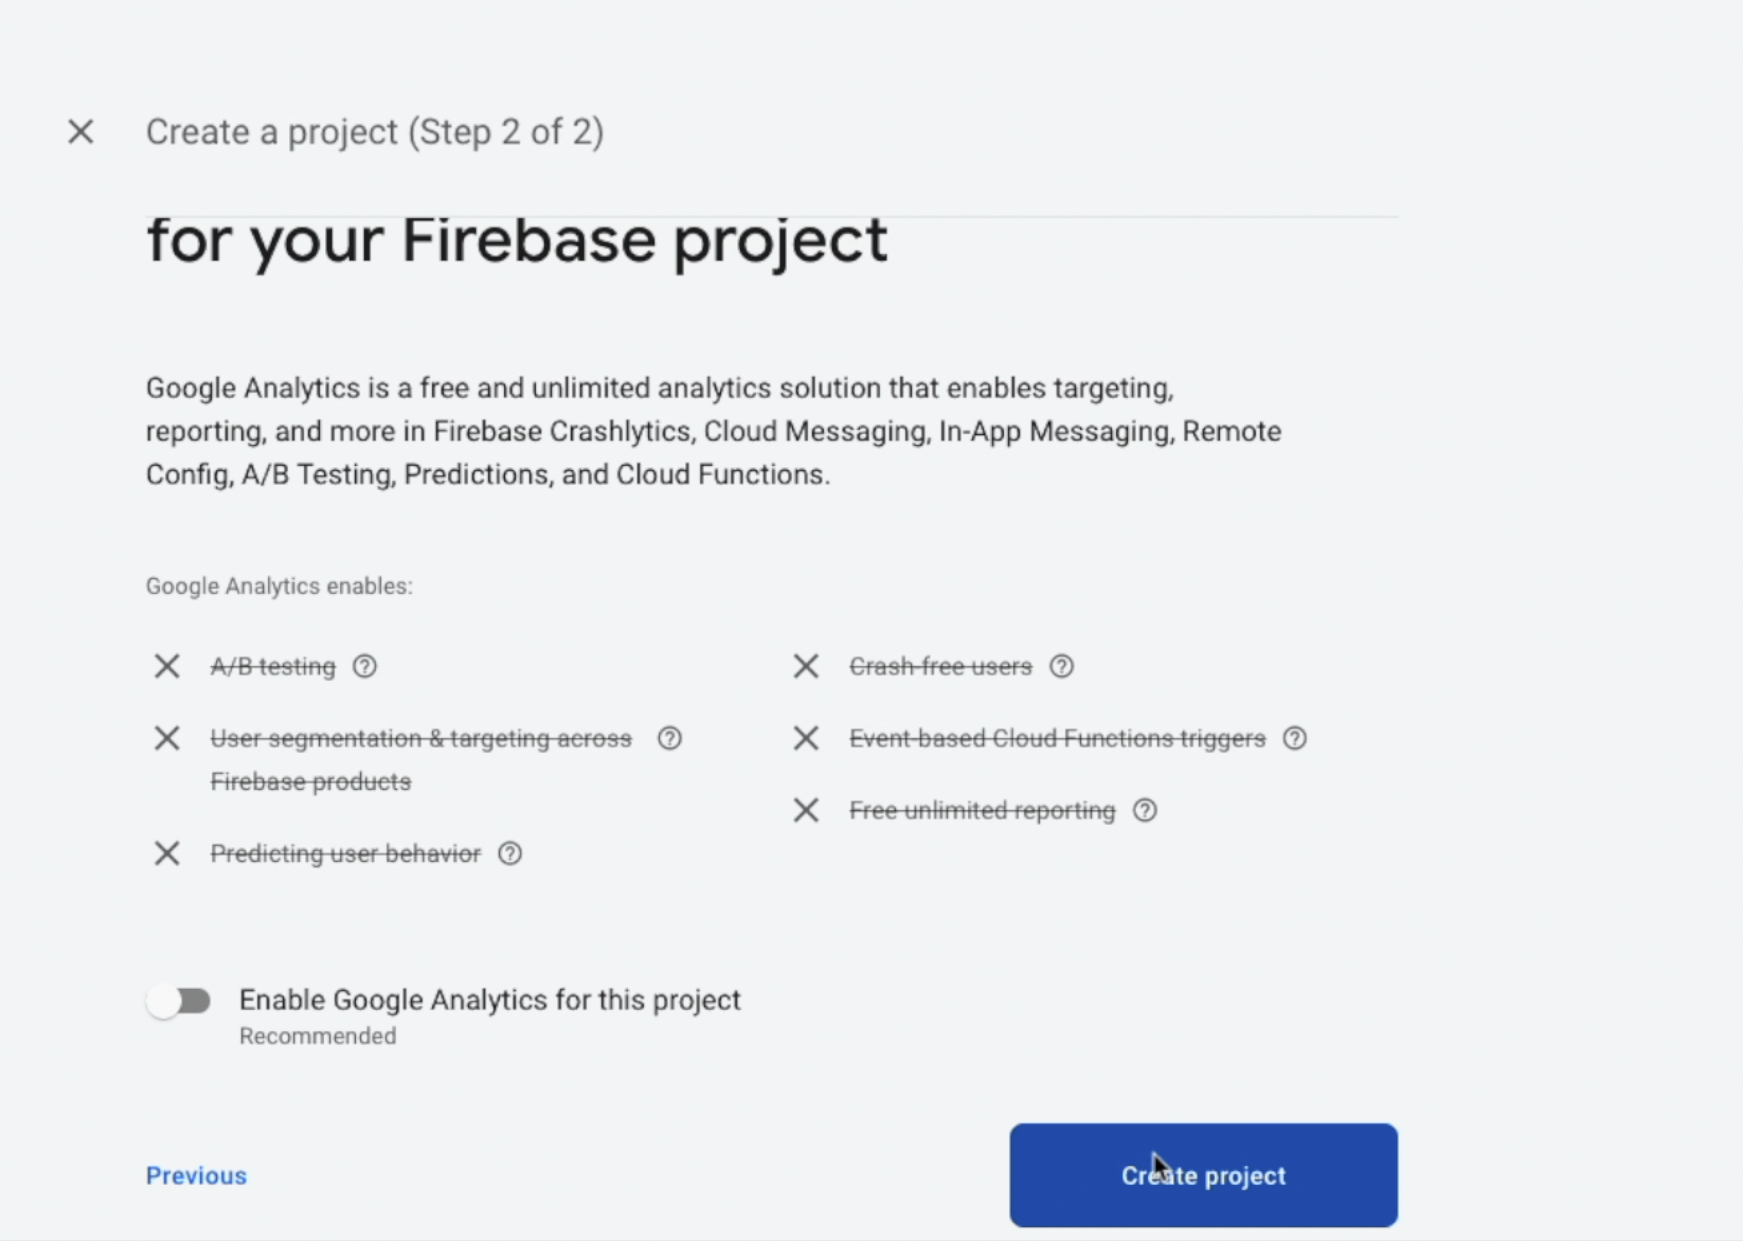 Add analytics
3. Wait a bit for the project to be created - it takes less than a minute.
4. Set the Billing type under ⚙️ -> Usage and Billing -> Details & Settings to Blaze. The Pay-as-you-go plan is required to use a third-party API. More details regarding billing with Google.
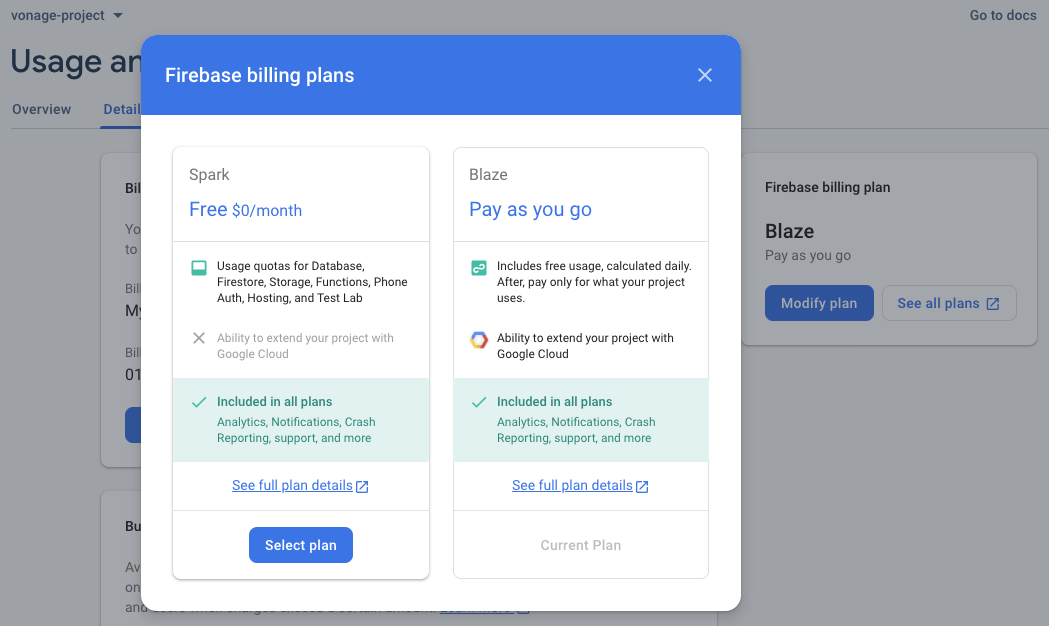 Change Billing
Set the
Google Cloud Platform (GCP) resource locationin⚙️ -> Project Settings.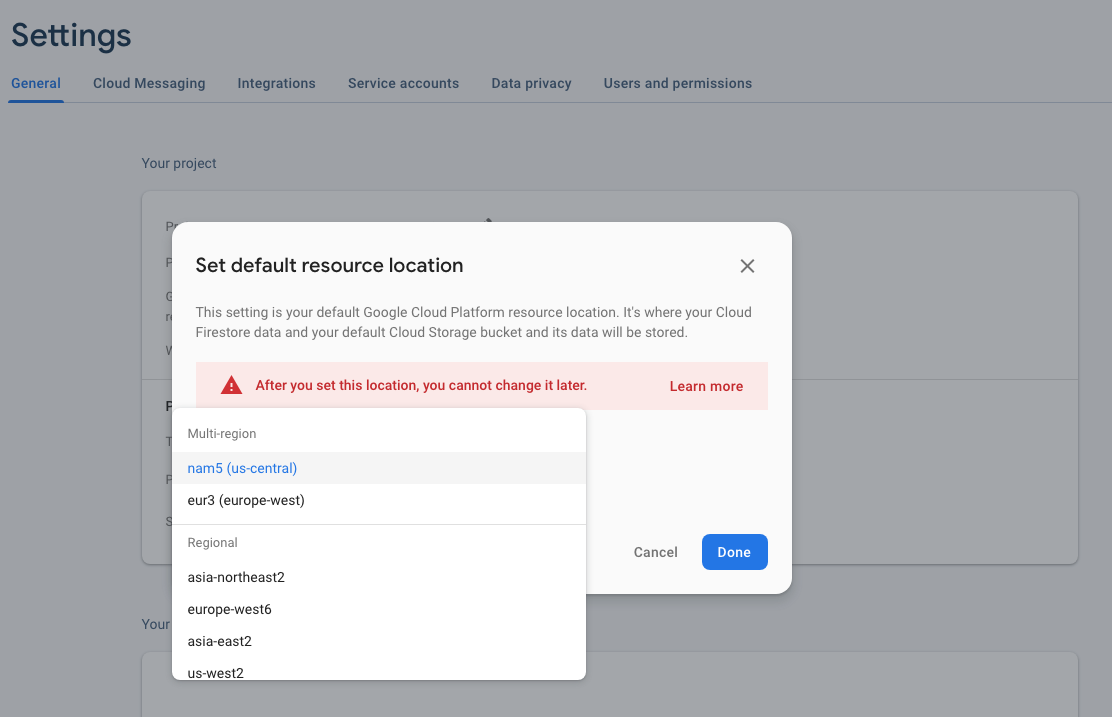 Update Location
Most everything you will need to do with Firebase can be done directly from the command line with the toolset they provide.
Install the Firebase tools with npm.
Log in to Firebase using
firebase login. The login process will open your browser for authentication.
Writing Cloud Functions for Firebase requires some initialization work to get started, but it's mostly done for you using Firebase Tools commands.
Create a project folder
mkdir vonage-project && cd vonage-project.Initialize Cloud Functions for Firebase
firebase init functions.
######## #### ########  ######## ########     ###     ######  ########
     ##        ##  ##     ## ##       ##     ##  ##   ##  ##       ##
     ######    ##  ########  ######   ########  #########  ######  ######
     ##        ##  ##    ##  ##       ##     ## ##     ##       ## ##
     ##       #### ##     ## ######## ########  ##     ##  ######  ########

You're about to initialize a Firebase project in this directory:

 /your_folders/your-project-name


=== Project Setup

First, let's associate this project directory with a Firebase project.
You can create multiple project aliases by running firebase use --add,
but for now, we'll just set up a default project.

? Please select an option: (Use arrow keys)
❯ Use an existing project
 Create a new project
 Add Firebase to an existing Google Cloud Platform project
Don't set up a default projectSince you already created a project in the dashboard, you can select Use an existing project which will prompt you to choose the desired project. If you haven't done this, use Create a new project and give it a unique name to create one. You would still need to go to the console to update the location and billing, but it is another option to create Firebase projects.
Select the project name you created.
Select JavaScript.
Choose Y for ESLint if you desire (I recommend it).
Install all dependencies now.
These steps will create the folders and files required to build Firebase Functions and install all dependencies. Once NPM completes, switch to the functions directory and open index.js in your favorite editor to start adding code.
The first function you create will act as a webhook to capture and log incoming SMS messages from Vonage. This function will allow you to receive incoming SMS text messages via Firebase.
The index.js file has some example code provided you won't need. Delete everything and start at the top to add the following code:
const functions = require("firebase-functions/v1");

const admin = require("firebase-admin");

const serviceAccount = require("./serviceAccountKey.json");

// Initialize Firebase app for database access
admin.initializeApp({
  credential: admin.credential.cert(serviceAccount),
  databaseURL: "https://name_of_the_database.europe-west1.firebasedatabase.app",
});Calling admin.initializeApp(); allows the functions to read and write to the Firebase Real-Time database.
You also need to create a Service Account for your project and add your databaseURL that can be found on the "Realtime Database" tab of your Firebase project.
Next, use the following method to create your function.
// This function will serve as the webhook for incoming SMS messages,
// and will log the message into the Firebase Realtime Database
exports.inboundSMS = functions.https.onRequest(async (req, res) => {
  let params;
  if (Object.keys(req.query).length === 0) {
    params = req.body;
  } else {
    params = req.query;
  }
  await admin.database().ref('/msgq').push(params);
  res.sendStatus(200);
});The inboundSMS method listens for HTTPS requests - which is precisely what Vonage webhook needs. The Firebase Function will capture the req.body in case it's a POST Method or the req.query in case it's a GET Method. It then sends it to the /msgq object in the Real-Time Database as a log.
Now that you have some code written be sure to save your file and deploy the function to Firebase:
firebase deploy --only functions

=== Deploying to 'vonage-project'...

i deploying functions
Running command: npm --prefix "$RESOURCE_DIR""

> functions@ lint /Users/kellyjandrews/Google Drive/Apps/vonage-project/functions
> eslint .

✔ functions: Finished running predeploy script.
i functions: ensuring necessary APIs are enabled...
✔ functions: all necessary APIs are enabled
i functions: preparing functions directory for uploading...
i functions: packaged functions (38.78 KB) for uploading
✔ functions: functions folder uploaded successfully
i functions: creating Node.js 18 function inboundSMS(us-central1)...
✔ functions[inboundSMS(us-central1)]: Successful create operation.
Function URL (inboundSMS): https://us-central1-vonage-project.cloudfunctions.net/inboundSMS

✔ Deploy complete!

Project Console: https://console.firebase.google.com/project/vonage-project/overviewThe vital piece of the output is Function URL (inboundSMS). This URL is required to set up the webhook in Vonage, which you will do next.
From the Vonage dashboard settings, make sure you are using the SMS API, choose post and copy the output Function URL(inbound SMS) from the terminal console, and paste it into the webhook on Vonage.
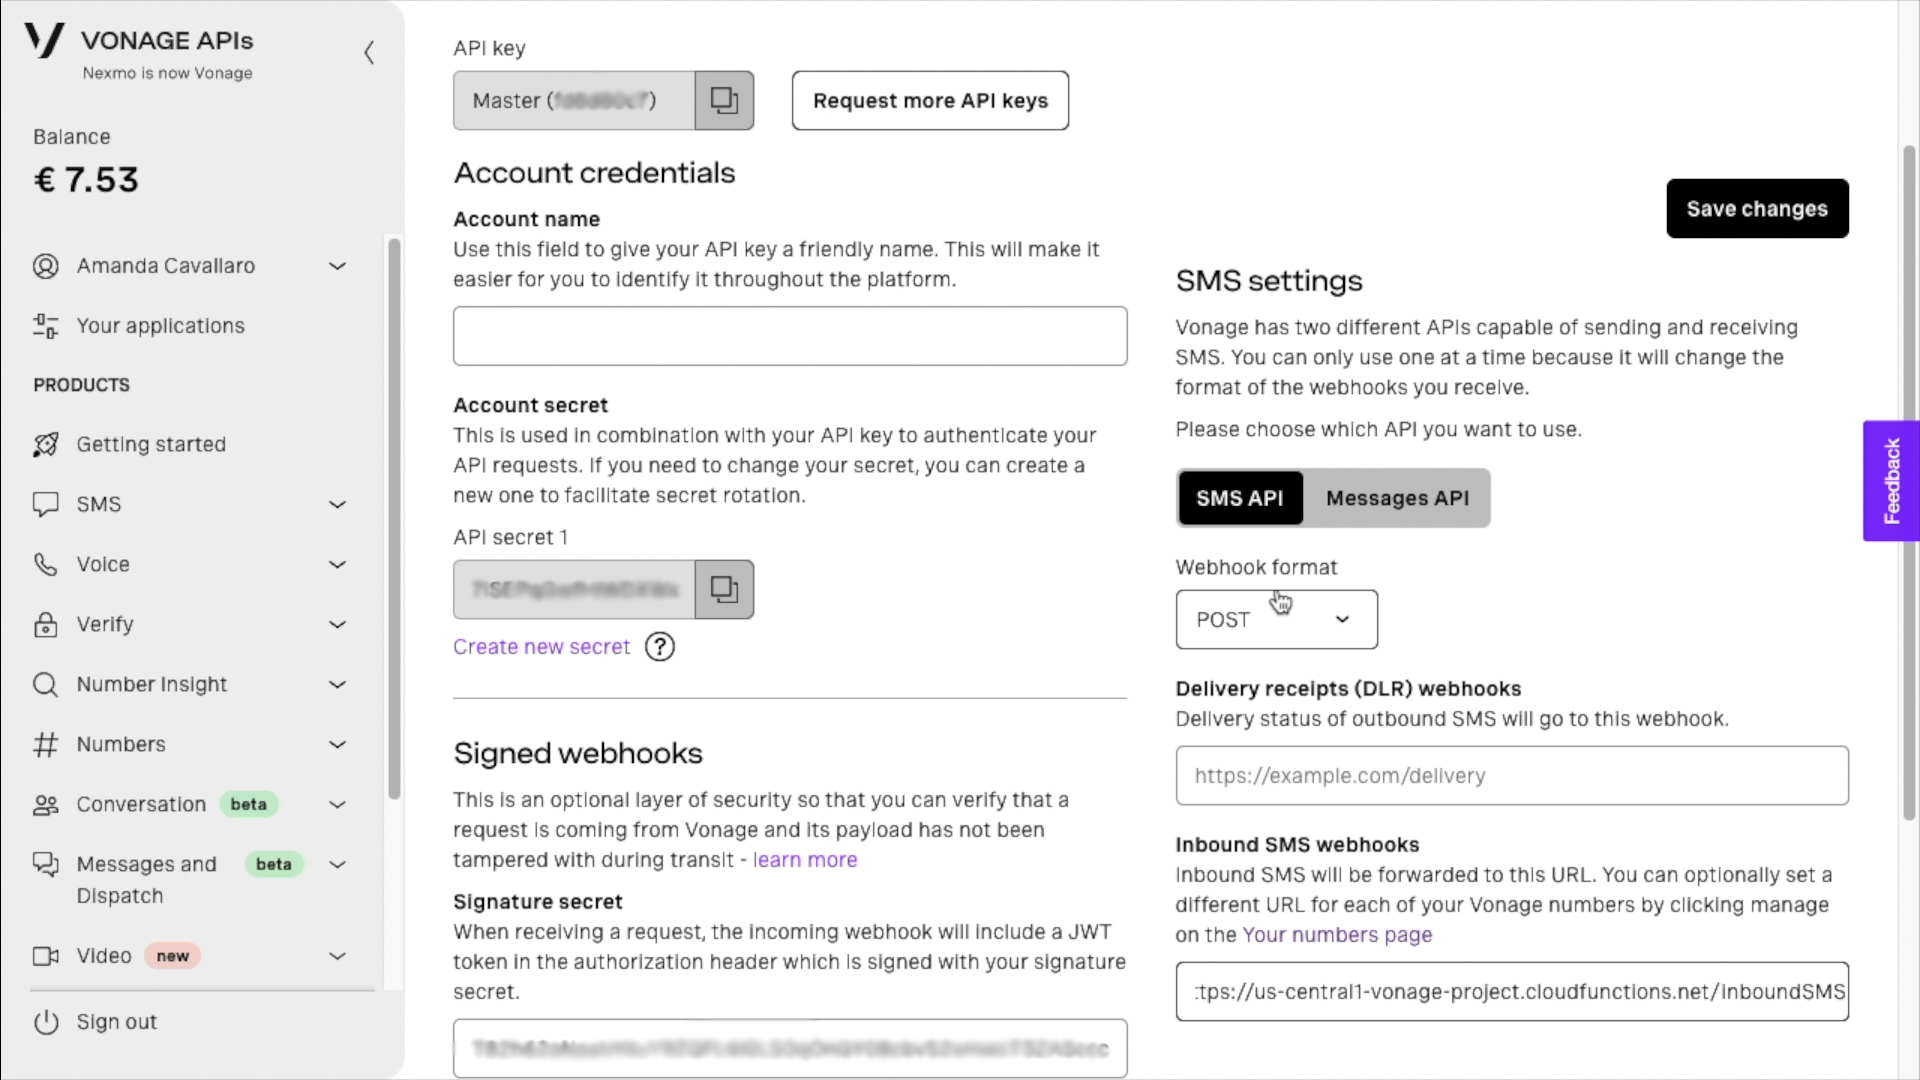 Vonage Dashboard SettingsGrab your phone and send a message to the phone number. Open up the Firebase console and navigate to
 database page, and you should see something like this:
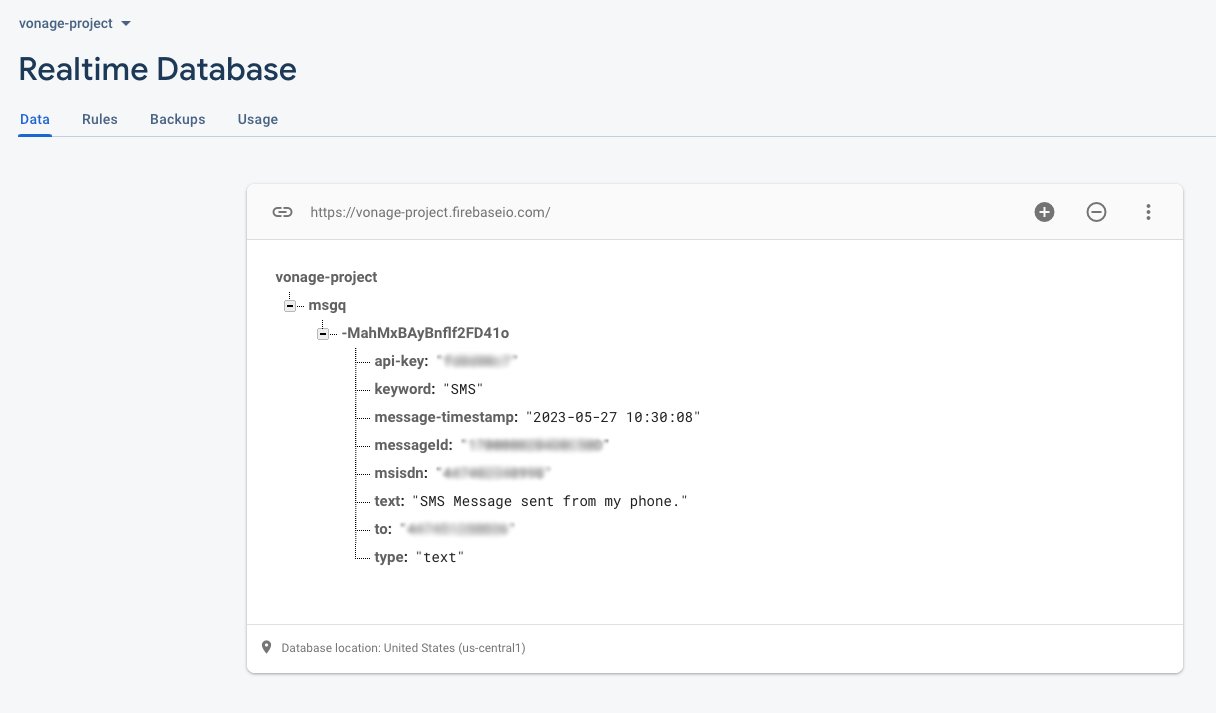 Real-time Database Vonage Message Entry
Now that there is a way to log incoming messages, you can write a function to do something with the incoming message.
So far, you have created a Firebase Function linked to a Vonage phone number for capturing inbound SMS messages. Firebase Functions can also react to database updates. Upon a new entry, the code sends an echo of the original text.
Below, we’ll show you how to create a function in Firebase that sends SMS text messages.
Start by adding Vonage to the dependency list - make sure you do this in the functions directory:
Next, add dotenv to the dependency list.
Create a .env file and add the environment variables in the functions directory:
You can either use dot env or add the following environment variables to the Firebase config:
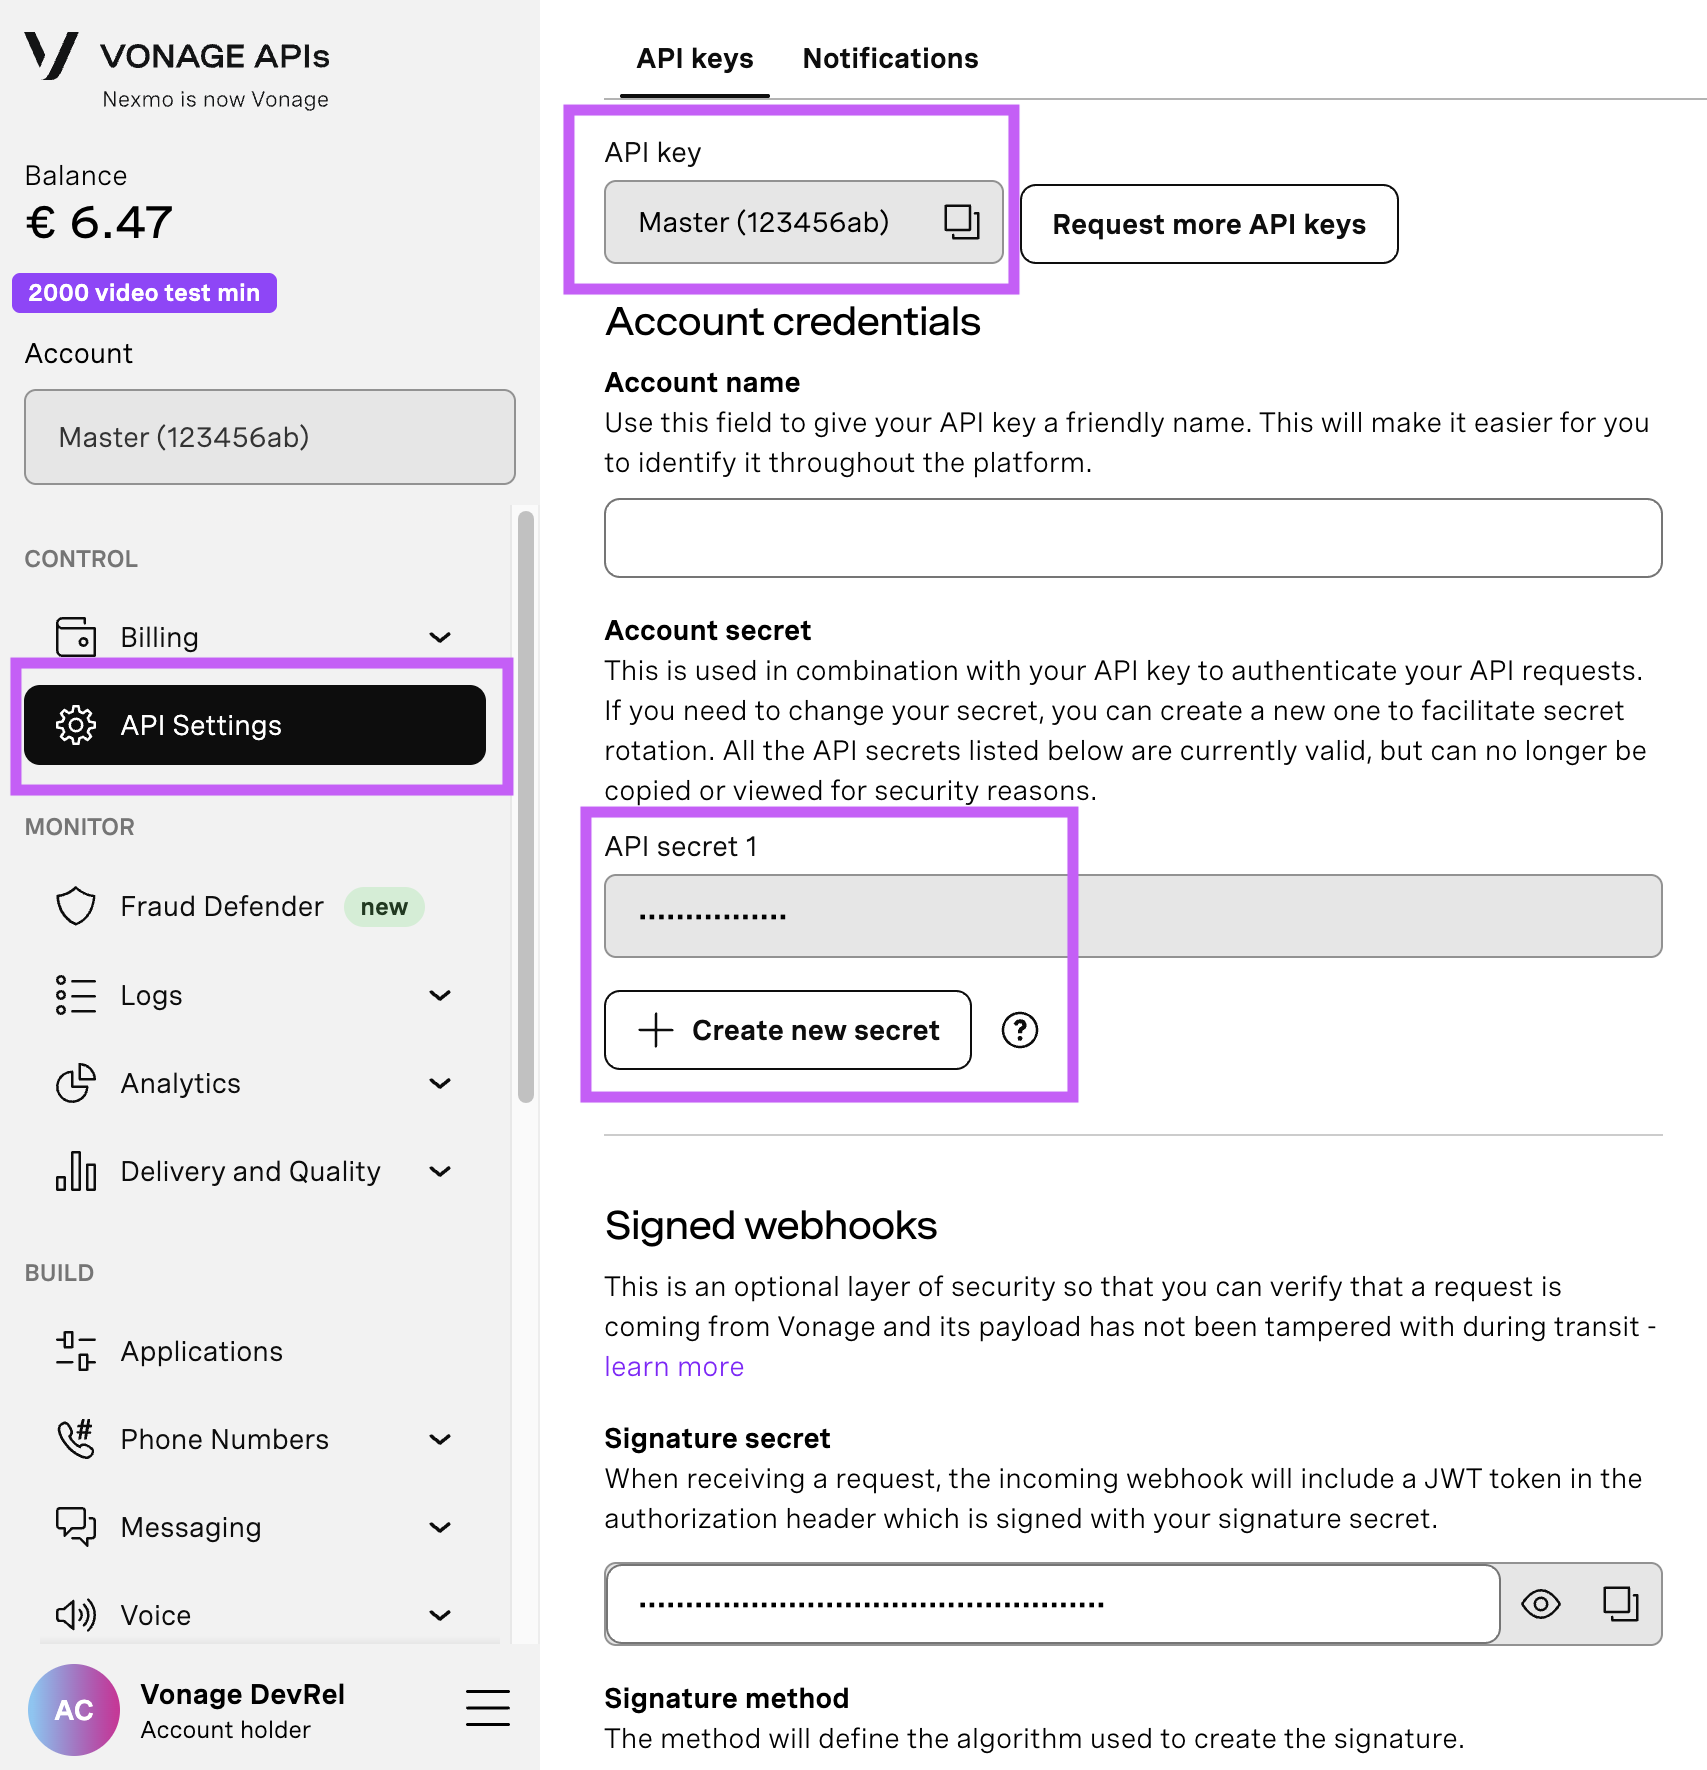
Open your API Settings Page to access your Vonage API Key and Secret, both of which are displayed as shown in the screenshot below. The API Key is located at the top of the page, and to access your API Secret, please refer to the “Account secret” subsection.
Note: In case you cannot remember your previously created API Secret, click on “+ Create new secret” and save it securely.
Next, open index.js add @vonage/server-sdk to the requirements at the top, and import the environment variables to initialize Vonage:
require("dotenv").config();

const functions = require("firebase-functions/v1");
const admin = require("firebase-admin");
const { Vonage } = require("@vonage/server-sdk");

const serviceAccount = require("./serviceAccountKey.json");

admin.initializeApp({
  credential: admin.credential.cert(serviceAccount),
  databaseURL: "https://name_of_the_database.region.firebasedatabase.app",
});

// If you are using .env
const vonage = new Vonage({
  apiKey: process.env.VONAGE_API_KEY,
  apiSecret: process.env.VONAGE_API_SECRET,
});

// If you are using the Firebase Environment Variables
const {
  api_key,
  api_secret
} = functions.config().vonage;Now you can create the new function for Firebase to send the response:
// This function listens for updates to the Firebase Realtime Database
// and sends a message back to the original sender
exports.sendSMS = functions.database
  .ref("/msgq/{pushId}")
  .onCreate(async (message) => {
    const { msisdn, text, to } = message.val();

    const resultSnapshot = await message.ref.parent
      .child("result")
      .once("value");
    if (resultSnapshot.exists()) {
      console.log("Result already exists. Exiting function.");
      return;
    }

    try {
      const responseData = await vonage.sms.send({
        to: to,
        from: msisdn,
        text: `You sent the following text: ${text}`,
      });

      if (responseData.messages && responseData.messages[0].status === "0") {
        const result = `You sent the following text:
 ${responseData.messages[0]["message-id"]}`;
        await message.ref.parent.child("result").set(result);
        console.log(result);
        return result;
      } else {
        const errorText =
          (responseData.messages && responseData.messages[0]["error-text"]) ||
          "Unknown error";
        const errorMessage = `Message failed with error: ${errorText}`;
        console.error(errorMessage);
        return errorMessage;
      }
    } catch (err) {
      console.error("Vonage error:", err);
      return `Vonage error: ${err.message}`;
    }
});The new function will watch for new messages added to the /msgq database object. When triggered, the full Vonage object gets passed as message. This object includes msisdn, which is the originating phone number - yours in this case, and the to number, which is the Vonage virtual number you purchased.
With the phone numbers in hand, as well as the text message, you can now do any number of things. You can create a lookup table to respond with specific data based on the keyword, forward it to another system, or, in our case, send the original message.
Deploy the Firebase Functions again from the command line:
firebase deploy --only functionsGrab your phone, send another message, and then you should get a response back that looks something like You sent the following text: A text message sent using the Vonage SMS API.
You have now completed all the steps for this tutorial. You can see the full code on GitHub.
Now that the initial steps to send and receive messages are complete, my next few posts will expand this concept into controlling some of my home automation via text messages.
Have a question or want to share what you're building?
Subscribe to the Developer Newsletter
Follow us on X (formerly Twitter) for updates
Watch tutorials on our YouTube channel
Connect with us on the Vonage Developer page on LinkedIn
Stay connected and keep up with the latest developer news, tips, and events.
Share:
Kelly J Andrews is a developer advocate for Nexmo and has been tinkering with computers for over 30 years, using BASIC for the first time at the age of 5.
It wasn't until building his first webpage in 1997, and trying out JavaScript for the first time that he found a true calling. Kelly now fights for JavaScript, testable code, and fast delivery.
You can find him singing karaoke, performing magic, or cheering for the Cubs and Fighting Irish.