
Share:
)
Liz Acosta is a Developer Advocate at Vonage. While her career path from film student to marketer to engineer to Developer Advocate might seem unconventional, it’s pretty typical for Developer Relations! Liz loves pizza, plants, pugs, and Python.
Seeking Validation: Data Validation in Python with Pydantic and Vonage Verify
Time to read: 15 minutes
This blog post provides an introduction to Pydantic, the popular data validation library for Python. It includes a demonstration of the value Pydantic provides using the Vonage Verify API.
To understand why Pydantic is such a useful library, it is important to first understand how typing works in Python. In programming, “typing” refers to systems of classifying and categorizing data. How data is typed determines how it can be acted upon – for instance, you can’t add the word “two” with the number 2.
Python owes a lot of its success and popularity to its flexibility around typing. Unlike most compiled languages that require you to explicitly declare types, Python implements something called duck-typing. Duck-typing is a dynamic type system that assumes that if an object “walks like a duck and quacks like a duck, then it must be a duck.”
More specifically, according to the Python documentation, duck-typing is:
“A programming style which does not look at an object’s type to determine if it has the right interface; instead, the method or attribute is simply called or used … By emphasizing interfaces rather than specific types, well-designed code improves its flexibility by allowing polymorphic substitution. Duck-typing avoids tests using
type()orisinstance().”
In practice, an example of this is Python’s len function. len() returns “the length (the number of items) of an object.” In the code below, observe how len() successfully produces an output regardless of the type of object it is called with:
>>> example_1 = "Hello? World!"
>>> type(example_1)
<class 'str'>

>>> example_2 = [1, 3, 5, 8]
>>> type(example_2)
<class 'list'>

>>> example_3 = {"hello" : "world", "foo": "bar"}
>>> type(example_3)
<class 'dict'>

>>> len(example_1)
13                                 # 13 letters in "Hello? World!"

>>> len(example_2)
4                                  # 4 items in the list

>>> len(example_3)
2                                  # 2 key-value pairs in the dictionary
In an example of dynamic typing that more likely represents what you might see in Python in the real world, the code below defines three different classes of dog breeds that can each bark():
class Pug:
    def bark(self):
        print("The pug goes arf arf!")

class LabradorRetriever:
    def bark(self):
        print("The labrador retriever goes arf arf!")

class Wolfhound:
    def bark(self):
print("The wolfhound goes arf arf!")You can instantiate one of each kind of dog breed and call bark() on every one of them without error because they all possess the same interface. Because of duck-typing, the following code runs successfully:
>>> pets = [Pug(), LabradorRetriever(), Wolfhound()]

>>> for pet in pets:
...     pet.bark()

The pug goes arf arf!
The labrador retriever goes arf arf!
The wolfhound goes arf arf!pet can be of class Pug, LabradorRetriever, or Wolfhound and Python will still call the bark function without error.
This can be convenient, and in many contexts, it's exactly what you want. For scripting, data science, and exploratory work, Python's dynamic typing is a feature, not a bug. Duck-typing lets you iterate quickly without the overhead of rigid type declarations. This is a big part of why Python has become the dominant language for AI and data science workflows.
However, the calculus changes significantly in production backend code. A Flask or Django application with no declared types can introduce maintenance and debugging friction. With Python’s duck-typing, type mismatches surface as cryptic runtime errors rather than clear, early failures. The problem becomes even more acute when applications rely on specific types of data in order to run as intended, such as when working with APIs, processing configuration files, or handling user input.
For instance, if you defined the following class:
class Sphynx:
    def meow(self):
print("The sphynx goes meow meow!")And then updated the example code to include an instance of Sphynx in the list of pets to iterate through, you will run into an error:
>>> pets = [Pug(), LabradorRetriever(), Sphynx()]

>>> for pet in pets:
...     pet.bark()
...

The pug goes arf arf!
The labrador retriever goes arf arf!
Traceback (most recent call last):
  File "<python-input-74>", line 2, in <module>
    pet.bark()
    ^^^^^^^^
AttributeError: 'Sphynx' object has no attribute 'bark'As this example illustrates, within certain contexts, the flexibility of duck-typing becomes a liability. For example, a wrong type passed to an API call might not fail until the request is already in flight, potentially costing you money on a chargeable call that was always destined to fail.
One way to address some of the issues that arise with dynamic typing is with Python’s type hints.
A type hint is a code annotation that “specifies the expected type for a variable, a class attribute, or a function parameter or return value.” Therefore, a type annotation refers to how type hints are used syntactically in Python.
The following code is a basic example of using type annotation:
def greeting(name: str) -> str:
return 'Hello ' + nameIn this example, the type hint is str and the type annotation is the name: str and -> str syntax. The type annotation tells us that the expected type of the parameter name is a string and that the expected return type of the function greeting is a string.
Adding type annotations to the example Pug class could look like this:
class Pug:
    def init(self, name: str) -> None:
        self.name: str = name

    def bark(self) -> None:
print(f"The pug {self.name} goes arf arf!")And if we update our pets iteration code to include type annotation, it could look like this:
def make_dogs_bark(pets: List[Pug | LabradorRetriever | Wolfhound ]) -> None:
    for pet in pets:
        pet.bark()

make_dogs_bark([Pug(), LabradorRetriever(), Sphynx()])As the name suggests, these are merely type hints. They help make the code more readable and maintainable, but they are not enforced by the Python interpreter. We could use an additional tool like mypy to check the types and receive an error like this:
error: List item 2 has incompatible type "Sphynx"; expected "Pug | LabradorRetriever | Wolfhound" [list-item]This would have to be performed as an additional step – nothing is preventing this code from executing and generating an error at runtime.
To prevent errors at runtime – such as an API call with incorrect data – you could validate the data in your request before sending it. In the example code, we could define some sort of validation to ensure each item in the list pets can bark():
def make_dogs_bark_safely(dogs):
    """Manual validation in the function"""
    for dog in dogs:
        if not hasattr(dog, 'bark') or not callable(getattr(dog, 'bark')):
            raise TypeError(f"Invalid dog type: {type(dog).__name__}")
        dog.bark()

# Now this fails immediately with a clear message:
pets = [Pug(), Sphynx()]

make_dogs_bark_safely(pets)
# TypeError: Invalid dog type: SphynxIn addition to quickly becoming tedious and unwieldy, this pattern undermines some of the conveniences of Python’s inherent dynamic-typing while also missing out on some of the benefits of type annotation.
Fortunately, Pydantic provides data validation while maintaining the ease and speed of the language using syntax already baked in.
Pydantic is a data validation library for Python offering the following benefits:
Leverages type hints to control schema validation and serialization.
Uses Rust under the hood for its core validation logic resulting in minimal impact on performance.
Supports validation of many standard library types including
dataclassandTypedDict.Works in either strict or lax mode when handling types.
Can output JSON Schema out of the box, which enables seamless integration with other tools.
Automatically generates documentation from models.
Let’s take a closer look at how these features come together in practice to provide reliable, efficient data validation in harmony with Python syntax and structure.
It is important to understand that in Pydantic, “validation” refers to “the process of instantiating a model (or other type) that adheres to specified types and constraints.” In other words, Pydantic’s validation applies to the output of a model instantiation, not the input data. As such, Pydantic raises a ValidationError when data cannot be successfully parsed into an instance of a model.
BaseModel
BaseModel lies at the heart of Pydantic. You inherit from it to define data models with type-annotated fields. One of the primary methods to define schema in Pydantic is via models. When you instantiate a BaseModel Pydantic automatically validates the data against the defined schema.
Using Pydantic, the Pug class now looks like this:
class Pug(BaseModel):
    name: str
    age: int
    color: str = "fawn"

    def bark(self):
print(f"The pug {self.name} goes arf arf!")If you were to instantiate Pug, Pydantic would make sure the resulting object has a name of type string, an age of type integer, and a color of type string with fawn as the default.
Type Hints and Required Fields
Type annotations control schema validation and serialization. Fields declared with just a type annotation are required; fields with defaults are optional.
In the Pug example, the name field is annotated with str meaning any string will suffice, but a string must be provided; the same applies to the age field. The color field, however, provides a default of fawn and thus not required when instantiating a Pug.
Type Coercion
Pydantic can be used in either strict or the default lax mode. In lax mode, the library will automatically convert data to the type defined in the schema.
So, for example, if we supplied "5" as a string for the age of a Pug, Pydantic would convert it to an integer.
The Field function enables the addition of metadata and constraints for schema fields.
Some commonly used parameters are:
Constraints such as greater than
gt) and greater than or equal toge), andmin_lengthandmax_lengthAliases for mapping input and output field names using
alias,validation_alias, andserialization_alias)Strict mode to prevent type coercion on certain fields
strict=True)
To enforce constraints on the name field for Pug, you would use the following code:
class Pug(BaseModel):
    name: str = Field(..., min_length=1, description="The pug's name")
    age: int
    color: str = "fawn"

    def bark(self):
        print(f"The pug {self.name} goes arf arf!")
Pydantic model instances can be converted to dictionaries without writing any additional serialization code by using model_dump(). This makes it straightforward to serialize to JSON or other formats to use elsewhere in a project. For example, model_dump_json() serializes a model directly to JSON.
Below is an example of creating an instance of Pug and then serializing it using one of Pydantic’s built-in functions:
matty_pug = Pug(name="Matty", age=14)

result = matty_pug.model_dump()

print(result)Which would produce the following output:
{'name': 'Matty', 'age': 14, 'color': fawn}
Since its inception, Pydantic has quickly become one of the most widely used data validation libraries for Python. Approximately 8,000 packages on PyPI use Pydantic including (and most famously) FastAPI, huggingface, Django Ninja, SQLModel, LangChain, and Vonage.
In November 2024, Vonage released a full, ground-up rewrite of the Vonage Python SDK. It’s not always easy to start over completely, but the rewrite was an opportunity to make some critical structural enhancements and improve user interaction with the SDK.
Among some of the changes included in this initiative was the addition of Pydantic to the SDK in order to facilitate calling Vonage APIs and parsing the responses.
Check out the video below to hear from one of our developers who works on the Python SDK and see what he has to say about using Pydantic.
Using Pydantic models to form requests enforces correct typing and makes it easier to pass the right objects to the Vonage APIs. With version 4 of the SDK, API responses are now deserialized into fully documented Pydantic models, which provide more consistency than returning dictionaries like in the prior version. Additionally, you can still turn Pydantic models into dictionaries or JSON strings with model.model_dump and model.model_dump_json respectively.
For this demonstration, we’ll take a look at the Vonage Verify API and how it is modeled using Pydantic in the SDK.
The Verify API is Vonage’s next generation two-factor authentication (2FA) product. With Verify API, you can authenticate your users and prevent fraud with a simple, easy-to-use API that abstracts away the complexity of 2FA at a global scale.
It expands on traditional authentication methods by supporting a wider range of channels, including over-the-top (OTT) channels like WhatsApp, as well as SMS, voice, and email. The API supports both JSON web tokens (JWT) and Basic authentication. Basic authentication is easier to get started with, but does not support advanced features such as ACLs. You can use either JWT or Basic authentication, but not both at the same time. You can read more about authentication in the documentation.
At a high level, the Verify API follows this workflow:
An end-user triggers a 2FA request in an application
On the backend, this 2FA request initiates a Verify API request
The Verify API sends a one time password (OTP) to the end-user via the configured channel (SMS, voice, WhatsApp, or email)
The end-user provides the OTP to the application
This initiates a Verify request to check the OTP provided by the end-user against the OTP generated by the API
The result of that check then determines what happens next (the end-user is authenticated, etc)
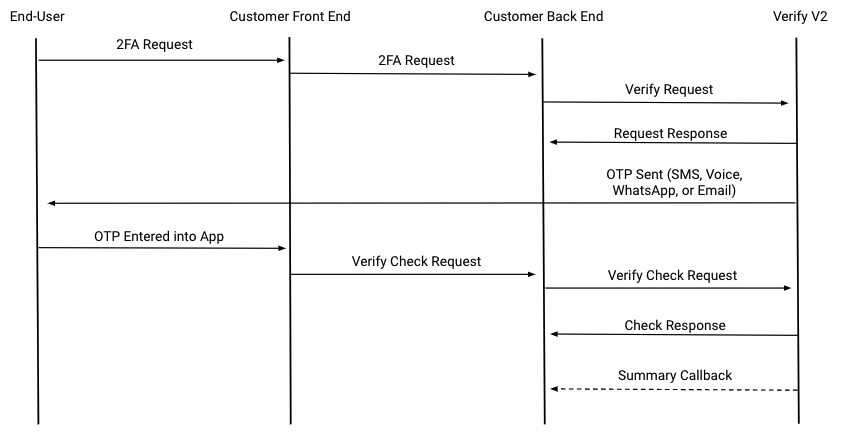 A diagram of the Verify V2 Request with Summary Callbacks.A typical initially verification request includes the following payload:
{

   "locale": "es-es",
   "channel_timeout": 180,
   "client_ref": "myPersonalRef",
   "code_length": 4,
   "code": "e4dR1Qz",
   "brand": "ACME",
   "template_id": "4ed3027d-8762-44a0-aa3f-c393717413a4",
   "workflow": [
      {
         "channel": "sms",
         "to": "44770090000"
      },
      {
         "channel": "voice",
         "to": "44770090000"
      }
   ]
}Which is explained more in-depth below:
Key | Description | Required or optional |
|---|---|---|
locale | The locale to use for the verification message | Optional, defaults to |
channel_timeout | The time in seconds to wait between attempts to deliver the verification code | Optional, defaults to 180 seconds |
client_ref | A unique identifier for the verification request | Optional |
code_length | The length of the verification code to generate | Optional, defaults to 4 |
code | An optional alphanumeric custom code to use, if you don't want Vonage to generate the code | Optional |
brand | The name of the company or service that is sending the verification request – this will appear in the body of the SMS or TTS message | Required, maximum length of 16 characters |
template_id | A custom template ID to use – works only when | Optional |
workflow | The list of channels to use in the verification workflow, used in the order they are listed | Required, maximum length of 3 items |
To learn more about the API and how it works, refer to the Vonage Verify documentation.
A successful request responds with a 202 OK to indicate that the verification request has been initiated. The response will also include a request_id which is required to complete the verification process:
{"request_id": "c11236f4-00bf-4b89-84ba-88b25df97315",}At the same time, Vonage sends an OTP to the end-user via the configured workflow, attempting each channel in the order in which they are defined.
Once the end-user receives and provides the OTP to the application, another request to the Verify endpoint with the request_id as a path parameter https://api.nexmo.com/v2/verify/:request_id) and the OTP in the request body for the code key.
If the code provided matches the code generated and sent by Vonage, a 200 OK response is returned along with a "status": "complete" .
The Vonage Python SDK facilitates implementing the Vonage APIs within a Python application. Introducing Pydantic to the SDK makes it even easier to use the APIs. With Pydantic, rather than discovering an error after making an API call and incurring any charges, request models are validated before execution without the need for additional code to do so.
The demonstration for this blog post is a minimal 2FA application using the FastAPI framework. The end-user navigates to a web page where they enter their email address. Using the Verify API, the application then generates an OTP code which is sent to the end-user provided email address. The end-user provides that code to the application and if the Verify check is successful, the end-user is rewarded with an animated gif.
If you want, you can go straight to the code and use the README to get it up and running.
The following code is where the Verify request is created:
   verify_request = VerifyRequest(
        brand=settings.verify_brand_name,
        workflow=[
            EmailChannel(to=email),
        ],
        channel_timeout=60,
        code_length=5,
)If we step into the VerifyRequest object, we find a Pydantic model:
class VerifyRequest(BaseModel):
    brand: str = Field(..., min_length=1, max_length=16)
    workflow: list[
        Union[
            SilentAuthChannel,
            SmsChannel,
            WhatsappChannel,
            VoiceChannel,
            EmailChannel,
        ]
    ]
    locale: Optional[Locale] = None
    channel_timeout: Optional[int] = Field(None, ge=15, le=900)
    client_ref: Optional[str] = Field(None, min_length=1, max_length=16)
    code_length: Optional[int] = Field(None, ge=4, le=10)
    code: Optional[str] = Field(None, pattern=r'^[a-zA-Z0-9]{4,10}$')

    @model_validator(mode='after')
    def check_silent_auth_first_if_present(self):
        if len(self.workflow) > 1:
            for i in range(1, len(self.workflow)):
                if isinstance(self.workflow[i], SilentAuthChannel):
                    raise VerifyError(
                        'If using Silent Authentication, it must be the first channel in the "workflow" list.'
                    )
return selfThe schema translates the API request into types using Python annotation and the Field function to define constraints. The workflow field defines a Union type of other modeled types, demonstrating how types can be nested.
Lastly, the model_validator(mode='after') is a Pydantic decorator that provides additional configuration for how the VerifyRequest model is to be validated. In this case, the def check_silent_auth_first_if_present method is executed after the VerifyRequest model has been constructed to ensure that if SilentAuthChannel is included in the workflow, it must be listed first.
After generating and activating a virtual environment, and installing the required dependencies per the README, you can run the demonstration application with the following:
fastapi devThis will spin up a web app on http://127.0.0.1:8000:
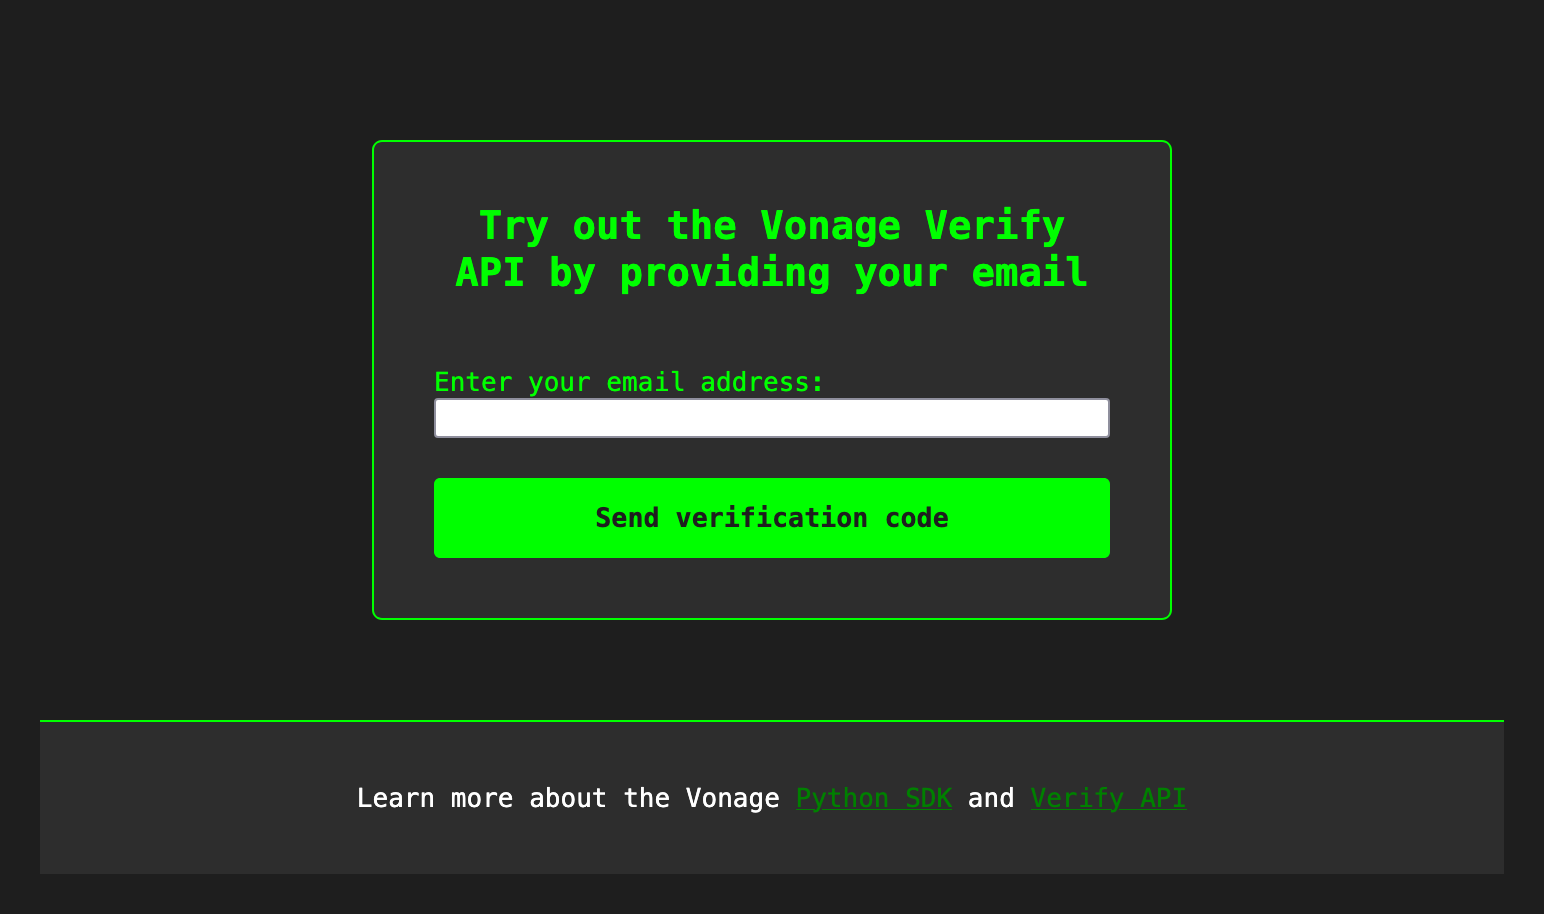 A screenshot of the index page inviting the end-user to enter their email address to try out the Vonage Verify API.Clicking on Submit verification code triggers the Verify API workflow. You should be directed to a web page where you can enter the code sent to the email address you provided:
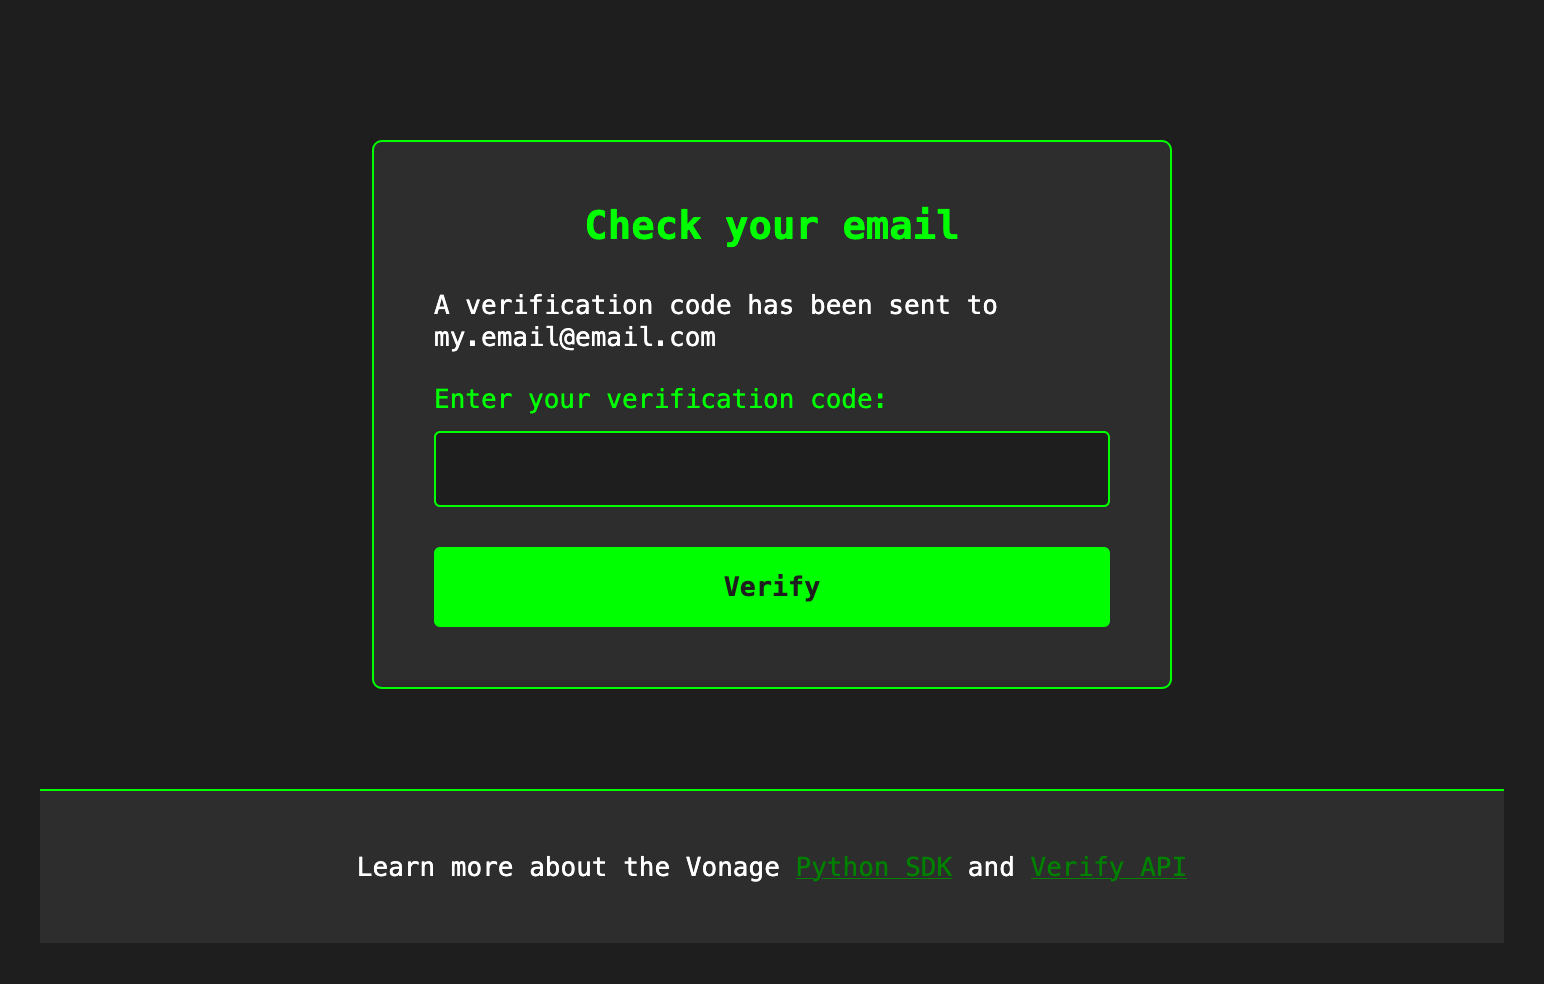 A screenshot of the verification page inviting the end-user to enter the code they received in their email.Entering the correct code here will direct you to a success page.
Under the hood, the code makes use of the Pydantic models in the SDK to ensure the Verify request is correctly formed and handled.
Now let’s take a look at how Pydantic facilitates the Verify API.
In the following code, we have two functions that perform the same task: make a request to the /verify endpoint. One of the functions creates the request body manually and the other one uses Pydantic.
Using a manually created request body:
def without_pydantic(request_payload):

    jwt_client = JwtClient(
        application_id=settings.vonage_application_id,
        private_key=settings.vonage_private_key_path,
    )

    jwt_token = jwt_client.generate_application_jwt()

    payload = {
        "brand": request_payload["brand"],
        "workflow": [
            {
                "channel": "email",
                "to": request_payload["to_email"],
            }
        ],
        "channel_timeout": request_payload["channel_timeout"],
        "code_length": request_payload["code_length"],
    }

    response = requests.post(
        "https://api.nexmo.com/v2/verify",
        headers={
            "Authorization": f"Bearer {jwt_token.decode()}",
            "Content-Type": "application/json",
        },
        json=payload,
    )

return responseUsing Pydantic:
def with_pydantic(request_payload):

    client = Vonage(
        Auth(
            application_id=settings.vonage_application_id,
            private_key=settings.vonage_private_key_path,
        )
    )

    verify_request = VerifyRequest(
        brand=request_payload["brand"],
        workflow=[EmailChannel(to=request_payload["to_email"])],
        channel_timeout=request_payload["channel_timeout"],
        code_length=request_payload["code_length"],
    )

    client.verify.start_verification(verify_request)

    last_response = client.http_client.last_response

return last_responseThe code then uses unittest to test the functions with test_data that violates the API parameters:
   test_data = {
        "brand": 12345,
        "to_email": 678910,
        "channel_timeout": "sixty",
        "code_length": "five",
}Run the tests with the following command:
python -m unittest -vRunning the tests should result in two different outcomes: an error and a failure.
The test for the function that uses Pydantic should return this error:
pydantic_core._pydantic_core.ValidationError: 1 validation error for EmailChannel
to
  Input should be a valid string [type=string_type, input_value=678910, input_type=int]
For further information visit https://errors.pydantic.dev/2.13/v/string_typeWhat’s important to note here is that the test did not fail – instead it errored out because Pydantic caught an incorrect data type before the request was made. Moreover, the error message itself provides useful information for debugging instead of a general type error message. Not only do we know that the data type provided did not meet the model requirements, we also know what the expected type is as well as the type that was passed in:
Input should be a valid string [type=string_type, input_value=678910, input_type=int]The test for the function without Pydantic returns a failure:
AssertionError: 422 != 202 : Test without Pydantic failed with: 422. Expected: 202This means that the request was made and, as the API is defined, returned a 422 for invalid parameters.
In this limited test scenario, one bad API call is negligible – on a broader scale, this can be an expensive mistake. Using Pydantic to validate a request model before making the API call helps minimize wasted API calls, enables more graceful error handling, and facilitates developers.
Pydantic offers a powerful, performant solution for data validation in Python, helping developers move beyond the potential pitfalls of duck-typing. By defining schema, constraints, and validation rules with Pydantic models, you can ensure data integrity and catch errors before API requests are ever sent. This saves you from costly invalid API calls and makes error handling more graceful.
As demonstrated with the Vonage Python SDK's integration with the Verify API, Pydantic makes it straightforward to work with complex, nested request models while keeping your code readable and maintainable. With version 4 of the SDK, API responses are deserialized into fully documented Pydantic models, giving you more consistency, better tooling support, and a cleaner developer experience overall.
Silent Authentication Updates in Verify API: New Silent Authentication updates in Verify API improve dev/test experience.
Build Passwordless Video Login with Silent Auth and the Video API: Use Silent Auth with Vonage Video to verify users automatically and start real-time sessions faster without passwords or codes.
Introducing Zero-Tap Verification for WhatsApp: Announcing the availability of Zero-tap verification for WhatsApp through the Vonage Verify v2 API.
Have a question or want to share what you're building?
Subscribe to the Developer Newsletter
Follow us on X (formerly Twitter) for updates
Prefer video? Watch tutorials on our YouTube channel
Connect with us on the Vonage Developer page on LinkedIn
Help us improve our developer experience by filling out our Voice of the Developer Feedback
Stay connected and keep up with the latest developer news, tips, and events.