
Share:
Javier studied Industrial Engineering back in Madrid where he's from. He is now one of our Solution Engineers, so if you get into trouble using our APIs he may be the one that gives you a hand. Out of work he loves playing football and travelling as much as he can.
Real-Time Translation with Vonage Video API
Time to read: 7 minutes
In the ever-evolving landscape of digital communication, real-time translation of video calls has become a vital component for breaking down language barriers and fostering global collaboration. With the Vonage Video API, developers have the power to seamlessly integrate this transformative capability into their applications.
Whether you're building a cross-border conferencing platform, a language learning app, or enhancing customer support on a global scale, our real-time translation functionality will speed up your development. In this blog post, you’ll learn to create inclusive and accessible video experiences for a worldwide audience. Let’s dive in!
Before we get started, let’s have a look at what we’ll build. Check out this sample video:
Now if you want to see a demo of a more complex application with 2 users speaking in different languages, check this other video:
A Vonage Video API account. Click Sign Up to create one if you don't have one already.
Node.js installed Experience Composer API enabled in your account. You can do so in the account portal
A Google Cloud Platform account and a project with Text-to-speech, translate and Speech-to-text APIs enabled.
This blog post assumes that you are familiar with Vonage Video API.
The media engagement of your website needs to be high so that the autoplay policy from Google does not block autoplay audio. Learn more here. For testing purposes you can use developer switches
The following diagram shows the architecture of what we’re going to build. To start with, we can use the Audio Connector API to get the raw audio data (PCM 16 Khz/16bit) from our Video session sent to our server via a secure WebSocket connection. Our server will then establish a connection with Google Cloud to pipe the raw audio data, transcribe it, translate it and get translated audio data.
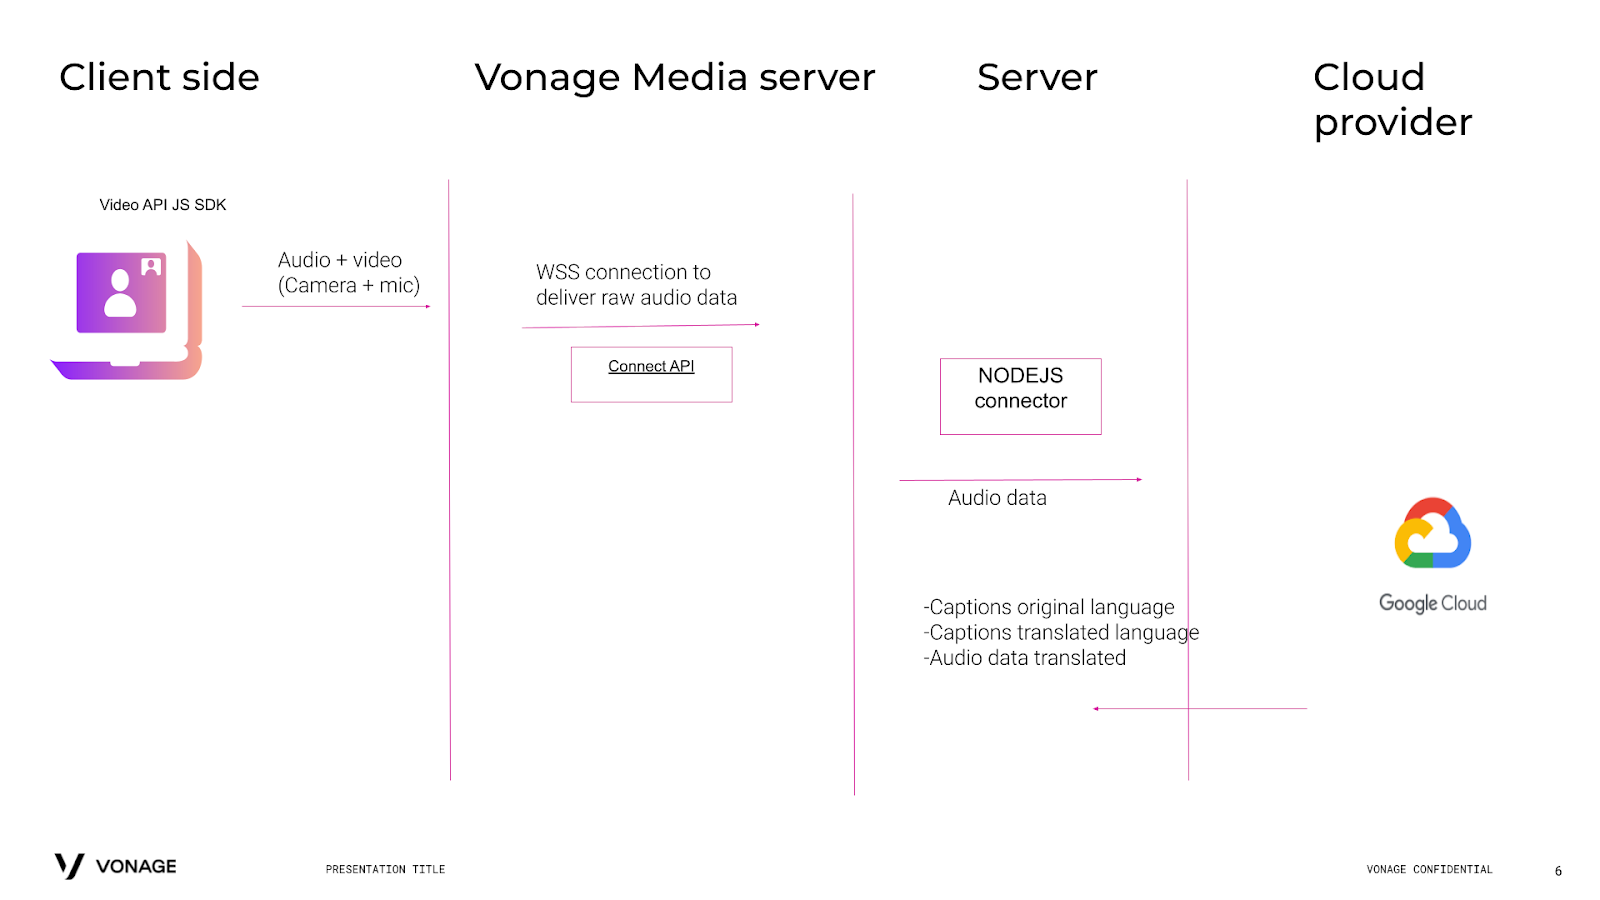 Real-Time Translation Architectual Diagram
Once we have the captions and the audio data translated, we can leverage the Experience Composer API to inject the audio into the Video session. The Experience Composer API allows you to publish the content of a website as a new stream into a Vonage Video API session.
Therefore, we can expose a simple webpage that receives the audio from our server and plays it using the Web Audio API. Since the content of this Website is being published into a session thanks to the power of Experience Composer, all of the users on the call will be able to hear the translations. This logic is described in the next screenshot:
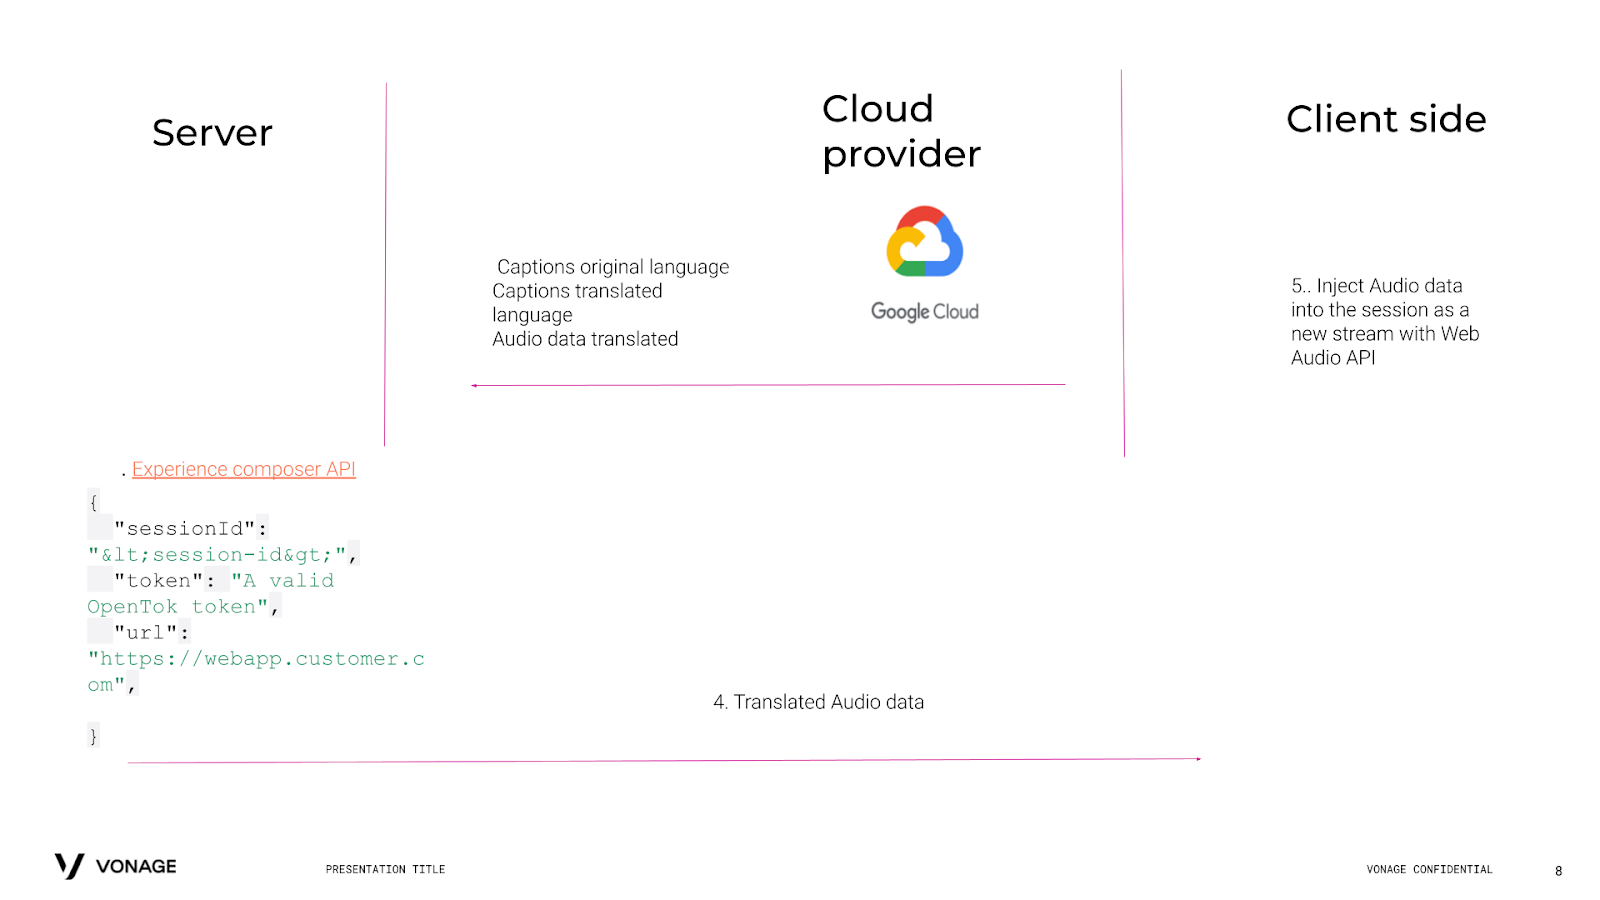 Vonage API Real-Time Translation Logic
You may think, why not directly send the audio to every user via a WebSocket connection and play it locally? Well, the short answer is that TCP is not the preferred option to send real-time audio data, and under non-ideal network conditions on the client side, we would hear the translated audio with quite a bit of latency. If we use Experience Composer API, we would not have to rely on individual user’s networks. Therefore, you can think of Experience Composer in this case as a user whose job is to receive the audio translated from our server and play it into the call.
The server is the middleware responsible for receiving the audio of the video session via WebSocket from the Audio Connect API and sending it to Google for speech recognition, translation, and text-to-speech processing.
We will expose an API endpoint that allows us to start the audio connector API instance in order to receive audio data. The start streaming endpoint will call the startStreamer function with the streamId from the user and we are also passing the websocket URL where we want to receive the audio data. This API will be called from the client side once the user starts publishing into the session. We will also instantiate an Experience Composer instance:
app.post('/startStreaming', async (req, res) => {
    try {
        console.log('someone wants to stream');
        const {
            streamId,
            sessionId
        } = req.body;
        console.log(streamId, sessionId);
        const response = await startStreamer(streamId, sessionId);
        const render = await createExperienceComposer(process.env.sessionId);
        if (render && response) {
            return res.send(response);
        }
        res.send(response);
    } catch (e) {
        console.log(e);
    }
});
const startStreamer = async (streamId, sessionId) => {
    try {
        const {
            token
        } = await opentok.generateToken(sessionId, 'publisher');


        const data = JSON.stringify({
            sessionId: sessionId,
            token: token,
            websocket: {
                uri: `${process.env.websocket_url}/socket`,
                streams: [streamId],
                headers: {
                    from: streamId,
                },
            },
        });
        const config = {
            method: 'post',
            url: `https://api.opentok.com/v2/project/${process.env.VIDEO_API_API_KEY}/connect`,
            headers: {
                'X-OPENTOK-AUTH': await generateRestToken(),
                'Content-Type': 'application/json',
            },
            data: data,
        };
        const response = await axios(config);
        console.log(response.data);
        return response.data;
    } catch (e) {
        console.log(e);
        return e;
    }
};
To receive audio data in our server we need to set up a websocket so that Vonage can send us the raw audio data. We will initialise one streaming client connection with Google per user.
app.ws('/socket', async (ws, req) => {
    console.log('someone connected');
    console.log(`starting connection for user with streamId ${streamId}`)
    const uuid = req?.query?.uuid
    let sc = new StreamingClient(uuid, 'es', 'en-US');
    await sc.init();
    const aWss = expressWs.getWss().clients;


    sc.setAudioChunkAvailableCallback(function(chunk) {
        console.log('audio available. Sending audio to the clients connected to the wss');


        const aWss = expressWs.getWss('/socket').clients;
        if (ws.readyState === 1) {
            aWss.forEach(function(client) {
                client.send(chunk);
            });
        }
    });


    sc.setTranscriptionAvailableCallback(function(data) {
        console.log(‘Sending original and translated captions to the connected clients’);
        const aWss = expressWs.getWss('/socket').clients;
        aWss.forEach(function(client) {
            client.send(JSON.stringify(data));
        });
    });
    sc.startRecognizer();
    ws.on('message', (msg) => {
        try {
            if (typeof msg === 'string') {
                let config = JSON.parse(msg);
                console.log(config);
                sc.setId(config.from);
            } else {
                console.log(‘Sending audio data to Google
                    for Speech to text recognition’);
                sc.sendMessage(msg);
            }
        } catch (err) {
            console.log('[' + uuid + '] ' + err);
            ws.removeAllListeners('message');
            ws.close();
        }
    });


    ws.on('close', () => {
        console.log('[' + uuid + '] Websocket closed');
        sc.closeConversation();
        sc = null;
    });
});
You can see the implementation of the createExperienceComposer in this file. To authenticate the requests with the API, we need to create a JWT token as explained in the authentication documentation. I have used the jsonwebtoken package from npm , but feel free to use any other package. `CreateRender` and `deleteRender` are functions aimed at starting and stopping a experience composer instance.
To create the experience composer instance, we need to pass a few parameters in the JSON body as per the documentation. Some of the parameters are mandatory such as the url, sessionId, token and projectId. Pay special attention to the URL parameter. Think of it as the URL that the “invisible user” that Experience Composer represents will visit. Then Javascript code will be loaded and the Experience Composer will publish a new stream into the sessionId.
You may have noticed that there’s an extra object properties that contains a name parameter. This name will prove useful when we listen to streamCreated events on the client-side. We will come back to that in a bit but all you need to know for now is that this is the name of the stream we are going to publish into the session.
app.get('/ec', (req, res) => {
    const options = {
        root: path.join(__dirname),
    };
    res.sendFile('public/ec.html', options);
});
You can take a look at the finished sample code for the Google connector in this repository. However, let’s talk briefly about it. The main function that starts the connection with Google is called startRecognised. We need to define the config object, with the source language, the model, and the encoding. You can refer to the sample code for the chosen parameters.
startRecognizer() {
    const config = {
        encoding: encoding,
        sampleRateHertz: sampleRateHertz,
        model: model,
        enableAutomaticPunctuation: true,
        languageCode: this.language,
    };

    const request = {
        config: config,
        interimResults: true,
    };

    this.recognizeStream = this.speechClient.streamingRecognize(request);
    this.recognizeStream.on('data', async (data) => {
        let originalText = data.results\[0].alternatives\[0].transcript;
        console.log('\[' + this.id + ']\[User]' + originalText);
        let translatedText = await this.translate(originalText);
        if (this.transcriptAvailableCallback) {
            this.transcriptAvailableCallback({
                original: originalText,
                translated: translatedText,
                id: this.id,
            });
        }
        this.getAudioData(translatedText);
    });

    this.recognizeStream.on('error', (err) => {
        console.error(err);
        this.tryEndAudioStream();
        if (this.errorCallback) {
            this.errorCallback(err);
        }
    });

    this.recognizeStream.on('finish', (res) => {});
    console.log('\[' + this.id + '] Stream Created');
    this.waitingRestart = false;
    return this.recognizeStream;
}
Once we get the speech transcribed by Google, we can pass it through the Translate API and the translated text we convert it to audio data using the Text To Speech API. This is the definition of the translate method which is used to translate the text into the target language
async translate(text) {
    let output = '';
    try {
        let [translations] = await this.translationClient.translate(text, this.outputLanguage);
        translations = Array.isArray(translations) ? translations : [translations];
        translations.forEach((translation, i) => {
            output += `${translation}`;
        });
    } catch (err) {
        console.log(err);
    }
    console.log(output);
    return output;
}
Lastly, once we have the text translated we call the playTTS method to get audio data from the translated text. The audio won’t be played yet, we’re only converting the translated text into audio data. The request object takes several parameters like the encoding and the voice. You can customise it by looking at Google text-to-speech docs
async getAudioData(text, isSessionEnding = false) {
    try {
        this.sessionEnding = isSessionEnding;
        const request = {
            input: {
                text: text
            },
            voice: {
                languageCode: this.outputLanguage,
                ssmlGender: 'NEUTRAL'
            },
            audioConfig: {
                audioEncoding: encoding,
                sampleRateHertz: sampleRateHertz,
            },
        };
        const [response] = await this.ttsClient.synthesizeSpeech(request);
        if (this.audioChunkAvailableCallback) {
            this.audioChunkAvailableCallback(response.audioContent);
        }
    } catch (err) {
        if (this.errorCallback) {
            this.errorCallback(err);
        }
    }
}
To sum it up, the infusion of real-time video translation doesn't just break down language barriers; it unlocks a whole new dimension in global communication possibilities. What new things will you build? What new features would excite you? Let us know on our Vonage Community Slack or send us a message on X, previously known as Twitter.
The application logic, components assembly, API call flows, described in this article and in the corresponding Github repository, are a subset of claims part of a pending Vonage patent. You may use this reference source code and application logic for your own commercial deployments by using Vonage Video API and any AI service providers for capabilities like Speech Recognition, Translation, Text-to-Speech