
Share:
Karl is a Developer Advocate for Vonage, focused on maintaining our Ruby server SDKs and improving the developer experience for our community. He loves learning, making stuff, sharing knowledge, and anything generally web-tech related.
RCS Business Messaging is Now GA in the Vonage Messages API
Time to read: 7 minutes
Rich Communication Services (RCS) is opening new opportunities for business messaging, and I'm excited to announce that RCS Messaging is now Generally Available (GA) in the Vonage Messages API!
With the move to GA, RCS messaging is now available more broadly.
While the RCS beta launch only covered networks in Germany, following the GA launch, the UK and 10+ other countries are now supported, with coverage being expanded further in the future.
RCS being GA also means that RCS messaging is now implemented in our Server SDKs. So as a developer, you can send RCS messages using your favourite programming language!
In the rest of this article, we're going to look at some examples of how to implement RCS programmatically. Let's go!
Are you wondering what RCS messaging is exactly? Or how RCS messaging compares to SMS or MMS? Check out the post I wrote earlier this year when RCS Messaging was added to the Messages API in beta. That article covers some advantages of RCS messaging. These advantages can provide richer customer experiences which can boost user engagement and lead to improved conversion rates
SMS/MMS vs RCS messaging, what’s the difference? All three channels support text messaging, and both MMS and RCS support sending messages with attachments such as image and video files. Where RCS really stands out is with some of the other message types it supports:
Suggested Replies
Suggested Actions
Rich Cards
Within the RCS channel of the Messages API, these kinds of messages are all sent using the custom message type. You can read more about RCS Custom Messages and how to use them.
Let's take a look at a couple of examples of sending some of these message types using the Server SDKs.
A Vonage Developer Account
Before you can start sending RCS messages with your chosen Vonage SDK, there are a couple of preliminary steps to go through first.
You'll need to setup an RBM (RCS Business Messaging) Agent. Once the Agent is created, you'll be provided with an Agent ID which you can then use as the Sender ID when sending RCS messages. In the context of the Vonage Messages API, this will be the value of the
fromfield in the request body.
One more thing to mention here, is that if you are using a test agent (i.e. an RBM Agent registered in Developer Mode), you'll need to allow-list the number you want to send to for that agent. You can contact your account manager or support to get that set up.
Create a Vonage Application enabled for the Messages API. Vonage Applications are used to store settings related to the Vonage API(s) you are using as well as to generate credentials for creating JWTs (JSON Web Tokens). There are a few different ways to create a Vonage Application:
Via the Applications page of the Vonage Developer Dashboard
Via the Vonage CLI
Via the Vonage Application API
Setting up the Vonage Application will provide you with an Application ID and a private.key file. You'll need these to generate JWTs which will be used for authentication with the Vonage Messages API. The SDKs will generate the JWTs for you automatically for each request, but you'll need to provide them with the Application ID and private key.
Once the RBM Agent and Vonage Application are both set up, one final thing to do is link the two together. You can do this via the Vonage Developer Dashboard, either on the page for the Vonage Application itself (under the External Accounts tab), or on the External Accounts page.
 Screenshot of the Vonage Developer Dashboard with an option to link an RCS agent to an Application
Okay, now that we have everything set up, let's look at some code examples!
All of the Server SDKs vary in terms of their specific implementation, but they all share some general concepts such as instantiating a Client object which can then be used to interact with the Vonage APIs by calling methods on it. This is the where you will need the Application ID and private key generated earlier. Below is an example of doing that with the Ruby SDK, though all of the Server SDKs follow a similar pattern:
vonage_client = Vonage::Client.new(
   application_id: ENV['VONAGE_APPLICATION_ID'],
   private_key: File.read(ENV['VONAGE_APPLICATION_PRIVATE_KEY_PATH'])
)Note that in the example above, VONAGE_APPLICATION_ID and VONAGE_APPLICATION_PRIVATE_KEY_PATH are set as environment variables.
Suggested Reply messages are a message type where you can send some text with a number of suggested options that the recipient can use as their reply. These options appear as 'chips' or buttons in the device UI which the recipient can then press to select.
Suggested Reply messages are great for many different use-cases. One example is conducting customer surveys. Constraining the responses to specific, suggested values makes it easier to process that input within your application. For example, you could send an RCS message asking a customer to rate your service from one to five, with text values from one to five as the suggested reply options.
As well as the suggested text, each suggested reply option also include a postbackData value. This can allow you to, for example, use some user-friendly language for the text value but something different for the postbackData value to be used for internal processing. Another use for postbackData could be to send out the survey in different regions with the text value in different languages according to the region, but mapping to the same postbackData value.
Let's look at an example.
Here's how you would send these messages with the Node and Ruby SDKs.
Send an RCS Suggested Reply Message with the Node SDK
Here we're sending out the survey message in English.
vonageClient.messages.send(
  new RCSCustom({
    custom: {
      contentMessage: {
        text: "Vonage APIs are easy to use.",
        suggestions: [
          {
            reply: {
              text: "Strongly agree",
              postbackData: "5",
            },
          },
          {
            reply: {
              text: "Agree",
              postbackData: "4",
            },
          },
          {
            reply: {
              text: "Neither agree or disagree",
              postbackData: "3",
            },
          },
          {
            reply: {
              text: "Disagree",
              postbackData: "2",
            },
          },
          {
            reply: {
              text: "Strongly disagree",
              postbackData: "1",
            },
          },
        ],
      },
    },
    to: '447900000000',
    from: 'VonageRCSAgent',
  }),
);When received, the message would display with a scrollable list of suggestions for the recipient to choose from.
 Screenshot of an RCS suggested reply message in English
 Screenshot of an RCS suggested reply message in English
Send an RCS Suggested Reply Message with the Ruby SDK
Here we're sending out the survey message in French.
message = vonage_client.messaging.rcs(
  type: 'custom',
  message: {
    contentMessage: {
      text: "Les APIs de Vonage sont simple a utilizer",
      suggestions: [
        {
          reply: {
            text: "Fortement en accord",
            postbackData: "5"
          }
        },
        {
          reply: {
            text: "En accord",
            postbackData: "4"
          }
        },
        {
          reply: {
            text: "Neutre",
            postbackData: "3"
          }
        },
        {
          reply: {
            text: "En désaccord",
            postbackData: "2"
          }
        },
        {
          reply: {
            text: "Fortement en  désaccord",
            postbackData: "1"
          }
        }
      ]
    }
  }
)

vonage_client.messaging.send(
  from: 'VonageRCSAgent',
  to: '447900000000',
  **message
)Which would display in the same way but with the amended text values:
 Screenshot of an RCS suggested reply message in French
 Screenshot of an RCS suggested reply message in French
Note that for both language versions, the postbackData values are the same.
When the recipient replies with one of the options, this is received via your inbound message webhook as an rcs message with a message_type of reply. The JSON payload for the reply message will include a reply object with two proerpties: title, which is contains the value of the text from the selected reply option; and id, which contains the value of the postbackData from the selected reply option.
Suggested Action messages let you suggest an action to the recipient that will interact with a native or installed app on the device with which they receive the message. For example to open a URL in a browser, view a location in a map or location app, and so on. As with Suggested Replies, there are numerous use-cases for the various types of Suggested Action messages. In a similar way to Suggested Replies, Suggested Actions appear as 'chips' or buttons in the device UI which the recipient can then press to trigger the action.
The available actions are:
openUrlAction
dialAction
viewLocationAction
shareLocationAction
createCalendarEventAction
With all of the suggested action types, you can include some text that will appear in the main message as well as some text within the action itself which will appear on the 'chip'/button.
All actions contain a postbackData property, the value of which will be received as the value of the payload property in an inbound rcs message of type button.
Let’s look at a couple of examples.
How to send a Create a Calendar Event message with the Python SDK
Let's start with the Create Calendar Event action. This action let's your message interact with the calendar app on the recipients phone in order to create an event in that calendar. One possible use case for this action would be confirming an appointment, for example a medical or dental appointment.
The message would display in the messaging app with an option to create a calendar event.
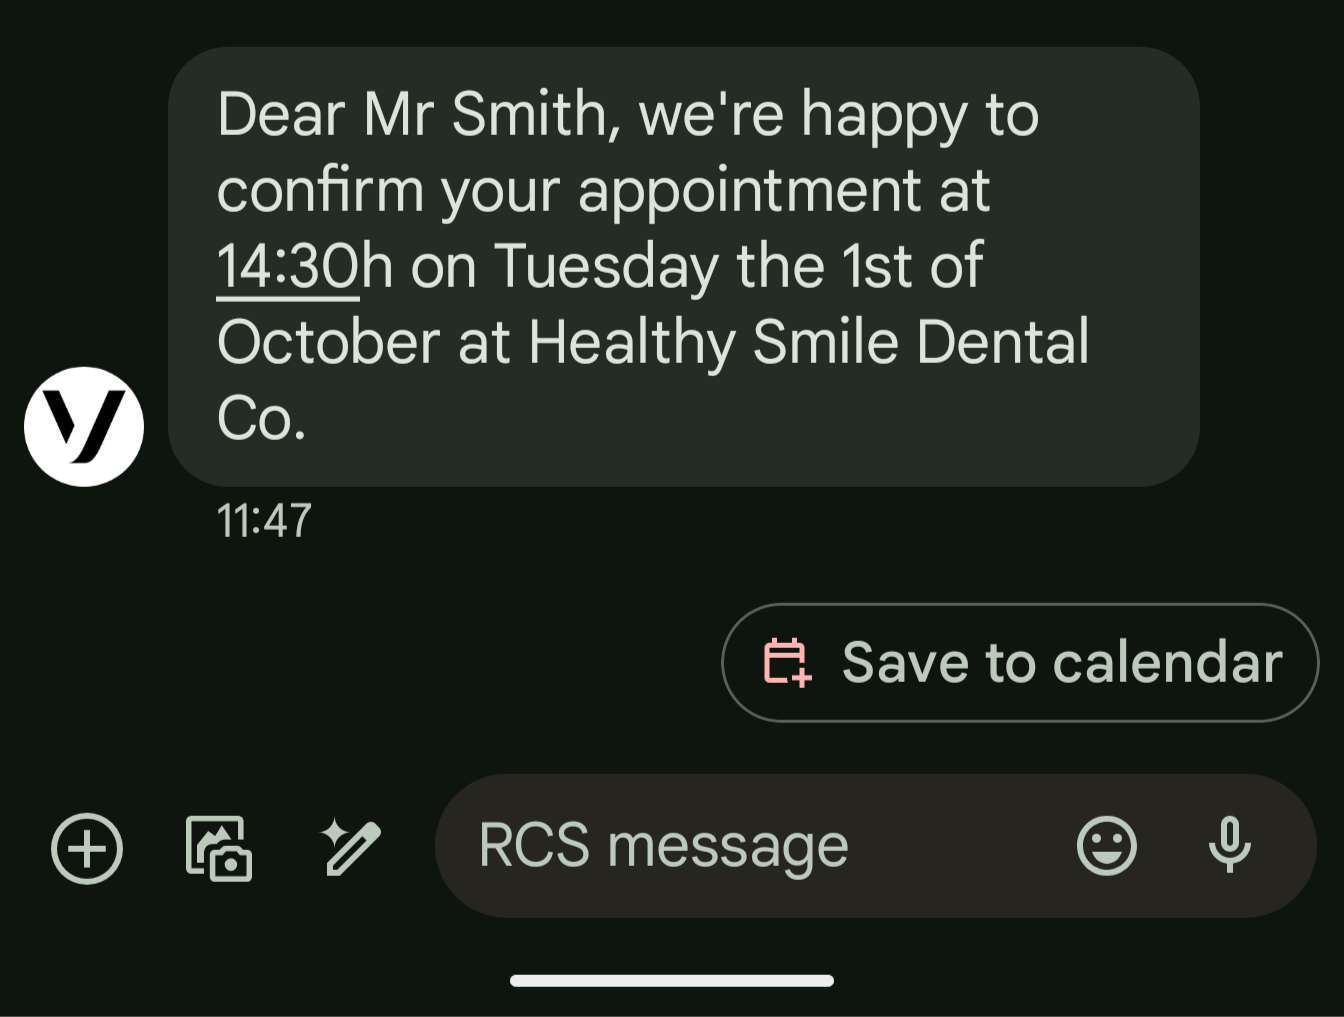 Screenshot of an RCS suggested action message to create a calendar eventIf that option is selected, this opens the device's default calendar application and allows the user to save the event to their calendar.
 Screenshot of a calendar appliction with a option to save an event
In this action you set a title and description of calendar event as well as the startTime and endTime (which represent the time and date on which the event begins and ends). Note the offset from UTC.
vonage_client.messages.send_message(
    {
        "channel": "rcs",
        "message_type": "custom",
        "to": '447900000000',
        "from": 'VonageRCSAgent',
        "custom": {
            "contentMessage": {
                "text": "Dear Mr Smith, we're happy to confirm your appointment at 14:30h on Tuesday the 1st of October at Healthy Smile Dental Co.",
                "suggestions": [
                    {
                        "action": {
                            "text": "Save to calendar",
                            "postbackData": "postback_data_1234",
                            "fallbackUrl": "https://www.google.com/calendar",
                            "createCalendarEventAction": {
                                "startTime": "2024-10-01T14:30:00+01:00",
                                "endTime": "2024-10-01T15:00:00+01:00",
                                "title": "Dental Appointment",
                                "description": "Dental Appointment at Healthy Smile Dental Co.",
                            },
                        }
                    }
                ],
            }
        },
    }
)How to send a Share Location message with the Java SDK
The Share a Location action, when selected, prompts the message recipient to share a geographical location by opening the device's default map or location application. Once the recipient has selected a location, they can then send this in reponse to the message they received. The recipient's response will be received via your inbound message webhook as an rcs message with a message_type of location. The JSON payload in this message will contain a location object with lat and long properties specifying the shared location.
One possible use-case for this message type would be a taxi service needing a customer to specify a pick-up point.
The message received would have an option to share a location.
 Screenshot of an RCS suggested action message to share a locationIf selected, this would open the device's default map application allowing the receipient to place a pin and then share their location.
 Screenshot of a map application with a pin and option to send location
var response = vonageClient.getMessagesClient().sendMessage(
	RcsCustomRequest.builder()
		.from('VonageRCSAgent').to('447900000000')
		.custom(Map.of("contentMessage", Map.of(
				"text", "Your driver will come and meet you at your specified location.",
				"suggestions", List.of(
					Map.of(
						"action", Map.of(
							"text", "Share your pickup location",
							"postbackData", "postback_data_1234",
							"shareLocationAction", Map.of()
						)
					)
				)
			))
		).build()
);
In this article, we've looked at a few examples of sending different types of RCS messages using Vonage's server SDKs. Really, this is just scratching the surface though, and there are countless potential use-cases for RCS messaging. We’ll be covering more examples of RCS messaging in future blog posts, so be sure to check back soon!
If you've been inspired to build something awesome with the Vonage Messages API's RCS channel, then make sure to check out the Messages API documentation and code snippets.
Thanks for reading! You can follow us on X for more Vonage Dev news, or join us on our Vonage Community Slack workspace.