Share:
Aaron was a developer advocate at Nexmo. A seasoned software engineer and wannabe digital artist Aaron is frequently found creating things with code, or electronics; sometimes both. You can customarily tell when he's working on something new by the smell of burning components in the air.
Inbound voice call campaign tracking with Mixpanel
Time to read: 9 minutes
Campaign tracking is a “must have” for any marketing or advertising campaign. Without the ability to accurately track the number of users engaging with each advertisement you can’t work out your cost per acquisition (CPA), so ultimately you can’t determine which campaigns are successful and which are losing your business money; CPA greater than ARPU (Average Revenue Per User).

(Business Intelligence uses even worse acronyms and jargon than tech!)
With the sheer amount of the web which is ad supported it should come as no surprise the tools for managing campaigns online are already pretty mature. But when we want to track "clicks" from print or other offline advertising we have to resort to unique promotional URLs or coupon codes.
However, after the user has entered our promotional URL or coupon code, we can track them within the same tried and tested business intelligence and analytics tools as any other online campaign.
But what about our inbound telephone callers? Arguably those users choosing to call our company are already more engaged with our brand than someone who has merely clicked a link, but the existing tools for tracking these interactions are either error prone or in the case of enterprise call handling equipment prohibitively expensive.
Inbound call tracking has the same difficulty as print URLs, the jump from analogue to digital. We need a unique entry point for each campaign, something which is as cheap and easy to set up as a unique URL but allows us to track our inbound voice campaigns in our existing CRM or BI platform.
Nexmo virtual numbers are perfect in this situation. They’re cheap, easy to setup and we can create a unique virtual number for each campaign so we can track where the user saw each number and ultimately which campaign is providing the best ROI (return on investment). You can also purchase local numbers in 66 different countries so they can be region specific, and this number is always increasing.
If you'd like to run the example locally you will need:
a Mixpanel account, the free tier will be fine for this example
a way to expose your local Flask application to the public internet. I tend to use ngrok for this during development
Some knowledge of Python/Flask would be useful but is not required. The code is pretty straight forward so even if you prefer Ruby, PHP, JavaScript, etc. you should still be able to follow along without too much difficulty.
![]()
We need to know which campaign it was the user called. We may have multiple different campaigns running across different channels so we need to identify the campaign so that we can attach any user actions to it correctly.
Ideally, we'd like to find out their name, but this will only be possible in certain territories. But using the Number Insight API we should always be able to identify the type of number they're calling from, which country they are in, and how often they call.
By using their telephone number as a unique identifier, we may also be able to track their actions beyond this call. If during registration on our website we capture the user's telephone number, which we can confirm with the number verify API, then we can cross-reference any future actions they perform with the call they have made to our virtual number.
In this example, we're only going to track completed calls, but we could track the different call statuses such as timeout, failed, reject, busy. Other information we need to track is call duration and the cost of the call. With this, we can begin to work out the cost per acquisition of our new customers via this campaign.
![]()
The sequence diagram above might look quite daunting, but let's take it one piece at a time.
When a user dials a Nexmo virtual number, the Nexmo API will request a Nexmo call control object (NCCO) from the URL we supply. This NCCO JSON file will contain a list of actions that Nexmo should execute whenever a call is received.
The first action we want to perform is to stream an mp3 to the caller; this sound file will inform them that we may record the call.
[
  {
    "action": "stream",
    "streamUrl": [
      "https://example.com/audio/calls-recorded.mp3"
    ]
  }
]
In the second part of the sequence diagram, we begin our call recording and then connect the caller to the agent who is handling calls for that campaign.
[
  {
    "action": "stream",
    "streamUrl": [
      "https://example.com/audio/calls-recorded.mp3"
    ]
  },
  {
    "action": "record",
    "eventUrl": [
      "https://example.com/record/"
    ]
  }
]The recording action in the NCCO is straightforward. We only need to specify the URL that should receive a notification when the call recording is available. When the call completes, the recording will stop automatically.
When using the connect action our from number needs to be a Nexmo virtual number. In this instance, we'll use the number for the inbound voice campaign the user is calling.
[
  {
    "action": "stream",
    "streamUrl": [
      "https://example.com/audio/calls-recorded.mp3"
    ]
  },
  {
    "action": "record",
    "eventUrl": [
      "https://example.com/record/"
    ]
  },
  {
    "action": "connect",
    "endpoint": [
      {
        "number": "441632960616",
        "type": "phone"
      }
    ],
    "from": "441632960277"
  }
]You can specify different types of endpoints to connect to, such as a WebSocket, but as we want to proxy the call, we're going to use the type of "phone" and then the number we wish to connect.
In the example, NCCOs above all our values are hard-coded. But in a real world situation, many of the values will change depending upon which virtual number it is the user has dialled. We will need first to identify the campaign they are calling about and then update the location of the mp3 file, and the phone number of the inbound agent.
We also need to consider the case where we do not have an active campaign for a number. Perhaps it is from an older advertisement, and the marketing campaign is no longer running. We may not have any agents available to deal with calls about this campaign, but we do not want to release the virtual number. In our example code, we will use the text-to-speech action to inform the user that the number is no longer active, however, in your live application you could redirect the user to your main switchboard or perform another action which will provide a better user experience.
Let's look at how we would find the relevant campaign first.
def get_campaign(number_to):
    Campaign = Query()
    campaigns = db.search(
        (Campaign.inbound_number == number_to) | (Campaign.redirect_number == number_to)
    )
    return campaigns[0] if campaigns else None

@app.route('/')
def answer():
    number_to = request.args.get('to')
campaign = get_campaign(number_to)We're using tinydb in our example; it's a simple database engine for Python designed for embedded systems. It is perfect for our example as it relies on a single flat (JSON) file as the database, but you could easily swap this out for SQLAlchemy or another ORM of your choice.
When Nexmo requests our NCCO, it includes the number called in the E.164 international format as part of the query string. We will use this number when querying our database for the relevant campaign, so you must ensure that you also use the E.164 format when saving your campaign information to your database.
Our get_campaign function will return the first matching campaign, or if none is found we return None.
Provided that we managed to find a matching campaign in the above steps then we will populate our NCCO with the correct streamUrl, from number and endpoint. If we cannot find a matching campaign, then we'll use the text-to-speech API and a synthesised voice to inform the user; 'The number dialled has not been recognised.'
if campaign:
    ncco = [
        {
            'action': 'stream',
            'streamUrl': ['https://example.com/{message}'.format(
                message=campaign['welcome_message']
            )]
        },
        {
            'action': 'record',
            'eventUrl': ['https://example.com/record/']
        },
        {
            'action': 'connect',
            'from': campaign['inbound_number'],
            'endpoint': [{
                'type': 'phone',
                'number': campaign['redirect_number']
            }]
        }
    ]
    return jsonify(ncco)
else:
    return jsonify([{
        'action': 'talk',
        'text': 'The number dialled has not been recognised. Please check and try again'
    }])
Once the call has ended not only will our call recording finish but Nexmo will trigger our webhook with the relevant information.
This completed event, however, will not contain information about the user who performed the call. For that, we will need to use the Nexmo number insight API.
After we have all the information we need; which campaign they called about, who it was who called, and information about the call itself, we will store this information in Mixpanel.
We're using Mixpanel in this example, but that does not mean you can only use Mixpanel. Send the data to any tool you wish, or to multiple applications at the same time using a tool such as Segment. It does not matter if you are using Mixpanel, KISSmetrics, Periscope, Chartio, Salesforce, or even a bespoke built BI or CRM system. If it can receive data, you will be able to use this same approach to track your inbound calls.
@app.route('/event', methods=['POST'])
def callevent():
    event = json.loads(request.data)

    if event['status'] == 'completed':
campaign = get_campaign(event['to'])First of all, we're specifying that this endpoint only accepts POST requests, as this is what we will receive from Nexmo. The body of this POST request will be a JSON string, so we will need to convert this into a Python object.
As mentioned above in this example we're only interested in calls which have a status of completed. There are many other statuses which we could receive such as busy or failed, and these statuses could be very important to track if, for example, you were writing software to track inbound support calls. But for now, we're going to focus on completed calls only.
We're also only going to track requests for existing campaigns. So before doing anything else, we will use our get_campaign function and check that the user has called about an active campaign.
To look up information about our caller we'll need an instance of the Nexmo API client so that we can use the number insight API. Following the 12-factor app methodology, I've created environmental variables containing my Nexmo API key and secret as well as the token for my Mixpanel project.
mix = Mixpanel(os.environ['MIXPANEL_TOKEN'])
client = nexmo.Client(
    key=os.environ['NEXMO_API_KEY'],
    secret=os.environ['NEXMO_API_SECRET']
)
We're going to use the advanced number insight API to fetch all available information about the caller. This information will include data such as the country they have dialled from, the network type, and where available the caller's name.
We will store this information alongside their telephone number as the unique identifier for the user. This way we can link this event, and all subsequent events to the same user account in Mixpanel. If a user already exists with that telephone number instead of creating a new user profile Mixpanel will update their profile with the data received from our number insight request ensuring that it is always up-to-date.
# Fetch people data
insight = client.get_advanced_number_insight(number=event['from'])
uid = event['from']

# Create/Update user in Mixpanel
mix.people_set(
    uid,
    {
        '$phone': '+' + event['from'],
        '$first_name': insight.get('first_name'),
        '$last_name': insight.get('last_name'),
        'Country': insight.get('country_name'),
        'Country Code': insight.get('country_code_iso3'),
        'Valid Number': insight.get('valid_number'),
        'Reachable': insight.get('reachable'),
        'Ported': insight.get('ported'),
        'Roaming': insight.get('roaming').get('status'),
        'Carrier Name': insight.get('current_carrier').get('name'),
        'Network Type': insight.get('current_carrier').get('network_type'),
        'Network Country': insight.get('current_carrier').get('country'),
    }
)We're also going to use a couple of other Mixpanel API methods people_track_charge and people_increment. We'll use these methods to track how much we have spent on answering calls from that user and the number of times they've called.
# Useful for Mixpanel revenue tracking
mix.people_track_charge(uid, float(data.get('price')) * -1)

# Track number of times user calls
mix.people_increment(uid, {'Number of Calls': 1})
Finally, we are going to track the actual call itself. We'll use the caller's telephone number as the identifier again so that we store the event against the correct user. We'll also track which campaign it was they called about so we can easily segment our data to see how well each campaign is performing.
# Track call data in Mixpanel
mix.track(
    uid,
    'Inbound Call',
    {
        'Campaign Name': campaign['name'],
        'Duration': int(data.get('duration')),
        'Start Time': data.get('start_time'),
        'End Time': data.get('end_time'),
        'Cost': float(data.get('price'))
    }
)
All the code for this article is available on Github. It uses Python, Flask, and tinydb. So be sure to install the dependencies in requirements.txt using pip first.
There is also an example campaigns.json, this is the file which is used by tinydb. You will need to update it with the correct values. See the tinydb documentation for how to add additional rows to your database if you wish to add more than one campaign.
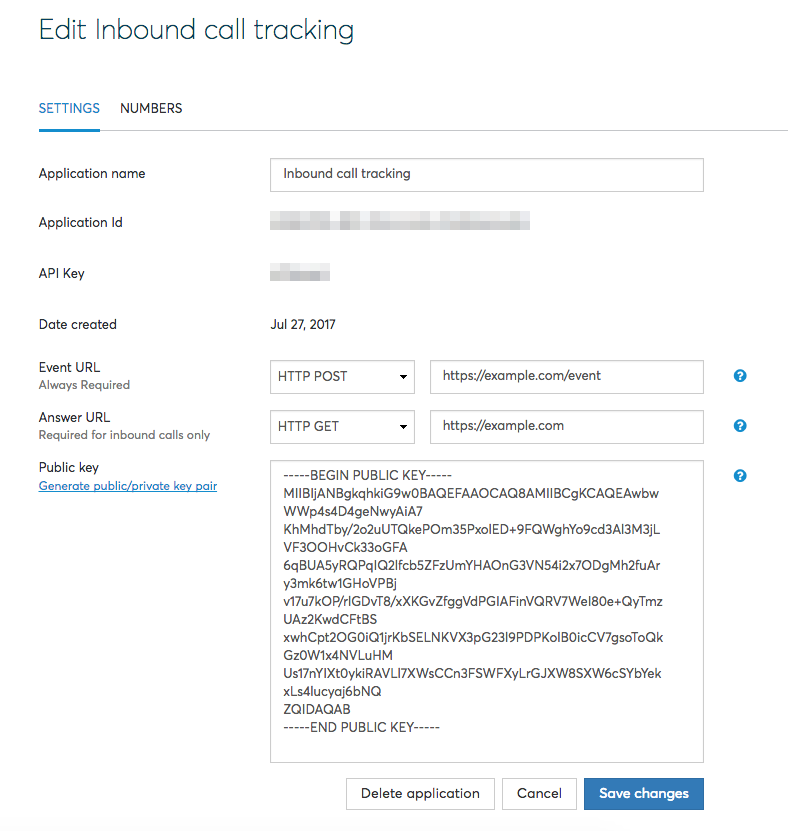
You will also need a Nexmo virtual number and a configured voice application. We've recently launched our voice application dashboard; you can read more about it and how to create a new voice application on our blog.
Once you have everything setup correctly you can run the Flask app with the following commands:
export FLASK_APP=app.py
flask runIf you run into any errors, try switching debug mode on in Flask before trying again. Oh, and don't forget to create the environment variables required by the Mixpanel and Nexmo clients!
export FLASK_DEBUG=1
export MIXPANEL_TOKEN="<YOUR MIXPANEL PROJECT TOKEN>"
export NEXMO_API_KEY="<YOUR NEXMO API KEY>"
export NEXMO_API_SECRET="<YOUR NEXMO API SECRET>"
Try adding SMS notifications when a call completes, or swap out the Mixpanel tracking for Segment. You can read more about the voice API and the number insight API used in the examples above on our developer site. Also be sure to review the other actions available in NCCOs.
Share:
Aaron was a developer advocate at Nexmo. A seasoned software engineer and wannabe digital artist Aaron is frequently found creating things with code, or electronics; sometimes both. You can customarily tell when he's working on something new by the smell of burning components in the air.