Share:
An English teacher turned empathetic software engineer. A curious optimist with a passion for creating accessible content and helping developers level up their skills.
How to Build a Magic 8-Ball Voice App with Ruby
Time to read: 9 minutes
Let’s be real. Our days are constantly filled with tough questions:
What should I make for dinner?
Is this the best move for my career?
Has this pizza gone bad?
Should I text him back?
Adulting is hard as heck, y’all. And frankly, it’s tough out there having to make decisions all of the time. Wouldn’t it be great if you could just go back to the days of childhood where a simple toy could address all of life’s tough questions? But better yet, what if you built it yourself?!
In this tutorial, you’ll create a Magic 8-Ball voice app with Ruby. This app won’t make those questions any less tough, but it will make the decision-making process easier.
In addition, you'll need:
ngrok to expose your Rails application to the outside
How to create your app:
Create the Rails application
Set up the Routes and Controller within the app
Expose your app externally with
ngrokPurchase a Nexmo phone number
Create a Nexmo Voice application
Link everything together
Run your app and answer all of life’s tough questions (the yes or no ones, that is)!
This tutorial takes you through the process from scratch. If you’d like to see the finished code, you can clone the git repository for this project.
To begin, initialize a new Rails API project.
From the command line execute the following:
(As there’s no persistent data for this app, adding the -api --skip-active-record part helps make your app super lightweight!)
Move into your new Rails app folder cd magic8-ball-voice-app and open it in your preferred code editor.
Let’s quickly pause to talk about the flow of this app before diving into the code.
The user dials into the app and is prompted to ask a question. To demonstrate that they’re ready to receive some sage advice, the user is prompted to press 1 into their keypad. Then the app randomly selects an answer to read back to the user.
To achieve this flow, you’ll need to create these actions & routes in your app:
#answer: to receive the initial call#caller_input: to respond to with a randomly selected answer to the caller’s question and handle input errors#event: to receive the event from Nexmo API and print it into the console
Now that the flow of the app is clear, let’s dive into the fun part and write the Routes and Controller Actions!
So that your app knows where to direct the Nexmo GET request, you should define the routes in routes.rb.
To answer the call, handle the caller input, and print the events to your terminal you’ll need to write three unique routes.
Open /config/routes.rb to add:
# routes.rb

get '/answer', to: 'responses#answer'

post '/caller_input', to: 'responses#caller_input'

post '/event', to: 'responses#event'
In your terminal, run the command: rails generate controller Responses.
This creates a new Controller file within the /app/controllers folder.
Inside of this file is where you’ll create your actions:
# responses_controller.rb

class ResponsesController < ActionController::API

    # this URL is the one you use ngrok to create
    NGROK_URL = "http://********.ngrok.io"

    # it’s up to you if there are more or less positive responses in your array
    POSSIBLE_RESPONSES = ["It is certain.", "It is decidedly so.", "Without a doubt.", "Yes, definitely.", "You may rely on it.", "As I see it, yes.", "Most likely.", "The outlook good.", "Yes.", "All signs point to yes.", "Sorry, but no.", "I really don’t think it will work out.", " Don't count on it.", "That my sources say no.", "It is very doubtful."]

    def answer
        render json:
        [
            {
                :action => 'talk',
                :text => 'Welcome to the Magic Eightball hotline. Ask your question and then press 1.',
                :bargeIn => true
            },
            {
                :action => 'input',
                :eventUrl => ["#{NGROK_URL}/caller_input"],
                :timeOut => '10'
            }
        ].to_json
    end
Next, you’ll need to handle the caller’s input.
Dual Tone Multi Frequency (DTMF) is a form of signaling used by phone systems to transmit the digits 0-9 and the * and # characters. We’ll use 'dtmf' here to accept the number 1 as a signal to the app that the caller is ready to move on to the next flow. If the caller hits any other key or doesn’t input anything at all, the app will ask the caller to try again.
Then we’ll utilize Ruby's .sample method. This will randomly select a Magic 8-Ball response from the POSSIBLE_RESPONSES array.
# responses_controller.rb continued

    def caller_input
        dtmf = params['dtmf'] || parsed_body['dtmf']

        if dtmf == '1'
            render json:
            [
                {
                    :action => 'talk',
                    :text => "My answer is: #{POSSIBLE_RESPONSES.sample}. I hope that helps. Thanks for calling the Magic 8-ball hotline. Please call again whenever you need help making a decision in life. Goodbye.",
                }
            ].to_json
        else
            render json:
            [{:action => 'talk', :text => 'I did not recognize your selection. Please call back and try again.'}].to_json
        end
    end
And finally, let’s print the details of the event into your terminal for debugging purposes.
# responses_controller.rb continued
    def event
        puts params
    end
endNote:
There is a constant variable on line 6 of theresponses_controller.rbfile that will hold your ngrok URL. It is currently blank because you still have to create it.
So let’s create that now, shall we?
ngrok
The goal now is to expose your app externally so that Nexmo can communicate with it. Because the app is just running locally, it isn’t available on anyone else’s machine. That means that we need to somehow externally expose our local server so that Nexmo can reach it.
There are a ton of different ways to do this, but one of the simplest is with ngrok. You can check out this article for a deeper look into how it all works.
But here’s the gist of it:
Download & install ngrok
Open a new terminal window
Execute the following from the command line:
Here, ngrok is pointing to the 3000 port as it assumes that your local server is running on
http://localhost:3000. If you’re running on a different port, be sure to adjust the ngrok command.
You should now see a ngrok logging interface in your terminal window.
Near the top of the interface is a line that begins with Forwarding and contains two URLs. The first is the externally accessible ngrok URL, which ends with ngrok.io and points to your local server.
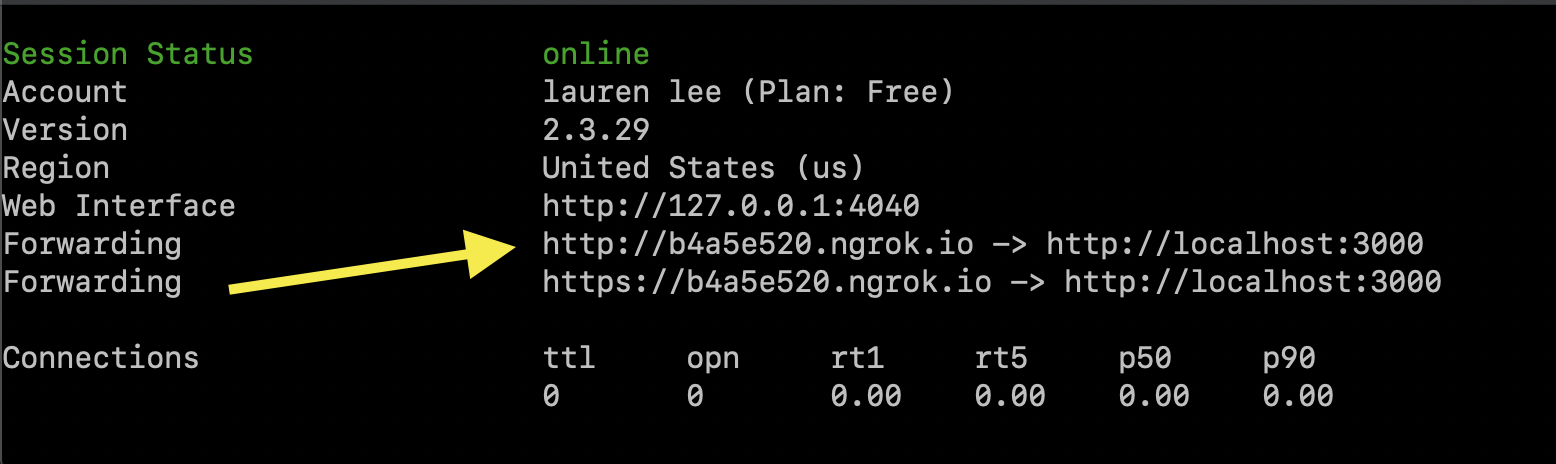
Copy and paste that URL into your responses_controller.rb file and update the NGROK_URL = "http://********.ngrok.io" to be that URL (the one that is running locally on your machine right now).

Note: Be sure to save your
ngrok.ioURL somewhere safe! You’ll also be using it in the next few steps.
Next, in order for your voice app to work, you must link your Nexmo account, a provisioned phone number, and a Voice application to one another.
From the Nexmo Dashboard, click on the
Numbersmenu item on the left-hand side.Click the
Buy Numbersoption and you’ll be directed to a page where you can choose a country, features, type, and four digits you would like the number to have.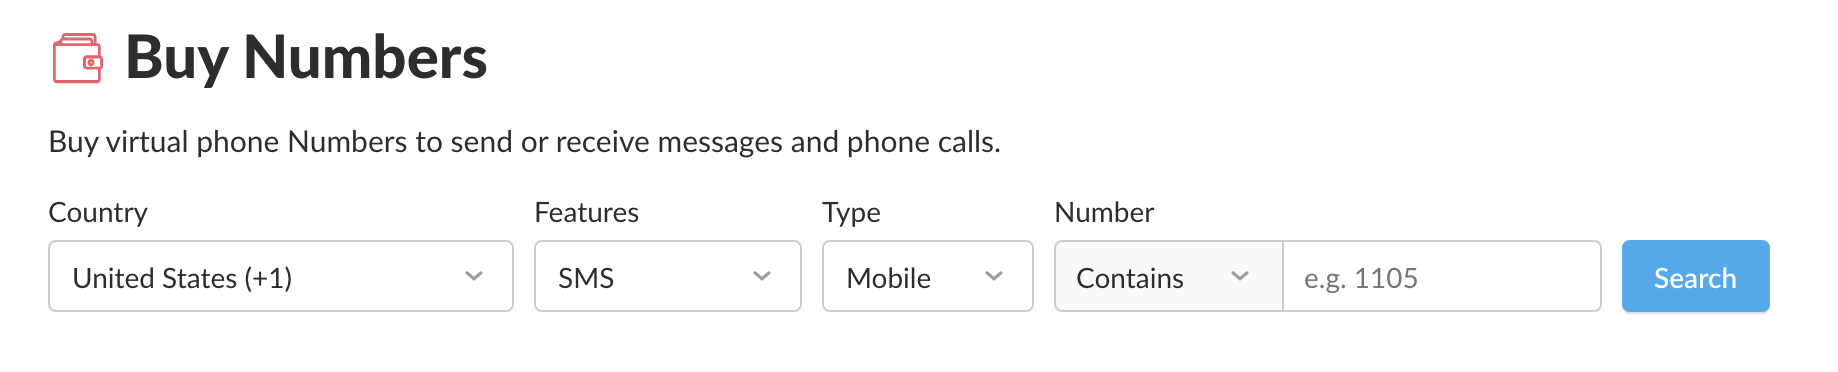
Select the country that you are currently in so the call is local. For features, select
Voiceand for type, either mobile or landline will work just fine.Click
Searchto see a list of phone numbers available.Select a number by clicking the orange
Buybutton, and clicking the orangeBuybutton again once you’re in the confirmation prompt.
You now own a Nexmo phone number. Your next step is to create an application in the Nexmo dashboard.
From the left-hand menu, click on the
Voicemenu item.Select the
Create an applicationoption. You are directed to a page where you can set up a new Nexmo application.Complete the form with the following:
-Application nametext field entermagic8-ball-voice-app-Event URLtext field enter the saved ngrok URL:https://[ngrok url here]/event-Answer URLtext field enter the saved ngrok URL again:https://[ngrok url here]/answerOnce that is all in there, click the blue
Create Applicationbutton. [video width="1042" height="814" mp4="https://www.nexmo.com/wp-content/uploads/2019/05/create-application.mp4"]
You now have a Nexmo voice number and an application, and all that is left to do is link the two together.
Select the
Numbersmenu option in the left-hand menu and then click onYour numbersto be directed to a page listing the phone number you just purchased.Click on the gear icon on the right-hand side of the page.
Select
Applicationunder theForward toarea.Select your new Nexmo application from the drop-down list under the
Applicationarea.Press the blue
Okbutton.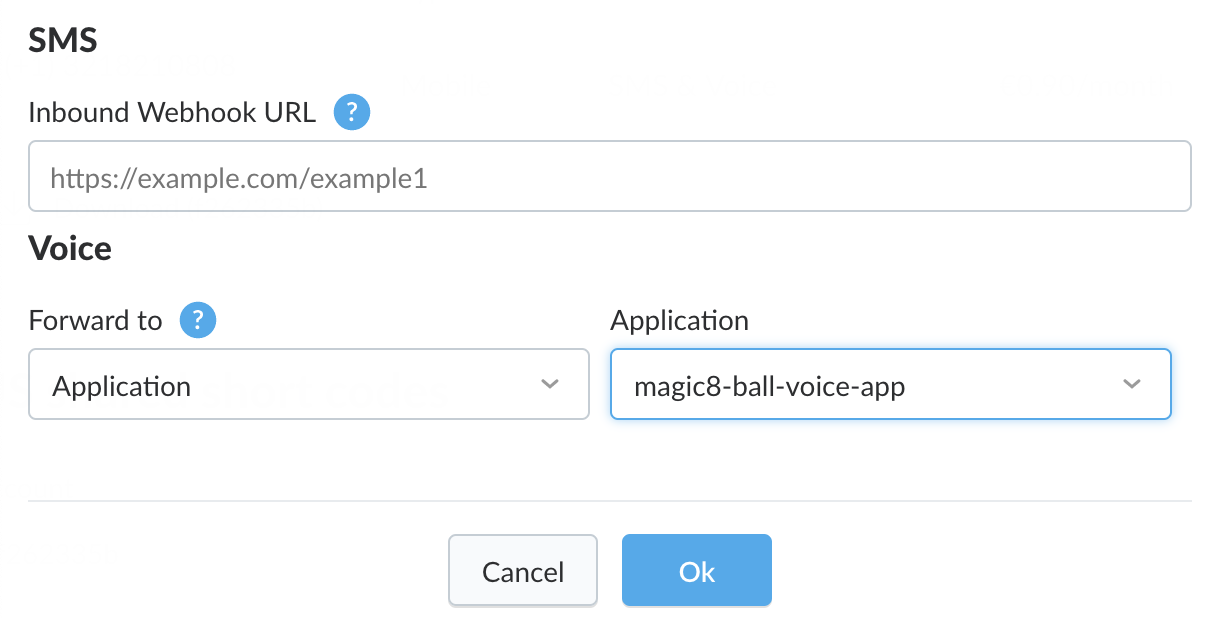
Your new Nexmo voice number is now linked to your new Nexmo application, and with that last step, you are ready to try it out!
With your ngrok server still running in one window, run rails s from another window in your terminal.
This should boot up your Rails server on http://localhost:3000. There are no views in your application, so the only way to interact with it is to call it.
Now is the fun part!
Prepare the question that’s been too tough for you to answer on your own.
Dial your new Nexmo phone number from your own phone.
You should hear your app answer the call and ask you the prompt from the
#answerController method.
Feel free to experiment with different options and play with your Nexmo app! Consider adding in some silly responses to the POSSIBLE_RESPONSES array or adding an option to get a different answer if the caller doesn’t like the first one. Congratulations! You now have a fully functioning Magic 8-Ball Voice app using Rails and the Nexmo Voice API.
If this has piqued your interest in doing more with voice, here are some ideas for things to try next:
Check out this excellent introduction to both SMS and Voice calling with Nexmo.
Take a look at this fun tutorial on how to set up a conference call with Nexmo Voice API, Ruby, and Rails.
If you’re craving even more clairvoyancy in your life, be sure to check out this tutorial on how to write serverless SMS fortune cookies with Nexmo!