
Share:
Tolulope is a growing software engineer who loves coding and writing about what he does. When he's not coding, he enjoys his time as a disc jockey.
Emergency Response System Using Vonage Messages API and Java
Accurate location monitoring and good communication are essential components of emergency response systems. Innovative solutions that improve emergency response operations have become possible thanks to integrating contemporary technologies. One such solution provides a solid framework for emergency response and location monitoring by fusing the strength of the Vonage Messages API with Java and Spring Boot.
With the help of the Vonage Messages API, businesses and organizations may use WhatsApp's popularity for efficient messaging and information sharing. This API may be used to build an extensive, all-inclusive emergency response system combined with Java and Spring Boot.
If you'd like to skip ahead, the code can be found on GitHub.
The Vonage Messages API, integrated with Java (Spring Boot), offers numerous advantages for emergency response and location tracking. Through WhatsApp, emergency responders can:
communicate with affected individuals
gather vital information, and
provide instructions, all within a familiar and widely-used messaging platform
This enhances the accessibility and reach of emergency communication, ensuring that critical messages are received and understood promptly.
You must register for a Vonage account and then construct an application within that account to begin using the Vonage APIs. An API key and secret will be given to the application, which you will use to authenticate your API queries.
Here is a list of the actions you must take:
Create a Vonage Developer account to get access to API Keys, etc.
Create a new application by logging into the Vonage Dashboard.
You will be requested to select the API you wish to utilize while building the application. For this tutorial, select the Messages API.
Once the application has been created, an API key and secret will be created for you. To authenticate your requests, you must use this key and secret.
Locate the key and secret in the Dashboard's section under "API Credentials."
[Optional, but recommended] - Read the documentation on the product.
It is assumed that you are familiar with the Java programming language and have worked extensively with the Spring Boot framework to follow this tutorial effectively. Additionally, you should be familiar with creating RESTful controllers in Spring Boot and have a standard IDE like IntelliJ installed.
Before you begin to develop the app, you must make sure your project is correctly set up. Create a new Spring Boot project to start developing the emergency response app. To create a new Spring Boot project, use the Spring Initializr. Go to the Project selection menu, then choose "Java" and "Maven." As of the writing of this post, select Boot Spring 3.1.0 because it is the latest and most stable version. However, this version seems to have a clash with the web dependency, so you will need to go to the pom.xml file of your project and modify it from <version>3.1.0</version> to <version>3.0.5</version>.
Rename the Artifact application to something like responseapp for the Project Metadata. This name acts as the display title and the project's entry title. Please give a project description if it would aid in better organization. Since the application will run on Java 17 and the built-in Tomcat server that Spring Boot offers, select "Jar" as the packaging type. The image below would give a clearer picture of what is expected as described here:
 Spring Initializr
The browser will download a.zip file containing the boilerplate code for the project when you click the Generate button at the bottom of the page. Open the project in your IDE after extracting the.zip file. In this project, the utilized IDE is the IntelliJ IDEA. The Ultimate version is paid, but you can always get the Community or Education editions for free.
Also, the Vonage Java SDK has to be added as a dependency in your project. This may be accomplished by including the following code in your pom.xml file. Save the modifications to the file. Replace what you currently have in dependencies in the pom.xml file with the dependencies below:
<dependencies>
<dependency>
    <groupId>org.springframework.boot</groupId>
    <artifactId>spring-boot-starter-web</artifactId>
</dependency>
<dependency>
    <groupId>org.projectlombok</groupId>
    <artifactId>lombok</artifactId>
    <optional>true</optional>
</dependency>
<dependency>
    <groupId>org.springframework.boot</groupId>
    <artifactId>spring-boot-starter-test</artifactId>
    <scope>test</scope>
</dependency>
     <dependency>
       	 <groupId>org.springframework.boot</groupId>
       	 <artifactId>spring-boot-starter-data-jpa</artifactId>
     </dependency>
    <dependency>
     	<groupId>com.vonage</groupId>
        	<artifactId>client</artifactId>
     	<version>7.1.1</version>
    </dependency>
</dependencies>
A list of what each dependency does is included below:
spring-boot-starter-web: This dependency provides the necessary libraries and components to develop web applications using Spring Boot. It includes features such as an embedded Tomcat server, Spring MVC framework, and other utilities required for handling HTTP requests, routing, and building RESTful APIs.
lombok: Lombok is a library that helps reduce boilerplate code in Java classes by automatically generating getter/setter methods, constructors, toString, equals, and other common methods. It simplifies the development process and improves code readability and maintainability. The <optional>true</optional> tag indicates that this dependency is optional and not required for the application to function but is often used for convenience.
spring-boot-starter-test: This dependency is used for writing tests in a Spring Boot application. It provides utilities and frameworks for writing units, integration, and other tests. The <scope>test</scope> tag indicates that this dependency is only required during the testing phase and is not included in the final application.
spring-boot-jpa: Spring JPA is a part of the Spring Framework that provides support for working with the Java Persistence API (JPA). JPA is a standard API for working with relational databases in Java, and Spring JPA provides a set of tools and libraries that make it convenient to work with JPA.
The emergency response app's objects and events will be stored in a MySQL database. Please remember that you are free to use any database supplier. This tutorial uses MySQL Workbench. To get started, first, you need to install the MySQL server. Follow the official installation pages for windows and Linux, respectively - depending on your operating system to get this done. Now, it is time to work towards using the MySQL Workbench. Go to their official download website, select your operating system, and download the corresponding package for your OS.
 MySQL Community Downloads
Open the MySQL Workbench. First, click the + symbol to the right of MySQL Connections (shown below). This would allow us to provision a new MySQL instance environment where all databases can be created and managed. Make a table with whatever name you choose on the workbench.
 MySQL Workbench
Clicking the + button will display a modal form, where you must choose a Connection Name, Username, and Password. You can leave other fields in their default. The username and password will be your credentials to access any database in that connection from your project.
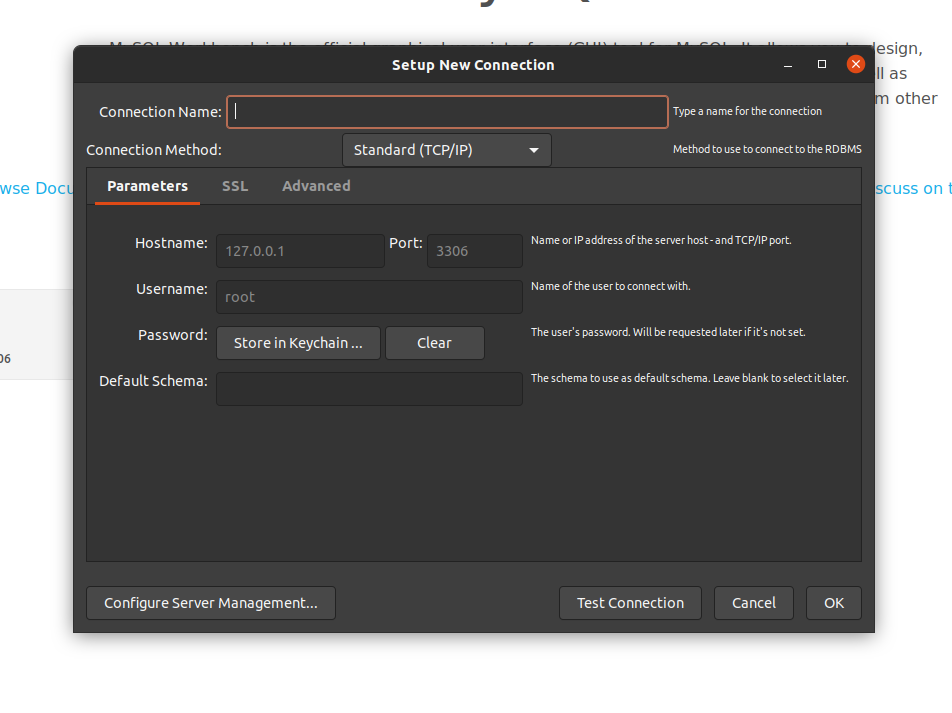 MySQL Setting up a Connection
Once this is done, it is time to create a database. Open the connection, and look in the top right corner. Below the View option, you will find a symbol like a stack of tiny cylinders. Click on it to Create New Schema. A schema is another word for the database. You can name this database with a name of your choice, but note that it must correspond to the name you pass into your project. The database, in this case, is called `vonage-dev. After saving, quit the program. Go to 'resources' in your project now, open the 'application.properties' file, and put the following into it:
spring.datasource.url=jdbc:mysql://localhost:3306/vonage-dev?serviceTimezone=UTC
spring.datasource.username=<your-connection-username>
spring.datasource.password=<your-connection-password>
spring.datasource.driver-class-name=com.mysql.cj.jdbc.Driver
spring.jpa.properties.hibernate.dialect = org.hibernate.dialect.MySQL5Dialect
spring.jpa.hibernate.ddl-auto=update
It is time to create the models representing the entities in the emergency response app. There has to be someone reporting, something to be reported, and someone attending to the things being reported.
Create a file named AppUser.java in the' model' package. Paste the following code into it:
import jakarta.persistence.Entity;
import lombok.AllArgsConstructor;
import lombok.Getter;
import lombok.NoArgsConstructor;
import lombok.Setter;
import jakarta.persistence.*;
import java.util.HashMap;
import java.util.Map;

@AllArgsConstructor
@NoArgsConstructor
@Getter
@Setter
@Entity

public class AppUser {
	@Id
	@GeneratedValue(strategy = GenerationType.IDENTITY)
	private Long id;
	private String fullName;
	private String emailAddress;
	private String phoneNumber;
	@ElementCollection
	private Map<String, Object> contactList = new HashMap<>();
}The class has several private instance variables (id, fullName, emailAddress, phoneNumber, and contactList) that represent different attributes of a user.
The id field is annotated with @Id and @GeneratedValue annotations, indicating that it is the entity's primary key and its value will be automatically generated by the underlying database.
The fullName, emailAddress, and phoneNumber fields represent the user's full name, email address, and phone number, respectively. These fields do not have any specific annotations, so their values are stored as simple string values.
The contactList field is annotated with @ElementCollection, which indicates that it represents a collection of elements to be stored as a separate table linked to the AppUser table. In this case, contactList is a Map<String, Object> that represents the user's contact list, where the key is a name (String) and the value is an object (typically a phone number).
Using the @ElementCollection annotation, the contactList field will be stored in a separate table with a foreign key reference to the AppUser table. The map entries will be stored as individual rows in the table, with the name as one column and the corresponding object value as another column.
Create another file in the same directory, name it Incident.java, and paste the following code into it too:
import jakarta.persistence.*;
import lombok.AllArgsConstructor;
import lombok.Getter;
import lombok.NoArgsConstructor;
import lombok.Setter;
import java.time.LocalDateTime;
import java.util.HashMap;
import java.util.Map;

@AllArgsConstructor
@NoArgsConstructor
@Getter
@Setter
@Entity

public class Incident {
	@Id
	@GeneratedValue(strategy = GenerationType.IDENTITY)

private Long id;
private Long userId;
private String incidentDescription;

@ElementCollection

	private Map<String, Object> incidentLocation = new HashMap<>();

private LocalDateTime incidentTime;
private String status;
private boolean respondedTo;
private Long responder;
}The class has several private instance variables (userId, incidentDescription, incidentLocation, incidentTime, status, respondedTo, and responder) that represent different attributes of an incident.
The userId field represents the identifier of the user associated with the incident.
The incidentDescription field represents a description of the incident.
The incidentLocation field is annotated with @ElementCollection, indicating that it represents a collection of elements that are to be stored as a separate table linked to the Incident table. In this case, incidentLocation is a Map<String, Object> that represents the location information of the incident, where the key is a string (e.g., "longitude", "latitude") and the value is an object representing the corresponding location data.
The incidentTime field represents the date and time when the incident occurred. It uses the LocalDateTime class from the Java 8
java.timepackage.The status field represents the current status of the incident.
The respondedTo field is a boolean flag indicating whether the incident has been responded to.
The responder field represents the identifier of the responder associated with the incident.
import lombok.AllArgsConstructor;
import lombok.Getter;
import lombok.NoArgsConstructor;
import lombok.Setter;
import jakarta.persistence.*;

@AllArgsConstructor
@NoArgsConstructor
@Getter
@Setter
@Entity

public class Responder {
	@Id
	@GeneratedValue(strategy = GenerationType.IDENTITY)
	private Long id;
	private String responderName;
	private String responderNumber;
	private boolean isAvailable;
}The class has several private instance variables (id, responderName, responderNumber, and isAvailable) that represent different attributes of a responder.
The id field is annotated with @Id and @GeneratedValue annotations, indicating that it is the entity's primary key and its value will be automatically generated by the underlying database.
The responderName field represents the name of the responder.
The responderNumber field represents the phone number of the responder.
The isAvailable field is a boolean flag indicating whether the responder is currently available.
public enum IncidentStatus {
	UNRESOLVED,
	BEING_RESOLVED,
	RESOLVED,
	ABANDONED;
}The enum consists of four values: UNRESOLVED, BEING_RESOLVED, RESOLVED, and ABANDONED.
Each value represents a different status that an incident can have. These statuses represent different stages or states of an incident's lifecycle.
Enums are a way to define a fixed set of constant values. They provide a convenient way to represent a group of related values and restrict the possible values that a variable can have.
In this case, IncidentStatus enum is used to define the possible states that an incident can have, such as whether it is unresolved, being resolved, resolved, or abandoned.
Create three new files under the repository subdirectory: UserRepository.java, ResponderRepository.java, and IncidentRepository.java. Paste the following code snippets below in each of their respective files:
import com.response.emergency.model.AppUser;
import org.springframework.data.jpa.repository.JpaRepository;
import org.springframework.stereotype.Repository;

@Repository
public interface UserRepository extends JpaRepository<AppUser, Long> {

}import com.response.emergency.model.Responder;
import org.springframework.data.jpa.repository.JpaRepository;
import org.springframework.stereotype.Repository;
@Repository
public interface ResponderRepository extends JpaRepository<Responder, Long> {
}import com.response.emergency.model.Incident;
import org.springframework.data.jpa.repository.JpaRepository;
import org.springframework.stereotype.Repository;
@Repository
public interface IncidentRepository extends JpaRepository<Incident, Long>{
}
This file will supply the credentials for successfully interacting with the Vonage SDK. Paste the code snippet in the block below into this file:
import com.vonage.client.VonageClient;
import org.springframework.beans.factory.annotation.Value;

public class VonageConfig {
	@Value("${APPLICATION_ID}")
	private static String applicationId;
	@Value("${PRIVATE_KEY}")

	private static String privateKey;
	private static VonageClient instance;

	private VonageConfig() {}

	public static VonageClient getInstance() {

		if (instance == null) {
        	instance = VonageClient.builder()
                	.applicationId(applicationId)
                	.privateKeyPath(privateKey)
                	.build();
    	}

    	return instance;
	}
}The code represents a Java class named VonageConfig.java that is responsible for configuring and providing an instance of the VonageClient from the Vonage API:
The class has two private static variables: applicationId and privateKey. These variables are annotated with
@Valueand are assigned values from external configuration properties using Spring's property injection mechanism. The values are retrieved from properties with the keysAPPLICATION_IDandPRIVATE_KEY, respectively.The class has a private static instance variable of type
VonageClient, representing the Vonage client's singleton instance.The class's constructor is marked as private, indicating that the class cannot be instantiated from outside.
The class provides a public static method
getInstance()that returns the singleton instance of theVonageClient. If the instance is not already created, the method creates it by using theVonageClient.builder()and sets theapplicationIdandprivateKeyusing the values obtained from the configuration. Finally, it builds and returns the instance.
In the service package, create the LocationService.java file and paste the code snippet below into it:
import lombok.extern.slf4j.Slf4j;
import org.springframework.stereotype.Service;
import java.util.HashMap;
import java.util.Map;
import java.util.Random;

@Service
@Slf4j

public class LocationService {

	Map<String, Object> getLocation() {
    	Map<String, Object> coordinates = new HashMap<>();
    	coordinates.put("longitude", generateDummyCoordinate());
    	coordinates.put("latitude", generateDummyCoordinate());
    	return coordinates;
	}

	public static double generateDummyCoordinate() {
    	double minValue = 111.00;
    	double maxValue = 999.99;
    	Random random = new Random();

    	return minValue + (maxValue - minValue) * random.nextDouble();
	}
}The LocationService class represents a service responsible for retrieving the location information. It contains a method called getLocation() that returns a map of coordinates, specifically longitude and latitude. Inside the getLocation() method, a new HashMap named coordinates is created to store the coordinates. The generateDummyCoordinate() method is called twice to generate random longitude and latitude values. These values are then added to the coordinates map using the keys "longitude" and "latitude".
The LocationService class provides a simple implementation for generating and returning dummy location coordinates in a map. This can be further enhanced to retrieve the device's location using GPS or other location services. To do this, you need to dabble into full Android development, for instance, which is beyond this article's scope. The idea to run with here is that we pick the location of an incident if it is being reported from the scene of the action.
Navigate to the service directory and create an EmergencyService file. Paste the code snippet into the file you created.
import com.response.emergency.model.*;
import com.response.emergency.repository.IncidentRepository;
import com.response.emergency.repository.ResponderRepository;
import com.response.emergency.repository.UserRepository;
import com.response.emergency.requests.CreateIncidentRequest;
import com.response.emergency.requests.PickIncidentRequest;
import com.response.emergency.requests.ReportIncidentRequest;
import lombok.extern.slf4j.Slf4j;
import org.springframework.beans.factory.annotation.Autowired;
import org.springframework.stereotype.Service;
import java.util.Map;
import java.time.LocalDateTime;

@Service
@Slf4j

public class EmergencyService {

	@Autowired
	private UserRepository userRepository;
	@Autowired
	private ResponderRepository respondentRepository;
	@Autowired
	private IncidentRepository incidentRepository;
	@Autowired
	private LocationService locationService;

	@Autowired
	private VonageService vonageService;
	public AppUser createUser(AppUser user) {

    	return userRepository.save(user);
	}

	public Responder createRespondent(Responder responder) {

    	return respondentRepository.save(responder);
	}

	public String addUserToEmergencyList(Long userId, String name, String phoneNumber) {

    	AppUser appUser = userRepository.findById(userId).orElse(null);
    	assert appUser != null;
    	appUser.getContactList().put(name, phoneNumber);
    	userRepository.save(appUser);
    	return "User successfully added to your emergency contact list";
	}

	public Incident createAndSendIncident(CreateIncidentRequest createIncidentRequest) {

    	Incident incident = new Incident();
    	incident.setUserId(createIncidentRequest.getUserId());
    	incident.setIncidentDescription(createIncidentRequest.getIncidentDescription());
    	incident.setStatus(IncidentStatus.UNRESOLVED.name());
    	incident.setIncidentTime(LocalDateTime.now());
    	incident.setRespondedTo(false);
    	incident.setResponder(null);

    	if (createIncidentRequest.isReportingFromScene()) {

        	Map<String, Object> locationMap = locationService.getLocation();
        	incident.getIncidentLocation().put("longitude", locationMap.get("longitude"));
        	incident.getIncidentLocation().put("latitude", locationMap.get("latitude"));

    	}

    	else {

        	incident.getIncidentLocation().put("longitude", createIncidentRequest.getLongitude());
        	incident.getIncidentLocation().put("latitude", createIncidentRequest.getLatitude());
    	}

    	// send whatsapp here

    	AppUser user = userRepository.findById(createIncidentRequest.getUserId()).orElse(null);
    	String message = "There has been an incident reported by your friend at a location. " +
            	"Please help report to authorities";

    	assert user != null;

    	for (Map.Entry<String, Object> entry : user.getContactList().entrySet()) {
        	vonageService.sendWhatsApp(String.valueOf(entry.getValue()), message);
    	}

    	return incidentRepository.save(incident);
	}

	public String pickIncident(PickIncidentRequest pickIncidentRequest) {

    	Incident incident = incidentRepository.findById(pickIncidentRequest.getIncidentId()).orElse(null);

    	assert incident != null;

    	if (incident.isRespondedTo()) {

        	return "This incident has already been picked for attention";

    	}

    	incident.setStatus(IncidentStatus.BEING_RESOLVED.name());
    	incident.setRespondedTo(true);
    	incident.setResponder(pickIncidentRequest.getResponderId());
    	incidentRepository.save(incident);

    	return "Incident successfully picked. Kindly hurry to the scene";

	}

	public String reportIncidentStatus(ReportIncidentRequest reportIncidentRequest) {

    	Incident incident = incidentRepository.findById(reportIncidentRequest.getIncidentId()).orElse(null);

    	assert incident != null;

    	if (!incident.isRespondedTo()) {
        	return "This incident has not been picked for attention";
    	}

    	if (reportIncidentRequest.getStatus().equalsIgnoreCase("Abandoned")) {
        	incident.setStatus(IncidentStatus.ABANDONED.name());
    	}

    	else {
        	incident.setStatus((IncidentStatus.RESOLVED.name()));
    	}

    	incident.setRespondedTo(true);
    	incident.setResponder(reportIncidentRequest.getResponderId());
    	incidentRepository.save(incident);
    	return "Incident successfully picked. Kindly hurry to the scene";
	}
}This code in the class above provides various functionalities related to our emergency reporting app. Let's go through the code and understand its components:
The class is annotated with
@Autowired, indicating that it is managed by a Spring framework and dependency injection is used to inject the required dependencies.The class has several instance variables (
userRepository,respondentRepository,incidentRepository,locationService, andvonageService) that are autowired using Spring's dependency injection mechanism. These dependencies are Spring-managed beans that provide data access, location services, and communication capabilities by Vonage.The class provides several public methods to perform different actions related to emergency incidents and users:
createUser()andcreateRespondent()methods save a new user and respondent respectively using their correspondingrepositoryinterfaces.addUserToEmergencyList()method adds a user's contact information (name and phone number) to their emergency contact list, which is stored in theAppUserobject. The updatedAppUseris then saved using theuserRepository.createAndSendIncident()method creates a new incident based on the provided information in theCreateIncidentRequest. It sets the incident details, including the incident description, status, time, and location. If the incident is reported from the scene, the method uses the locationService to retrieve the current location and adds it to the incident object. After that, it sends a WhatsApp message to the user's emergency contact list using thevonageServicewith the incident details.pickIncident()method marks an incident as picked for attention by a responder. It updates the incident's status, marks it as responded to, and sets the responder's ID. The updated incident is saved in theincidentRepository.reportIncidentStatus()method updates the status of a picked incident based on theReportIncidentRequest. It sets the status as eitherAbandonedorResolvedand updates the responder's ID. The updated incident is saved in theincidentRepository.
In the package of your project named controller. Inside it, create a file with the name EmergencyController.java. Paste the code below into it:
import com.response.emergency.model.AppUser;
import com.response.emergency.model.Responder;
import com.response.emergency.requests.AddContactRequest;
import com.response.emergency.requests.CreateIncidentRequest;
import com.response.emergency.requests.PickIncidentRequest;
import com.response.emergency.requests.ReportIncidentRequest;
import com.response.emergency.service.EmergencyService;
import org.springframework.beans.factory.annotation.Autowired;
import org.springframework.http.HttpStatus;
import org.springframework.http.ResponseEntity;
import org.springframework.web.bind.annotation.PostMapping;
import org.springframework.web.bind.annotation.RequestBody;
import org.springframework.web.bind.annotation.RequestMapping;
import org.springframework.web.bind.annotation.RestController;

@RestController

@RequestMapping("/api/")

public class EmergencyController {
	@Autowired
	private EmergencyService emergencyService;
	@PostMapping("/create-user")

	public ResponseEntity<?> createUser(@RequestBody AppUser user) {
    	return new ResponseEntity<>(emergencyService.createUser(user), HttpStatus.OK);
	}

	@PostMapping("/create-responder")

	public ResponseEntity<?> createResponder(@RequestBody Responder responder) {
    	return new ResponseEntity<>(emergencyService.createRespondent(responder), HttpStatus.OK);
	}

	@PostMapping("/add-contact")

	public ResponseEntity<?> addUserToEmergencyList(@RequestBody AddContactRequest addContactRequest) {

    	return new ResponseEntity<>(emergencyService.addUserToEmergencyList(addContactRequest), HttpStatus.OK);
	}

	@PostMapping("/report-incident")

	public ResponseEntity<?> createAndSendIncident(@RequestBody CreateIncidentRequest createIncidentRequest) {

    	return new ResponseEntity<>(emergencyService.createAndSendIncident(createIncidentRequest), HttpStatus.OK);
	}

	@PostMapping("/pick-incident")

	public ResponseEntity<?> pickIncident(@RequestBody PickIncidentRequest pickIncidentRequest) {

    	return new ResponseEntity<>(emergencyService.pickIncident(pickIncidentRequest), HttpStatus.OK);
	}

	@PostMapping("/report-incident-status")

	public ResponseEntity<?> reportIncidentStatus(@RequestBody ReportIncidentRequest reportIncidentRequest) {

    	return new ResponseEntity<>(emergencyService.reportIncidentStatus(reportIncidentRequest), HttpStatus.OK);
	}
}The EmergencyController class is a Spring MVC controller responsible for handling HTTP requests related to emergency operations. It is annotated with @RequestMapping to define the base path "/api/" for all its endpoints.
The controller has a dependency on the EmergencyService class, which is autowired using @Autowired annotation. This allows the controller to access the methods provided by the service.
The controller defines several HTTP POST endpoints that correspond to different emergency operations:
/create-user: This endpoint handles the creation of a new user. It expects a JSON payload in the request body containing the user details. The createUser() method of the EmergencyService is invoked to create the user, and the response is wrapped in a ResponseEntity object with an HTTP status of 200 (OK).
/create-responder: This endpoint handles the creation of a new responder. It expects a JSON payload in the request body containing the responder details. The createResponder() method of the EmergencyService is invoked to create the responder, and the response is wrapped in a ResponseEntity object with an HTTP status of 200 (OK).
/add-contact: This endpoint handles adding a contact to a user's emergency contact list. It expects a JSON payload in the request body containing the user ID, name, and phone number of the contact to be added. The addUserToEmergencyList() method of the EmergencyService is invoked to add the contact, and the response is wrapped in a ResponseEntity object with an HTTP status of 200 (OK).
/report-incident: This endpoint handles the reporting of an incident. It expects a JSON payload in the request body containing the details of the incident. The createAndSendIncident() method of the EmergencyService is invoked to create and send the incident, and the response is wrapped in a ResponseEntity object with an HTTP status of 200 (OK).
/pick-incident: This endpoint handles picking an incident for attention by a responder. It expects a JSON payload in the request body containing the incident ID and responder ID. The pickIncident() method of the EmergencyService is invoked to pick the incident, and the response is wrapped in a ResponseEntity object with an HTTP status of 200 (OK).
/report-incident-status: This endpoint handles reporting the status of an incident. It expects a JSON payload in the request body containing the incident ID, responder ID, and the status (e.g., "Abandoned" or "Resolved"). The reportIncidentStatus() method of the EmergencyService is invoked to report the incident status, and the response is wrapped in a ResponseEntity object with an HTTP status of 200 (OK).
Overall, this tutorial aimed to harness the power of Vonage’s Messages API, focusing on the WhatsApp channel. The steps here can be replicated for any other Vonage API, and more service calls to the WhatsApp API can even be implemented. For instance, when an incident is resolved, a WhatsApp notification could be sent to the user who reported the incident and all the members to assure them of the safety or the victims.
In conclusion, the Emergency Response and Location System utilizing the Vonage Messages API and Java/Spring Boot offers an efficient solution for enhancing emergency management capabilities. By integrating these technologies, organizations can establish seamless communication channels and track the location of individuals in distress, enabling prompt response and assistance during critical situations. The system's use of Java and Spring Boot provides a solid foundation for building a secure and scalable emergency response system. With careful consideration of privacy and legal compliance, this system can contribute to the safety and well-being of communities.
By leveraging the system, emergency responders can swiftly extract a person's phone location, providing essential information to dispatch help promptly. The Java-based code example showcases the integration of location tracking using various techniques, including GPS, network-based services, or third-party APIs.
However, it is essential to note that implementing such a system requires careful consideration of privacy, security, and legal compliance aspects. Handling sensitive location data and ensuring proper consent and authorization are crucial in maintaining user trust and adhering to applicable regulations. The code for this article can be found here.