
Share:
Russ has been arguing with computers since 1985, and now mostly wins the fights. He has worked in video games, defence and investment banking, and joined the Vonage team four days before the Coronavirus lockdown. He enjoys travel, poker, games of all sorts, science fiction, and is easily dist... ooh, squirrel!
Build a “Google Authenticator” from a Landline with Vonage
Time to read: 22 minutes
We love Two-Factor Authentication (2FA)—it makes logging in so much more secure to use both a memorised password and a one-time passcode generated by your mobile phone. The problem with good security, though, is that it makes it very easy to lock yourself out.
Imagine that you’re away from home—on holiday, perhaps, or maybe a business trip to a distant city. That’s what 2FA is designed for; you can use that shared computer in the hotel lobby without being overly scared of keyloggers. Hackers may get your password, but they still can’t access your stuff without the phone in your hand!
But what happens if you don’t have your mobile? If it’s lost or damaged or stolen? Well, you’ll want to call your insurer for starters… but the contact details are on your phone and in email as a backup… and you can’t access your email without your phone as you’re using 2FA! 😱
What if you could access your 2FA passcode as a remote service? You could dial a number, enter your PIN, and have it read the digits to you.
Although the earliest implementations were proprietary, there is an open standard from the Initiative for Open Authentication (OATH) for Time-based One-Time Passwords (TOTP) specified in RFC 6238. This takes a pre-shared secret and the number of 30-second ticks since 1970-01-01 00:00:00 UTC, computes a cryptographic hash, and transforms this into a six-digit number which cannot be predicted without knowing the secret.
What makes this practical to use, however, is a URI scheme defined by Google. These look like: otpauth://totp/Example:totp@example.com?secret=KVKFKRCPNZQUYMLXOVYDSQKJKZDTSRLD&issuer=Example
Most commonly these URIs are encoded as a QR code, like this:

There are a few things you’ll need for this example:
Google Authenticator (Android/iOS, or any similar OATH TOTP app)
A service with 2FA support (such as a Google Account)
An ngrok account
A Heroku account
ngrok installed locally (I used 2.3.35)
node.js installed locally (I used v12.6.1)
We’re going to use node.js for this example because it makes it really easy to run a simple web service. There’s also a rather nice implementation of the one-time password logic that we need: otplib.
First, we need to install the required libs, which we do with npm.
Now put the following code into a file called totp.js. We’ll start with the access PIN and the shared secret, which is the same one as the QR code above, and bring in otplib.
const totp = require('otplib');

// Hardcoded secrets
const secret = 'KVKFKRCPNZQUYMLXOVYDSQKJKZDTSRLD';
const pin = '1234';We’ll build a simple node.js Express web service, using the Vonage Voice API to answer the call and return a Nexmo Call Control Object (NCCO) telling the API to use text-to-speech to speak a phrase and then wait for user input via the phone keypad. This is a very simple Interactive Voice Response (IVR) system, but we won’t go into how the Voice API works here. If you’d like to understand what this code is doing in more depth, take a look at this tutorial.
const app = require('express')()
const bodyParser = require('body-parser')

app.use(bodyParser.json())

const onInboundCall = (request, response) => {
  const ncco = [
    {
      action: 'talk',
      text: 'Please enter your PIN, followed by a hash.'
    },
    {
      action: 'input',
      eventUrl: [`${request.protocol}://${request.get('host')}/webhooks/passcode`]
    }
  ]

  response.json(ncco)
}
Now for the critical part—check the PIN typed in by the user. If it’s correct, we will get the current passcode and read it out to them.
const onInput = (request, response) => {
  const dtmf = request.body.dtmf;
  if (dtmf === pin) {
    const token = totp.authenticator.generate(secret);
    const slow = token.split('').join('. ');

    const ncco = [{
      action: 'talk',
      text: `Passcode is ${slow}. Repeat. ${slow}.`
    }]

    response.json(ncco)
  } else {
    const ncco = [{
      action: 'talk',
      text: `Incorrect PIN. Goodbye.`
    }]

    response.json(ncco)
  }
}
Finally, we wire up the functions we’ve just defined to HTTP methods/paths and start the app listening on port 3000.
const PORT = 3000

app
  .get('/webhooks/answer', onInboundCall)
  .post('/webhooks/passcode', onInput)

app.listen(PORT)That’s it! You can now run this with node totp.js and test it by going to http://localhost:3000/webhooks/answer in your browser—it’ll return the JSON object from the onInboundCall function we just defined!
Well, it’s nice that something is running, but it’s not much use if we can only access it on our local machine!
The ngrok service provides a wonderful way to set up a dynamic forwarder to make our little service available over the internet. Register on the website—a free account is all you need—and then run:
That will save your account credentials locally, and then you can set up forwarding of HTTP to port 3000 (the one we used above) by running:
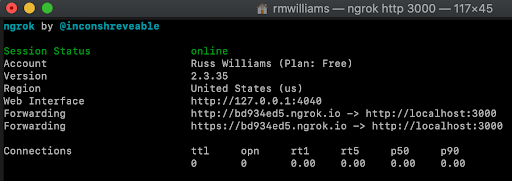
Make a note of the URIs it displays as those will be specific to your service and will change every time ngrok runs.
Again, we can test this with our browser by going to: https://bd934ed5.ngrok.io/webhooks/answer
Note: You’ll need to use the URI that ngrok provides.
ngrok also gives us free HTTPS, so our connection will be secure—how cool is that?
It still doesn’t do anything, though. This part is where it gets good.
Firstly, we need to create a new Voice API application. Go to the “Your applications” tab of the Vonage APIs dashboard and click the big “Create a new application” button:
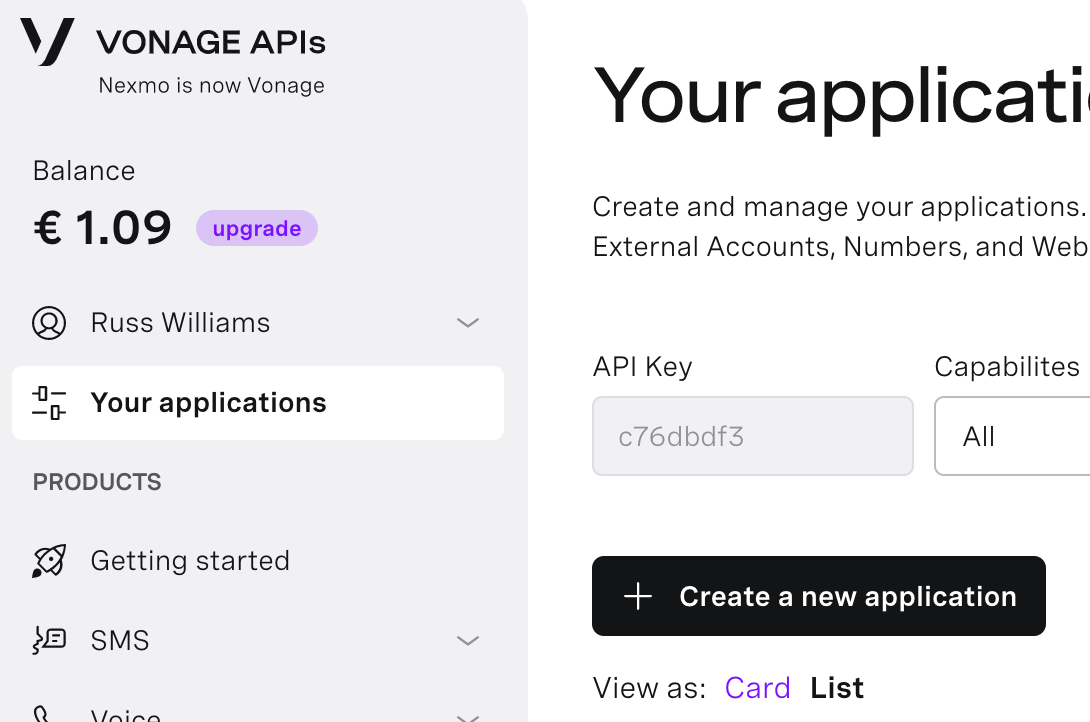
Enter a name like “TOTP Passcode Example,” and generate a keypair so it can have API access:

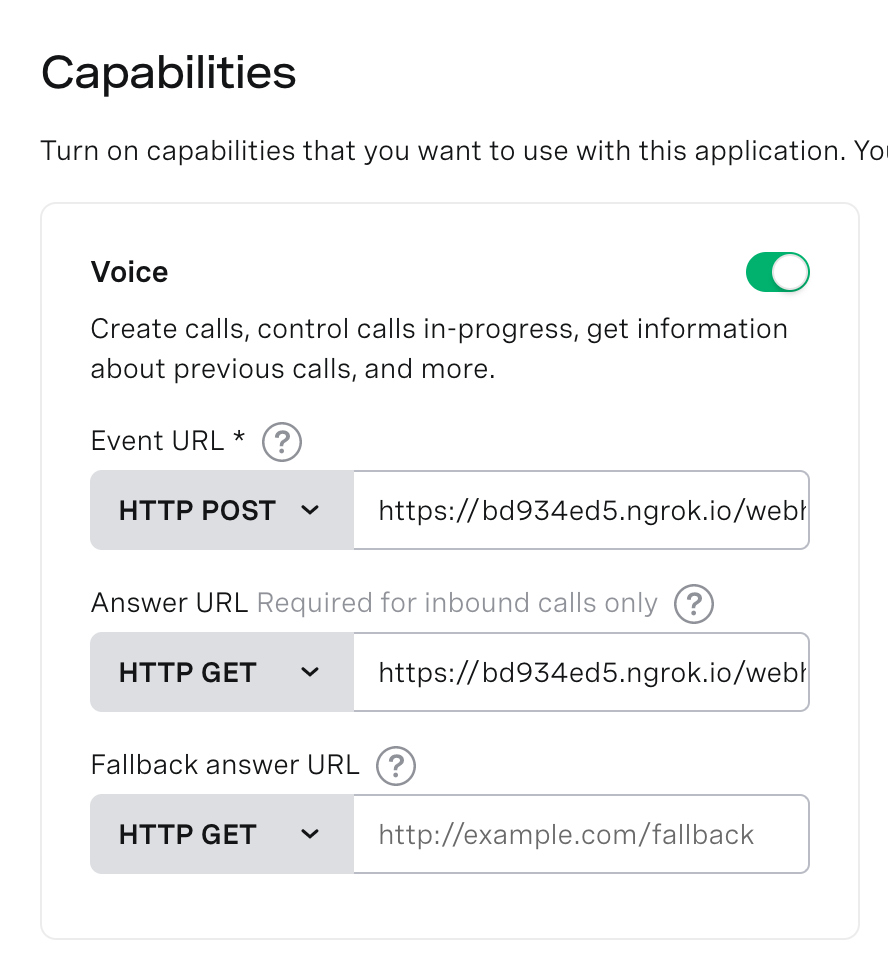
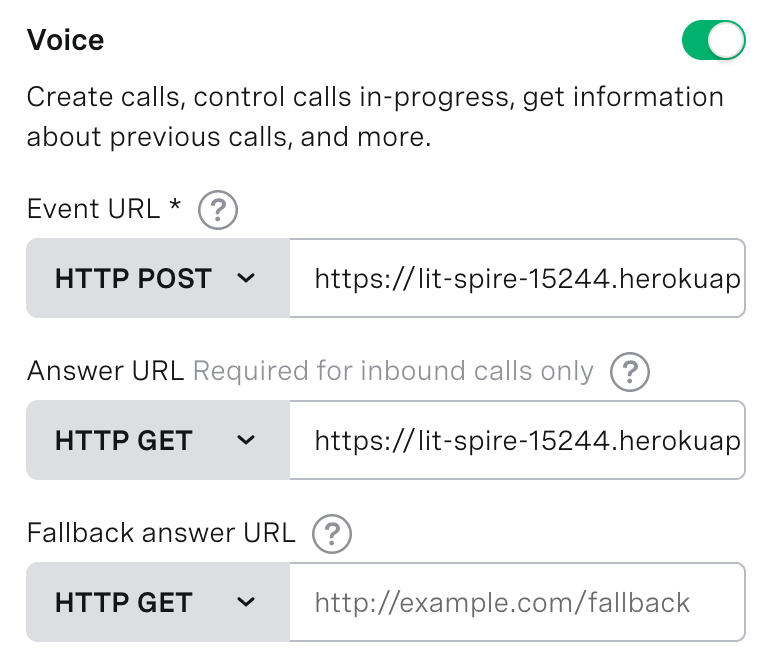
Then turn on the “Voice” capability, and set the event (https://bd934ed5.ngrok.io/webhooks/passcode) and answer (https://bd934ed5.ngrok.io/webhooks/answer) URIs to the ones from ngrok that you noted down above. Be sure to use your own ngrok URIs. Note that the event URI uses HTTP POST, so you’ll need to select that from the drop-down:
Alternatively, if you prefer using a CLI, you can create an app like this.
Install the Vonage CLI globally with this command:
npm install @vonage/cli -gNext, configure the CLI with your Vonage API key and secret. You can find this information in the Developer Dashboard.
vonage config:set --apiKey=VONAGE_API_KEY --apiSecret=VONAGE_API_SECRETCreate a new directory for your project and CD into it:
mkdir my_project
CD my_projectNow, use the CLI to create a Vonage application.
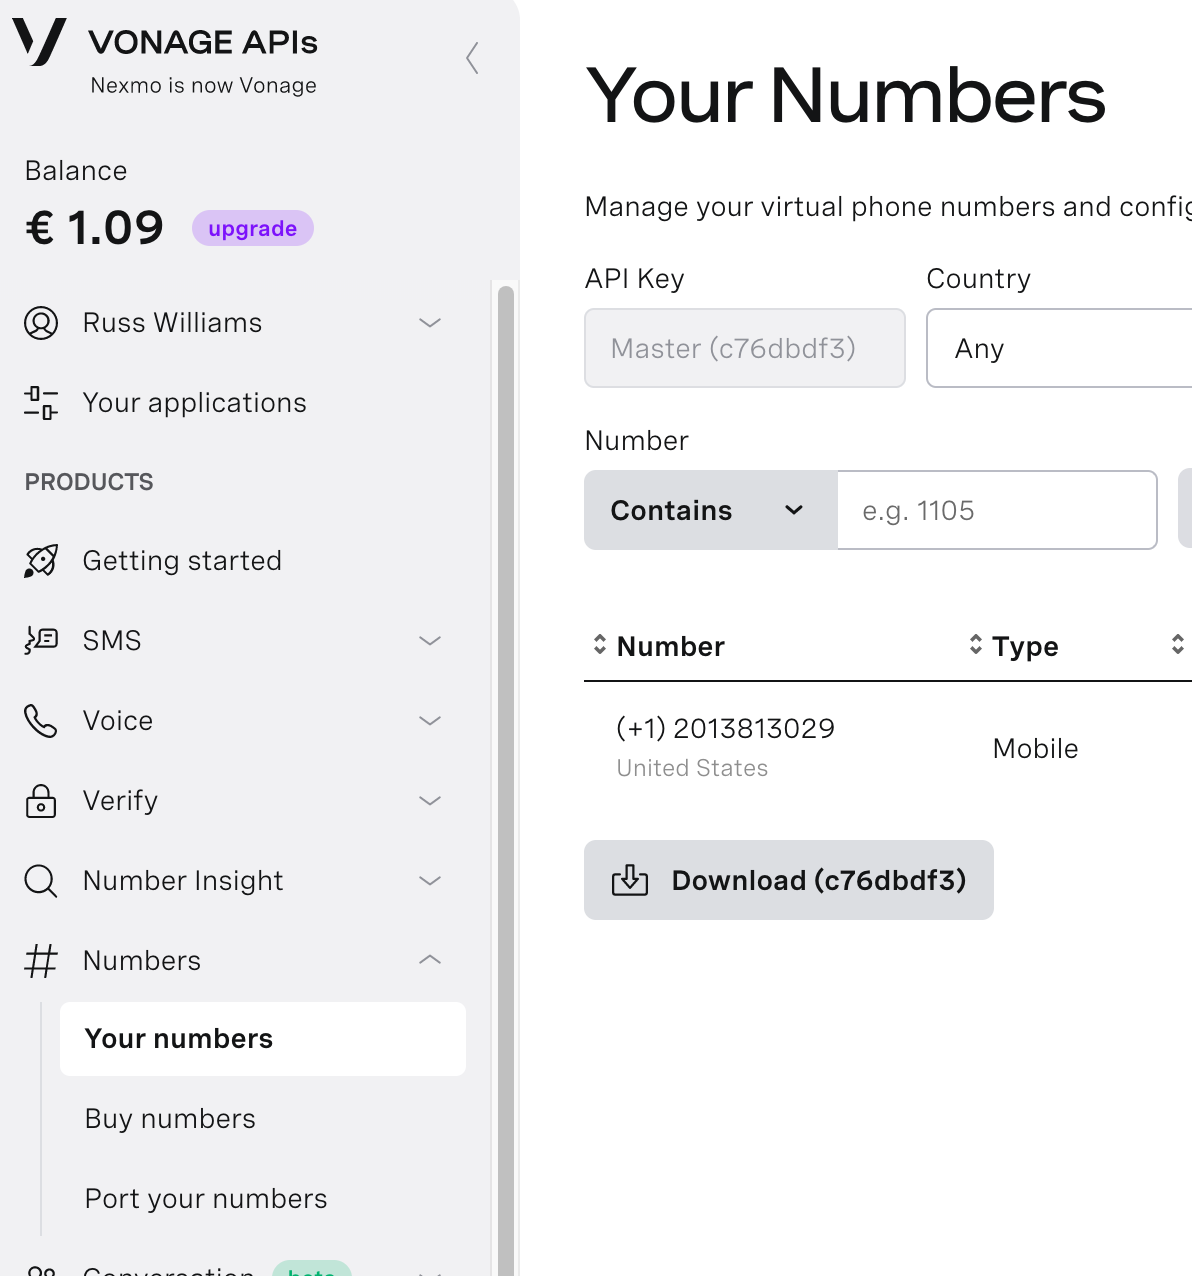
To be able to dial this service, we need an externally-facing number. Create one using “Numbers” -> “Buy Numbers” from the dashboard:
Again, for CLI fans, there’s the option to first search for voice-capable numbers (e.g. in the US):
Then buy one from the list:
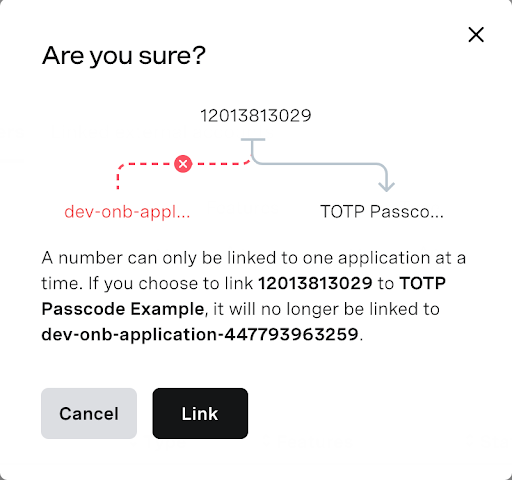
Finally, we need to link this number to the application. If you go to “My Applications” in the dashboard and click on your TOTP application, you should see a line at the bottom for your number and a “Link” button under “Manage”:
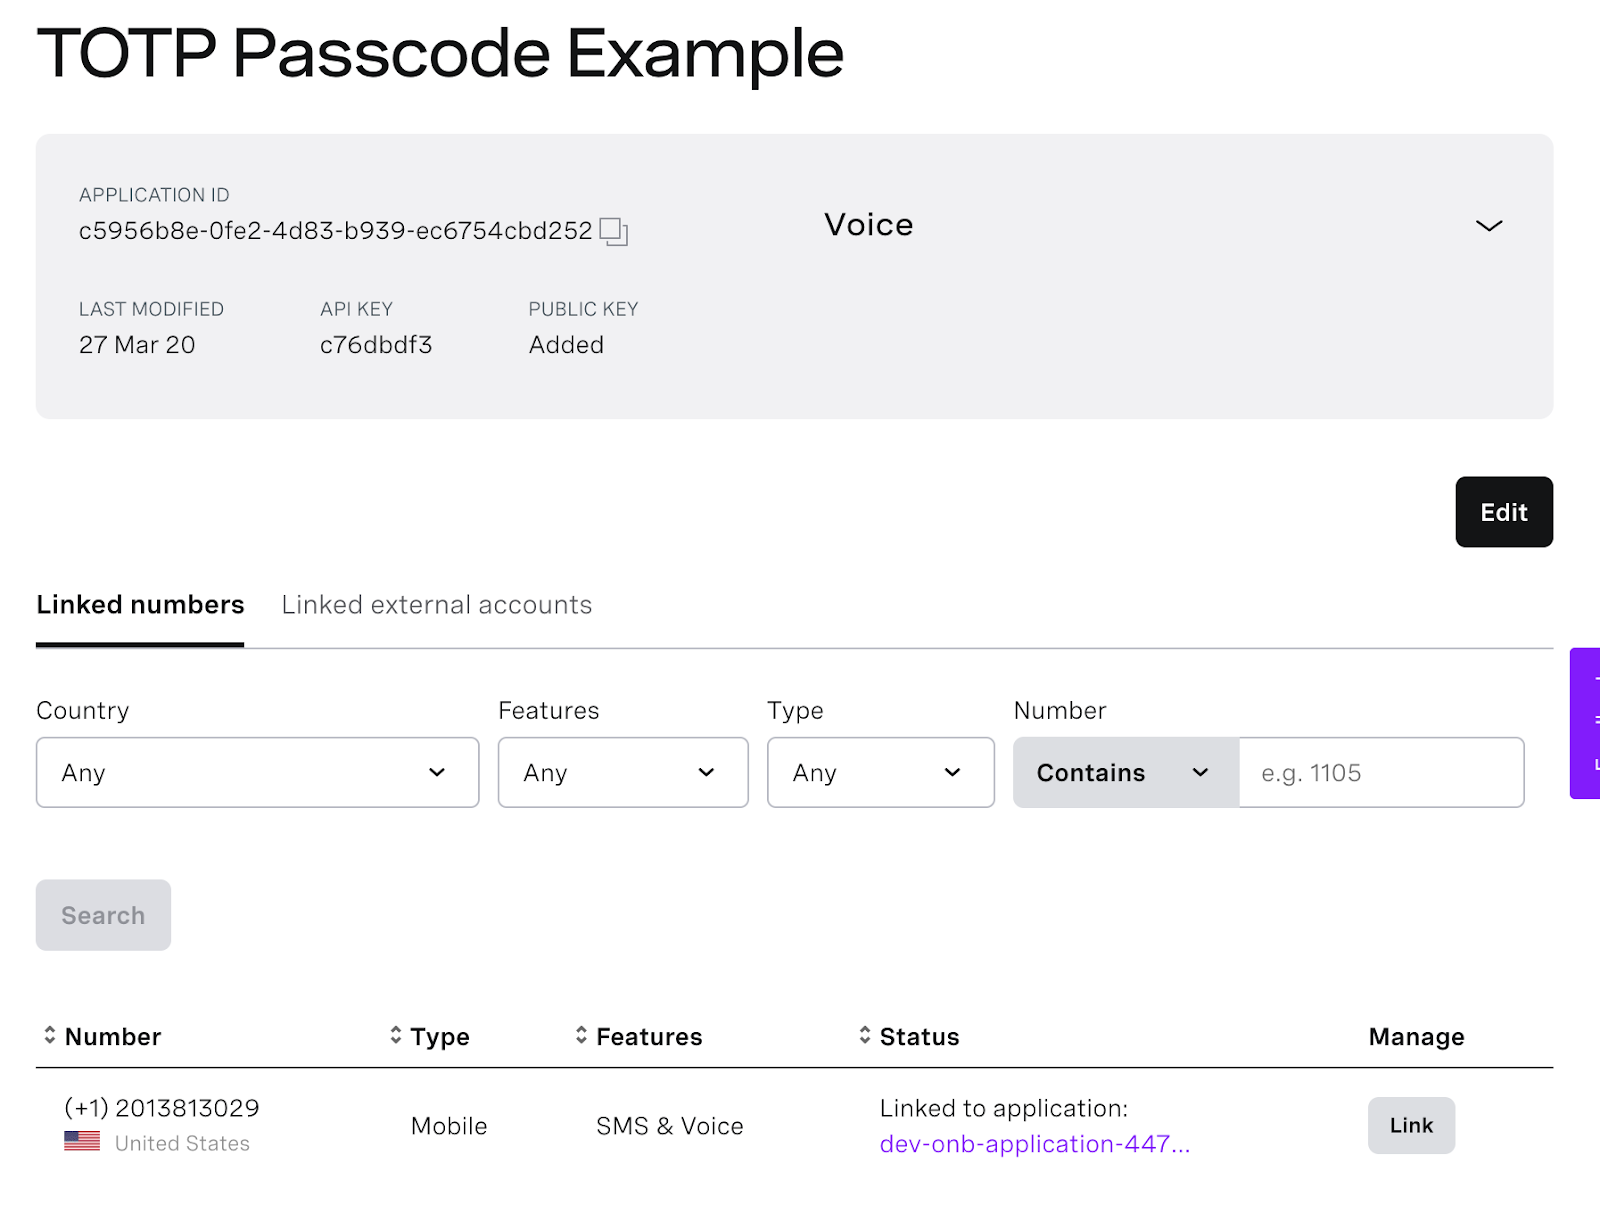
Click “Link” and confirm if necessary:
Fear not, CLI army, there’s a command for this as well:
There are also handy commands if you can’t remember the phone number (vonage numbers) or application UUID (vonage apps).
Now we have our service attached to a phone number. If we call that number, it’ll trigger the /webhooks/answer endpoint and the NCCO returned will trigger text-to-speech to speak the phrase “Please enter your PIN, followed by a hash.” and then wait for input from the telephone keypad. Enter “1234#” on your keypad, and that will be sent to the /webhooks/passcode endpoint, which will read out the six-digit passcode.
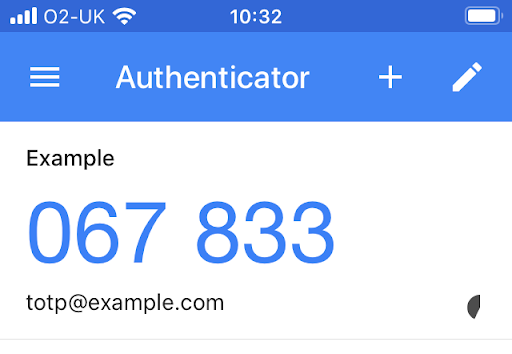
Scan the QR code at the top of this blog post into Google Authenticator, and you should find that the codes match perfectly!
It’s good that we’ve got this running, but it’s not very convenient running on your machine—it’ll stop if you turn it off and if you’re travelling, it’s unlikely you’ll leave a computer on at home! So it’ll clearly be better if we can have it running somewhere on the internet.
Heroku is good for this, allowing simple deployment and hosting of web services. A free account is sufficient, so go and sign up for one and set it up (with Git and the Heroku CLI). I’ll wait.
Heroku will assign a random port for the application to listen on, so we can’t just use 3000. We need to make this one-line change to totp.js to pick it up from the environment:
const PORT = process.env.PORT || 3000Another change is required to the package.json file to make the npm start command work as Heroku won’t otherwise know how to start our app! Simply add the node totp.js command we used locally to the scripts element. The whole package.json should now look something like this:
{
  "name": "totp",
  "version": "1.0.0",
  "description": "One Time Password by phone",
  "main": "totp.js",
  "dependencies": {
    "body-parser": "^1.19.0",
    "express": "^4.17.1",
    "nexmo": "^2.6.0",
    "otplib": "^12.0.1"
  },
  "devDependencies": {},
  "scripts": {
    "start": "node totp.js",
    "test": "echo \"Error: no test specified\" && exit 1"
  },
  "author": "Russ Williams",
  "license": "ISC"
}
We need to use Git to deploy to Heroku, plus it’s obviously good practice to have source control in place for any development. We’ll only bother with a local repository for now, but GitHub is free and will keep your code safe while making it available to you from anywhere in the world.
First, create a repository:
Next, add the source files we’ll need:
Finally, we need to commit these changes:
First, we need to create a new application in Heroku:
This will give your new application a randomly-generated name, something like lit-spire-15244. The heroku create command sets up a remote repository (e.g. https://git.heroku.com/lit-spire-15244.git) to which we can push code.
To deploy the application, we need to use Git again to push to that remote repo:
That will push the code to Heroku, and trigger a deployment. It will internally run npm start and report a status like https://lit-spire-15244.herokuapp.com/ deployed to Heroku. If you use that URI, https://lit-spire-15244.herokuapp.com/webhooks/answer, in my case, you should see that the service is now running. Again, we have free HTTPS, which is nice.
If you have problems, or just want to see what’s going on, you can view the logs for the service with the command:
Finally, we need to update the Vonage APIs dashboard. Go to the “Your Applications” tab, pick out the TOTP application, click “Edit” and change the URIs:
Unfortunately, Google Authenticator and most similar apps do not allow this. Once they have scanned a QR code, they don’t provide a way to retrieve the secret.
For G-Suite/Google accounts (e.g. Gmail), they offer a “Change Phone” option on the 2FA config page, which lets you get a new QR code. For most other services, you will have to disable and then re-enable 2FA, or request your system admin to do so for you—essentially the same process as replacing your mobile phone.
Taking a screenshot as well as scanning the QR code into the app will allow you to extract the secret and use it with this application.
Use a generic QR code scanner application to get the URI - there are plenty available for all phones, and there might even be one built into your phone’s camera app. Alternatively, you can use a website like https://webqr.com/ to scan a photo.
The secret you need is the sequence of capital letters between “secret=” and the “&” in the URI: otpauth://totp/Example:totp@example.com?secret=KVKFKRCPNZQUYMLXOVYDSQKJKZDTSRLD&issuer=Example
There are many ways to build upon this example application:
Requiring hardcoded secrets isn’t optimal and it’d be much better to retrieve them from a server-side database
There’s no protection against brute-forcing your PIN if someone is willing to make 10,000 calls to this application, so some sort of rate-limiting would be useful to implement
It’s wasteful to have a phone number for just one secret, so we could build an IVR menu system (“Press 1 for Gmail passcode, Press 2 for…”)
The passcodes are time-sensitive, so if it’s only a couple of seconds before the code changes we should probably use text-to-speech to say that and wait for the next one, rather than reading out a stale code. It’s better to extend the call by a few seconds than to have to redial and try again
Manually pulling secrets from QR codes sucks and there are node.js modules (e.g. qrcode-reader) which can do that for us. If we were storing the application secrets in a database, we could add a simple web front-end to enrol all the way from a screenshot (e.g. this guide from Google)
… or from access to the phone’s camera and a little HTML5 glue to capture an image (e.g. getUserMedia) or even parse the QR code (e.g. this tutorial or html5-qrcode) and call the enrolment web service
I hope that this has given you some ideas for how you can use Vonage APIs with two-factor authentication.
Share:
Russ has been arguing with computers since 1985, and now mostly wins the fights. He has worked in video games, defence and investment banking, and joined the Vonage team four days before the Coronavirus lockdown. He enjoys travel, poker, games of all sorts, science fiction, and is easily dist... ooh, squirrel!