Share:
Former Director of Developer Education at Vonage. With a background as a creative developer, product manager, and hack day organizer, Martyn has been working as a technology advocate since 2012 having previously spent time in broadcasting and major record companies. Educating and empowering developers all over the world.
Add 2FA to Your Nuxt Application with Nexmo Verify
Time to read: 17 minutes
In this tutorial we're going to build a basic application with two-factor authentication using the Nuxt JS framework.
Our application contains a secret section that can only be accessed if the user verifies themselves by entering a PIN code sent to them via SMS.
If you'd like to check out all the code for this example you can take a look at the nexmo-verify-nuxt repository on our Nexmo Community GitHub.
If you're going to follow along you'll need the following things:
Node JS - this app was built using v10.0, but it should be fine with version 8 or above.
Previous experience with VueJS would be helpful but not absolutely necessary. This is a very basic app and serves as a good intro for new learners.
Nuxt is a framework for building 'Universal Vue.js Applications'. Essentially, this means that when you use Nuxt you have the option of building out your finished app for production in three different ways:
As a Server Side Rendered application that builds all the HTML to be rendered in the browser on the server side at runtime and then sends it over to the user.
As a Single Page Application where all the UI rendering takes place in the browser at runtime. This would be most similar to a traditional Vue JS application.
As a Static Site, where all the HTML, CSS and JS is build out into static files that you can upload to Amazon S3, GitHub Pages, Netlify - anywhere you like!
It's a really flexible framework that, as a Vue JS fan, I've really enjoyed working with. If you want to find out more about it then check out the introduction to Nuxt JS in their documentation.
I chose Nuxt for this tutorial because I wanted to highlight a couple of features that have really impressed me and that have made the possibilities of working with a framework like this almost limitless. Those are:
Server Side Rendering
Custom Server Middleware
Don't worry to much if you don't know what these are yet. We'll cover them soon enough. Let's get going with the code for our app by installing Nuxt and building out our folder structure.
Start by creating an empty folder to work in, call it whatever you want.
We're going to be using NPM to install the dependencies for this project so start by running:
Then install the dependencies:
We'll also be working with the excellent dotenv package in development to handle our environment variables, so install that as a devDependency.
Before we get into the folder structure of the app there's a small change to make. Open up package.json in your editor and replace the scripts section with this:
"scripts": {
  "dev": "nuxt",
  "build": "nuxt build",
  "start": "nuxt start"
}
Nuxt uses a set of specific folders in order to organise itself. Often, the presence of these folders ensures that the dependencies for doing certain things are automatically included when you build out your app.
For example, if you need to use VueX in your app to manage shared state, you don't need to install it. Just create a folder named store, throw an index.js inside and Nuxt will automatically include VueX for you. It's pretty sweet.
We will be using VueX, and a couple of other things in our app so, in the root of your working directory, create a few new folders:
The pages, store, and middleware folders are specific to Nuxt, this is what they are for:
pages- This is where you keep the pages of your site. Nuxt supports automatic route generation that lines up with your folder structure. For example to achieve https://myapp.xyz/register, you would need to have a folder calledregisterinside thepagesfolder.store- This folder contains your VueX store files. VueX will be automatically included if you have this folder.middleware- If you want to define custom functions to run before pages are rendered, this is where they have to live.
If you want to understand more about how folder structure maps to actions in Nuxt, check out their Directory Structure guide.
Because it's best to focus on the core aspect of this tutorial, I'm going to suggest that you copy certain aspects directly from the repository or from code blocks for the sake of speed.
In the root of your working directory, create a new file call ed nuxt.config.js and open it. Add the following code:
module.exports = {
  head: {
    meta: [
      { name: 'viewport', content: 'width=device-width, initial-scale=1.0' }
    ],
    script: [
      {
        src:
          'https://cdnjs.cloudflare.com/ajax/libs/materialize/1.0.0-rc.2/js/materialize.min.js',
        body: true
      }
    ],
    link: [
      {
        rel: 'stylesheet',
        href: 'https://fonts.googleapis.com/icon?family=Material+Icons'
      },
      {
        rel: 'stylesheet',
        href:
          'https://cdnjs.cloudflare.com/ajax/libs/materialize/1.0.0-rc.2/css/materialize.min.css'
      }
    ]
  },
  loading: false,
  build: {
    vendor: ['axios']
  },
  env: {
    baseUrl: process.env.BASE_URL || 'http://localhost:3000'
  }
};This will ensure all the styling and fonts I've used will work on your version as well. We're using Materialize CSS as our UI framework, you can check out their documentation if you need more information on any of the layout elements.
For more information on configuring Nuxt, check out their guide.
Next, open the layouts folder and create a new file called default.vue. Add the following markup to it:
<template>
  <div class="container">
    <nuxt/>
  </div>
</template>
This will ensure that all the other views we create are properly contained and laid out correctly.
This app does use some state management, so inside the store folder, create a file called index.js and add the following code:
import Vuex from 'vuex';

export const store = () => {
  return new Vuex.Store({
    state: {
      token: null
    },
    mutations: {
      SET_TOKEN(state, token) {
        state.token = token || null;
      },
      INVALIDATE_TOKEN(state) {
        state.token = null;
      }
    },
    getters: {
      isVerified(state) {
        return state.token;
      }
    }
  });
};

export default store;
Once you've got that in place, it's time to write some code!
The app we're building has two pages in it. The first is a landing page with a login form, the second is a secret section that users can access once they've been verified.
We'll work on the landing page first. Inside the pages directory, create a new file called index.vue.
Open up the index.vue file in your editor and add the following code:
<template>
  <div>
    <div class="row">
      <div class="col s12 center-align">
        <h1><i class="medium material-icons">verified_user</i> Login</h1>
      </div>
    </div>
    <div class="row" v-if="request.token === ''">
      <form v-on:submit.prevent class="col s12">
      <div class="row center-align">
        <div class="input-field col s12">
          <i class="material-icons prefix">phone</i>
          <input type="text" id="phoneNumber" v-model="phoneNumber"/>
          <label for="phoneNumber"> Phone Number</label>
        </div>
        <div class="row center-align">
          <button v-on:click.stop.prevent="sendVerificationCode" type="submit" class="waves-effect waves-light btn"><i class="material-icons left">account_box</i>Send me a verifiation code</button>
        </div>
      </div>
    </form>
    </div>
    <div class="row" v-else>
      <form v-on:submit.prevent class="col s12">
        <div class="row center-align">
          <div class="input-field col s12">
            <i class="material-icons prefix">sms</i>
            <input type="text" id="verificationPin" v-model="request.verificationPin"/>
            <label for="verificationPin"> Enter the pin you were sent</label>
          </div>
          <div class="row center-align">
            <button v-on:click.stop.prevent="verifyPin" type="submit" class="waves-effect waves-light btn"><i class="material-icons left">account_box</i>Verify me</button>
          </div>
        </div>
      </form>
    </div>
  </div>
</template>

<script>
import { mapMutations } from 'vuex';
import axios from 'axios';

export default {
  data() {
    return {
      phoneNumber: '',
      request: {
        token: '',
        verificationPin: ''
      }
    };
  },
  methods: {
    displayMessage: function(type, message) {
      if (type === 'error') {
        M.toast({
          html: `${message}`,
          classes: 'rounded red accent-1',
          displayTime: 3000
        });
      }
    },

    sendVerificationCode: async function() {
      const { data } = await axios.post('/verification/send', {
        phoneNumber: this.phoneNumber
      });
      if (!data.token) {
        this.displayMessage('error', data.error_text || data.error);
      } else {
        const { token } = data;
        this.request.token = token;
      }
    },

    verifyPin: async function() {
      const { data } = await axios.post('/verification/verify', {
        token: this.request.token,
        code: this.request.verificationPin
      });
      if (!data.token) {
        this.displayMessage('error', data.error_text || data.error);
      } else {
        const { token } = data;
        this.$store.commit('SET_TOKEN', token);
        this.$nuxt.$router.replace({ path: '/secret' });
      }
    }
  }
};
</script>
There are two sections in this file, <template> and <script>. The <template> section holds the HTML for our login form and the <script> section has all the methods we need to do things with that form.
We're exposing three methods here, in order, this is what they do:
displayMessage- This is just a helper function that will display any errors returned via the API in an overlaid error message. The classes you see there come directly from Materialize CSS.sendVerificationCode- Takes the phone number entered by the user and passes it over to our middleware API for working with Nexmo VerifyverifyPin- When the user receives their PIN code they have to input it here as well, this method passes it to the verify endpoint in out middleware API.
You can run the app at this point:
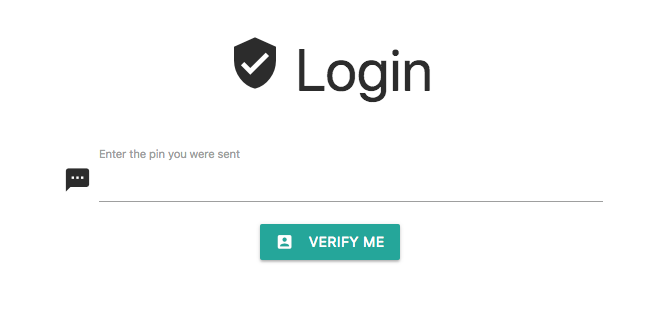
If all is well, you should be able to head to https://localhost:3000 and see this:

Sadly, clicking the 'Send Me a Verification Code' isn't going to do anything because our code is trying to pass off the number to an endpoint called /verification/send which doesn't exist.
It's time to go server side.
The Nexmo Verify API requires that you use a key and secret to authenticate requests. In typical browser rendered, or single page, applications this wouldn't be something we could do without exposing our secret key to the world - disaster.
The usual route to solving this would be to create a quick NodeJS script that exposes some Express endpoints you can hit to achieve what you want whilst keeping your keys secret.
The downside is that unless your app really needs a chunky API with lots of endpoints and server side functionality, finding a place to host this script in addition to your Nuxt app is, to me, more effort that you need.
Did you know you can run Express inside Nuxt?
That's right. Because Nuxt is already rendering things server side, technically NodeJS is already in play, which means that you can use packages like Express as Server Side Middleware.
This means no extra server for our little verification API!
Create a new file inside the node-scripts folder called verification_api.js and open it in your editor.
if (process.env.NODE_ENV !== 'production') {
  require('dotenv').config();
}
const express = require('express');
const Nexmo = require('nexmo');
const jwt = require('jsonwebtoken');

const API_KEY = process.env.apiKey;
const API_SECRET = process.env.apiSecret;
const JWT_SECRET = process.env.jwtSecret;

const app = express();
app.use(express.json());

const nexmo = new Nexmo({ apiKey: API_KEY, apiSecret: API_SECRET });

app.post('/send', async (req, res) => {
  // Get the phone number from the request body of our main app
  let phoneNumber = req.body.phoneNumber;

  nexmo.verify.request(
    {
      number: phoneNumber,
      brand: 'MyApp',
      code_length: 6,
      pin_expiry: 60
    },
    async (err, result) => {
      if (err || result.status !== '0') {
        res.json({ error: err || result.error_text });
      } else {
        const accessToken = await jwt.sign(
          {
            phoneNumber,
            request_id: result.request_id
          },
          JWT_SECRET
        );
        res.json({ token: accessToken });
      }
    }
  );
});

app.post('/verify', async (req, res) => {
  let { token, code } = req.body;
  const tokenObject = await jwt.verify(token, JWT_SECRET);

  nexmo.verify.check(
    { request_id: tokenObject.request_id, code: code },
    async (err, result) => {
      if (err || result.status !== '0') {
        res.json({ error: err || result.error_text });
      } else {
        const tokenizeResult = await jwt.sign(result, JWT_SECRET);
        res.json({ token: tokenizeResult });
      }
    }
  );
});

app.post('/auth-check', async (req, res) => {
  let { token } = req.body;
  const tokenObject = await jwt.verify(token, JWT_SECRET);
  const { request_id } = tokenObject;

  nexmo.verify.search(request_id, async (err, result) => {
    if (err) {
      res.json({ error: err });
    } else {
      res.json(result);
    }
  });
});

module.exports = {
  path: '/verification',
  handler: app
};
Those of you familiar with Node & Express applications will feel right at home with this code.
There are three endpoints, /send, /verify and /auth-check being exposed. Here is what they do:
/send- Receives the user phone number from the form and creates a new verification request using the Nexmo Node SDK. Therequest_idof this new request is converted into a signed JSON Web Token and send back to the front end./verify- Receives the JWT and the pin code back from the user. They JWT is decoded and the originalrequest_idis extracted, then passed along with the pin to the Verify API to see if they match up. If they do the verification is successful!/check-auth- Is a helper method used to check if an authorisation already exists for therequest_id, so users dont have enter their number every single time.
Unlike a typical express app where you would set server.listen to a port, we're going to export our whole script as a module so Nuxt can reference it.
Before it'll work though, create a file called .env in the root of your working directory and add the following:
apiKey = "YOUR NEXMO API KEY GOES HERE"
apiSecret = "YOUR NEXMO API SECRET GOES HERE"
jwtSecret = "ANY RANDOM STRING OF LETTERS & NUMBERS GOES HERE"Note: Be sure to keep .env out of any GitHub repositories by also adding a .gitignore to your working directory. You can copy the one I created for this project.
To make our new endpoints accessible in our Nuxt app, there are two steps to complete.
The first is to register the script as middleware in nuxt.config.js. Do this by adding the following line:
serverMiddleware: ['~/node-scripts/verification_api'];If you need to check exactly where that should go, you can reference the example on GitHub.
The second step is to build the app so these new routes (/verification/send and /verification/verify) are available. Make it so by running this command in your terminal:
Once that is complete, restart the dev server:
Go to https://localhost:3000 and enter your number into the form. Be sure to enter the country code as well.
Clicking 'Send me a Verification Code' should send you an SMS with a 6 digit pin code in it. You'll also notice that the view has changed and is now awaiting the pin.
Entering the PIN will finalise the verification and if all is successful then the app will try and redirect to a route called /secret.
...which doesn't exist yet. Let's create that and make sure it's secure using some Nuxt middleware.
Create a new folder inside the pages folder, call it secret and add a file called index.vue to it.
Open index.vue in your editor and add the following code:
<template>
  <div>
    <div class="row center-align">
      <h1>Secret Area</h1>
    </div>
    <div class="row center-align">
      <button v-on:click.stop.prevent="logout" class="waves-effect waves-light btn red"><i class="material-icons left">account_box</i>Logout</button>
    </div>
  </div>
</template>

<script>
export default {
  middleware: 'check_auth',
  methods: {
    // Clicking log out triggers this function that wipes out any pre-existing tokens
    logout: function() {
      this.$store.commit('INVALIDATE_TOKEN');
      this.$nuxt.$router.replace({ path: '/' });
    }
  }
};
</script>You'll notice this code references a piece of middleware called check_auth. This middleware will be called every time this file is requested, and can therefore be used to secure the page.
In the middleware folder create a new file called check_auth.js and open it in your editor. Add the following code:
import axios from 'axios';

export default function({ store, route, redirect }) {
  if (store.getters.isVerified) {
    const token = store.getters.isVerified;
    axios
      .post('/verification/auth-check', {
        token
      })
      .then(res => {
        const { data } = res;

        if (!data.error_text && data.checks[0].status === 'VALID') {
          console.log('valid, allowing access');
          redirect('/secret');
        } else {
          console.log('invalid, redirecting...');
          redirect('/');
        }
      })
      .catch(err => console.log(err));
  } else {
    redirect('/');
  }
}
This file will be called every time /secret is requested as a route but before the HTML is rendered and send to the browser. Above, the following steps take place:
The VueX store is checked using a getter method to see if a JSON Web Token has already been returned from our verification API
If it has, we pass it to the
/auth-checkendpoint to see if that authentication is still activeIf it doesn't exist, or the authentication is not valid, we redirect the request back to the login form.
If your dev server is still running at this time, restart it so the middleware registers properly and repeat the login process again. This time, a successful verification should show you the /secret page.
(The secret page I created for the example app is more fun than this one. You can get it here if you want to use it.)
Nuxt allows us to take a technology we might already know, like Vue, and add additional powerful elements, such as authentication via middleware without having to deviate to working on separate APIs on different servers.
Obviously, there are limits to how much you would want to pack into Server Side Middleware before actually making the move to building an external API would be the best option. It's up to you but I'd say anything more than 5 basic endpoints might warrant the effort. Anything less, consider building it as middleware - especially if it's just a proxy for calls to another API like this example is doing.
I hope this has provided a good insight into what can be done, and know that this approach works for a lot of the Nexmo APIs, not just Verify. You could just as easily make your Server Side Middleware send SMS messages instead of verify users.
Get creative with it and if you come up with other examples then feel free to share them with us via our Nexmo Community Slack channel.
Share:
Former Director of Developer Education at Vonage. With a background as a creative developer, product manager, and hack day organizer, Martyn has been working as a technology advocate since 2012 having previously spent time in broadcasting and major record companies. Educating and empowering developers all over the world.