SMSの受信
SMSを受信するには
- バーチャル番号のレンタル メッセージを受信する
- ウェブフック・エンドポイントの作成 以下のコード例のいずれかを使用する。
- Vonage DashboardでWebhookを設定します。
Prerequisites
Add the following to build.gradle:
Run your code
We can use the アプリケーション plugin for Gradle to simplify the running of our application. Update your build.gradle with the following:
Run the following gradle command to execute your application, replacing com.vonage.quickstart.kt.sms with the package containing ReceiveMessage:
Prerequisites
Add the following to build.gradle:
Write the code
Add the following to the main method of the ReceiveSms class:
/*
 * Route to handle incoming SMS GET request.
 */
Route inboundSmsAsGet = (req, res) -> {
    System.out.println("msisdn: " + req.queryParams("msisdn"));
    System.out.println("messageId: " + req.queryParams("messageId"));
    System.out.println("text: " + req.queryParams("text"));
    System.out.println("type: " + req.queryParams("type"));
    System.out.println("keyword: " + req.queryParams("keyword"));
    System.out.println("messageTimestamp: " + req.queryParams("message-timestamp"));

    res.status(204);
    return "";
};

/*
 * Route to handle incoming SMS with POST form-encoded or JSON body.
 */
Route inboundSmsAsPost = (req, res) -> {
    // The body will be form-encoded or a JSON object:
    if (req.contentType().startsWith("application/x-www-form-urlencoded")) {
        System.out.println("msisdn: " + req.queryParams("msisdn"));
        System.out.println("messageId: " + req.queryParams("messageId"));
        System.out.println("text: " + req.queryParams("text"));
        System.out.println("type: " + req.queryParams("type"));
        System.out.println("keyword: " + req.queryParams("keyword"));
        System.out.println("messageTimestamp: " + req.queryParams("message-timestamp"));
    } else {
        MessageEvent event = MessageEvent.fromJson(req.body());

        System.out.println("msisdn: " + event.getMsisdn());
        System.out.println("messageId: " + event.getMessageId());
        System.out.println("text: " + event.getText());
        System.out.println("type: " + event.getType());
        System.out.println("keyword: " + event.getKeyword());
        System.out.println("messageTimestamp: " + event.getMessageTimestamp());
    }

    res.status(204);
    return "";
};

Spark.port(8080);
Spark.get("/webhooks/inbound-sms", inboundSmsAsGet);
Spark.post("/webhooks/inbound-sms", inboundSmsAsPost);Run your code
We can use the アプリケーション plugin for Gradle to simplify the running of our application. Update your build.gradle with the following:
Run the following gradle command to execute your application, replacing com.vonage.quickstart.sms with the package containing ReceiveSms:
Prerequisites
Create a file named SmsController.cs and add the following code:
Prerequisites
Create a file named index.php and add the following code:
Add the following to index.php:
require 'vendor/autoload.php';

$app = AppFactory::create();Run your code
Save this file to your machine and run it:
Prerequisites
Run your code
Save this file to your machine and run it:
Prerequisites
Create a file named receive.rb and add the following code:
Run your code
Save this file to your machine and run it:
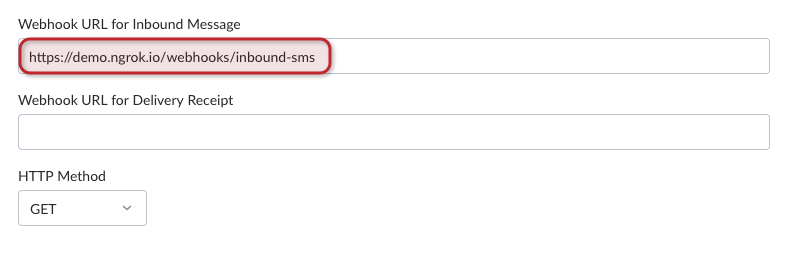
Vonage DashboardでWebhookエンドポイントを設定します。
VonageがWebhookにアクセスする方法を知るには、Vonageアカウントで設定する必要があります。
コード・スニペットでは、ウェブフックは次の場所にあります。 /webhooks/inbound-sms.Ngrok を使用している場合、Webhook を設定する必要があります。 Vonage Dashboard API 設定ページ という形式である。 https://demo.ngrok.io/webhooks/inbound-sms.交換 demo というフィールドにエンドポイントを入力します。 インバウンドメッセージ用Webhook URL:
試してみる
これで、Vonage番号にSMSを送信すると、コンソールにログが記録されるはずです。メッセージオブジェクトには以下のプロパティが含まれています:
{
  "msisdn": "447700900001",
  "to": "447700900000",
  "messageId": "0A0000000123ABCD1",
  "text": "Hello world",
  "type": "text",
  "keyword": "Hello",
  "message-timestamp": "2020-01-01T12:00:00.000+00:00",
  "timestamp": "1578787200",
  "nonce": "aaaaaaaa-bbbb-cccc-dddd-0123456789ab",
  "concat": "true",
  "concat-ref": "1",
  "concat-total": "3",
  "concat-part": "2",
  "data": "abc123",
  "udh": "abc123"
}