Numbers Verification APIからVerify Silent Authへの移行
このガイドでは、Network Enablement APIおよびNumbers Verification APIを使用したサイレント認証フローから、サイレント認証を使用した統合Verify APIへの移行方法について説明します。
Verify API は、以下の両方をサポートしています。 同期 そして 非同期 サイレント認証の実装に従う。本ガイドは 非同期 これは、サイレント認証を統合するために推奨される方法である。
レガシーと新アーキテクチャーの比較
移行を開始する前に、以下のセクションを確認し、旧アーキテクチャと新アーキテクチャの違いを理解してください。
レガシー・アーキテクチャネットワークの有効化とNumbersの検証
現在のセットアップでは、サイレント認証は2つの別々のAPIを調整する必要がある。まず、Network Enablement API が呼び出され、ユーザーのネットワークとデバイス・コンテキストがサイレント認証をサポートしているかどうかがチェックされる。サポートされている場合、Numbers Verification APIが実際のサイレント・モバイルID認証を実行するために使用される。
このアプローチにはいくつかの限界がある:
- サイレント認証がサポートされていない場合のフォールバックは組み込まれていない。
- 開発者は両方のAPIを手動でオーケストレーションしなければならない。
- エラーと再試行のロジックはクライアント側で実装する必要がある。
新しいアーキテクチャサイレント認証によるVerify
新しいアーキテクチャは、2段階のアプローチを、サイレント認証とVerify APIを使用する単一の統合に置き換えます。この統一されたアプローチは複雑さを軽減し、サイレント認証が不可能な場合のフォールバックチャンネル(SMS、音声、WhatsApp、Eメールなど)をサポートし、Webhookコールバックを自動的に処理します。
主な相違点
以下の表は、レガシー・アプローチと新アプローチの主な違いを示している:
| 特徴 | ネットワークの有効化とNumbersの検証 | Verify API (サイレント認証) |
|---|---|---|
| サイレント認証 | ||
| キャリア検索 | ||
| カバレッジ・チェック | ||
| フォールバック・サポート(SMS/ボイス/WhatsApp/Eメール) | ||
| 統一APIコール | ||
| JWTベアラ認証 | ||
| Webhookコールバック・サポート | パーシャル(手動) |
移行ステップ
以下の手順に従って、Network Enablement and Number Verification APIからVerify API with Silent Authenticationに移行してください:
ステップ2:レガシーフローをVerify APIに置き換える
ステップ7:モバイルアプリがリダイレクトに従ってコードを受け取る
アプリケーション設定の更新
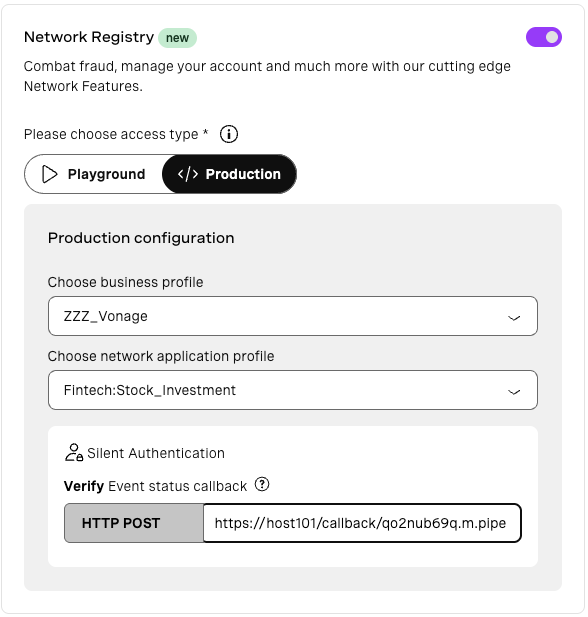
の中で Vonageアプリケーションダッシュボードアプリケーションの設定を開きます。設定 機能 > ネットワーク・レジストリVerifyイベントステータスのコールバックを、バックエンドが受け取るURLで更新する。 ウェブフック イベント(例. action_pending, completed).
レガシーフローをVerify APIに置き換える
モバイルアプリが認証をトリガーしたら、バックエンドは認証フローを開始しなければならない:
レガシー・フロー:
- コール・ネットワーク・イネーブルメントAPI。
- ネットワークがサポートされている場合は、Numbers Verification APIを呼び出してカバレッジチェックを行う。
新しい流れ:
- を使用してVerify APIを呼び出す。
silent_authワークフロー - サイレント認証に失敗した場合、ワークフローで定義されていれば、フォールバック・チャネル(SMS、音声、WhatsApp、Eメールなど)が自動的にトリガーされる ( リクエスト構造の更新).
認証方法の更新
Verify API は 2 つの認証方法をサポートしています: 基本認証 そして JWT(ベアラートークン).を参照してください。 Verify認証ガイド を参照してください。
リクエスト構造の更新
Verify API は ワークフロー 配列を使用して、検証チャネルのシーケンスを定義します。以下の例に示すように、サイレント認証はワークフローの最初のステップでなければならない:
{
  "brand": "ACME",
  "workflow": [
    {
      "channel": "silent_auth",
      "to": "447700900000",
    },
    {
      "channel": "sms",
      "to": "447700900000"
    }
  ]
}
をパスする。 check_url モバイルアプリへ
Verify APIを呼び出すと、この例のような同期応答が返ってくる:
{
  "request_id": "c11236f4-00bf-4b89-84ba-88b25df97315",
  "check_url": "https://api.nexmo.com/v2/verify/c11236f4.../silent-auth/redirect"
}
応答には以下が含まれる。 check_url パラメータに似ている。 auth_url Numbers Verificationで使用されます。モバイルアプリは、サイレント認証フローを開始するために、このURLにHTTP GETリクエストを実行する必要があります。
同じものを受け取ることもできる。 check_url 後でイベント・コールバック ( モバイルアプリにcheck_urlを渡すそのため、実装次第でどちらのソースからでもアプリに渡すことができる。
を扱う。 action_pending コールバック
リクエストの直後に、Vonage はイベントコールバックを アプリケーション設定の更新.
{
  "request_id": "...",
  "type": "event",
  "channel": "silent_auth",
  "status": "action_pending",
  "action": {
    "type": "check",
    "check_url": "https://eu.api.silent.auth/..."
  }
}
を使用することができます。 check_url 最初のAPIレスポンス(リクエスト構造の更新)、またはこのコールバックを使って、アプリでサイレント認証を開始します。
モバイルアプリがリダイレクトに従いコードを受け取る
モバイル・アプリは、以下のことを実行する。 GET にリクエストする。 check_url.それは、1つまたは複数の HTTP 302 リダイレクトを繰り返し、ようやくレスポンスを受け取る:
{
  "request_id": "...",
  "code": "si9sfG"
}
成功した場合、このコードは次のステップで検証されなければならない。
検証コードを検証する
送信 POST リクエストをモバイルアプリからVerify APIに送り、コードを検証します:
POST https://api.nexmo.com/v2/verify/{request_id}
Authorization: Bearer {access_token}
Content-Type: application/json
以下のボディを持つ:
{
  "code": "si9sfG"
}
すべてがうまくいけば、バックエンドからのレスポンスはこの例のようになる:
{
  "request_id": "...",
  "status": "completed"
}
サマリー・コールバックの処理
検証が完了すると、Vonageは最終的なコールバックをWebhookに送信します:
{
  "request_id": "...",
  "type": "event",
  "channel": "silent_auth",
  "status": "completed"
}
これにより、検証フローが終了したことが確認される。
次のステップ
- で統合をテストします。 サンドボックス環境.テスト番号と開発者ダッシュボードを使用して、サイレントシナリオとフォールバックシナリオの両方を検証してください。
- 私たちの サイレント認証ベストプラクティスガイド.
- ウェブフックイベントを監視する。バックエンドがステータスのコールバックを正しく処理していることを確認する(例.
action_pending,completed,failed).
詳細は APIドキュメントの検証.