Azure Face APIとVonageによるセンチメント分析
所要時間:1 分
あなたはその人を知っている。それはあなたの大切な人かもしれないし、子どもかもしれないし、同僚かもしれないし、友人かもしれない。あることを言っていても、顔を見ればまったく違うことを言っているとわかる人。あなたはおそらく、頭の中にその人の姿を思い浮かべただけだろう。もしかしたら正確な会話を覚えているかもしれない。おそらくこんな感じだったのではないだろうか:
あなたいいかい?
彼らいいよ。
ネタバレ注意:大丈夫じゃなかった。
相手の言っていることの背後にある感情を知ることができたら、素晴らしいと思いませんか?Vonage Video APIとAzureのFace APIを使えば、それが可能です!
このチュートリアルでは、顔の表情に基づいて各参加者の感情を分析することができる複数パーティーのビデオ会議を構築します。そして、その感情を絵文字としてビデオに表示します。
始める前に必要なものがいくつかある:
Vonage Video APIアカウント - Vonage Video APIアカウントは無料です。 無料で作成まだの場合
無料のAzure Accountと Face APIコグニティブサービス
オプション Ngrokテストデプロイ用
最後まで読み飛ばしたいですか?このチュートリアルのソースコードはすべて GitHub.
重い仕事はJavaScriptで行うので、HTMLとCSSはこの辺にしておこう。
mkdir video-sentiment
cd video-sentimentVideo-Sentimentフォルダーのルートに index.htmlファイルを作成し、以下をコピーする。
<!DOCTYPE html>
<html>
  <head>
    <title>Vonage Video API Sentiment Analysis</title>

    <link href="https://emoji-css.afeld.me/emoji.css" rel="stylesheet" type="text/css" />
    <link href="css/app.css" rel="stylesheet" type="text/css" />

    <a href="https://static.opentok.com/v2/js/opentok.min.js">https://static.opentok.com/v2/js/opentok.min.js</a>

    <!-- Polyfill for fetch API so that we can fetch the sessionId and token in IE11 -->
    <a href="https://cdn.jsdelivr.net/npm/promise-polyfill@7/dist/polyfill.min.js">https://cdn.jsdelivr.net/npm/promise-polyfill@7/dist/polyfill.min.js</a>
    <a href="https://cdnjs.cloudflare.com/ajax/libs/fetch/2.0.3/fetch.min.js">https://cdnjs.cloudflare.com/ajax/libs/fetch/2.0.3/fetch.min.js</a>
  </head>
  <body>

    <div id="videos">
      <div id="subscriber"></div>
      <div id="publisher"></div>
    </div>

    <!-- Footer will go here -->

    <a href="http://js/config.js">http://js/config.js</a>
    <a href="http://js/app.js">http://js/app.js</a>
  </body>
</html>
次に cssディレクトリを作成し、そこに app.cssファイルを追加する。そのファイルに以下のCSSをコピーする。
body,
html {
  height: 100%;
  background-color: black;
  margin: 0;
  padding: 0;
  font-family: Arial, Helvetica, sans-serif;
}

#videos {
  width: 100%;
  height: 50%;
  margin-left: auto;
  margin-right: auto;
}

#subscriber {
  width: 100%;
  height: 100%;
}

#publisher {
  position: absolute;
  bottom: 50px;
  right: 0px;
  z-index: 100;
}

.OT_subscriber {
  width: 300px !important;
  height: 200px !important;
  float: left;
  margin: 5px !important;
}

.OT_widget-container {
  padding: 6px 0 0 6px !important;
  background-color: #70B7FD !important;
}

#publisher .OT_widget-container {
  padding: 6px 0 0 6px !important;
  background-color: hotpink !important;
}

.sentiment {
  position: absolute;
  z-index: 9000;
  height: 100px;
  width: 100px;
  font-size: 48px;
}

footer {
  position: absolute;
  left: 0;
  right: 0;
  bottom: 0;
  height: 30px;
  padding: 10px;
  background-color: gray;
}

button {
  font-size: 16px;
  padding: 5px 10px;
  display: inline;
}

ul {
  float: right;
  display: inline;
  list-style: none;
  padding: 5px 10px;
  margin: 0;
}

li {
  display: inline;
  background-color: lightgrey;
  padding: 10px;
  display: none;
}
li.used {
  display: inline;
}
素晴らしい!では、そのきれいなHTMLとCSSに何かをさせましょう。フォルダを作成し jsフォルダを作成し config.jsファイルを追加する。
この config.jsファイルには、Vonage Video API と Azure Account から取得する設定パラメータが含まれています。以下の内容を config.jsファイルにコピーします。
// Replace these values with those generated in your Vonage Video API and Azure Accounts
const OPENTOK_API_KEY = '';
const OPENTOK_SESSION_ID = '';
const OPENTOK_TOKEN = '';
const AZURE_FACE_API_SUBSCRIPTION_KEY = '';
const AZURE_FACE_API_ENDPOINT = '';
私たちは OPENTOK_API_KEY, OPENTOK_SESSION_IDと OPENTOK_TOKEN変数を Vonage Video API Account から取得します。
Vonage Video API Accountで、'Projects'メニューから'Create New Project.`をクリックし、'Create Custom Project'ボタンをクリックします。新しいプロジェクトに名前を付け、'Create'ボタンを押してください。優先コーデックは'VP8'のままでかまいません。
。
APIキーをコピーして、それを OPENTOK_API_KEY設定の値として貼り付けます。
次に、"View Project "をクリックします。プロジェクト詳細ページの下部に、セッションIDとトークンを作成できるプロジェクトツールがあります。セッションのメディアモードに "Routed "を選び、"Create Session ID "ボタンを押してください。次に、生成されたセッションIDをコピーし、設定の値として貼り付けます。 OPENTOK_SESSION_ID設定の値として貼り付けてください。
最後に、生成されたセッションIDをトークン生成フォームのセッションIDフィールドに貼り付け、「トークン生成」ボタンを押す。生成されたトークンを設定の値としてコピーします。 OPENTOK_TOKEN設定の値としてコピーします。
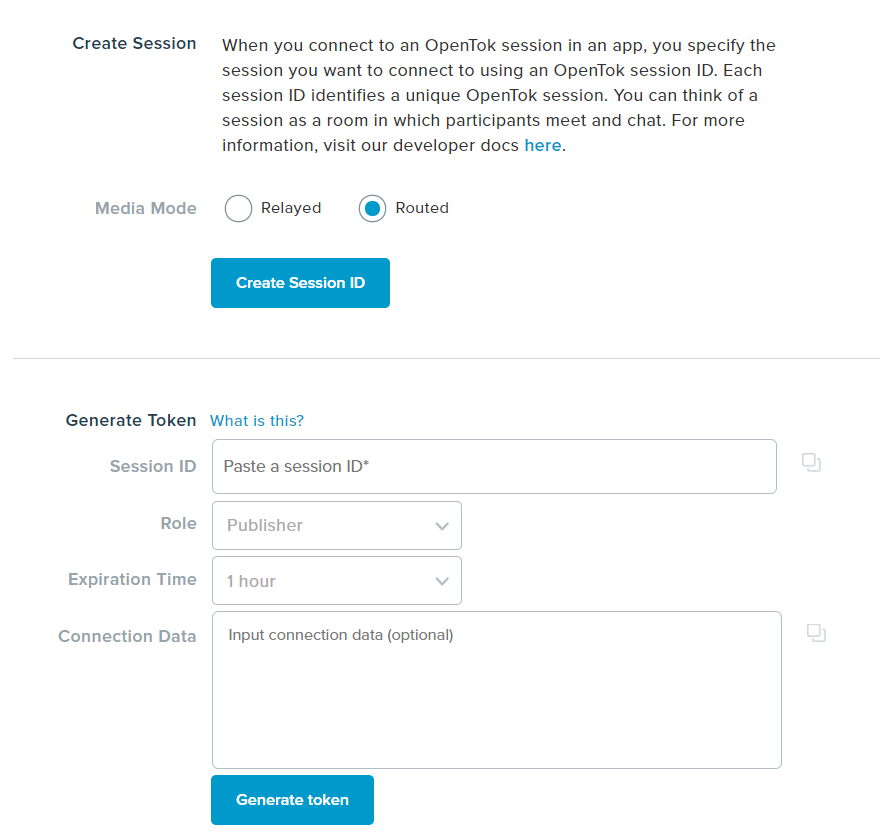 Project Tools area of a specific project in a Vonage Video API account.
Azureアカウントにログインし、新しいFace API Cognitive Serviceを作成します。作成したら、サービスをクリックし、"Quick start "ブレードに移動します。そこで Keyと Endpoint.この2つの値を AZURE_FACE_API_SUBSCRIPTION_KEYと AZURE_FACE_API_ENDPOINTの設定にコピーします。
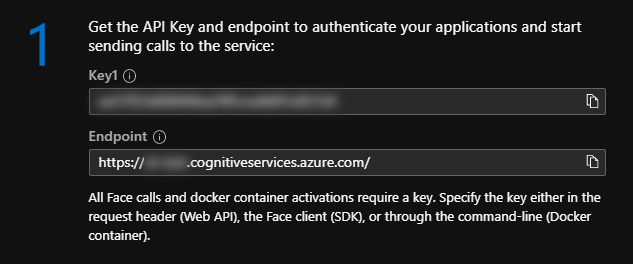 Screenshot of the Quick start blade within Azure for the Face API service.
設定ができたので、OpenTok セッションに接続する JavaScript を追加してみましょう。jsフォルダに app.jsファイルを js フォルダに追加し、以下をコピーします。
var opentok_api_key;
var opentok_session_id;
var opentok_token;
var azure_face_api_subscription_key;
var azure_face_api_endpoint;

// See the config.js file.
if (OPENTOK_API_KEY &&
  OPENTOK_SESSION_ID &&
  OPENTOK_TOKEN &&
  AZURE_FACE_API_SUBSCRIPTION_KEY &&
  AZURE_FACE_API_ENDPOINT) {

  opentok_api_key = OPENTOK_API_KEY;
  opentok_session_id = OPENTOK_SESSION_ID;
  opentok_token = OPENTOK_TOKEN;
  azure_face_api_subscription_key = AZURE_FACE_API_SUBSCRIPTION_KEY;
  azure_face_api_endpoint = AZURE_FACE_API_ENDPOINT;

  initializeSession();

} else {

  alert('Failed to get configuration variables. Make sure you have updated the config.js file.');

}

// Handling all of our errors here by logging them to the console
function handleError(error) {
  if (error) {
    console.log(error.message);
  }
}

function dataURItoBlob(dataURI) {
  // convert base64/URLEncoded data component to raw binary data held in a string
  var byteString;
  if (dataURI.split(",")[0].indexOf("base64") >= 0)
    byteString = atob(dataURI.split(",")[1]);
  else byteString = unescape(dataURI.split(",")[1]);

  // separate out the mime component
  var mimeString = dataURI
    .split(",")[0]
    .split(":")[1]
    .split(";")[0];

  // write the bytes of the string to a typed array
  var ia = new Uint8Array(byteString.length);
  for (var i = 0; i < byteString.length; i++) {
    ia[i] = byteString.charCodeAt(i);
  }

  return new Blob([ia], { type: mimeString });
}

var streams = [];
var emotions = [];
ここでは4つのことが起こっている:
で指定した変数に基づいて変数をロードする。
config.jsファイル私たちは
handleErrorメソッドを作成する。ここでは
dataURItoBlobメソッドを追加し、Azure Face APIに送信するために、base64/URLEncoded画像をblobに変換する。という名前の2つの配列を追加した。
streamsとemotions
この streams配列はすべてのアクティブな参加者ストリームを保持し、Azure Face APIに送信する画像をキャプチャするためにそれらにアクセスできるようにします。
この emotions配列には、Azure Face API が返す感情を表す文字列が格納されます。これは、ユーザーに絵文字の凡例を動的に表示するために使用されます。
以下のメソッドを initializeSessionメソッドを app.jsファイルの一番下に追加する。
function initializeSession() {
  var session = OT.initSession(opentok_api_key, opentok_session_id);

  // Subscribe to a newly created streams and add
  // them to our collection of active streams.
  session.on("streamCreated", function (event) {
    streams.push(event.stream);
    session.subscribe(
      event.stream,
      "subscriber",
      {
        insertMode: "append"
      },
      handleError
    );
  });

  // Remove streams from our array when they are destroyed.
  session.on("streamDestroyed", function (event) {
    streams = streams.filter(f => f.id !== event.stream.id);
  });

  // Create a publisher
  var publisher = OT.initPublisher(
    "publisher",
    {
      insertMode: "append"
    },
    handleError
  );

  // Connect to the session
  session.connect(opentok_token, function (error) {
    // If the connection is successful, initialize a publisher and publish to the session
    if (error) {
      handleError(error);
    } else {
      session.publish(publisher, handleError);
    }
  });
}
この initializeSessionメソッドは、セッション ID で指定したセッションで Video API クライアントを初期化します。次に streamCreatedと streamDestroyedイベントのイベントハンドラを追加します。 streams配列へのストリームの追加と削除を管理します。ファイルに設定したトークンを使用してセッションに接続します。 config.jsファイルに設定したトークンを使用してセッションに接続します。
これで index.htmlをChromeまたはFirefoxで開くことができます。ページを読み込んだら、ブラウザがウェブカメラとマイクにアクセスできるようにする必要があるかもしれません。その後、あなた自身(またはあなたのウェブカメラが見ているもの)のビデオストリームがページに表示されるはずです。
うまくいったら、音声をミュートにしてから別のタブを開き(元のタブは開いたまま)、同じファイルをロードしてください。2つ目のビデオが表示されるはずです。
トラブルシューティングのヒントページに Video が表示されない場合は、ブラウザのツール(Mac では command+option+i、Windows では CTRL+i)で「コンソール」タブを開き、エラーがないか確認してください。最も可能性の高い問題は、Vonage Video APIキー、セッションID、またはトークンが正しく設定されていないことです。認証情報をハードコードしているため、トークンの有効期限が切れている可能性もあります。
さて、参加者を見たり聞いたりすることはできますが、口からはわからない彼らの表情は何を物語っているのでしょうか?それぞれの参加者を分析できるボタンを追加してみましょう。
ファイル内の index.htmlファイルの <!-- Footer will go here -->というコメントを次のように置き換える:
<footer>
    <button id="analyze" type="button" onclick="processImages();">Analyze</button>

    <ul>
        <li name="em-angry"><i class="em em-angry"></i> Angry</li>
        <li name="em-frowning"><i class="em em-frowning"></i> Contempt</li>
        <li name="em-face_vomiting"><i class="em em-face_vomiting"></i> Disgust</li>
        <li name="em-fearful"><i class="em em-fearful"></i> Fear</li>
        <li name="em-grin"><i class="em em-grin"></i> Happiness</li>
        <li name="em-neutral_face"><i class="em em-neutral_face"></i> Neutral</li>
        <li name="em-cry"><i class="em em-cry"></i> Sadness</li>
        <li name="em-astonished"><i class="em em-astonished"></i> Surprise</li>
    </ul>
</footer>これは、ページの一番下に「分析」ボタンと、絵文字とセンチメントの間の凡例として使用する順序なしリストのあるフッターを追加します。
それでは、センチメント分析を処理するJavaScriptを追加しましょう。ファイル app.jsファイルの一番下に追加します。
function assignEmoji(emojiClass, index) {
  var widgets = document.getElementsByClassName('OT_widget-container');
  emotions.push(emojiClass);

  var sentimentDiv = document.createElement("div");
  sentimentDiv.classList.add("sentiment");
  sentimentDiv.classList.add("em");
  sentimentDiv.classList.add(emojiClass);

  widgets[index].appendChild(sentimentDiv);

  const legendEl = document.getElementsByName(emojiClass);
  legendEl[0].classList.add('used');
}

function processEmotion(faces, index) {
  // for each face identified in the result
  for (i = 0; i
      memo[1] > value ? memo : [key, value]
    );

    let emojiClass = 'em-neutral_face';
    switch (maxEmotion[0]) {
      case 'angry':
        emojiClass = 'em-angry';
        break;
      case 'contempt':
        emojiClass = 'em-frowning';
        break;
      case 'disgust':
        emojiClass = 'em-face_vomiting';
        break;
      case 'fear':
        emojiClass = 'em-fearful';
        break;
      case 'happiness':
        emojiClass = 'em-grin';
        break;
      case 'sadness':
        emojiClass = 'em-cry';
        break;
      case 'surprise':
        emojiClass = 'em-astonished';
        break;
      default:
        break;
    }
    assignEmoji(emojiClass, index);
  }
}

// Gets a <video> element and draws it to a new
// canvas object. Then creates a jpeg blob from that
// canvas and sends to Azure Face API to get emotion
// data.
function sendToAzure(video, index) {
  // Get the stream object associated with this
  // <video> element.
  var stream = streams[index];

  var canvas = document.createElement("canvas");
  canvas.height = stream.videoDimensions.height;
  canvas.width = stream.videoDimensions.width;

  var ctx = canvas.getContext("2d");
  ctx.drawImage(video, 0, 0, canvas.width, canvas.height);

  var dataURL = canvas.toDataURL("image/jpeg", 0.8);
  var blob = dataURItoBlob(dataURL);
  var fd = new FormData(document.forms[0]);
  fd.append("canvasImage", blob);

  // Perform the REST API call.
  var uriBase = `${azure_face_api_endpoint}/face/v1.0/detect`;

  // Request parameters.
  var params = 'returnFaceId=true&returnFaceLandmarks=false&returnFaceAttributes=emotion';

  const xhr = new XMLHttpRequest();
  xhr.open('POST', `${uriBase}?${params}`);
  xhr.responseType = 'json';
  xhr.setRequestHeader('Content-Type', 'application/octet-stream');
  xhr.setRequestHeader("Ocp-Apim-Subscription-Key", azure_face_api_subscription_key);

  xhr.send(blob);

  xhr.onload = () => {

    if (xhr.status == 200) {
      processEmotion(xhr.response, index);
    } else {
      var errorString = `(${xhr.status}) ${xhr.statusText}`;
      alert(errorString);
    }
  }
}

// Reset emojis and loop through all <video> elements and call
// sendToAzure
function processImages() {
  emotions = [];
  var sentiments = document.getElementsByClassName('sentiment');
  var usedListItems = document.getElementsByClassName('used');
  var videos = document.getElementsByTagName('video');

  // Remove any existing sentiment & emotion objects
  if (sentiments.length > 0) {
    for (s = 0; s  0) {
    for (l = 0; l < usedListItems.length; l++) {
      usedListItems[l].classList.remove('used');
    }
  }

  for (v = 0; v < (videos.length - 1); v++) {
    sendToAzure(videos[v], v);
  }
}このコードが何をするのか、おさらいしてみよう。
この assignEmojiメソッドは、特定のビデオ・ストリームの感情に関連付けられたCSSクラスと、UIにおけるそのストリームのインデックスを受け取ります。以下の処理を行います:
提供されたクラスを
emotions配列に追加します。適切なVideoパネルの上に、絵文字を表示するクラスを持つdivを追加する。
クラスを
usedクラスを追加します。liを追加し、その絵文字が凡例に表示されるようにする。
この processEmotionメソッドはAzure Face APIから顔データのペイロードを受け取り、最も高い順位の感情を特定します。そして assignEmojiを呼び出します。
この sendToAzureメソッドは、HTML video 要素と、ページ上の video オブジェクトのインデックスを受け取ります。その Video 要素に関連付けられたストリームを取得し、ストリームと同じ寸法の HTML canvas を作成します。次に、新しい canvas にストリームのキャプチャを描画し、作成した画像を含む XMLHttpRequest を Azure Face API に送信します。Azure Face API は JSON オブジェクトを返します。 processEmotionメソッドに送信します。
最後に processImagesメソッドは、UIから既存の絵文字を消去し、DOM内のすべてのHTMLビデオタグを取得し、それらを処理するために sendToAzureメソッドに送ります。このメソッドは、フッターの「Analyze」ボタンから呼び出されます。
これで index.htmlブラウザでページを開くと、"Analyze "ボタンを押して、AzureのFace APIがどのような感情を識別したかを見ることができる。現時点ではいくつかの制限がある。例えば、Azure Face APIがフレーム内で2つの顔を認識した場合、両方のデータを返しますが、現在のコードでは1つ目の顔に対してのみ絵文字を追加しています。
また、定かではないが、ティーンエイジャーには使えないかもしれない。10代の娘に何十回もテストさせたが、感情として返ってきたのは「嫌悪」と「軽蔑」だけだった。これはあまり良いアイデアではなかったのかもしれない。彼らが本当はどう思っているのか、知らない方がいいのかもしれない。😂
 Four video frames of Michael showing different sentiments returned from Azure's Face API
Nexmoを使ったセンチメント分析についてもっと知りたいですか?以下のブログ記事をご覧ください: