
Build an AI Wardrobe with Vonage Messages API (RCS) and Gemini
You know that feeling when you look at your closet and think, "I have nothing to wear"? It happens to most of us. You end up wearing the same few things, while other clothes are just forgotten. What if you could text your wardrobe and it would show you what you have?
So, in this blog post, we'll build a digital wardrobe assistant. It's a fun project that allows you to use Rich Communication Services (RCS) to text a bot. It will show you pictures of your clothes. We'll use the Vonage Messages API and the Google Gemini API to make it smart. It's about turning a simple problem into a cool, tech solution.
You can find the complete code in the GitHub repository.
 RCS Conversation
To follow along, you’ll need:
A phone with RCS capabilities for testing
Node.js 18+
Vonage API account
Vonage API Account To complete this tutorial, you will need a Vonage API account. If you don’t have one already, you can sign up today and start building with free credit. Once you have an account, you can find your API Key and API Secret at the top of the Vonage API Dashboard.

git clone https://github.com/Vonage-Community/blog-messages-nodejs-rcs_wardrobe

cd blog-messages-nodejs-rcs_wardrobe

npm install
This project utilizes the dependencies included in the package.json file.
Express. You can click on each one to see their definitions on npm: dotenv, @vonage/server-sdk, @vonage/messages, @vonage/jwt, and @google/genai.
You can find the project structure on the accompanying GitHub repository for the blog post.
src/index.js       server, wardrobe endpoint, webhook handlers

src/vonage.js      Vonage client setup with your private key

wardrobe.json      sample items that reference image filenames

Photos/            images used by wardrobe.json

private.key        your Vonage application private key (add this file)

.env               environment variables (create this)
アプリケーションを作成するには アプリケーションの作成ページでアプリケーションの名前を定義します。

Webhooksを使用するAPIを使用する場合は、秘密鍵が必要です。Generate public and private key "をクリックすると、自動的にダウンロードが始まります。この鍵は紛失すると再ダウンロードできません。この鍵は紛失しても再ダウンロードできません。 private_<あなたのアプリID>.key.この鍵はAPIコールの認証に使用できます。 注意:アプリケーションを保存するまで、キーは機能しません。
必要な機能(Voice、Messages、RTCなど)を選択し、必要なWebhook(イベントURL、応答URL、受信メッセージURLなど)を提供します。これらはチュートリアルで説明します。
保存してデプロイするには、"Generate new application "をクリックして設定を確定します。これでアプリケーションはVonage APIで使用する準備が整いました。
The steps below show you how to create a new Vonage application from the dashboard. Alternatively, you can use the CLI to create an application.
Go to 'Your Applications' in the Vonage dashboard and click to create a new application.
Create a public/private key pair for API authentication. Click 'Generate public and private key’ to obtain the private key. The file will be downloaded to the location you set in your browser for downloaded files. Be sure to add that file to the project folder.
Run the following command to start an ngrok tunneling instance.
ngrok http 3000In the output, you’ll find a URL that starts with https:// and ends in .ngrok.app/. Make a note of it as you’ll need it for the next step to configure your webhooks.
Forwarding https://94cd51b63460.ngrok.app/ -> http://localhost:8000 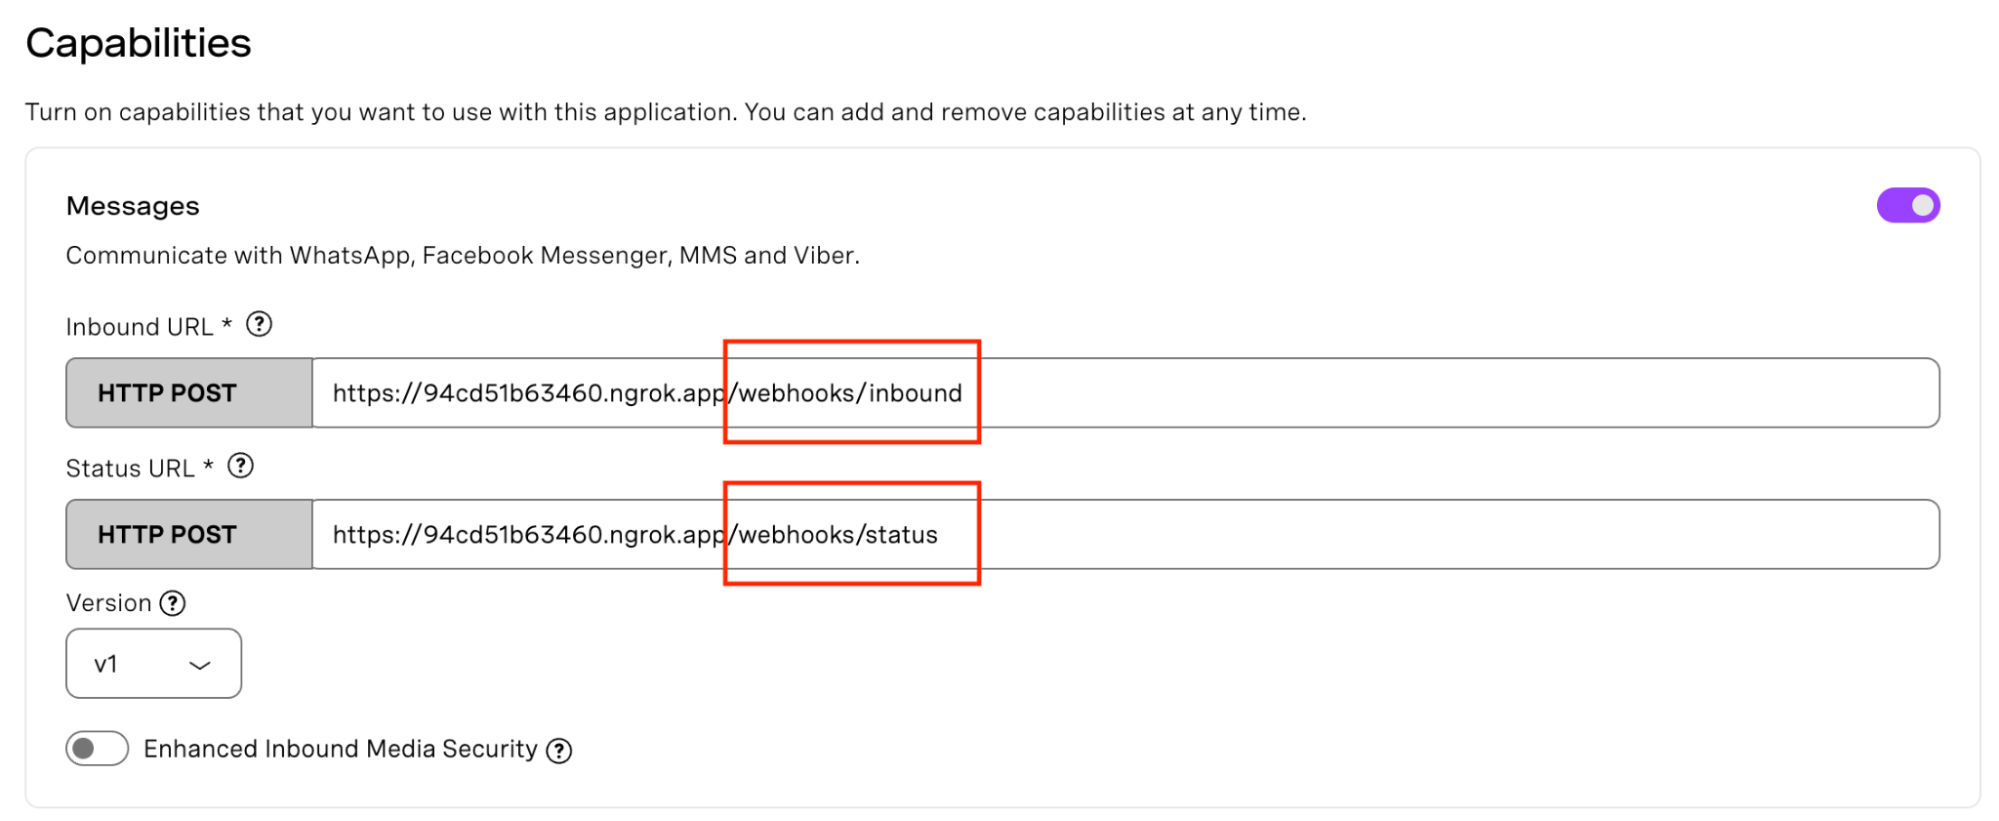 Messages Webhooks
Back in the Vonage API Dashboard, under your Apps, toggle the Messages option under capabilities, and set your server's public URL from ngrok as the endpoint for inbound messages and events. It should look like: https://94cd51b63460.ngrok.app/webhooks/inbound for inbound and https://94cd51b63460.ngrok.app/webhooks/status for status. If you’d like to learn more about webhooks, you can find information on our Vonage documentation.
Environment variables let you keep credentials and configuration out of your code. Create a .env file in the repo root and add the following environment variables:
VONAGE_APPLICATION_ID=your-app-id

VONAGE_PRIVATE_KEY_PATH=./private.key

RCS_SENDER_ID=your-rcs-sender-id

GEMINI_API_KEY=your-gemini-api-key

VONAGE_API_SIGNATURE_SECRET=your-signature-secret

PUBLIC_BASE_URL=https://your-ngrok-subdomain.ngrok-free.app

PHONE_NUMBER=+<your_e164_number>

PORT=3000
The server serves /photos from Photos, verifies Vonage webhooks with your Signature Secret, reads the user’s RCS text, loads wardrobe.json, and asks Gemini for { TextResponse, ReferencedImages }. It returns the text, then sends images; if there are several, it sends a carousel. Image URLs use PUBLIC_BASE_URL/photos/<filename>.
src/index.js holds the routes, webhook check, Gemini call, and RCS send logic. src/vonage.js loads env values, reads private.key, and creates the Vonage client.
JWT検証機能を追加し、着信リクエスト(メッセージやコールなど)がVonageからのものであるかどうかを検証します。
VONAGE_API_SIGNATURE_SECRET変数は、JWTクレームに含まれるAPIキーに関連付けられた署名秘密に対応するリクエストに署名するために使用される秘密です。署名の秘密は ダッシュボードの設定.
リクエストの確認 リクエストの確認.
const verifyJWT = (req) => {
  // Verify if the incoming request came from Vonage
  const jwtToken = req.headers.authorization.split(" ")[1];
  if(!verifySignature(jwtToken, process.env.VONAGE_API_SIGNATURE_SECRET)) {
    console.error("Signature does not match");
    throw new Error("Not a Vonage API request");
  }

  console.log("JWT verified");
}vonage/jwt依存関係をインストールしてください。
npm install @vonage/jwtRun node src/index.js, then visit http://localhost:3000/wardrobe once to send the first message to PHONE_NUMBER. After the thread appears on your device, reply with your queries.
From the repository root, run the following command from your terminal. Make sure your ngrok instance is still running.
node src/index.js
To send the first agent message to PHONE_NUMBER to open an RCS thread on your device, navigate to this URL in your browser: http://localhost:3000/wardrobe.
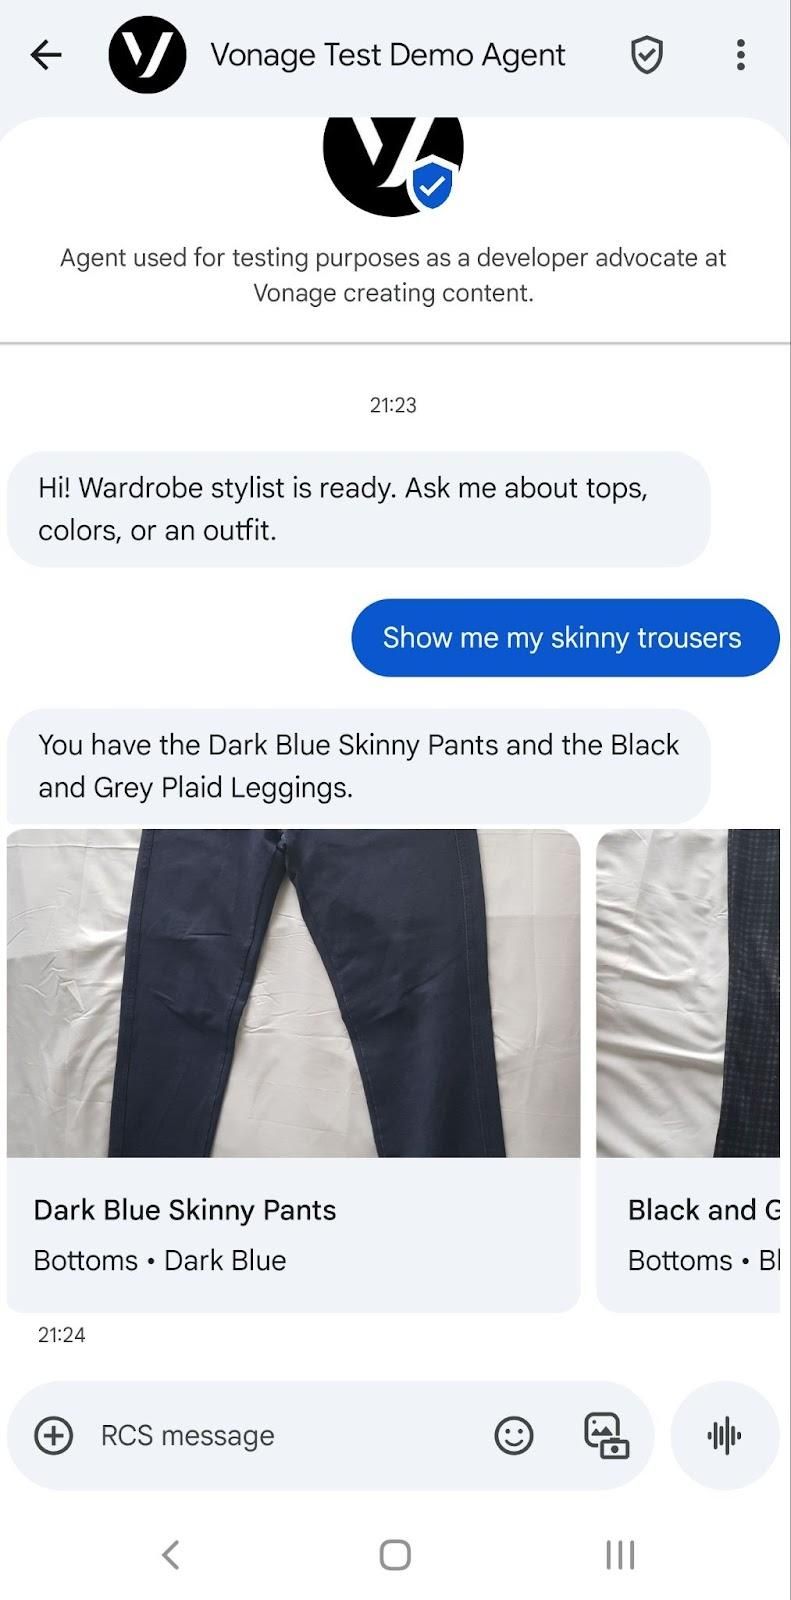
You can chat with your digital wardrobe, which reads information from the wardrobe.json file. You can ask questions regarding the clothes, for instance, how many skinny trousers do I have? It then sends an RCS Rich Card Carousel Message containing the clothes that fit the criteria you specified, and the images are sourced from PUBLIC_BASE_URL/photos/<filename>.
Note: For this project, I used a populated JSON file; however, you could also read from a database. Gemini doesn't use computer vision here; instead, it helps filter the JSON file based on your text query, and the RCS message then utilizes the image links within that file. You can see what the interaction looks like from the image I’ve added at the very top of this blog post.
Today, you learnt how to build an AI digital wardrobe using Gemini and send Rich Card Carousel Messages via RCS. Go ahead and try the other types of RCS messages, beyond text such as: rich cards, rich card carousels, suggested replies, suggested actions.
To learn more about how you can use these features, check out this tutorial on how to Build a Storytelling Service With RCS Rich Cards and Gemini. You can use Rich Cards to create a narrative, with each card representing a different chapter or choice in an interactive story, here’s a blog post recommendation: How to Send RCS Rich Card Carousels With Node.js.
ご質問がある場合、またはあなたが作っているものを共有したい場合は、こちらをクリックしてください。
会話に参加する VonageコミュニティSlack
登録する 開発者ニュースレター
フォローする X(旧ツイッター)最新情報
チュートリアルを見る YouTubeチャンネル
LinkedInの LinkedIn の Vonage デベロッパーページ
最新の開発者向けニュース、ヒント、イベント情報をお届けします。